
'%3e%3cpath%20d='M8%200C12.4183%200%2016%203.58172%2016%208C16%2012.4183%2012.4183%2016%208%2016C3.58172%2016%200%2012.4183%200%208C0%203.58172%203.58172%200%208%200ZM11.6162%204.38379C11.2257%203.99337%2010.5927%203.99338%2010.2021%204.38379L8%206.58594L5.79785%204.38379C5.40732%203.99334%204.77429%203.99329%204.38379%204.38379C3.99331%204.77429%203.99335%205.40733%204.38379%205.79785L6.58594%208L4.38379%2010.2021C3.99348%2010.5927%203.99341%2011.2257%204.38379%2011.6162C4.77426%2012.0066%205.40734%2012.0065%205.79785%2011.6162L8%209.41406L10.2021%2011.6162C10.5927%2012.0066%2011.2257%2012.0067%2011.6162%2011.6162C12.0067%2011.2257%2012.0066%2010.5927%2011.6162%2010.2021L9.41406%208L11.6162%205.79785C12.0066%205.40735%2012.0066%204.77429%2011.6162%204.38379Z'%20fill='%23080E17'%20fill-opacity='0.46'/%3e%3c/g%3e%3cdefs%3e%3cclipPath%20id='clip0_3761_713'%3e%3crect%20width='16'%20height='16'%20fill='white'/%3e%3c/clipPath%3e%3c/defs%3e%3c/svg%3e)


'%3e%3cpath%20fill-rule='evenodd'%20clip-rule='evenodd'%20d='M21.4999%2010.9993C21.4999%205.20009%2016.7986%200.498901%2010.9993%200.498901C5.19994%200.498901%200.498657%205.20009%200.498657%2010.9993C0.498657%2016.2404%204.33858%2020.5844%209.35855%2021.3722V14.0346H6.69238V10.9993H9.35855V8.68594C9.35855%206.05427%2010.9262%204.60062%2013.3248%204.60062C14.4736%204.60062%2015.6753%204.80571%2015.6753%204.80571V7.38979H14.3512C13.0468%207.38979%2012.64%208.19921%2012.64%209.0296V10.9993H15.5523L15.0867%2014.0346H12.64V21.3722C17.66%2020.5844%2021.4999%2016.2404%2021.4999%2010.9993Z'%20fill='%231568EA'/%3e%3c/g%3e%3c/svg%3e)


In the mystical realm of Excel, headers and footers are the keys to imparting a touch of elegance and organization to your creations. Picture this: your insights, neatly displayed at the top or bottom of each printed page, guiding your readers through the enchanted data landscape. As you embark on this journey, remember, the right incantations can elevate your spreadsheet from mundane to enchanting.
Part 1: How to Insert Header in Excel

To get the most out of Excel's features, it's essential to learn basic Excel skills for beginners, which will help streamline tasks like navigating different views, formatting, and data organization. In the realm of Excel, headers are like the majestic crowns that adorn your spreadsheets. They elegantly display vital information, guiding readers through your mystical data. In this segment, we'll unveil the secrets of adding headers – step by step. Prepare to elevate your spreadsheets to regal status as we guide you through the art of header insertion.
Step 1: Open your Excel spreadsheet and go to the "Insert" tab.

Step 2: Click on "Header & Footer" in the "Text" group.
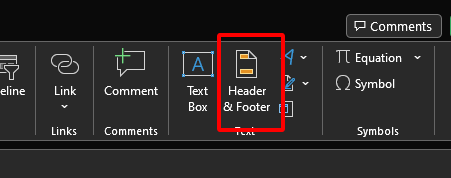
Step 3: A header section will appear at the top. Click inside to activate the "Header & Footer Tools" tab.

Step 4: Use the options to customize the header - add text, page numbers, dates, etc.
Step 5: Click outside the header area to finish.
As I ventured into the realm of Excel headers, I discovered a way to add a personal touch to my spreadsheets. The process allowed me to elegantly display key information at the top of each page, creating a seamless and professional look.
Part 2: How to Insert Footer in Excel
A wizard's spellbook isn't complete without a fitting closure, and the same holds true for Excel spreadsheets. Footers, like the last strokes of a masterful painting, provide a sense of completion. Join us in this part as we delve into the captivating world of footer insertion. Your journey will be filled with enchanting steps that elevate your spreadsheets to a new level of sophistication.
Step 1: Open your Excel sheet and navigate to the "Insert" tab.
Step 2: Click on "Header & Footer" in the "Text" group.
Step 3: A footer area will appear at the bottom. Click inside to activate the "Header & Footer Tools" tab.

Step 4: Customize the footer using available options - add page numbers, dates, etc.
Step 5: Click outside the footer area to finalize
Exploring footer insertion in Excel showed me how to give my spreadsheets a polished finish. Footers at the bottom of each page added a touch of sophistication, and I was able to experiment with elements like page numbers and dates.
Part 3: How to Insert Predefined Headers and Footers in Excel
As every sorcerer knows, having a repertoire of spells is essential. In Excel, predefined headers and footers are your ready-made enchantments, adding a touch of mystique to your spreadsheets. Join us in this segment as we unravel the secrets of effortlessly inserting predefined headers and footers. Discover how to weave these precast spells into your creations, making them truly enchanting.
Step 1: Open your Excel sheet and go to the "Insert" tab.
Step 2: Click on "Header & Footer" in the "Text" group.
Step 3: Choose a predefined header or footer from the drop-down menu.

Step 4: The selected element will be inserted automatically.
Step 5: Customize the predefined header or footer as needed.
Discovering predefined headers and footers was like finding shortcuts to elegance. These preset options, such as page numbers, helped streamline the process while allowing room for my personal touch to shine through.
Part 4: How to Make a Custom Header or Footer in Excel
Just as a sorcerer tailors spells to suit their needs, an Excel maestro crafts custom headers and footers. Like an artisan imbuing their creation with a personal touch, you too can infuse your spreadsheets with elegance. Join us in this part as we guide you through the art of crafting your own header and footer enchantments. Your spreadsheets will radiate your unique style and purpose.
Step 1: Open your Excel sheet and navigate to the "Insert" tab.
Step 2: Click on "Header & Footer" in the "Text" group.
Step 3: A header or footer section will appear, depending on your choice.
Step 4: Customize the header or footer using options like text, page numbers, etc.

Step 5: Click outside the header or footer area to complete.
Crafting custom headers and footers enabled me to express my unique style in my spreadsheets. By blending functional elements with my personal creativity, I created designs that were both practical and visually appealing.
Part 5: How to Remove Header and Footer in Excel
In the world of magic, knowing how to undo spells is just as important as casting them. Similarly, in Excel, the ability to remove headers and footers is a valuable skill. Join us in this segment as we delve into the art of dispelling enchantments. You'll learn how to gracefully remove headers and footers, restoring your spreadsheets to their original form.
With these insights, you're ready to wield the power of headers and footers in Excel, enhancing your spreadsheets with a touch of enchantment. Let each part be your guide as you journey through the realms of Excel sorcery, mastering the art of both addition and removal
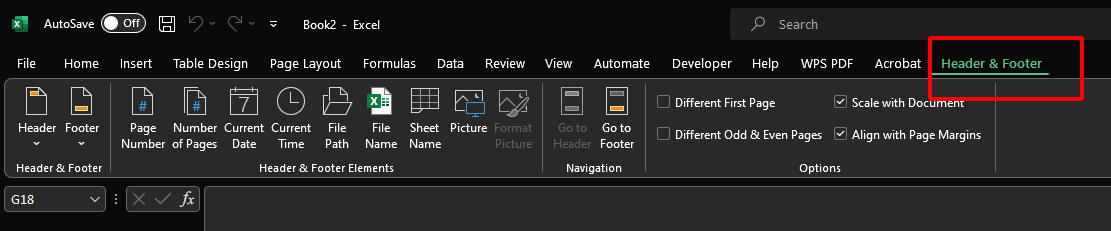
Step 1: Open your Excel sheet and go to the "Page Layout" tab.
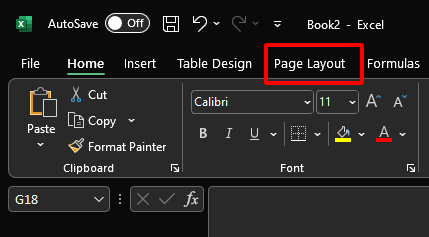
Step 2: Click on "Header & Footer" in the "Page Setup" group.
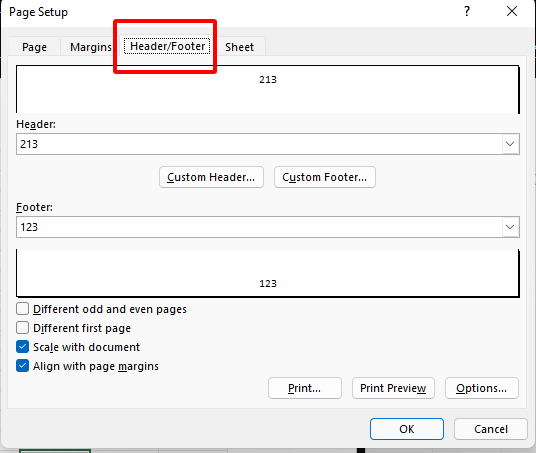
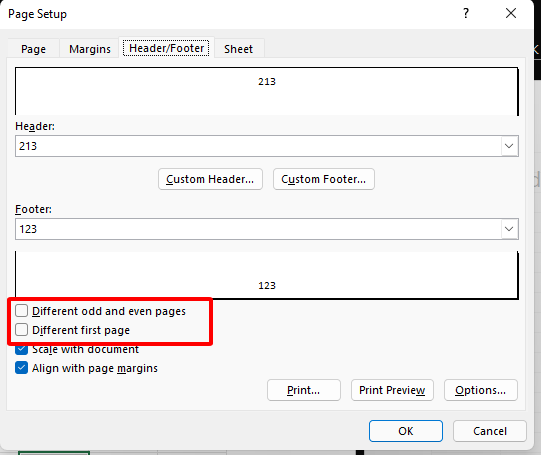
Step 3: Clear any text or elements in the header or footer sections.
Step 4: If necessary, uncheck "Different First Page" and "Different Odd & Even Pages" options.
Step 5: Click outside the header or footer area to finalize the removal.
Learning how to remove headers and footers allowed me to refine my spreadsheets with clarity. This skill empowered me to maintain a clean and focused presentation, enhancing the overall readability of my work.
With these insights, you can enhance your Excel experience and make your spreadsheets truly your own. Each step offers a way to add a touch of creativity and efficiency to your data.
Part 6: Why Use WPS Office?

In the world of spreadsheets, your choice of software can shape your journey. While both Microsoft Excel and WPS Office Spreadsheet offer capable tools, let me introduce you to the compelling reasons why embracing WPS Office could be a game-changer for your Excel endeavors.
Price: With WPS Office, you unlock a powerful suite of tools without breaking the bank. Embrace efficiency without the heavy cost burden, allowing you to allocate resources where they matter most.
Compatibility: Seamlessly interact with colleagues and partners using WPS Office's exceptional compatibility. Whether you're collaborating with Microsoft Excel users or working across different devices, your data remains fluid and accessible.
Features: WPS Office isn't just an alternative; it's an enhancement. Discover a treasure trove of features that empower you to create, analyze, and visualize your data with precision. From creative templates to advanced analysis tools, your possibilities expand.
User-friendly Interface: Navigating through complex tasks becomes a breeze with WPS Office's intuitive interface. You'll spend less time deciphering menus and more time focusing on your work, leading to enhanced productivity and a smoother workflow.
Make an informed decision about your spreadsheet journey. Embrace WPS Office as your partner, and elevate your Excel experiences to new heights.


FAQs About Excel Hyperlink to Another Sheet
• How Do You Format the Header in Excel?
Formatting the Header in Excel - Quick Steps
Step 1. Open Excel, click "Insert" tab.
Step 2. Select "Header & Footer."
Step 3. Use tools to style text.
Step 4. Add page numbers, dates, etc.
Step 5. Apply codes for advanced formatting.
Step 6. Click outside header to finish.
Now your header is polished and professional!
• How Do You Edit Header and Footer in Excel?
To modify your header and footer in Excel, follow these steps:
Step 1. Open your Excel file and go to the "Insert" tab.
Step 2. Click on "Header & Footer" in the "Text" group.
Step 3. Your header and footer sections will appear.
Step 4. Click inside the header or footer to activate the "Header & Footer Tools" tab.
Step 5. Use the options to make edits, change text, or add dynamic elements like page numbers.
Step 6. Click outside the header or footer area to save your changes.
With these quick edits, your header and footer will reflect your updates.
• How Do I Put a Header on All Pages in Excel?
Ensuring a uniform header on all pages in Excel is a straightforward process:
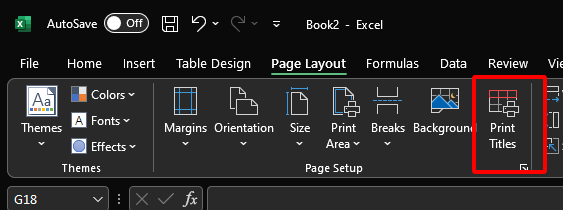
Step 1. Open your Excel sheet and navigate to the "Page Layout" tab.
Step 2. Click on "Print Titles" in the "Page Setup" group.
Step 3. In the "Sheet" tab of the "Page Setup" dialog box, locate the "Rows to repeat at top" field.
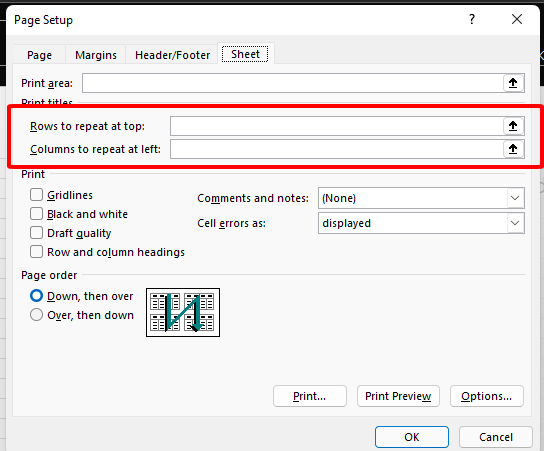
Step 4. Click in the field and select the rows you want to repeat as the header on all pages.
Step 5. Click "OK" to apply the changes.
Now, your chosen header will appear consistently across all pages when you print or preview your spreadsheet.
Summary
This guide has equipped you to seamlessly add, personalize, and remove headers and footers in Excel, enhancing the visual appeal of your spreadsheets. Moreover, embrace the advantages of WPS Office, a budget-friendly and feature-rich alternative, designed to amplify your Excel journey. With these skills and WPS Office's support, you're ready to create impactful spreadsheets that efficiently convey your data and insights.

'%3e%3cpath%20d='M19.9911%204.11386V6.471H18.5894C18.0775%206.471%2017.7322%206.57814%2017.5536%206.79243C17.3751%207.00671%2017.2858%207.32814%2017.2858%207.75671V9.44421H19.9019L19.5536%2012.0871H17.2858V18.8639H14.5536V12.0871H12.2769V9.44421H14.5536V7.49779C14.5536%206.39064%2014.8632%205.53201%2015.4822%204.92189C16.1013%204.31177%2016.9257%204.00671%2017.9554%204.00671C18.8304%204.00671%2019.509%204.04243%2019.9911%204.11386Z'%20fill='%23333333'/%3e%3c/g%3e%3cdefs%3e%3cclipPath%20id='clip0_2938_8199'%3e%3crect%20width='16'%20height='16'%20fill='white'%20transform='translate(8%204.00671)'/%3e%3c/clipPath%3e%3c/defs%3e%3c/svg%3e)
'%3e%3cpath%20d='M17.5237%2010.7813L23.4811%204H22.0699L16.8949%209.88693L12.7648%204H8L14.2469%2012.9029L8%2020.0133H9.4112L14.8725%2013.7952L19.2352%2020.0133H24M9.92053%205.04213H12.0885L22.0688%2019.0224H19.9003'%20fill='%23333333'/%3e%3c/g%3e%3cdefs%3e%3cclipPath%20id='clip0_2938_8200'%3e%3crect%20width='16'%20height='16.0134'%20fill='white'%20transform='translate(8%204)'/%3e%3c/clipPath%3e%3c/defs%3e%3c/svg%3e)


