
'%3e%3cpath%20d='M8%200C12.4183%200%2016%203.58172%2016%208C16%2012.4183%2012.4183%2016%208%2016C3.58172%2016%200%2012.4183%200%208C0%203.58172%203.58172%200%208%200ZM11.6162%204.38379C11.2257%203.99337%2010.5927%203.99338%2010.2021%204.38379L8%206.58594L5.79785%204.38379C5.40732%203.99334%204.77429%203.99329%204.38379%204.38379C3.99331%204.77429%203.99335%205.40733%204.38379%205.79785L6.58594%208L4.38379%2010.2021C3.99348%2010.5927%203.99341%2011.2257%204.38379%2011.6162C4.77426%2012.0066%205.40734%2012.0065%205.79785%2011.6162L8%209.41406L10.2021%2011.6162C10.5927%2012.0066%2011.2257%2012.0067%2011.6162%2011.6162C12.0067%2011.2257%2012.0066%2010.5927%2011.6162%2010.2021L9.41406%208L11.6162%205.79785C12.0066%205.40735%2012.0066%204.77429%2011.6162%204.38379Z'%20fill='%23080E17'%20fill-opacity='0.46'/%3e%3c/g%3e%3cdefs%3e%3cclipPath%20id='clip0_3761_713'%3e%3crect%20width='16'%20height='16'%20fill='white'/%3e%3c/clipPath%3e%3c/defs%3e%3c/svg%3e)


'%3e%3cpath%20fill-rule='evenodd'%20clip-rule='evenodd'%20d='M21.4999%2010.9993C21.4999%205.20009%2016.7986%200.498901%2010.9993%200.498901C5.19994%200.498901%200.498657%205.20009%200.498657%2010.9993C0.498657%2016.2404%204.33858%2020.5844%209.35855%2021.3722V14.0346H6.69238V10.9993H9.35855V8.68594C9.35855%206.05427%2010.9262%204.60062%2013.3248%204.60062C14.4736%204.60062%2015.6753%204.80571%2015.6753%204.80571V7.38979H14.3512C13.0468%207.38979%2012.64%208.19921%2012.64%209.0296V10.9993H15.5523L15.0867%2014.0346H12.64V21.3722C17.66%2020.5844%2021.4999%2016.2404%2021.4999%2010.9993Z'%20fill='%231568EA'/%3e%3c/g%3e%3c/svg%3e)


How to Add Border in Word on Single Page Using Online Tools
Many online tools allow you to add borders to your Word documents quickly and easily. One such tool is the Online Word Border Editor. Here are the steps to use this tool:
Open the Online Word Border Editor in your web browser.
Click the "Upload" button to upload the Word document to which you want to add a border.
Select the page to which you want to add a border by clicking on it.
Choose the type of border you want to add by clicking the appropriate button.
Customize the border by adjusting the size, color, and style using the options provided.
Click the "Save" button to save your changes.
How to Add Border in Word on Single Page Using Shortcut Method
Another way to add a border in Word on a single page is by using a shortcut method. Here are the steps to do it:
Click on the "Insert" tab from the toolbar at the top of the screen.
Click on "Shapes" from the dropdown menu.
Select the shape you want to use for the border, such as a rectangle or a square.]

Draw the shape around the content of the page.
Right-click the shape and select "Format Shape" from the dropdown menu.
Click on "Line Color" and choose the color of the border.
Choose the thickness of the border by clicking on "Weight."
Click on "Close" to apply the border to the document.
How to Add Border in Word on Single Page Using Manual Method
If you prefer to create a border manually, you can do it using the word formatting tools. Here are the steps to follow:
Click on the "Design" tab from the toolbar at the top of the screen.
Click on "Page Borders" from the dropdown menu.
Click on the "Borders" tab.
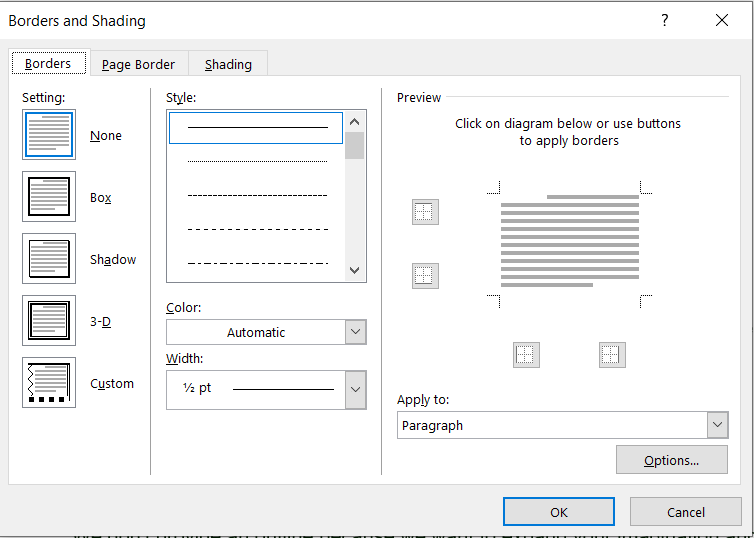
Select the type of border you want to use from the options available, such as a solid line, a dotted line, or a dashed line.
Choose the color of the border by clicking on the color palette.
Select the position of the border, such as inside, outside, or center.
Choose the thickness of the border by clicking on "Weight."
Click on "OK" to apply the border to the document.


What to Consider When Adding Border in Word on Single Page
You can save a custom border by clicking on "Options" in the Page Borders dialog box and selecting "Save Border." This way, you can reuse the border in other documents.
You can delete a border by going to the Page Borders dialog box and selecting "None" from the list of options.
You can remove a border from a single page by going to the Page Borders dialog box, selecting "Apply to," and choosing "This section - First page only."
Add Border in Word on Single Page with WPS Office
Adding a border to a document is a simple way to make it look more professional and visually appealing. Following the steps outlined in this article, you can add a border to a single page in Word using different methods, including online tools, shortcuts, and manual formatting. We recommend using WPS Office for its user-friendly interface and versatility. Its spreadsheet program also offers a variety of features that can help you easily create and manage data. Try WPS Office today and see how it can improve your productivity and creativity!

'%3e%3cpath%20d='M19.9911%204.11386V6.471H18.5894C18.0775%206.471%2017.7322%206.57814%2017.5536%206.79243C17.3751%207.00671%2017.2858%207.32814%2017.2858%207.75671V9.44421H19.9019L19.5536%2012.0871H17.2858V18.8639H14.5536V12.0871H12.2769V9.44421H14.5536V7.49779C14.5536%206.39064%2014.8632%205.53201%2015.4822%204.92189C16.1013%204.31177%2016.9257%204.00671%2017.9554%204.00671C18.8304%204.00671%2019.509%204.04243%2019.9911%204.11386Z'%20fill='%23333333'/%3e%3c/g%3e%3cdefs%3e%3cclipPath%20id='clip0_2938_8199'%3e%3crect%20width='16'%20height='16'%20fill='white'%20transform='translate(8%204.00671)'/%3e%3c/clipPath%3e%3c/defs%3e%3c/svg%3e)
'%3e%3cpath%20d='M17.5237%2010.7813L23.4811%204H22.0699L16.8949%209.88693L12.7648%204H8L14.2469%2012.9029L8%2020.0133H9.4112L14.8725%2013.7952L19.2352%2020.0133H24M9.92053%205.04213H12.0885L22.0688%2019.0224H19.9003'%20fill='%23333333'/%3e%3c/g%3e%3cdefs%3e%3cclipPath%20id='clip0_2938_8200'%3e%3crect%20width='16'%20height='16.0134'%20fill='white'%20transform='translate(8%204)'/%3e%3c/clipPath%3e%3c/defs%3e%3c/svg%3e)


