
'%3e%3cpath%20d='M8%200C12.4183%200%2016%203.58172%2016%208C16%2012.4183%2012.4183%2016%208%2016C3.58172%2016%200%2012.4183%200%208C0%203.58172%203.58172%200%208%200ZM11.6162%204.38379C11.2257%203.99337%2010.5927%203.99338%2010.2021%204.38379L8%206.58594L5.79785%204.38379C5.40732%203.99334%204.77429%203.99329%204.38379%204.38379C3.99331%204.77429%203.99335%205.40733%204.38379%205.79785L6.58594%208L4.38379%2010.2021C3.99348%2010.5927%203.99341%2011.2257%204.38379%2011.6162C4.77426%2012.0066%205.40734%2012.0065%205.79785%2011.6162L8%209.41406L10.2021%2011.6162C10.5927%2012.0066%2011.2257%2012.0067%2011.6162%2011.6162C12.0067%2011.2257%2012.0066%2010.5927%2011.6162%2010.2021L9.41406%208L11.6162%205.79785C12.0066%205.40735%2012.0066%204.77429%2011.6162%204.38379Z'%20fill='%23080E17'%20fill-opacity='0.46'/%3e%3c/g%3e%3cdefs%3e%3cclipPath%20id='clip0_3761_713'%3e%3crect%20width='16'%20height='16'%20fill='white'/%3e%3c/clipPath%3e%3c/defs%3e%3c/svg%3e)


'%3e%3cpath%20fill-rule='evenodd'%20clip-rule='evenodd'%20d='M21.4999%2010.9993C21.4999%205.20009%2016.7986%200.498901%2010.9993%200.498901C5.19994%200.498901%200.498657%205.20009%200.498657%2010.9993C0.498657%2016.2404%204.33858%2020.5844%209.35855%2021.3722V14.0346H6.69238V10.9993H9.35855V8.68594C9.35855%206.05427%2010.9262%204.60062%2013.3248%204.60062C14.4736%204.60062%2015.6753%204.80571%2015.6753%204.80571V7.38979H14.3512C13.0468%207.38979%2012.64%208.19921%2012.64%209.0296V10.9993H15.5523L15.0867%2014.0346H12.64V21.3722C17.66%2020.5844%2021.4999%2016.2404%2021.4999%2010.9993Z'%20fill='%231568EA'/%3e%3c/g%3e%3c/svg%3e)


Whether you're looking to design labels for your brand or need labels for mailing purposes, Microsoft Word is your go-to solution. It offers a user-friendly and hassle-free approach to kickstarting the labeling process, saving you time and effort. In this article, we'll guide you through the steps of how to create labels in word, making the entire process straightforward and efficient.
Step-by-step to Create Labels in Word
Crafting labels in Word can be an enjoyable endeavor, offering users the creative freedom to design customized labels tailored to their needs. With a plethora of tools at your disposal, learning how to make labels in Word becomes a straightforward and user-friendly process. Let’s create one for ourselves right away:
Step 1: Open Microsoft Word on your system and create a new Blank document.

Step 2: Visit the “Mailings” tab and select “Labels” in the ribbon menu.

Step 3: A new “Envelopes and Labels” window will pop-up. On this window, click on “Options”.

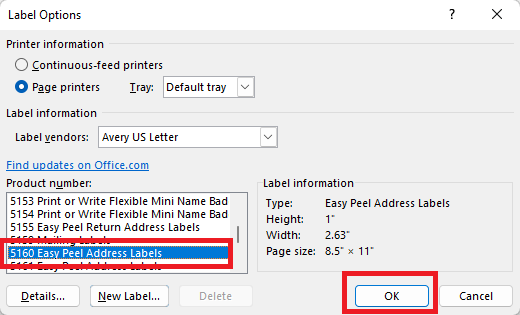
Step 4: Select a category under "Label Vendors". For our demonstration, we'll choose the widely used Avery US Letter label format.

Step 5: Choose a template, referred to as the "Product Number". For this illustration, we'll select the widely used "5160 Address Labels" template. Then, click "OK". This template allows users to create address labels, alleviating the need to learn how to create address labels in Word.
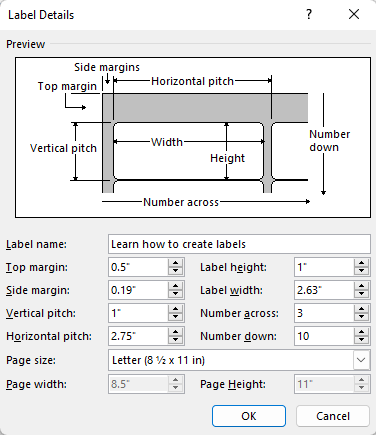
Step 6: If the desired layout isn't available, opt for "New Label".

Step 7: Here users can establish a personalized tag format. After configuring, click "OK".
Step 8: Once you've chosen a template, you can proceed to input your information. In our example, we'll include the address, although specifics may differ based on the chosen template.

Step 9: For a preview of your labels prior to printing, simply click on "New Document" located at the bottom of the window. This will let you view your labels on the Word Display.

Step 10: For adjusting the font or color of your text, either select the entire page or specific sections, then proceed to make your desired modifications using the usual formatting methods.

Step 11: Users can also print their labels in Word. Simply navigate to File > Print.
Tips
Label Layout Harmony: Maintain a clean and organized layout for your labels. Ensure text and images are well-aligned, creating an aesthetically pleasing and professional look.
Size Matters: Double-check label dimensions before printing. Accurate sizing prevents unexpected cropping and guarantees your labels fit perfectly on the intended surface.
Test and Adjust: Always print a sample label first. This trial run allows you to spot any potential issues and make necessary adjustments before producing the entire batch.
Things Need to be Paid Attention to
When you're learning how to create labels in Word, there are a few important points that need to be kept in, here are some easy things to keep in mind:
Printing Options: When creating labels for mailings in Word, you have flexible printing options. Choose to print a single label if you only need one, or print an entire sheet of labels if you have multiple recipients. This feature ensures you use your label paper efficiently, whether it's for one recipient or many.
Label Templates: Microsoft Word has your back with a wide range of premade label templates. These templates are designed to match various popular brands and label styles. This compatibility ensures your labels look professional and fit perfectly on your chosen label paper, saving you time and hassle.
Mailing List Convenience: For even more efficiency, you can use a pre-existing mailing list to create labels for printing. Instead of manually entering recipient information, simply import the mailing list, and Word will automatically generate labels for each entry. This feature is a real time-saver when you have a long list of recipients.


How to Edit Microsoft Office Word for Free?
WPS Office stands out as an exceptional office solution accessible worldwide, especially if you're seeking an alternative that doesn't require an expenditure on office suites.WPS Office effectively addresses the concerns about productivity when you don't have access to the expensive Office suites. Its compatibility spans across diverse devices, encompassing Linux, Windows, Mac, Android, and iPhone platforms. The beauty lies in its cost-free nature—no financial investment is necessary.

We've thoughtfully crafted a tutorial, enabling you to seamlessly embark on your journey with WPS Office's word processing capabilities. Within this guide, we'll walk you through the essentials of getting started with word processing and effective editing. With WPS Office, you'll find the process notably streamlined and user-friendly.

Furthermore, the transition from mastering word processing to using WPS Writer is notably smooth. The simplified interface and intuitive features of WPS Writer render it an approachable and user-friendly tool, ensuring you can harness its potential without any complexities.
Steps to Edit Word/Excel/Powerpoint in WPS:
Editing files in WPS Office is a breeze. Follow these simple steps to make changes to your Word documents, Excel sheets, and PowerPoint presentations:
Edit a Word File:
Step 1: Browse and open WPS Office on your system.
Step 2: From the Sidebar menu, select "Docs". Browse and open your Word Document with WPS Writer.

Step 3: Utilize the comprehensive editing tools within WPS Writer's various tabs to modify your document to perfection.

Edit an Excel File:
Step 1: In the Sidebar menu, choose "Sheets". Locate and open your Excel Document using WPS Spreadsheet.

Step 2: Take advantage of the diverse editing tools available in WPS Spreadsheet's different tabs to refine your spreadsheet effortlessly.

Edit a PowerPoint Presentation:
Step 1: Navigate to the Sidebar menu and click on "Slides" Browse and open your PowerPoint presentation with WPS Presentation.

Step 2: Harness the powerful editing tools provided in WPS Presentation's distinct tabs to enhance your presentation with ease.

Now you're all set to efficiently edit your files using WPS Office's user-friendly interface.
FAQS:
Q1. Can I use images on my product labels?
Yes, you can. Including images or logos on your product labels is an excellent option. It can make your labels more aesthetically appealing and help buyers quickly understand vital information or branding. Incorporating photographs can magnify the overall look of your product and attract the attention of potential buyers.
Q2. Is it possible to print labels from Microsoft Excel?
Yes, it is possible. You may easily print labels from Microsoft Excel by utilizing the Mail Merge tool in Microsoft Word. It allows you to promptly import data from your Excel spreadsheet into Word, making label printing straightforward. It's a convenient method to create labels using Excel data, saving time while guaranteeing proper label printing.
Streamline Your Label Creation
In this article, we've delved into the world of labeling in Word, exploring not just what it is, but also how to use it effectively for efficient mailing. This guide is designed to walk you through how to create labels in word, ensuring a seamless experience. However, if you're looking for a cost-effective alternative or prefer a different solution, WPS Writer is a fantastic option. Take a step towards enhanced label creation and management by downloading WPS Office now.

'%3e%3cpath%20d='M19.9911%204.11386V6.471H18.5894C18.0775%206.471%2017.7322%206.57814%2017.5536%206.79243C17.3751%207.00671%2017.2858%207.32814%2017.2858%207.75671V9.44421H19.9019L19.5536%2012.0871H17.2858V18.8639H14.5536V12.0871H12.2769V9.44421H14.5536V7.49779C14.5536%206.39064%2014.8632%205.53201%2015.4822%204.92189C16.1013%204.31177%2016.9257%204.00671%2017.9554%204.00671C18.8304%204.00671%2019.509%204.04243%2019.9911%204.11386Z'%20fill='%23333333'/%3e%3c/g%3e%3cdefs%3e%3cclipPath%20id='clip0_2938_8199'%3e%3crect%20width='16'%20height='16'%20fill='white'%20transform='translate(8%204.00671)'/%3e%3c/clipPath%3e%3c/defs%3e%3c/svg%3e)
'%3e%3cpath%20d='M17.5237%2010.7813L23.4811%204H22.0699L16.8949%209.88693L12.7648%204H8L14.2469%2012.9029L8%2020.0133H9.4112L14.8725%2013.7952L19.2352%2020.0133H24M9.92053%205.04213H12.0885L22.0688%2019.0224H19.9003'%20fill='%23333333'/%3e%3c/g%3e%3cdefs%3e%3cclipPath%20id='clip0_2938_8200'%3e%3crect%20width='16'%20height='16.0134'%20fill='white'%20transform='translate(8%204)'/%3e%3c/clipPath%3e%3c/defs%3e%3c/svg%3e)


