
'%3e%3cpath%20d='M8%200C12.4183%200%2016%203.58172%2016%208C16%2012.4183%2012.4183%2016%208%2016C3.58172%2016%200%2012.4183%200%208C0%203.58172%203.58172%200%208%200ZM11.6162%204.38379C11.2257%203.99337%2010.5927%203.99338%2010.2021%204.38379L8%206.58594L5.79785%204.38379C5.40732%203.99334%204.77429%203.99329%204.38379%204.38379C3.99331%204.77429%203.99335%205.40733%204.38379%205.79785L6.58594%208L4.38379%2010.2021C3.99348%2010.5927%203.99341%2011.2257%204.38379%2011.6162C4.77426%2012.0066%205.40734%2012.0065%205.79785%2011.6162L8%209.41406L10.2021%2011.6162C10.5927%2012.0066%2011.2257%2012.0067%2011.6162%2011.6162C12.0067%2011.2257%2012.0066%2010.5927%2011.6162%2010.2021L9.41406%208L11.6162%205.79785C12.0066%205.40735%2012.0066%204.77429%2011.6162%204.38379Z'%20fill='%23080E17'%20fill-opacity='0.46'/%3e%3c/g%3e%3cdefs%3e%3cclipPath%20id='clip0_3761_713'%3e%3crect%20width='16'%20height='16'%20fill='white'/%3e%3c/clipPath%3e%3c/defs%3e%3c/svg%3e)


'%3e%3cpath%20fill-rule='evenodd'%20clip-rule='evenodd'%20d='M21.4999%2010.9993C21.4999%205.20009%2016.7986%200.498901%2010.9993%200.498901C5.19994%200.498901%200.498657%205.20009%200.498657%2010.9993C0.498657%2016.2404%204.33858%2020.5844%209.35855%2021.3722V14.0346H6.69238V10.9993H9.35855V8.68594C9.35855%206.05427%2010.9262%204.60062%2013.3248%204.60062C14.4736%204.60062%2015.6753%204.80571%2015.6753%204.80571V7.38979H14.3512C13.0468%207.38979%2012.64%208.19921%2012.64%209.0296V10.9993H15.5523L15.0867%2014.0346H12.64V21.3722C17.66%2020.5844%2021.4999%2016.2404%2021.4999%2010.9993Z'%20fill='%231568EA'/%3e%3c/g%3e%3c/svg%3e)


If you’ve ever seen your screen suddenly turn blue with a “Memory Management” stop code, you know how quickly everything can come to a halt. One moment your system is running fine, and the next, you're staring at a crash you didn’t see coming. On Windows 10, this type of error usually points to deeper issues such as issues with your RAM, corrupted system files, or a driver that’s no longer playing nice.
Figuring out the exact cause can be a bit tricky. With so many different settings and features involved, it’s easy to feel like you're going in circles. But you don’t need to go in blind. In this guide, I’ll take you through three clear and proven ways to fix the memory management error Windows 10.

Run Windows Memory Diagnostic to Fix Memory Management Error Windows 10
Running the Windows Memory Diagnostic tool is the first method I’ll cover, and it’s one that has personally helped me resolve the memory management error Windows 10 more than once. When random crashes start appearing and the blue screen shows that frustrating stop code, this tool has often pointed me in the right direction. I’ve used it on my own systems, and in many cases, it’s been the quickest way to find out if faulty RAM is the culprit.
Step 1: Open the Start Menu and type “Windows Memory Diagnostic” into the search bar. This will bring up the built-in tool that helps check your system’s RAM for any issues.

Step 2: When it pops up, open the tool and choose “Restart now and check for problems”. Your computer will immediately restart and begin scanning the memory for any potential Windows driver errors.

Step 3: Your PC will reboot and run a memory test on its own. Just let it do its thing and wait for the results. Once the scan is complete, your PC will automatically boot back into Windows.
The Memory Diagnostic Tool directly scans your RAM for faults. I’ve personally had it catch a failing RAM module that I later replaced and after that, the system was rock solid. If the tool reports no errors, don’t rule out memory issues just yet. It might still be worth swapping RAM sticks or testing them one at a time later.
Update Drivers and Windows to Solve Memory Management Error Windows 10
The memory management blue screen Windows 10 issue has cleared up more than once after updating GPU and storage drivers. It might not seem like a major fix, but outdated drivers are a common cause of these crashes. I’ve worked on systems that were practically unusable and watched them become completely stable with just a few key updates. If your PC hasn’t been updated in a while, this is a solid place to begin.
Step 1: Click on the Start menu and open “Settings”. It’s the gear icon on the left, or you can type “Settings” into the search bar and hit Enter.

Step 2: In the Settings window, go to Windows Update, then click Check for updates and let Windows scan for anything new. If updates are available, download and install them.

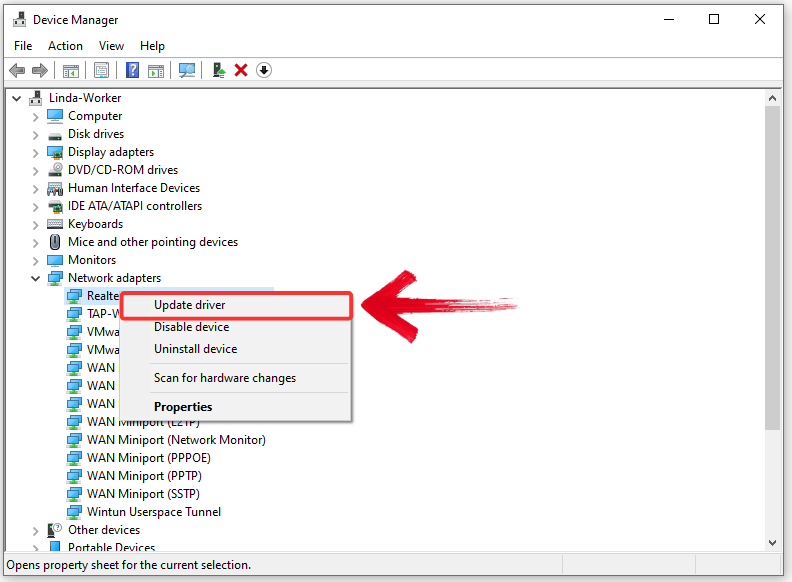
Step 3: Once the updates are installed, right-click the Start menu and choose Device Manager from the list.

Step 4: Inside Device Manager, expand sections like Network adapters, Disk drives, and Memory technology devices. Right-click each one and select Update driver.
Step 5: In the dialog that appears, select Search automatically for updated driver software. Windows will now check online and locally for any available updates.

Step 6: After updating your drivers, go ahead and restart your PC. This ensures all updates are fully applied and gives your system a clean start.
Incompatible or outdated drivers can conflict with Windows' memory management subsystem. I once had a laptop that BSOD'd every time I opened a certain app. Updating the graphics driver fixed it immediately. Once you’ve updated everything, restart your PC and monitor it over the next few hours or days. If your system feels more stable and the error hasn’t returned, that’s a strong sign that the driver update did the trick.
Run SFC and DISM Tools to Repair Corrupted Files Causing Memory Management Error Windows 10
Blue screens that seem to come out of nowhere are often tied to corrupted system files. I’ve learned how to fix memory management error Windows 10 users often struggle with by using two built-in tools: SFC and DISM. They scan deep into the system for damage and repair what’s broken. If other fixes haven’t worked, this one’s definitely worth a try.
Step 1: Click the search bar in the taskbar and type Command Prompt. When it appears in the results, right-click and select Run as Administrator to open it with elevated permissions.

Step 2: Now, in Command Prompt, paste the following command to find any integrity violations:
sfc /scannow

Step 3: This might take a few seconds. Once it's complete, run the next command to check if any component store is corrupted:
DISM /Online /Cleanup-Image /CheckHealth

Step 4: Finally, restore the health of your system image using this command:
DISM /Online /Cleanup-Image /RestoreHealth

Note: This last step may take a while. It might seem stuck at certain points, but avoid closing the window, let the process complete fully.
Step 5: Once the restoration is complete, you’ll see the message; “The restore operation completed successfully”.

SFC and DISM are essential tools for repairing system-level corruption. They’ve helped me recover PCs that were otherwise on the edge of total failure. When I ran these tools after a memory management BSOD Windows 10, they found corrupted kernel files and repaired them. Afterward, no more crashes. If these tools detect and fix anything, your chances of resolving the error without hardware replacement are high.
Stay Productive After Fixing Memory Management Error Windows 10 with WPS Office
After turning off Copilot, I immediately noticed how much calmer my desktop felt. No more sidebars sliding in, no unexpected prompts, it was just me and my work again. That’s when I started using WPS Office more seriously. It doesn’t try to take over or distract you. I’ve used it to write out recovery steps, organize system tweaks, and even keep track of changes after disabling Copilot. It’s simple, fast, and honestly a relief.

If you’ve just clawed your way through diagnostics, driver updates, and command-line repairs, staying productive afterward shouldn’t feel like another uphill battle. That’s where WPS Office earns its keep. Here’s how it helps you hit the ground running:
Fast loading speed: It starts quickly, which is helpful if your system was recently unstable and you just need to open your files without delays.
All-in-one suite: It gives you access to documents, spreadsheets, presentations, and PDFs in one place. Useful if you don’t want to install multiple apps just to stay organized.
WPS AI: I’ve used it to quickly sum up error logs or note what changes I made, especially when I didn’t have time to write everything out myself. It’s simple, and it helps keep things clear.
Perfect for recovery documentation: It’s a useful way to keep track of what steps you took, what fixed the issue, and what to try next time. Having everything in one place makes follow-ups much easier.
WPS helps you stay focused when your system’s just getting back on its feet. I’ve used it right after fixing memory management errors to keep track of what worked, save recovery steps, and prepare for the next time something breaks. It really comes in handy when you're moving between devices or helping someone else. You’ve got everything laid out and easy to follow.
FAQs About Memory Management Error
1. What causes the memory management error?
It usually comes from hardware memory issues (bad RAM), driver conflicts, or corrupted system files.
2. Can software alone cause memory management errors?
Yes. Bad drivers or OS-level corruption can cause this BSOD without any RAM problems.
3. Will replacing the RAM definitely fix this BSOD?
Yes, both are safe. They are built-in Windows tools meant to help fix system problems without harming your computer.
4. How often should I scan my memory to prevent future errors?
Every few months or when your system shows signs like crashing, freezing, or becoming unusually slow.
Stabilizing Your System with WPS Office
Finally fixing the Memory Management Error Windows 10 is like flipping a switch: your system runs smoother, and you can finally stop worrying about sudden crashes. No more circling through diagnostics or wondering what step you missed.
WPS Office helps you keep that steady pace going. From logging every fix to organizing system recovery notes, it gives you one organizable space to manage your workflow. And with WPS Cloud keeping everything backed up, you’re always ready to pick up where you left off on any machine, anytime.

'%3e%3cpath%20d='M19.9911%204.11386V6.471H18.5894C18.0775%206.471%2017.7322%206.57814%2017.5536%206.79243C17.3751%207.00671%2017.2858%207.32814%2017.2858%207.75671V9.44421H19.9019L19.5536%2012.0871H17.2858V18.8639H14.5536V12.0871H12.2769V9.44421H14.5536V7.49779C14.5536%206.39064%2014.8632%205.53201%2015.4822%204.92189C16.1013%204.31177%2016.9257%204.00671%2017.9554%204.00671C18.8304%204.00671%2019.509%204.04243%2019.9911%204.11386Z'%20fill='%23333333'/%3e%3c/g%3e%3cdefs%3e%3cclipPath%20id='clip0_2938_8199'%3e%3crect%20width='16'%20height='16'%20fill='white'%20transform='translate(8%204.00671)'/%3e%3c/clipPath%3e%3c/defs%3e%3c/svg%3e)
'%3e%3cpath%20d='M17.5237%2010.7813L23.4811%204H22.0699L16.8949%209.88693L12.7648%204H8L14.2469%2012.9029L8%2020.0133H9.4112L14.8725%2013.7952L19.2352%2020.0133H24M9.92053%205.04213H12.0885L22.0688%2019.0224H19.9003'%20fill='%23333333'/%3e%3c/g%3e%3cdefs%3e%3cclipPath%20id='clip0_2938_8200'%3e%3crect%20width='16'%20height='16.0134'%20fill='white'%20transform='translate(8%204)'/%3e%3c/clipPath%3e%3c/defs%3e%3c/svg%3e)


