
Blurry screen issues are a common frustration for users across all kinds of devices—Windows laptops, Android smartphones, and external monitors alike. These problems can stem from incorrect display scaling, outdated or incompatible graphics drivers, or non-native resolution settings. Besides making your screen look unclear, they can strain your eyes and reduce productivity, especially when reading text or working on detailed tasks.
Unfortunately, many users don’t know where to start fixing the issue. A blurry display can disrupt your workflow, whether you’re using office tools, browsing the web, or watching videos. So, how do you fix blurry screen problems across different devices? What settings or tools make the difference? In this guide, we’ll walk you through reliable, step-by-step solutions—from adjusting display and DPI settings to updating drivers and resolving mobile issues. We'll also show how WPS Office offers a sharp, consistent display experience, no matter what device you're using.
Part 1: Fix Blurry Screen by Adjusting Display Settings (Windows)
One of the most common causes of a blurry screen on Windows is improper display scaling or resolution settings. Windows allows users to adjust how content appears on the screen through scaling percentages and resolution levels. However, if these settings are misconfigured—especially after a system update or when connecting to a new monitor—your display can look fuzzy or stretched, making text difficult to read and images appear unclear.
Fortunately, you can often solve the issue by following a few simple steps in the Display Settings panel. Here’s how to restore sharpness and clarity to your screen:
Step-by-Step Fix
Right-click on your Desktop and choose Display settings from the context menu. This opens the main display configuration window.
choose Display settings Under the section labeled “Scale and layout”, ensure the scaling is set to either 100% (default) or 125%, depending on your screen size and resolution. Avoid entering custom scaling values, as these can cause compatibility issues and lead to app blurriness.
Choose “Scale and layout” Next, look at the Display resolution dropdown. Always choose the “Recommended” option, which corresponds to your monitor’s native resolution. For example, on a Full HD screen, the recommended resolution would be 1920x1080. Using anything lower or higher may stretch or compress visual content unnaturally.
Choose Display resolution Scroll down and click on Advanced scaling settings. In this section, enable the option that says “Let Windows try to fix apps so they’re not blurry.” This feature is especially helpful when using older programs that don’t handle DPI scaling well on high-resolution screens.
When you set your screen to its native resolution and use standard scaling values, Windows displays every pixel as it was intended by the software or content designer. Incorrect scaling or non-native resolutions can lead to pixel interpolation, which is what causes text and images to appear soft or fuzzy. The Advanced scaling option gives Windows permission to optimize app rendering, especially useful after Windows updates or when plugging into a new external display.
Pro Tip
This fix is especially useful if your screen became blurry after a recent Windows update, monitor change, or graphics driver reinstallation. Updates can sometimes reset your display settings or change your scaling percentages without clear notification, so it’s always a good idea to recheck these values after any system modification.
Part 2: Fix Blurry Screen by Updating Graphics Drivers
Steps:
Open Device Manager (Search from Start Menu)
Expand Display adapters
Expand Display adapters Right-click your GPU > Update driver > Search automatically
Restart your PC
Optional Tools:
Intel Driver & Support Assistant
NVIDIA GeForce Experience
These tools ensure you get the latest, device-specific drivers for optimal clarity.
Part 3: Fix Blurry Screen for Specific Apps (Microsoft Office, Chrome, etc.)
Steps:
Right-click the app shortcut > Click Properties
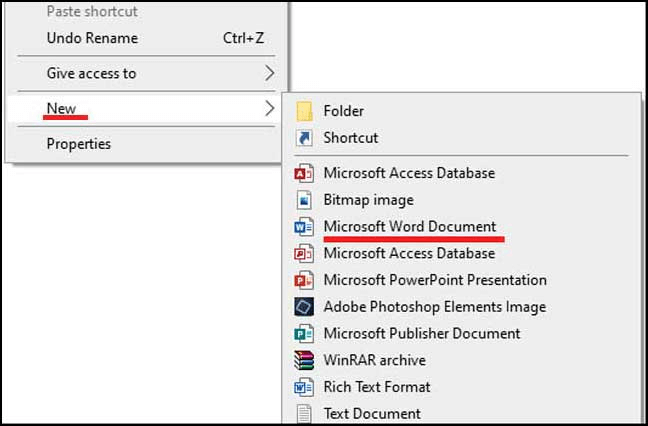
Right-click the app shortcut > Click Properties Navigate to the Compatibility tab
Navigate to the Compatibility tab Click Change high DPI settings
Enable “Override high DPI scaling behavior”
Click Change high DPI settings. Enable “Override high DPI scaling behavior” Under Scaling performed by, select System (Enhanced)

Tip: This fix is great for blurry text in Chrome, Office, or older applications on high-DPI monitors.
Part 4: Fix Blurry Screen on Android Devices
Steps:
Restart your phone and adjust brightness settings
Go to Settings > Display > Screen resolution (Available on models like Samsung or Huawei)
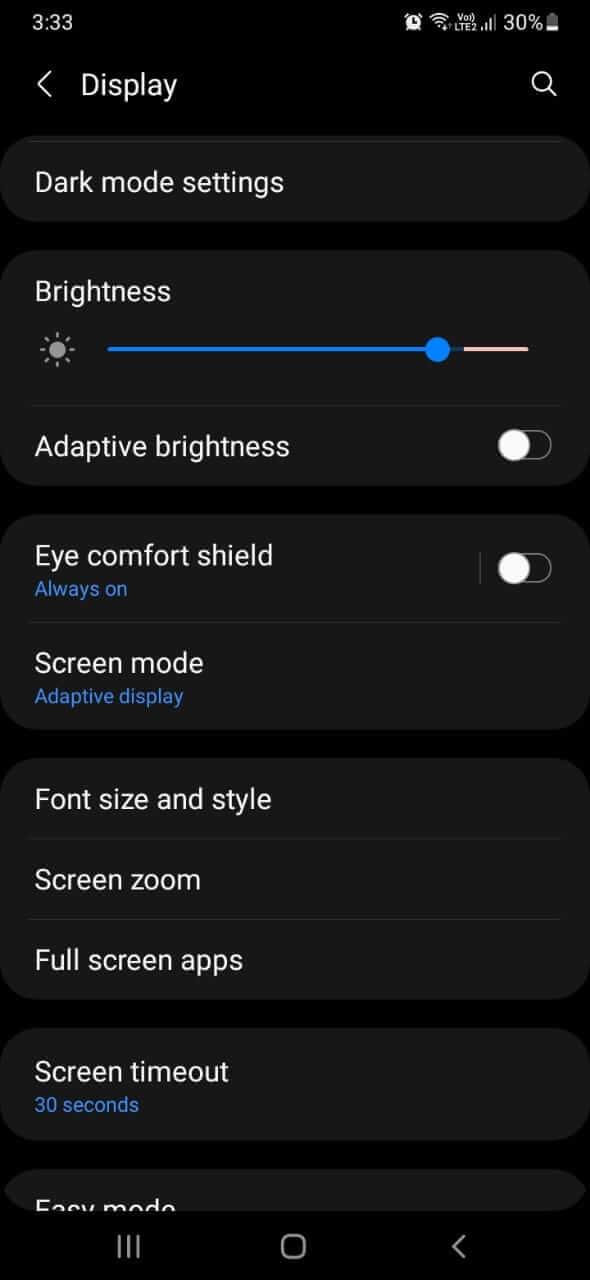
Go to Settings > Display > Screen resolution on Andriod If using a third-party launcher, try clearing its cache or resetting
Clean your screen physically, especially around the edges and sensor zones
Check if a screen protector or tempered glass is affecting visibility

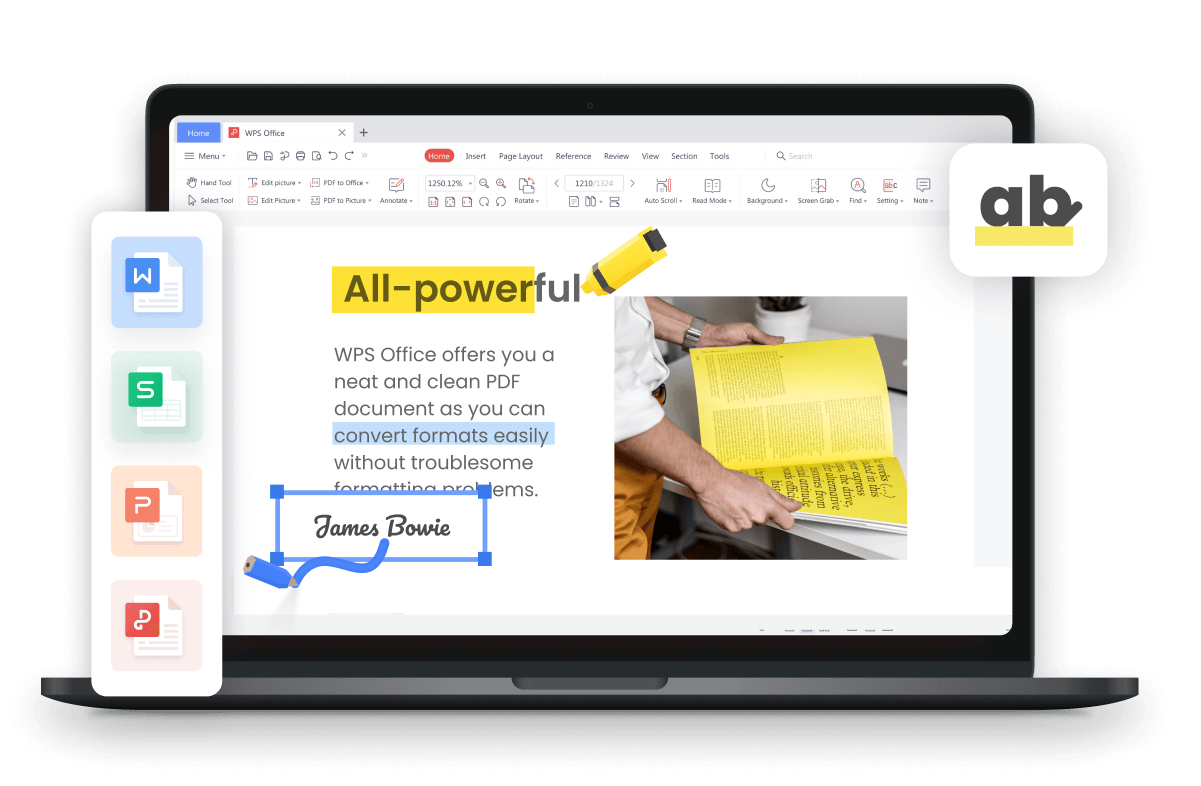
Part 5: Use WPS Office for a Clearer Display Experience
Sometimes, even after adjusting resolution, scaling, and driver settings, you may find that certain applications still look blurry—especially older office suites or programs not optimized for high-DPI screens. That’s where WPS Office provides a superior alternative. Built with display optimization at its core, WPS Office ensures a consistently sharp and comfortable viewing experience, no matter what device you’re using. Whether you're working on a compact laptop screen, a high-resolution 4K monitor, or a mobile device, WPS Office adapts beautifully to your display environment.
Why WPS Office Stands Out
DPI-Aware Rendering: WPS Office is fully DPI-aware, which means it intelligently scales fonts, UI elements, and graphics based on your screen's resolution. Unlike older software that may appear fuzzy or distorted on modern high-resolution displays, WPS Office delivers crystal-clear visuals with every document you open.
Seamless Cross-Platform Compatibility: Whether you're using Windows, macOS, Android, or iOS, WPS Office maintains a clean and uniform look. This ensures a consistent user experience across devices—perfect for those who work on the go and switch between platforms frequently.
Lightweight & Fast Performance: Unlike bulkier office suites, WPS Office is optimized for performance. It consumes less memory and CPU resources, which makes it ideal for users on older or budget devices. You’ll enjoy smooth operation without lags or crashes, even when working with large files.
Modern, Clean UI Design: The user interface is clean, modern, and carefully structured to reduce visual fatigue. Icons are well-defined, fonts are sharp and readable, and the overall layout is intuitive, allowing you to work longer without straining your eyes.
Who Will Benefit Most from WPS Office?
Students who create presentations, reports, and essays will appreciate the clean interface and reliable performance during study sessions or project work. Professionals dealing with spreadsheets, business documents, or multi-page reports will benefit from the crisp rendering and clutter-free workspace—especially useful when precision matters. Writers and content creators will enjoy a distraction-free environment with excellent readability, helping them stay focused on their craft without fighting visual blurriness.
In short, WPS Office isn’t just a free alternative to Microsoft Office—it’s a smart upgrade for anyone who values visual clarity, speed, and cross-device reliability. If you’ve been battling blurry fonts or fuzzy UI elements in your productivity tools, WPS Office is the easiest and most effective way to restore clarity to your screen and comfort to your workflow.
FAQs
Q1: Why is my screen blurry after changing resolution?
You may be using a non-native resolution. Always select the “Recommended” option in Display Settings.
Q2: Why are some apps blurry while others are not?
Older apps that don’t support DPI scaling can appear blurry. Apply the fix in Part 3.
Q3: Can I fix a blurry screen without updating drivers?
You can try adjusting scaling and resolution first. But updating drivers is often necessary for long-term clarity.
Q4: How does the WPS Office help with display issues?
WPS Office is built for visual clarity. It scales properly across high-DPI screens and avoids UI blurriness.
Summary
Blurry screens don’t have to ruin your day. Whether you're using a Windows laptop or an Android device, most display issues can be resolved with a few simple tweaks. Start by adjusting your screen resolution and scaling settings, making sure they match your device’s recommended values. Updating your graphics drivers and enabling high DPI settings for specific apps like Microsoft Office or Chrome can also dramatically improve clarity. On mobile, check display resolution (if supported), clear third-party launcher settings, and clean the screen to rule out physical interference.
For those who want consistently sharp visuals while working on documents, presentations, or spreadsheets, switching to WPS Office is a smart move. It’s optimized for high-DPI screens, delivers clear fonts and UI elements across platforms, and works smoothly even on low-end devices. Whether you’re a student or a professional, WPS Office enhances readability and reduces eye strain—making your screen and your workflow look better instantly.


