
'%3e%3cpath%20d='M8%200C12.4183%200%2016%203.58172%2016%208C16%2012.4183%2012.4183%2016%208%2016C3.58172%2016%200%2012.4183%200%208C0%203.58172%203.58172%200%208%200ZM11.6162%204.38379C11.2257%203.99337%2010.5927%203.99338%2010.2021%204.38379L8%206.58594L5.79785%204.38379C5.40732%203.99334%204.77429%203.99329%204.38379%204.38379C3.99331%204.77429%203.99335%205.40733%204.38379%205.79785L6.58594%208L4.38379%2010.2021C3.99348%2010.5927%203.99341%2011.2257%204.38379%2011.6162C4.77426%2012.0066%205.40734%2012.0065%205.79785%2011.6162L8%209.41406L10.2021%2011.6162C10.5927%2012.0066%2011.2257%2012.0067%2011.6162%2011.6162C12.0067%2011.2257%2012.0066%2010.5927%2011.6162%2010.2021L9.41406%208L11.6162%205.79785C12.0066%205.40735%2012.0066%204.77429%2011.6162%204.38379Z'%20fill='%23080E17'%20fill-opacity='0.46'/%3e%3c/g%3e%3cdefs%3e%3cclipPath%20id='clip0_3761_713'%3e%3crect%20width='16'%20height='16'%20fill='white'/%3e%3c/clipPath%3e%3c/defs%3e%3c/svg%3e)


'%3e%3cpath%20fill-rule='evenodd'%20clip-rule='evenodd'%20d='M21.4999%2010.9993C21.4999%205.20009%2016.7986%200.498901%2010.9993%200.498901C5.19994%200.498901%200.498657%205.20009%200.498657%2010.9993C0.498657%2016.2404%204.33858%2020.5844%209.35855%2021.3722V14.0346H6.69238V10.9993H9.35855V8.68594C9.35855%206.05427%2010.9262%204.60062%2013.3248%204.60062C14.4736%204.60062%2015.6753%204.80571%2015.6753%204.80571V7.38979H14.3512C13.0468%207.38979%2012.64%208.19921%2012.64%209.0296V10.9993H15.5523L15.0867%2014.0346H12.64V21.3722C17.66%2020.5844%2021.4999%2016.2404%2021.4999%2010.9993Z'%20fill='%231568EA'/%3e%3c/g%3e%3c/svg%3e)


Do you need help to reorganize data in Excel using the transpose Function? Don't worry: The Transpose Function in Excel is a powerful tool that enables you to reorganize or rearrange data within a worksheet. The Excel Transpose Function efficiently transforms rows into columns and vice versa within a spreadsheet, making it easier to analyze and present information in a more understandable format. While the Excel Transpose Function is generally straightforward, it can lead to unexpected results or errors in the transposed data. This blog post guides you to use the Excel transpose function effectively to make data analysis a breeze. So, let's dive into the process.
What is TRANSPOSE Function in Excel
The Excel Transpose function is a powerful tool that enables you to reorganize data within a worksheet. It allows you to switch the positions of rows and columns, effectively transforming vertical data into a horizontal layout or vice versa. This Function simplifies data manipulation, aiding in tasks like data analysis, chart creation, and reporting by quickly altering the data's orientation without manual copying and pasting.
The transpose Function must be used as an array formula. Now, what is an array formula?
An array formula is a short formula applied to multiple Excel cells. Before jumping into how to rearrange rows and columns to streamline data organization swiftly, let's discuss the syntax of the Transpose Function.
Transform Function has the syntax =TRANSPOSE(array).
Array means the number of rows you want to transpose. The Excel Transpose Function is similar to the transposing data in the matrix in grade 10 mathematics. It transforms the first row into the first column and the second row into the second column.
To insert an array formula in Excel, we need to highlight the range of cells and type function in the first cell of the range and press Ctrl+Shift +Enter. Don't press enter alone.
This way, the Function will be applied to multiple cells selected in the range.
How to Use Excel TRANSPOSE Function
Let's master the Excel Transpose Function to enhance efficiency and workflow. You'll also come across many excel functions that complement the Transpose function, allowing you to streamline complex data analysis even further.
Consider the following steps on how to use the Excel transpose function formula effectively.
Step 1: Select the blank cells equal to the no of original data cells you want to transpose in the opposite direction. For example, if five original data cells are arranged vertically, you must select five empty cells horizontally as shown.

Step 2: Now type =TRANSPOSE(array) in the first empty cell you previously selected. Type your data range in brackets.

Step 3: Enter the range of the cells you want to transpose. For example, if you want to transpose cells from A2 to B6. Add your cell range and press Ctrl + Shift + Enter.

As you can see, when data is transposed, rows become columns and vice versa.
This is not all about transpose Function; you can use it in many ways to benefit yourself.
You can combine it with Excel functions like the IF function to label empty cells and the CONCATENATE function to combine the words in different rows in a single cell.
The Excel Transpose function is a dynamic solution to reorganize data with changing data sources. But if you want to transpose cells once, then you can use the Paste Special option to transpose data cells.
Follow these steps to use transpose function using Paste Special option:
Step 1: Copy data you want to transpose.

Step 2: Right-click on a new cell and go to the paste option, choose Paste Special.
Step 3: Choose Transpose from the Paste special menu.
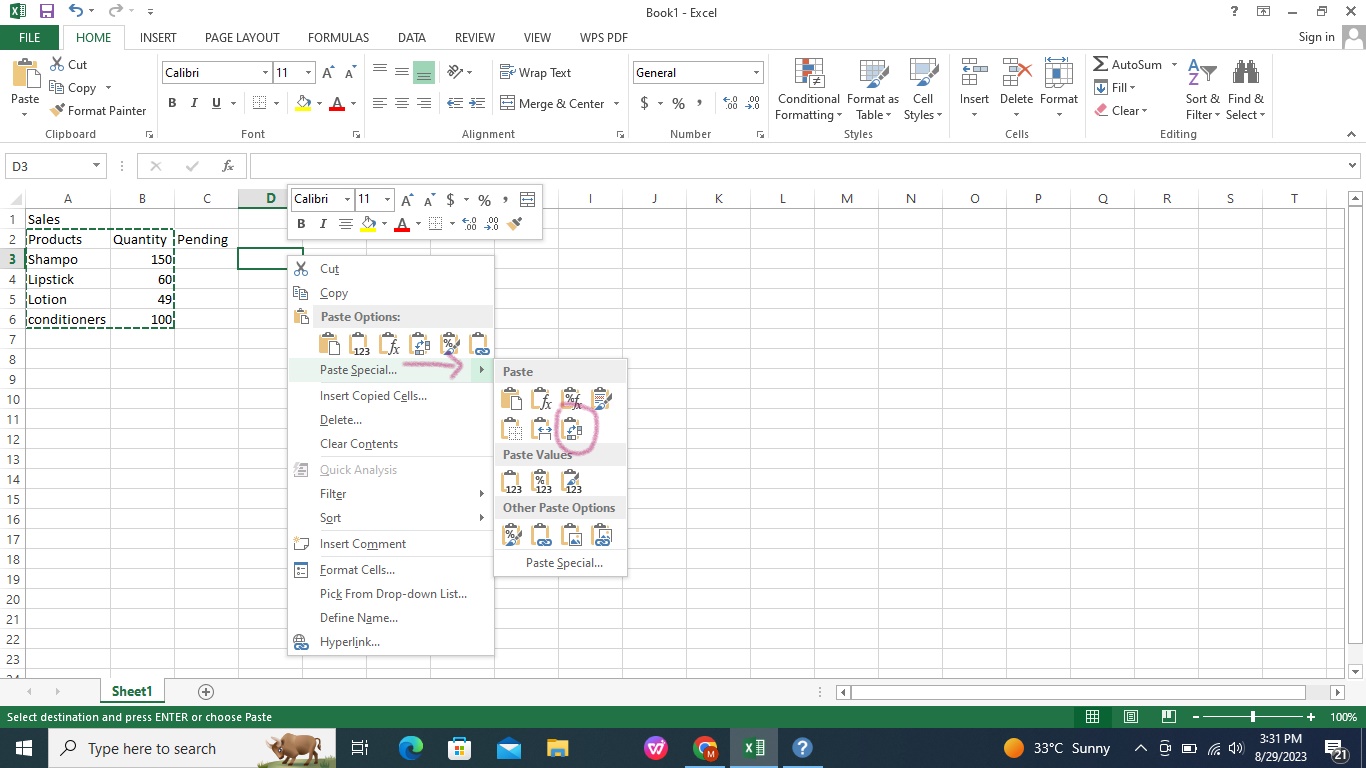
Step 4: Rows will be transposed to columns.

Best Free Alternative to Microsoft Excel -WPS Office

You can use the Transpose Function both in Microsoft Excel and WPS Spreadsheet, but we recommend WPS Office for several reasons:
Free Download and Features: WPS Office is a free, powerful productivity software compatible with Microsoft Office files and formats. Its premium features are also available free for 7 Days. Unlike Microsoft Office, you can unlock its premium features with your university or company email address for a lifetime.

Compatibility with Microsoft Office: You must learn something new to transition from Microsoft Office to WPS Office. WPS has the same interface as Microsoft, with better support for multiple operating systems.
User-friendly Interface: WPS Office has an easy-to-navigate and easy-to-use interface to facilitate the users.
WPS Office is a lightweight yet powerful tool with dynamic features to enhance productivity in professional environments and personal data management. Try it now for free! Click here and download WPS Office to easily lock rows in your Excel files!


FAQs About Transpose Function
Q1: How do I transpose horizontal data to vertical in Excel?
You can use two methods to transpose horizontal data to vertical in Excel.
Method-1: Use the Paste Special option.
Open Excel and copy the data in vertical rows.
Select the cell where you want to transpose data.
Right-click and find the Paste Special option.
In the Paste Special menu, Choose Transpose and click OK.
Method 2: Use the Transpose Function.
Highlight the range of cells you want to transpose.
Select the same number of cells and Type transpose function syntax in the first cell.
Add the data range in the array formula in brackets.
Press Ctrl + Shift + Enter
Q2: Why is the transpose Function not working in Excel?
The Transpose Function in Excel might not work for a variety of reasons. Here are some common issues and potential solutions to fix them:
The Transpose function has limitations on the size of data it can handle. If you're trying to transpose an extensive range that exceeds these limits, it might not work. Consider transposing smaller portions of your data.
Transpose Function may fail due to blank cells, merged cells, formulas referencing any specific cell, array formulas, and inadequate designation range.
To fix these errors, fill or remove the blank cells, unmerge the merged cell, and convert array formulas to regular formulas before using the transpose Function.
Q3: How do I transpose data in Excel and keep the formula?
To transpose data in Excel while preserving formulas, follow these steps:
Step 1:Highlight the range of cells containing the data and formulas you want to transpose.
Step 2: Press `Ctrl + C` or right-click and select "Copy."
Step 3: Right-click on the cell where you want the transposed data to begin. Choose "Paste Special."
Step 4: From the "Paste Special" dialog box, click the "Transpose" option.
Step 5: Click "OK." The data will be transposed to the new location while retaining the original formulas.
Remember that transposing formulas might lead to incorrect references, so review and adjust them as needed in the transposed location.
Summary
In conclusion, Excel Transpose Function opens up the world of efficient data manipulation, allowing you to rearrange rows and columns for better analysis and presentation. Through our step-by-step guide, you have learned different methods to use the Excel transpose function to streamline the data management process.
However, we recommend WPS Office as an exceptional alternative to Microsoft Office for those seeking more to uplift their productivity. With its affordability, platform compatibility, and unwavering support for multiple operating systems, WPS Office emerges as a standout choice. Try it now for free!

'%3e%3cpath%20d='M19.9911%204.11386V6.471H18.5894C18.0775%206.471%2017.7322%206.57814%2017.5536%206.79243C17.3751%207.00671%2017.2858%207.32814%2017.2858%207.75671V9.44421H19.9019L19.5536%2012.0871H17.2858V18.8639H14.5536V12.0871H12.2769V9.44421H14.5536V7.49779C14.5536%206.39064%2014.8632%205.53201%2015.4822%204.92189C16.1013%204.31177%2016.9257%204.00671%2017.9554%204.00671C18.8304%204.00671%2019.509%204.04243%2019.9911%204.11386Z'%20fill='%23333333'/%3e%3c/g%3e%3cdefs%3e%3cclipPath%20id='clip0_2938_8199'%3e%3crect%20width='16'%20height='16'%20fill='white'%20transform='translate(8%204.00671)'/%3e%3c/clipPath%3e%3c/defs%3e%3c/svg%3e)
'%3e%3cpath%20d='M17.5237%2010.7813L23.4811%204H22.0699L16.8949%209.88693L12.7648%204H8L14.2469%2012.9029L8%2020.0133H9.4112L14.8725%2013.7952L19.2352%2020.0133H24M9.92053%205.04213H12.0885L22.0688%2019.0224H19.9003'%20fill='%23333333'/%3e%3c/g%3e%3cdefs%3e%3cclipPath%20id='clip0_2938_8200'%3e%3crect%20width='16'%20height='16.0134'%20fill='white'%20transform='translate(8%204)'/%3e%3c/clipPath%3e%3c/defs%3e%3c/svg%3e)


