

One of the ways to keep the document you are making presentable is to know how to insert columns in Word efficiently. The document will have a much more professional aesthetic and allow certain elements to be highlighted more efficiently.
Knowing how to insert columns in Word will allow you to edit your document the way you want without losing visual aesthetics and achieving truly professional results. This is a great advantage when learning how to insert columns in word quickly and efficiently.
How to Create One or Two Columns in Word?
There are many ways how to insert columns in Word, but you should always choose the one that best suits the document that is being made. Learn how to insert columns in Word with the instructions you will find here.
1. You must have your Word document open, and you will go to the Design tab.
2. Once here, you can see the various column configurations that can be made, select Columns.
3. A menu will be displayed that will allow you to choose the column you want to use.
4. Select the column style you want to use, and the document's column organization will automatically change.
Use Column Breaks to add Columns in Word
One of the ways how to insert columns in Word is through the use of column breaks. This is usually very useful to section the column found on a page. Follow the instructions, and you will have no problems when using it.
1. Open the Word document to work with. Select the start point of the column break.
2. Select the Design tab and click on Breaks.
3. Go to the Breaks menu and click on Column.
4. Once this is done, a column break will be created after the selected point.
How to Customize Columns in Word?
Identifying the correct width for your Column is vital. Correcting the number of columns does not guarantee it will look how you want it to. Therefore, customize the width of each Column. Follow the following steps to customize columns in Word.
Step 1.
After opening Microsoft Word app, To modify the contents of the preexisting document in the Microsoft Word application, double-click the file. However, you can click the icon labeled “Blank Document” to generate an entirely original Word file.

Step 2.
Now, you have to examine and visually scan the horizontal rows of tabs at the highest point in the Microsoft Word app window. Click the “Layout” tab from the main menu to do this.
Step 3.
In the Page Layout tab, look on the left for an option called “Columns.” Go ahead and click it.

Step 4.
At the bottom of the Columns drop-down menu, tap the “More Columns” option. It will reveal an additional new window.

Step 5.
Inside the new Columns window, you'll be presented with multiple choices like “One,” “Two,” “Three,” and so on. Click the numerical value representing the precise amount of columns you wish to generate. If you had selected any content prior, your configuration settings will only be applied to those parts.

Step 6.
Additionally, you can adjust the column widths and spacing amount from the same window. Now, use the up and down arrows located adjacent to the "Width" and "Spacing" settings for modification. If you want columns with even width, you can checkmark the option for “Equal Column width.”

Step 7.
Make use of the "Apply to" drop-down menu to restrict your column formatting to only selected text. However, it can be applied to the whole document. When the settings suit your needs, click “OK” to implement the changes. That’s all!

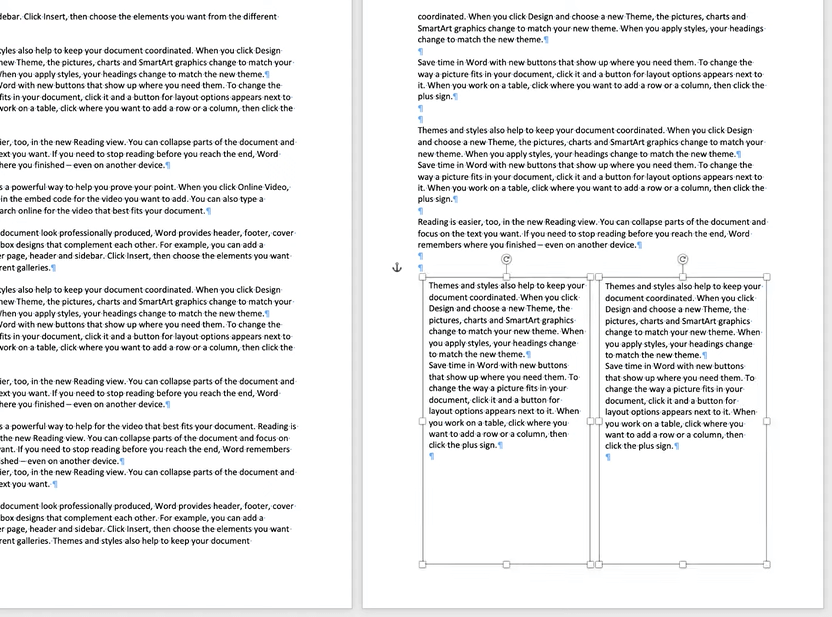
Use Textbox to Create Columns in Word
Textbox in Word provides a simple way to create customized column layouts for documents. So you can make two columns in Word for one section. Let’s follow the steps on how to make columns or rows in Word using Textbox:
Step 1.
Open the document and press the Insert tab from the main menu.

Step 2.
Now, click the Text Box tab, and select the “Draw Text Box” option.

Step 3.
Click and drag to draw a textbox on the page. Make it the desired width for one of your columns. Start typing or pasting text into the textboxes to fill the columns with content.
Step 4.
Text will flow within its box. Make sure to set the text wrapping to anything except "in line with text" so the textbox sits over the existing text. To adjust a textbox, click its border to select it.

Step 5.
You can copy and paste for more boxes. Position the textboxes side-by-side or in any layout you wish. Make them the same width for evenly split columns or different widths for customized columns. Then use the resize handles to make it wider, narrower, shorter, or taller as needed.
Step 6.
Format the text in each box separately using font, size, color, alignment, etc. This allows different looks in each Column.

Step 7.
You can resize or reposition the text boxes at any time by selecting the border and dragging.

Step 8.
Optionally, you can give each textbox a unique color border and fill it for visual distinction.

Step 9.
For a professional column look, make sure the textboxes align cleanly. Use gridlines and alignment guides to assist. Go to Advanced Layout and adjust wrapping, position, and more.

Using textbox columns gives you more layout flexibility than the built-in columns in Word. Get creative with your designs!
Why Use WPS Office?
The above methods are similar for both Microsoft and WPS Office. WPS Office is a leading software with millions of satisfied users all around the globe. We believe in the quality and satisfaction of the customers. WPS provides you with the best Office services, which are on par with Microsoft Office but available at lower prices. Plus, it has hundreds of additional features which will help you save time and do your work more efficiently.

Price:
WPS offers you the best and most affordable prices. It provides you with the same software package but at a low cost. You can choose the plan that fits within your spending limit.
Features:
A vital factor is that WPS gives you more advanced and new features that will help you improve your work and save time. You can also select the features you want. It will be helpful for you. Make your package in line with your needs.
Compatibility:
A crucial feature of any software. Some of the software is highly compatible with laptops but starts to lag or is not so good in presentation when opened on a mobile phone. WPS has put great focus on it and developed software that is highly compatible with all your devices.
User-friendly Interface:
WPS has an interface that is simple and quite easy to understand. Customer satisfaction is the top priority at WPS. You will be able to access all the features without any complexity or hurdles.


FAQs about Creating a Watermark in Word
1. What is the shortcut key for two columns in Word?
The shortcut key for making two columns in a word is Alt+A, and then press P. The column dialog box will be shown to you on your screen.
2. How do I make different Columns on each page in Word?
Select or highlight all the text you want to make columns of. Click on the page layout option. Choose the Columns option and make columns of your text without lines.
3. How do I make Columns in Word without lines?
Select all the tables you want to remove lines from. Go to the Design tab and click on Borders. Choose Show no borders, and you will be able to make invisible columns and rows.
Summary
To conclude, we can say that the columns and column breaks are highly crucial to make your text appealing and inculcating. Most of the newspaper-style and print-layout style uses columns in the texts extensively. Also, it has huge applications in your resumes, business cards, presentations, and much more.
Make sure you know how to create one or two columns and rows in your text. WPS is the leading website helping thousands of customers worldwide. You can find multiple beneficial software applications that will help you excel in the field of Word.


