
'%3e%3cpath%20d='M8%200C12.4183%200%2016%203.58172%2016%208C16%2012.4183%2012.4183%2016%208%2016C3.58172%2016%200%2012.4183%200%208C0%203.58172%203.58172%200%208%200ZM11.6162%204.38379C11.2257%203.99337%2010.5927%203.99338%2010.2021%204.38379L8%206.58594L5.79785%204.38379C5.40732%203.99334%204.77429%203.99329%204.38379%204.38379C3.99331%204.77429%203.99335%205.40733%204.38379%205.79785L6.58594%208L4.38379%2010.2021C3.99348%2010.5927%203.99341%2011.2257%204.38379%2011.6162C4.77426%2012.0066%205.40734%2012.0065%205.79785%2011.6162L8%209.41406L10.2021%2011.6162C10.5927%2012.0066%2011.2257%2012.0067%2011.6162%2011.6162C12.0067%2011.2257%2012.0066%2010.5927%2011.6162%2010.2021L9.41406%208L11.6162%205.79785C12.0066%205.40735%2012.0066%204.77429%2011.6162%204.38379Z'%20fill='%23080E17'%20fill-opacity='0.46'/%3e%3c/g%3e%3cdefs%3e%3cclipPath%20id='clip0_3761_713'%3e%3crect%20width='16'%20height='16'%20fill='white'/%3e%3c/clipPath%3e%3c/defs%3e%3c/svg%3e)


'%3e%3cpath%20fill-rule='evenodd'%20clip-rule='evenodd'%20d='M21.4999%2010.9993C21.4999%205.20009%2016.7986%200.498901%2010.9993%200.498901C5.19994%200.498901%200.498657%205.20009%200.498657%2010.9993C0.498657%2016.2404%204.33858%2020.5844%209.35855%2021.3722V14.0346H6.69238V10.9993H9.35855V8.68594C9.35855%206.05427%2010.9262%204.60062%2013.3248%204.60062C14.4736%204.60062%2015.6753%204.80571%2015.6753%204.80571V7.38979H14.3512C13.0468%207.38979%2012.64%208.19921%2012.64%209.0296V10.9993H15.5523L15.0867%2014.0346H12.64V21.3722C17.66%2020.5844%2021.4999%2016.2404%2021.4999%2010.9993Z'%20fill='%231568EA'/%3e%3c/g%3e%3c/svg%3e)


In our daily data handling tasks with Excel, knowing how to divide value in excel cells is essential to uncover valuable insights. However, many users struggle with this operation. In this article, we'll guide you through two effective ways of dividing values in Excel and how to split cells to process data easily.
Part 1. Dividing in Excel Cells with 2 Methods
In this section, we will explore two straightforward methods to divide in Excel. Learn how to efficiently divide by numbers and percentages with easy-to-follow tutorials and examples.
#1. Using a forward slash (/) to divide number/percentage
1. Dividing by Number:
To divide cells by a specific number in Excel, follow these simple steps:
Step 1: Open your Excel spreadsheet and select the cell you want to divide by the number.
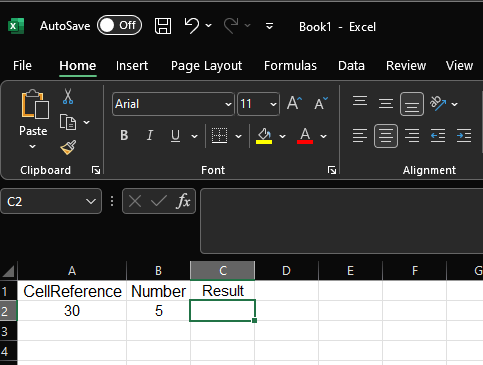
Step 2: In a new cell, enter the formula "=CellReference/Number", where "CellReference" is the reference to the cell you want to divide, and "Number" is the value you wish to divide by. For example, if you want to divide cell A2 by 5, the formula will be "=A2/5".

Step 3: Press "Enter," and Excel will automatically display the result of the division.

2. Dividing by Percentage:
To divide cells by a percentage, follow these steps:
Step 1: Select the cell you want to divide by the percentage.

Step 2: Enter the formula "=CellReference/Percentage", where "CellReference" is the reference to the cell you want to divide, and "Percentage" is the percentage value you wish to use. For example, to divide cell A2 by 20%, the formula will be "=A2/20%".

Step 3: Press "Enter," and Excel will calculate the result of the division.

#2. Using the QUOTIENT Function:
The QUOTIENT function in Excel allows you to divide cells using a formula. Here's how:
Step 1: Choose the cell in which the outcome should appear.
Step 2: Enter the formula "=QUOTIENT(Numerator, Denominator)", replacing "Numerator" with the reference to the cell you want to divide and "Denominator" with the reference to the cell containing the divisor. For example, to divide cell A2 by B2, the formula will be "=QUOTIENT(A2, B2)".

Step 3: Press "Enter," and Excel will display the quotient.
Master these two methods for dividing cells in Excel, and you'll have the tools to perform efficient data calculations and analysis.
Part 2 : How to Split a Cell to Form a New Column?
Often, data in Excel may be combined within a single cell, making it challenging to analyze or manipulate effectively. By splitting a cell into separate columns, you can organize and extract valuable insights from your data. Here's a step-by-step guide on how to split a cell to form a new column:
Step 1. Choose the cell that you want to divide.
Step 2. Go to the "Data" tab in the top menu.

Alt tag: Data tab
Step 3. Click on "Text to Columns" in the "Data Tools" group.

Alt tag: Text to Columns tool
Step 4. Choose the method to split the data: "Delimited" (using specific characters) or "Fixed Width."

Step 5. Follow the on-screen instructions and preview the results.
Step 6. Click "Finish" to complete the split.

Now your cell data will be divided into separate columns, allowing for better data organization and analysis.


Part 3: A Free Alternative Choice——WPS Office

Discover WPS Office, the perfect free alternative to traditional office suites. With WPS Office, you get a powerful all-in-one software that not only meets your productivity needs but also enhances your efficiency.
Emphasizing WPS Office's key features and advantages:
Strong Compatibility: Easily work with Word, Excel, and PowerPoint files, as WPS Office seamlessly supports various file formats.
AI Services: Benefit from built-in AI services that automate tasks and enhance work efficiency.
All-in-One: WPS Office combines word processing, spreadsheets, and presentations in a single software suite.
User-Friendly: With an intuitive interface, WPS Office is easy to use for all skill levels.
Merge and Split Cells: Conveniently merge and split cells in WPS Writer for better data organization.
Versatility: Access WPS Office on Windows, macOS, Android, and iOS devices.
Lightweight: Occupying minimal memory, WPS Office ensures smooth performance.
Regular Updates: Stay up-to-date with frequent software updates for the latest features.
Online and Cloud Support: Access and sync documents across devices with online and cloud support.
Multilingual Support: WPS Office caters to users worldwide with support for multiple languages.
FAQs
1. How do I unmerge cells in Excel?
To split a cell in half in Excel:
Step 1. Choose the cell that you want to divide.
Step 2. Go to the "Home" tab.

Step 3. Select “Merge & Center” from the menu.

Step 4. Then, click on the "Unmerge Cells" button.
The cell will be split for better visibility and organization.

2. How do I split text in a cell in sheets?
For a simple text split in Excel, you can use the "Text to Columns" feature. Here's a step-by-step guide:
Step 1. Select the cell or range of cells containing the text you want to split.
Step 2. Go to the "Data" tab on the Excel ribbon.

Step 3. Go to the “Data Tools” group and select “Text to Columns.”

Step 4. Select “Delimited” from the drop-down menu in the “Convert Text to Columns Wizard,” then click “Next.”
Step 5. Select the delimiter that separates your text (e.g., Comma, Tab, Space, etc.) by ticking the appropriate box. You can see a preview of how the data will be split in the Data preview section.

Step 6. Click "Next."
Step 7. Choose the data format for each column (or leave it as "General"), and optionally set column data formats.

Step 8. Click "Finish."
Excel will automatically split the text in the selected cell(s) into separate columns based on the chosen delimiter.

Summary
The article provides valuable information on how to perform specific tasks in Excel, such as dividing in cells with two methods and splitting cells to form new columns. Additionally, it highlights WPS Office as a free alternative, emphasizing its strong compatibility, AI services, and features like merging and splitting cells in WPS Writer. Users can benefit from WPS Office's user-friendly interface, regular updates, and versatile online and cloud support. Overall, the article offers practical tutorials and emphasizes the advantages of using WPS Office for efficient and cost-effective office productivity.

'%3e%3cpath%20d='M19.9911%204.11386V6.471H18.5894C18.0775%206.471%2017.7322%206.57814%2017.5536%206.79243C17.3751%207.00671%2017.2858%207.32814%2017.2858%207.75671V9.44421H19.9019L19.5536%2012.0871H17.2858V18.8639H14.5536V12.0871H12.2769V9.44421H14.5536V7.49779C14.5536%206.39064%2014.8632%205.53201%2015.4822%204.92189C16.1013%204.31177%2016.9257%204.00671%2017.9554%204.00671C18.8304%204.00671%2019.509%204.04243%2019.9911%204.11386Z'%20fill='%23333333'/%3e%3c/g%3e%3cdefs%3e%3cclipPath%20id='clip0_2938_8199'%3e%3crect%20width='16'%20height='16'%20fill='white'%20transform='translate(8%204.00671)'/%3e%3c/clipPath%3e%3c/defs%3e%3c/svg%3e)
'%3e%3cpath%20d='M17.5237%2010.7813L23.4811%204H22.0699L16.8949%209.88693L12.7648%204H8L14.2469%2012.9029L8%2020.0133H9.4112L14.8725%2013.7952L19.2352%2020.0133H24M9.92053%205.04213H12.0885L22.0688%2019.0224H19.9003'%20fill='%23333333'/%3e%3c/g%3e%3cdefs%3e%3cclipPath%20id='clip0_2938_8200'%3e%3crect%20width='16'%20height='16.0134'%20fill='white'%20transform='translate(8%204)'/%3e%3c/clipPath%3e%3c/defs%3e%3c/svg%3e)


