
'%3e%3cpath%20d='M8%200C12.4183%200%2016%203.58172%2016%208C16%2012.4183%2012.4183%2016%208%2016C3.58172%2016%200%2012.4183%200%208C0%203.58172%203.58172%200%208%200ZM11.6162%204.38379C11.2257%203.99337%2010.5927%203.99338%2010.2021%204.38379L8%206.58594L5.79785%204.38379C5.40732%203.99334%204.77429%203.99329%204.38379%204.38379C3.99331%204.77429%203.99335%205.40733%204.38379%205.79785L6.58594%208L4.38379%2010.2021C3.99348%2010.5927%203.99341%2011.2257%204.38379%2011.6162C4.77426%2012.0066%205.40734%2012.0065%205.79785%2011.6162L8%209.41406L10.2021%2011.6162C10.5927%2012.0066%2011.2257%2012.0067%2011.6162%2011.6162C12.0067%2011.2257%2012.0066%2010.5927%2011.6162%2010.2021L9.41406%208L11.6162%205.79785C12.0066%205.40735%2012.0066%204.77429%2011.6162%204.38379Z'%20fill='%23080E17'%20fill-opacity='0.46'/%3e%3c/g%3e%3cdefs%3e%3cclipPath%20id='clip0_3761_713'%3e%3crect%20width='16'%20height='16'%20fill='white'/%3e%3c/clipPath%3e%3c/defs%3e%3c/svg%3e)


'%3e%3cpath%20fill-rule='evenodd'%20clip-rule='evenodd'%20d='M21.4999%2010.9993C21.4999%205.20009%2016.7986%200.498901%2010.9993%200.498901C5.19994%200.498901%200.498657%205.20009%200.498657%2010.9993C0.498657%2016.2404%204.33858%2020.5844%209.35855%2021.3722V14.0346H6.69238V10.9993H9.35855V8.68594C9.35855%206.05427%2010.9262%204.60062%2013.3248%204.60062C14.4736%204.60062%2015.6753%204.80571%2015.6753%204.80571V7.38979H14.3512C13.0468%207.38979%2012.64%208.19921%2012.64%209.0296V10.9993H15.5523L15.0867%2014.0346H12.64V21.3722C17.66%2020.5844%2021.4999%2016.2404%2021.4999%2010.9993Z'%20fill='%231568EA'/%3e%3c/g%3e%3c/svg%3e)


Do you need help with timelines in Excel? Excel may interpret date formats differently, especially if the data is copied from another source. This can lead to incorrect date values and disrupt the timeline. Don't worry! This blog post guides you on how to create a Timeline in Excel without any hassle and overcome timeline formatting issues within a few seconds.
Method-1 How to Create a Timeline in Excel Using a Built-in Timeline Template
Timelines are used in project management to plan and track the progress of tasks.
Excel's flexibility allows project managers to customize timelines based on the project's specific needs. Therefore, Excel's ease of use, flexibility, and wide availability make it a popular choice for creating timelines. Excel offers various charting and formatting options, allowing users to customize timelines to their specific needs and preferences.
One of the fastest ways to create a timeline in Excel is by using premade templates.
Let's explore some ready-made templates in the WPS Spreadsheet to streamline the Process.
Step 1: Open the WPS Spreadsheet and go to Create from Template.
Step 2: Search project timeline templates in the search bar. Choose the template you like and add your details.

Step 3: If you can access WPS Pro, select All Templates on the right side of the menu.

Select Free from the drop-down list If you don't have WPS Pro. If you are still looking for a suitable one on the app, go to the official website of WPS Office and search for free project timeline templates.

You will get a variety of unique templates for creating timelines; select one and download it.
Step 4: You can edit these templates on a web browser and download them. Click on Download, and it shows you pop-on the download icon.

Step 5: Click on the downloaded template, and it will automatically appear in your WPS spreadsheet.

Step 6: Edit it like you want, and that's all.
Step 7: Go to the Insert tab to add new text, shapes, pictures, tables, icons, or anything you want to customize timelines.

Method-2 How to Create a Timeline in Excel (Step-by-Step)
Tracking timelines is not a headache anymore. Thanks to Excel for enabling us to create timelines to remember and track important events.
You don't need to remember about your boss, your friend's or partner's birthday, your anniversary, or any significant event in life.
You can easily create a timeline in Excel within a few steps. These steps could be different depending on the operating system you are using.
However, in this section, we will guide you on how to create a timeline in Excel for the latest versions.
Step 1: Open the Excel Workbook where you want to insert a timeline. Go to the Insert tab in the ribbon and click SmartArt.

Step 2: Click Smart Art.

Step 3: In the Choose a SmartArt Graphic gallery, click Process. Double-click a timeline layout to use it.

Here is a tip for you! Two timelines are available in SmartArt graphics: Basic timeline and Circle Accent Timeline, but you can also use almost any process-related SmartArt graphic.
Step 4: After selecting the timeline style, Click [Text], type in this textbox, or paste your text into the SmartArt graphic. You can add text using the Text Pane tab on SmartArtToolDesign.
![Click [Text], type in this textbox.Click [Text], type in this textbox.](http://res-academy.cache.wpscdn.com/images/seo_posts/20230918/57757f69c676794938faa8d16411e4a5.png)
Step 5: You can change the color of boxes to customize the timeline, click on the Design tab in SmartArt Tools and then select Change colors.

Method-3 How to Create a Timeline in Excel Using Scatter Plot with Connect Lines
Here is a step-by-step tutorial on how to create a timeline in Excel using a scatter plot with connecting lines:
Step 1: Collect the data you want to include in your timeline. This should consist of events, dates, and any other relevant information.
Step 2: Open Microsoft Excel and open a new worksheet. Enter your event names in one column and their corresponding dates in another.

Step 3: Highlight the data in Columns A and B that you want to include in your timeline.
Step 4: Go to the Insert tab in the Excel ribbon and select "Scatter" under the "Charts" section. Choose the scatter plot style without markers (dots).

Step 5: Right-click on any data point on the scatter plot and click "Select Data."

Step 6: In the "Select Data Source" window, click "Add" to add a new series.

Step 7: For the "Series Name," select the event names you entered in Column A. For the "Series Values," select the corresponding dates in Column B.

Step 8: Click on any data point on the scatter plot to select the whole series. Then, right-click and choose "Add Trendline."
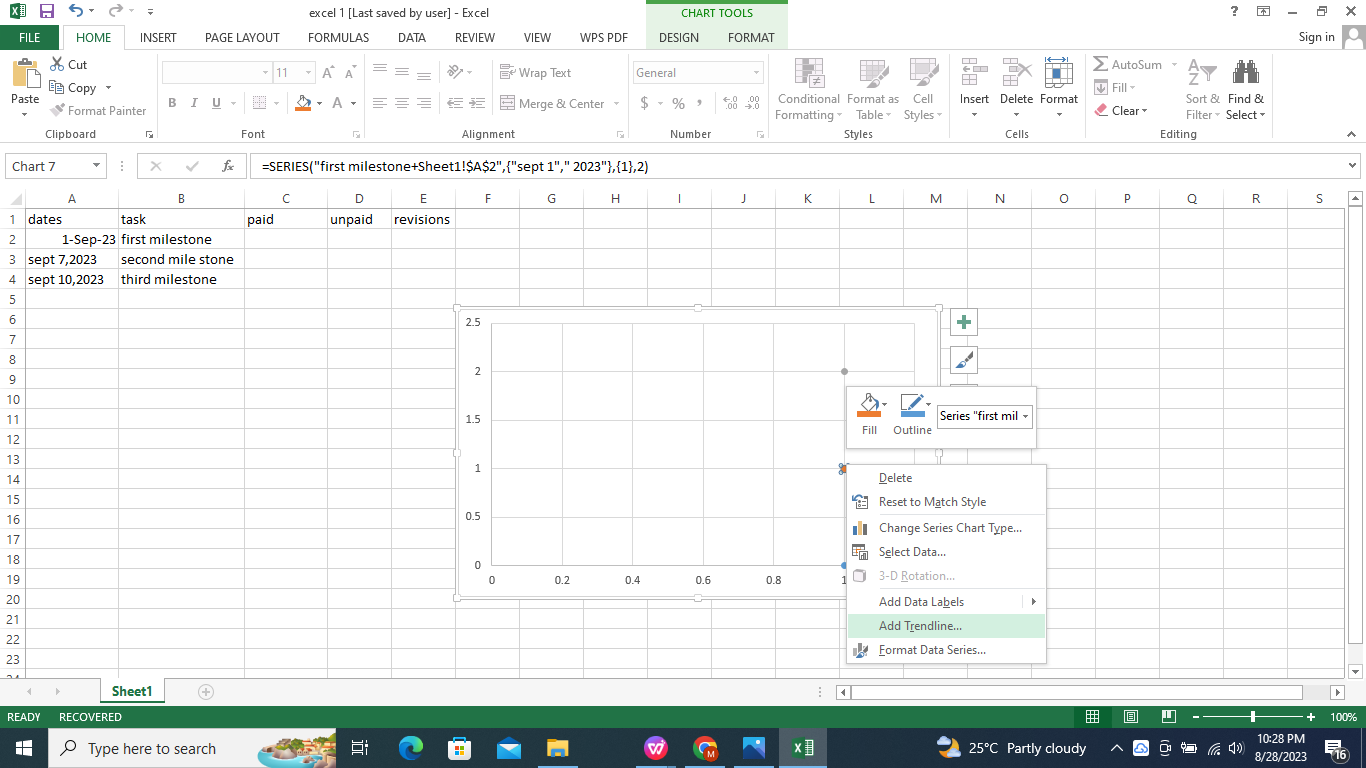
Add Trendline menu

Step 9: Format the chart to your liking. Adjust the axis labels, title, colors, and other elements to make the timeline visually appealing.

Step 10: Label the Axes. Click on the horizontal (dates) axis and right-click to access the formatting options. Set the appropriate date range for your timeline.

Step 11: Add details you want to include, such as milestone labels, event descriptions, or other relevant information.
Step 12: Once you're satisfied with your timeline, save your Excel file. You can then share it with others or use it for your reference.

And there you have it! You've successfully created a timeline in Excel using a scatter plot with connecting lines.


FAQs about creating a timeline in Excel
Q1.How do you deal with inconsistent or missing data when creating a timeline in Excel?
When dealing with inconsistent or missing data while creating a timeline in Excel, you need to review your data table to identify any inconsistencies in event names, date formats, or lost entries.
Inconsistent data could include typos, different date formats, or improperly entered dates.
Suppose you have empty cells in your data and want to plot it in a chart in Excel. Then, there are three options to handle them. You can plan these empty cells as Gap, Zero, and Connect data points with a line.
Moreover, you must clean and standardize your data to ensure accuracy and consistency before creating the timeline.
Q2.Would creating a timeline in Excel cause an error?
Creating timelines in Excel can cause data entry and data formatting errors. Because when you enter event names or dates, it can lead to inaccuracies in the timeline. Thus, double-checking data entry can help minimize such errors. Also, inconsistent date formats or incorrectly formatted dates can incorrectly display data in timelines.
Therefore, before you create a timeline, ensure all dates are in the same format and accurately reflect the intended values.
Q3. Do you create a timeline in Excel to help officers improve flexibility?
Absolutely! Creating timelines in Excel plays a vital role in improving efficiency. There are various types of charts in Excel and formatting options, allowing you to customize the timeline according to your needs and preferences. You can adjust the appearance, layout, colors, and labels to create a timeline that suits your project or presentation.
So, creating a timeline in Excel offers a user-friendly, flexible, and versatile solution for visualizing chronological data across various fields and projects. Its integration with other Excel features and collaborative capabilities further enhance its data analysis and decision-making utility. Give it a try, and you won't regret it!
Summary
In conclusion, creating a timeline in Excel offers a visually appealing way to present data chronologically. We've explored three distinct methods: utilizing a built-in timeline template, following a step-by-step guide, and employing a scatter plot with connect lines for a customized approach to help you effectively create a timeline in Excel.
While Microsoft Excel remains a popular choice for many, an excellent alternative worth considering is WPS Excel from the WPS Office suite.
WPS Excel offers a comprehensive set of features akin to its Microsoft counterpart and stands out with its user-friendly interface and efficiency in timeline creation.
With its seamless compatibility, WPS Excel proves to be a valuable tool for users seeking a reliable and powerful platform to craft engaging timelines. Try it now for free!

'%3e%3cpath%20d='M19.9911%204.11386V6.471H18.5894C18.0775%206.471%2017.7322%206.57814%2017.5536%206.79243C17.3751%207.00671%2017.2858%207.32814%2017.2858%207.75671V9.44421H19.9019L19.5536%2012.0871H17.2858V18.8639H14.5536V12.0871H12.2769V9.44421H14.5536V7.49779C14.5536%206.39064%2014.8632%205.53201%2015.4822%204.92189C16.1013%204.31177%2016.9257%204.00671%2017.9554%204.00671C18.8304%204.00671%2019.509%204.04243%2019.9911%204.11386Z'%20fill='%23333333'/%3e%3c/g%3e%3cdefs%3e%3cclipPath%20id='clip0_2938_8199'%3e%3crect%20width='16'%20height='16'%20fill='white'%20transform='translate(8%204.00671)'/%3e%3c/clipPath%3e%3c/defs%3e%3c/svg%3e)
'%3e%3cpath%20d='M17.5237%2010.7813L23.4811%204H22.0699L16.8949%209.88693L12.7648%204H8L14.2469%2012.9029L8%2020.0133H9.4112L14.8725%2013.7952L19.2352%2020.0133H24M9.92053%205.04213H12.0885L22.0688%2019.0224H19.9003'%20fill='%23333333'/%3e%3c/g%3e%3cdefs%3e%3cclipPath%20id='clip0_2938_8200'%3e%3crect%20width='16'%20height='16.0134'%20fill='white'%20transform='translate(8%204)'/%3e%3c/clipPath%3e%3c/defs%3e%3c/svg%3e)


