
'%3e%3cpath%20d='M8%200C12.4183%200%2016%203.58172%2016%208C16%2012.4183%2012.4183%2016%208%2016C3.58172%2016%200%2012.4183%200%208C0%203.58172%203.58172%200%208%200ZM11.6162%204.38379C11.2257%203.99337%2010.5927%203.99338%2010.2021%204.38379L8%206.58594L5.79785%204.38379C5.40732%203.99334%204.77429%203.99329%204.38379%204.38379C3.99331%204.77429%203.99335%205.40733%204.38379%205.79785L6.58594%208L4.38379%2010.2021C3.99348%2010.5927%203.99341%2011.2257%204.38379%2011.6162C4.77426%2012.0066%205.40734%2012.0065%205.79785%2011.6162L8%209.41406L10.2021%2011.6162C10.5927%2012.0066%2011.2257%2012.0067%2011.6162%2011.6162C12.0067%2011.2257%2012.0066%2010.5927%2011.6162%2010.2021L9.41406%208L11.6162%205.79785C12.0066%205.40735%2012.0066%204.77429%2011.6162%204.38379Z'%20fill='%23080E17'%20fill-opacity='0.46'/%3e%3c/g%3e%3cdefs%3e%3cclipPath%20id='clip0_3761_713'%3e%3crect%20width='16'%20height='16'%20fill='white'/%3e%3c/clipPath%3e%3c/defs%3e%3c/svg%3e)


'%3e%3cpath%20fill-rule='evenodd'%20clip-rule='evenodd'%20d='M21.4999%2010.9993C21.4999%205.20009%2016.7986%200.498901%2010.9993%200.498901C5.19994%200.498901%200.498657%205.20009%200.498657%2010.9993C0.498657%2016.2404%204.33858%2020.5844%209.35855%2021.3722V14.0346H6.69238V10.9993H9.35855V8.68594C9.35855%206.05427%2010.9262%204.60062%2013.3248%204.60062C14.4736%204.60062%2015.6753%204.80571%2015.6753%204.80571V7.38979H14.3512C13.0468%207.38979%2012.64%208.19921%2012.64%209.0296V10.9993H15.5523L15.0867%2014.0346H12.64V21.3722C17.66%2020.5844%2021.4999%2016.2404%2021.4999%2010.9993Z'%20fill='%231568EA'/%3e%3c/g%3e%3c/svg%3e)


If you work with data, it's essential to have the skills to present it effectively and make it visually appealing and comprehensible. One technique for achieving this is by adjusting cell sizes, ensuring that your cell content fits neatly. In this article, we'll explore how to expand all columns in Excel to enhance the presentation of your data.

Importance of Expanding All Columns in Excel
Expanding all columns in Excel is crucial for effective data analysis, ensuring that every piece of information is easily visible. Failure to do so can lead to errors and missed insights, undermining the accuracy of your analysis. Additionally, this practice helps uncover hidden characters or spaces, avoiding potential data issues. It also aids in identifying formatting inconsistencies, enhancing data accuracy and presentation. In essence, expanding columns is essential for harnessing your data's full potential, reducing errors, and maintaining data integrity. So, don't overlook the significance of expanding columns when working with Excel datasets.
4 Easy Method to Expand All Columns in Excel
When engaging with data in Excel, it's paramount to prioritize the interpretation of results, such as forecasting next month's sales or identifying underlying trends. Rather than worrying about how to expand all columns in Excel! Excel offers four different solutions for this issue, and we will go through each method in detail to understand and execute them.
Method 1: Using Mouse
The first method for resizing columns in Excel involves using the mouse, allowing users to easily adjust column widths. Here's a step-by-step guide:
Step 1: Position your cursor over the column header section and select the columns you want to resize. As you make the selection, the cursor icon will change into a downward arrow.

Step 2: Once the desired columns are selected, move your cursor to the boundary of the selected column. You will notice the cursor changing into a crosshair symbol. Now, click and drag the boundary to expand or shrink the columns.

Step 3: This action will uniformly resize all the selected columns.

This method is straightforward to follow. However, it's essential to ensure that the cursor icon transforms into a downward arrow while selecting columns. If not, be cautious, as you might inadvertently move the column instead of resizing it.
Method 2: Using Right-Click Menu
Next, we have the Right-Click method in Excel to expand all columns, providing users with a more precise approach to format cells and manually adjust cell sizes. Here's a step-by-step guide along with a user experience:
Step 1: Begin by selecting the columns you want to expand. To do this, click and drag your mouse cursor over the column headers to highlight them.
Step 2: Once the columns are selected, right-click anywhere within the selected area to open the context menu.
Step 3: In the context menu that appears, look for and click on "Column Width". This will open a dialog box that allows you to specify the desired width for the selected columns.

Step 4: In the Column Width dialog box, enter your preferred column width in the provided field. After you have entered it, click "OK" to apply the changes.

The Right-Click method offers precise control over column widths. By following these steps, users can effortlessly tailor the columns to their exact specifications, ensuring that the data presentation meets their needs with accuracy and ease.
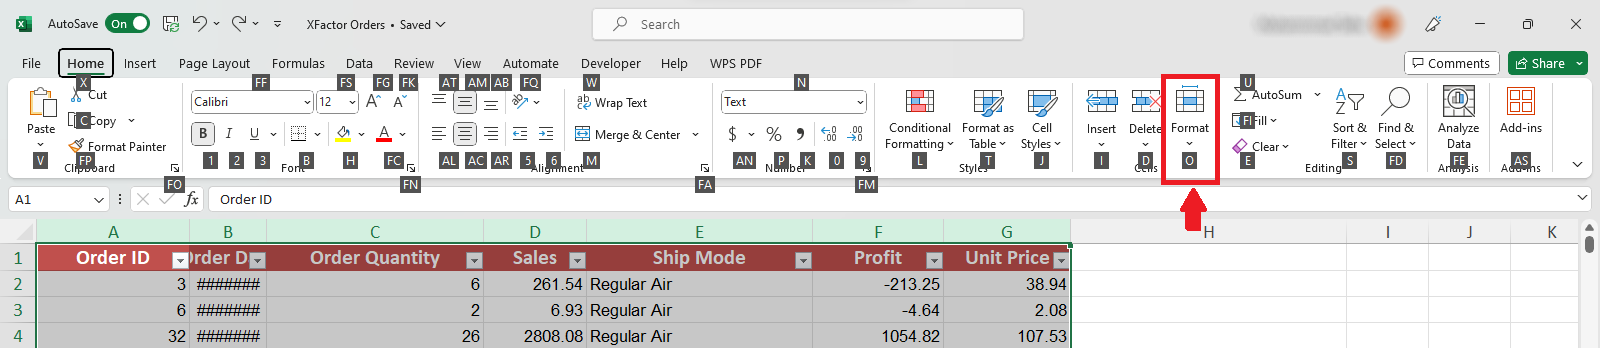
Method 3: Using the Format Option
Another method to expand all columns in Excel is using the Ribbon, providing users with a different approach to adjust column widths. Here's a step-by-step guide along with a user experience:
Step 1: Begin by selecting the columns you want to resize. To do this, click and drag your mouse cursor over the column headers to highlight them.
Step 2: Move to the "Home" tab in Excel's Ribbon, located at the top of the application window. Within this tab, locate and click on "Format" to access the formatting drop-down menu.
Step 3: Once you click on "Format", a menu will expand. In this menu, find and select "Column Width".

Step 4: A dialog box will appear, allowing you to set the column width manually. Enter your desired width and then press "OK" to confirm the changes.
This method provides a structured and accessible way to adjust column widths. Navigating the Ribbon and finding the "Format" option is relatively straightforward. However, users may sometimes face challenges in how to resize columns in Excel, as it requires manual input. It's important to double-check the entered value to ensure the columns are resized as intended.
Method 4: Using the Shortcut Keys
For users who prefer shortcuts, Excel provides a convenient way to expand all cells using key combinations. Here's a step-by-step guide with a user experience:
Step 1: To begin, select the cell or cells that you need to resize. Now, press the "ALT" key on your keyboard. This keypress allows you to access the Ribbon using keyboard shortcuts.
Step 2: Next, hit the "H" key to access the options within the Home Ribbon.

Step 3: In the Home tab, navigate to the Format option. To do this, press the "O" key on your keyboard.
Step 4: Within the Format dropdown menu, you'll want to select the "Column Width" option. To do this, press the "W" key.

Step 5: After pressing "W", a dialog box will appear. Here, you can enter the desired column width manually. Once you've set the width, press "OK" to confirm the changes.
To resize the column width: Press ALT + H + O + W.
To resize the row height: Press ALT + H + O + H.
Using keyboard shortcuts can be a time-saving and efficient method for experienced Excel users. However, it might be challenging for beginners or those unfamiliar with the shortcuts. One key point to note is that if you press the wrong key at any stage, you'll need to start the process from the beginning, which can be a bit frustrating. Nevertheless, with practice, this method can become second nature and significantly speed up the column resizing process in Excel.
Best Free Office Suite: WPS Office
WPS Office is a remarkable alternative to the Microsoft Office juggernaut, offering a robust package of productivity tools that covers everything from word processing to Excel and presentations. It also introduced advanced features and incorporation powerful PDF capabilities all for free.

The user-friendly interface is so engaging that it transforms work into something more than just a task. It's almost fun, defying the conventional perception of office software. What's truly intriguing, however, is their recent foray into AI integration within the suite. It's all about simplifying tasks, and that's a game-changer in the world of productivity software.
Pros:
AI integration streamlines tasks.
A vast template store enhances creativity.
User-friendly, intuitive interface.
Excellent cross-platform compatibility.
Efficient PDF tools included.
Collaboration features for teamwork.
How to free download the WPS Office?
To download WPS Office follow the steps below:
Step 1: Navigate to the official website of WPS Office,
Step 2: Select the "Free Download" option.

Step 3: To install WPS Office, simply double-click the downloaded file and then proceed as directed in the instructions.

Step 4: Begin using WPS Office by selecting "Get Started with WPS."


FAQs
Q1. Can I expand all columns simultaneously across multiple sheets?
Certainly, you can achieve this by selecting all sheets in your Excel workbook (Ctrl + click on each sheet tab) and then double-clicking the separator line of any column header. This action will expand columns across all the selected sheets.
Q2. Will expanding all columns affect the formatting of my spreadsheet?
Expanding columns using the double-click method primarily adjusts column width to accommodate content, preserving the overall formatting of your spreadsheet. However, if your sheet contains merged cells or specific formatting, it's advisable to review the layout post-expansion to ensure it remains consistent with your intentions.
Q3. Does expanding columns impact printing or sharing my Excel file?
Expanding columns for content fitting generally enhances both on-screen readability and print quality. Nevertheless, it's important to exercise caution with extremely wide columns, as they might cause printing problems. It's a good practice to check the print preview before finalizing printing. When sharing the file electronically, rest assured that the adjusted column widths will be preserved for recipients.
Mastering Excel Column Expansion
In this article, you've discovered how to expand all columns in Excel for a more visually appealing data presentation — practical Excel formatting tips that apply to most spreadsheet tools. WPS Office, among the options available, offers a simplified spreadsheet tool compatible with various file formats and introduces integrated AI, a feature not commonly found in others. Try out these column expansion methods on WPS Office and boost your data presentation today!

'%3e%3cpath%20d='M19.9911%204.11386V6.471H18.5894C18.0775%206.471%2017.7322%206.57814%2017.5536%206.79243C17.3751%207.00671%2017.2858%207.32814%2017.2858%207.75671V9.44421H19.9019L19.5536%2012.0871H17.2858V18.8639H14.5536V12.0871H12.2769V9.44421H14.5536V7.49779C14.5536%206.39064%2014.8632%205.53201%2015.4822%204.92189C16.1013%204.31177%2016.9257%204.00671%2017.9554%204.00671C18.8304%204.00671%2019.509%204.04243%2019.9911%204.11386Z'%20fill='%23333333'/%3e%3c/g%3e%3cdefs%3e%3cclipPath%20id='clip0_2938_8199'%3e%3crect%20width='16'%20height='16'%20fill='white'%20transform='translate(8%204.00671)'/%3e%3c/clipPath%3e%3c/defs%3e%3c/svg%3e)
'%3e%3cpath%20d='M17.5237%2010.7813L23.4811%204H22.0699L16.8949%209.88693L12.7648%204H8L14.2469%2012.9029L8%2020.0133H9.4112L14.8725%2013.7952L19.2352%2020.0133H24M9.92053%205.04213H12.0885L22.0688%2019.0224H19.9003'%20fill='%23333333'/%3e%3c/g%3e%3cdefs%3e%3cclipPath%20id='clip0_2938_8200'%3e%3crect%20width='16'%20height='16.0134'%20fill='white'%20transform='translate(8%204)'/%3e%3c/clipPath%3e%3c/defs%3e%3c/svg%3e)


