
'%3e%3cpath%20d='M8%200C12.4183%200%2016%203.58172%2016%208C16%2012.4183%2012.4183%2016%208%2016C3.58172%2016%200%2012.4183%200%208C0%203.58172%203.58172%200%208%200ZM11.6162%204.38379C11.2257%203.99337%2010.5927%203.99338%2010.2021%204.38379L8%206.58594L5.79785%204.38379C5.40732%203.99334%204.77429%203.99329%204.38379%204.38379C3.99331%204.77429%203.99335%205.40733%204.38379%205.79785L6.58594%208L4.38379%2010.2021C3.99348%2010.5927%203.99341%2011.2257%204.38379%2011.6162C4.77426%2012.0066%205.40734%2012.0065%205.79785%2011.6162L8%209.41406L10.2021%2011.6162C10.5927%2012.0066%2011.2257%2012.0067%2011.6162%2011.6162C12.0067%2011.2257%2012.0066%2010.5927%2011.6162%2010.2021L9.41406%208L11.6162%205.79785C12.0066%205.40735%2012.0066%204.77429%2011.6162%204.38379Z'%20fill='%23080E17'%20fill-opacity='0.46'/%3e%3c/g%3e%3cdefs%3e%3cclipPath%20id='clip0_3761_713'%3e%3crect%20width='16'%20height='16'%20fill='white'/%3e%3c/clipPath%3e%3c/defs%3e%3c/svg%3e)


'%3e%3cpath%20fill-rule='evenodd'%20clip-rule='evenodd'%20d='M21.4999%2010.9993C21.4999%205.20009%2016.7986%200.498901%2010.9993%200.498901C5.19994%200.498901%200.498657%205.20009%200.498657%2010.9993C0.498657%2016.2404%204.33858%2020.5844%209.35855%2021.3722V14.0346H6.69238V10.9993H9.35855V8.68594C9.35855%206.05427%2010.9262%204.60062%2013.3248%204.60062C14.4736%204.60062%2015.6753%204.80571%2015.6753%204.80571V7.38979H14.3512C13.0468%207.38979%2012.64%208.19921%2012.64%209.0296V10.9993H15.5523L15.0867%2014.0346H12.64V21.3722C17.66%2020.5844%2021.4999%2016.2404%2021.4999%2010.9993Z'%20fill='%231568EA'/%3e%3c/g%3e%3c/svg%3e)


Welcome to the fascinating world of spreadsheets, where knowing how to move columns over in Excel is definitely an advantage.
In this article, we will show you how the magic of organization helps you to manage information effortlessly.
Don't fret, for we hold the solution to your burning question: How to move columns in Excel? You are going to master your spreadsheets.
Method 1: Move Columns with Drag and Drop
Drag and drop is the easiest way to move columns in Excel. Here's a simple step-by-step guide on how to move columns in Excel with a keyboard:
1. Locate the column you wish to move in your spreadsheet and Click on the column letter at the top to select the entire column.

2. Move your mouse cursor to the border of the selected column. You will notice that the cursor transforms into a four-arrow icon. Press and hold the Shift key on your keyboard while the cursor is a four-arrow icon.

3. With the Shift key held down, click and drag the column to its new desired location within the spreadsheet.
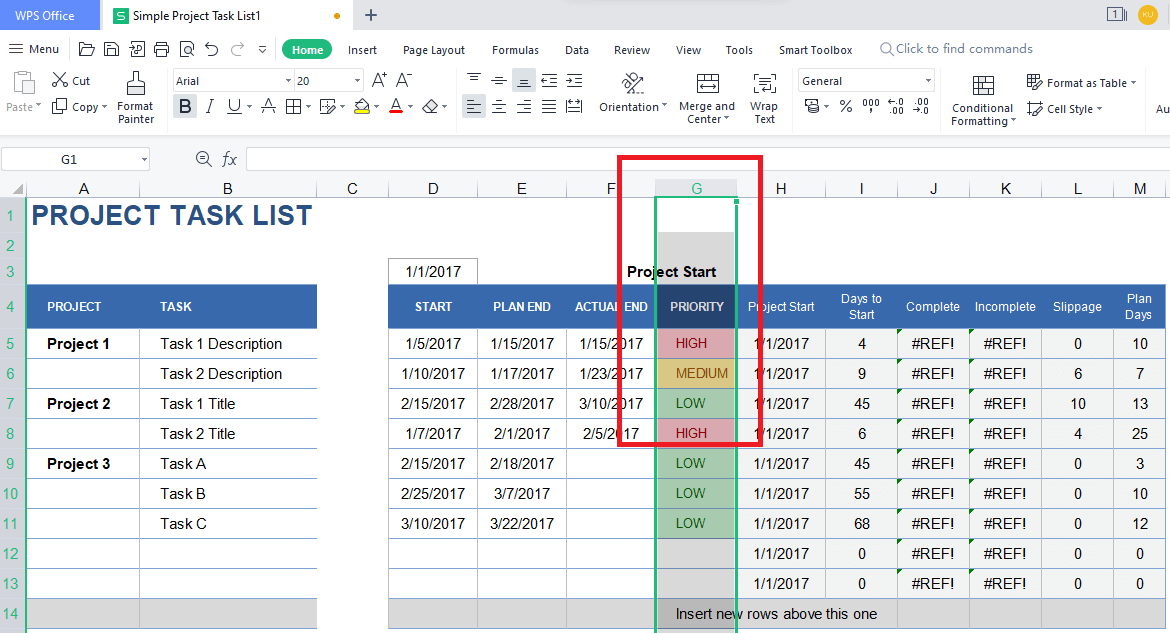
4. Once you drop the column, Excel will place it on the column where you released it. That's it! Your selected column has been successfully moved to its new location.
The following step-by-step guide shows you how to quickly move columns in Excel without replacing existing data:
Using the Shift key
5. Select the column you want to move by clicking the column header. Hover your mouse over the border of the selected column. You will see a four-sided arrow cursor.
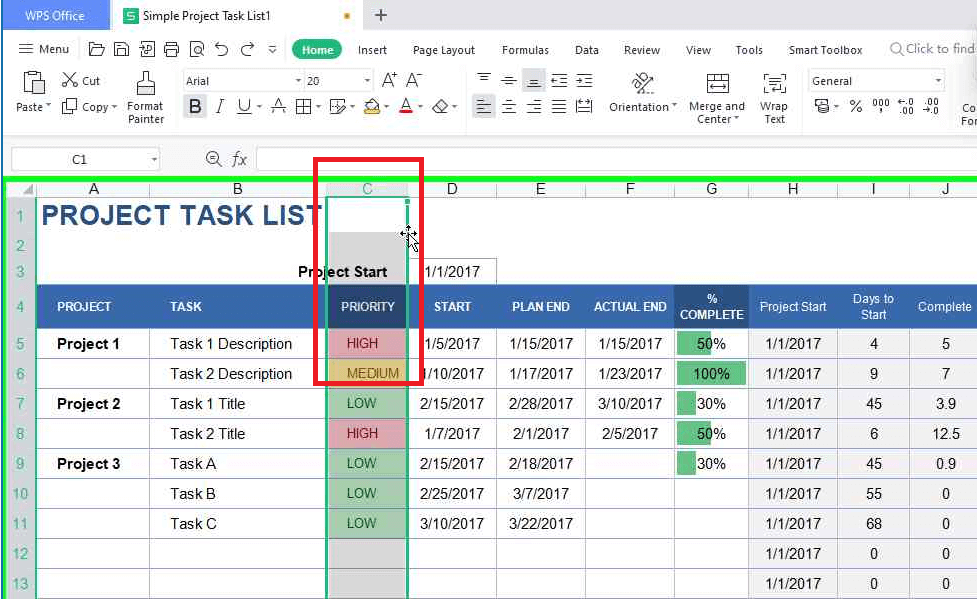
6. Press and hold the Shift key on your keyboard. While holding the Shift key, click and hold the left mouse button. Move the column to the desired new position by dragging it horizontally.
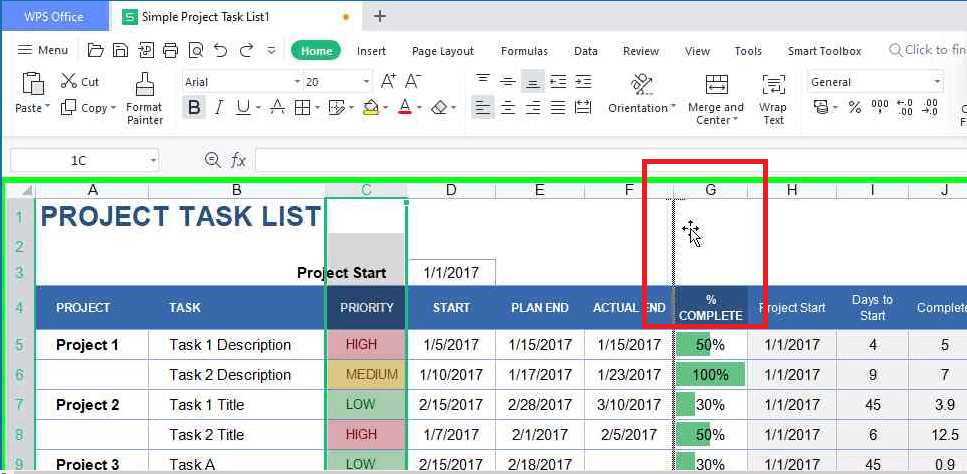
7. Release the left mouse button to drop the column in its new position. Finally, release the Shift key on your keyboard.

Holding the Shift and drag columns will change the order of the columns
Method 2: Move Columns with Copy, Cut and Paste
Another way to move a column in Excel Mac or Windows is by copying, cutting, and pasting the column.
1. Select the column you want to move in your spreadsheet and Right-click on the letter at the top of this column.

2. From the context menu that appears, select "Cut". The column will be highlighted with an animated dotted line to indicate that it has been successfully cut.

3. Find the column where you want to place the selected column. The cut column will be inserted in this column. Right-click on the letter of this new column.
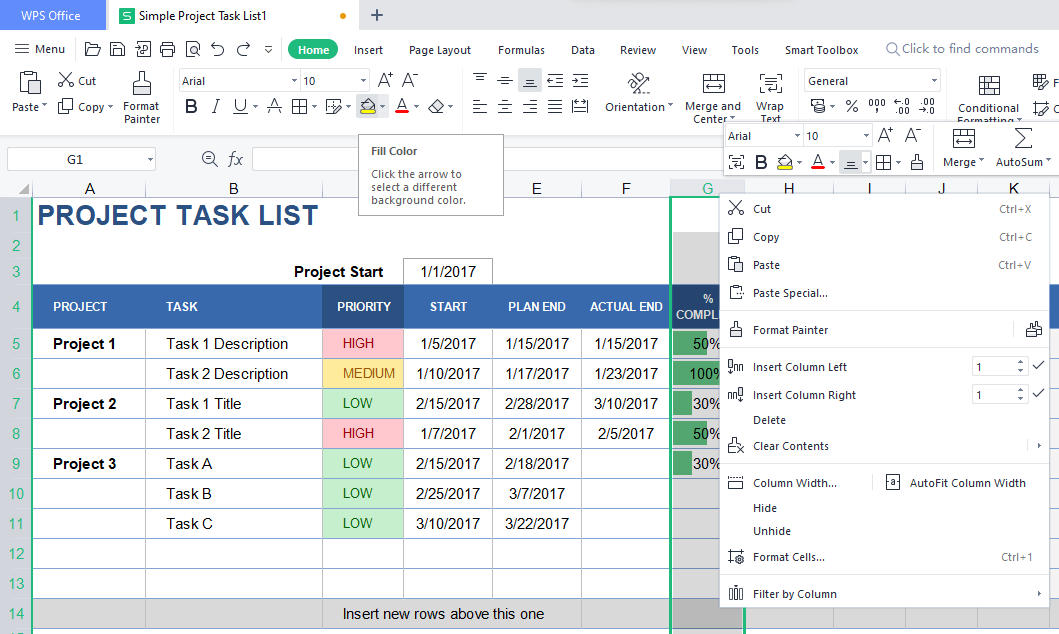
4. From the context menu, select "Paste". The original column you cut will now appear to the left of the selected column.

Congratulations! you have successfully moved the columns in your Excel online spreadsheet using this method.
Method 3: Move Columns With Sort Feature
See the following step-by-step guide on how to move columns using the Data Sort method in Excel. This method is handy for moving multiple columns simultaneously.
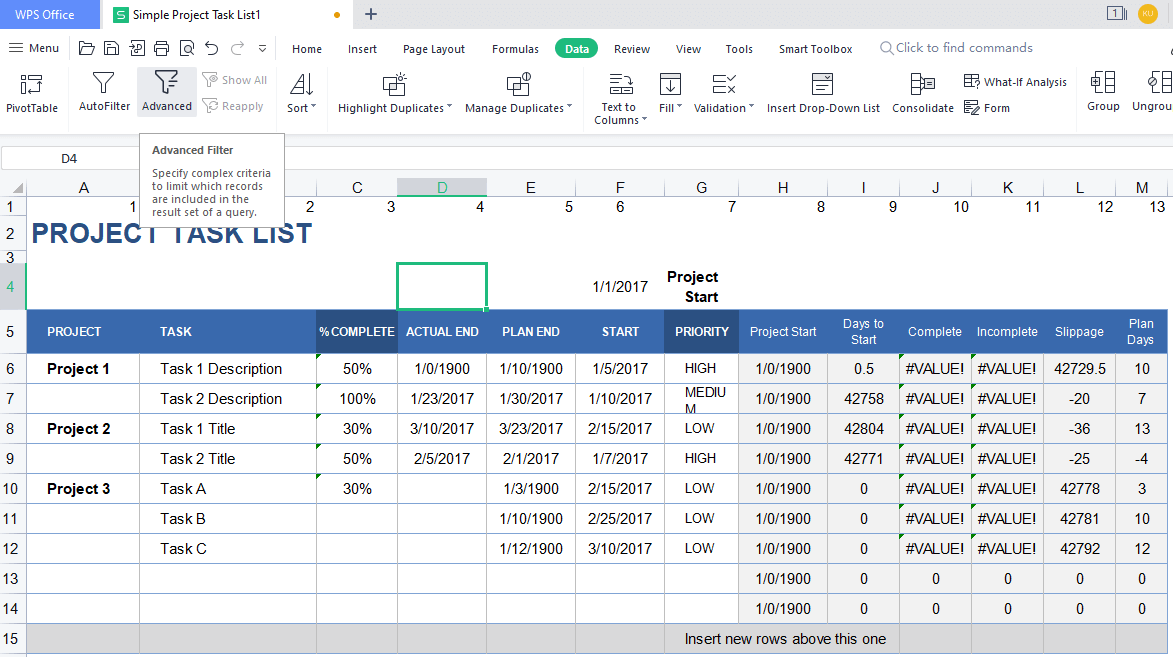
1. To begin, open your spreadsheet and locate the column you want to move. Right-click on any cell in the first row of your spreadsheet and select "Insert" from the context menu. This will add a new row at the top.
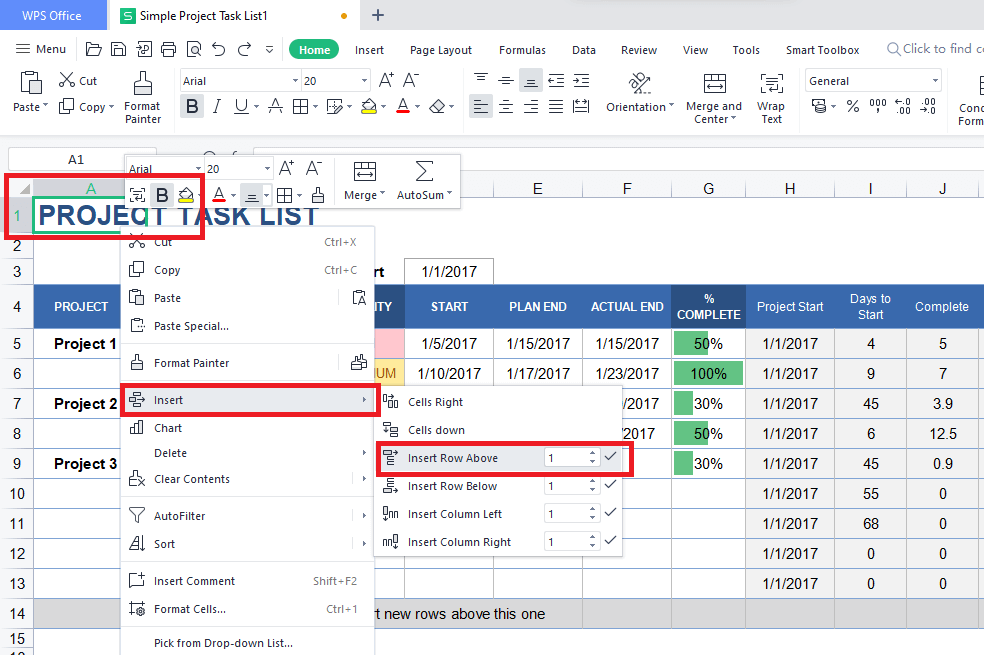
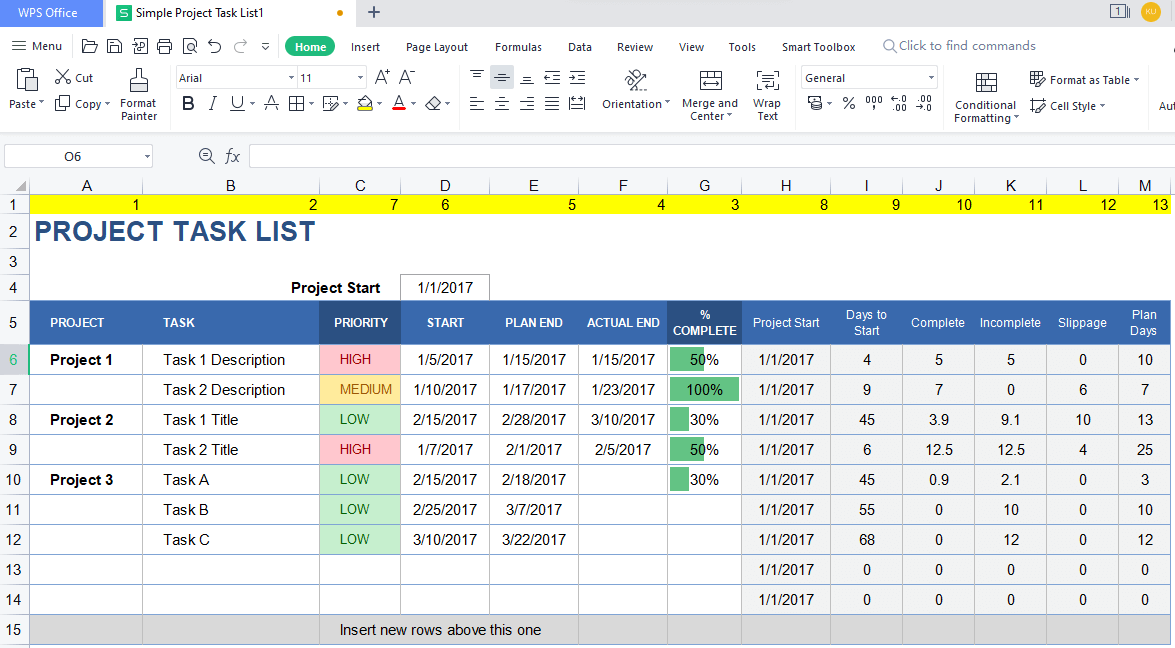
2. In the newly inserted row, enter the sorting order for your columns above each respective column. For example, if you want the first column to be the fourth column in the new order, type "4" in the cell above it.
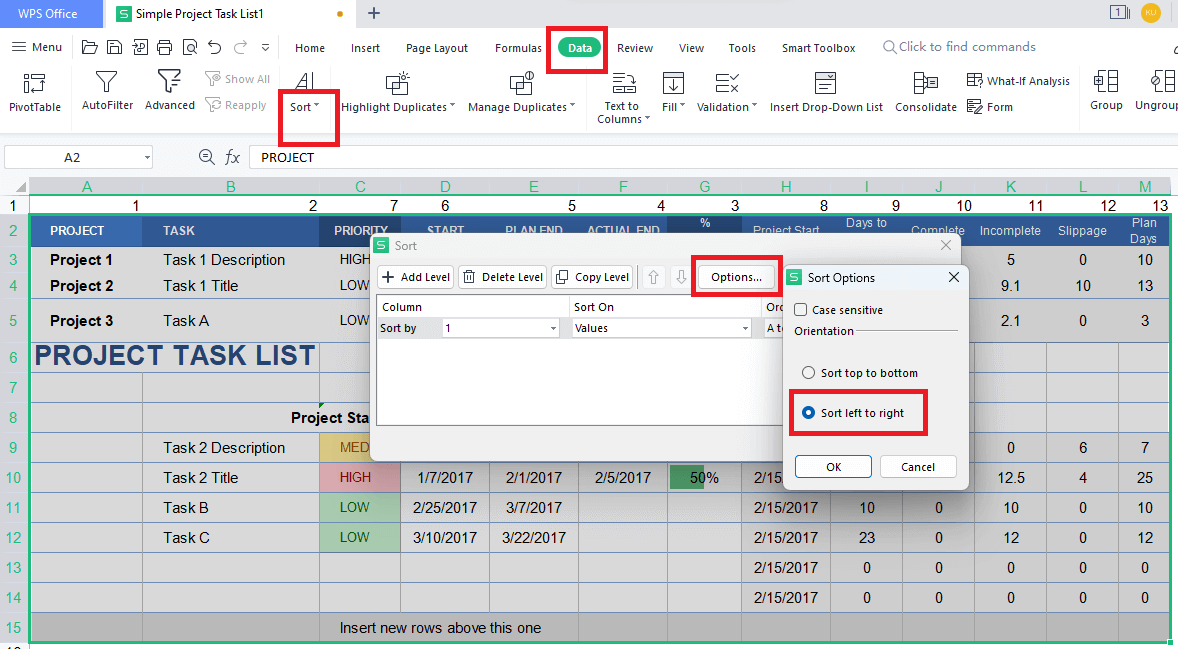
3. Select the entire data table, including the newly added row. Go to the "Data" menu and click on "Sort" in the "Sort & Filter" section. The Sort window will appear. In the Sort window, click on "Options".
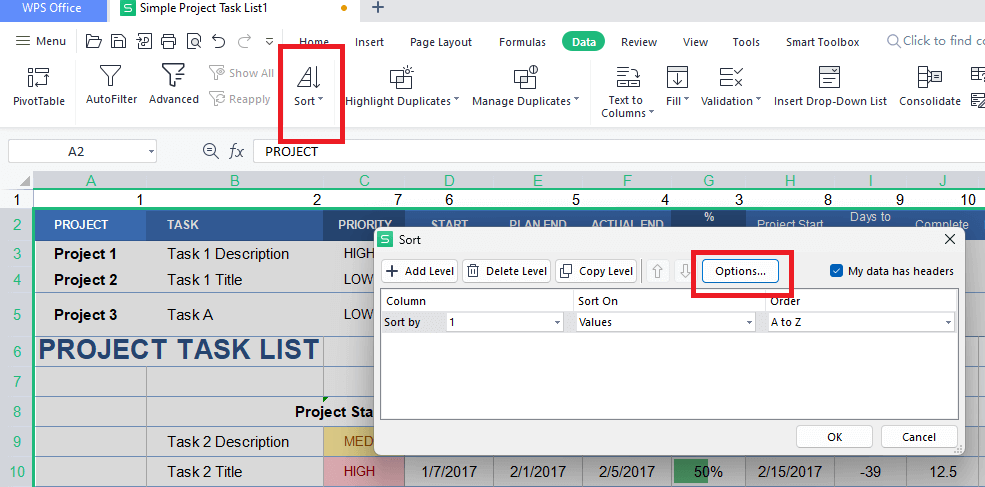
4. Under "Orientation", check the "Sort left to right" box. Click "OK" to return to the Sort window.
5. In the Sort window, select "Row 1" from the "Sort by" dropdown menu. This will sort your table based on the values in the first row where you added the sorting order numbers. Ensure that "Cell Values" is selected under "Sort on". This option will sort the columns based on the values in the first row.
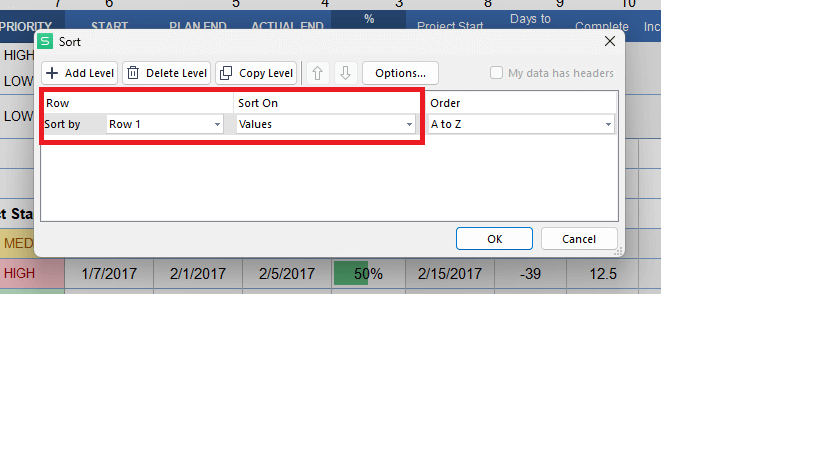
6. Choose "Smallest to Largest" for the "Order". This ensures that the column numbered "1" will be positioned first, with the other columns following in sequence.
Once configuring all the settings, click "OK" to apply the sorting.
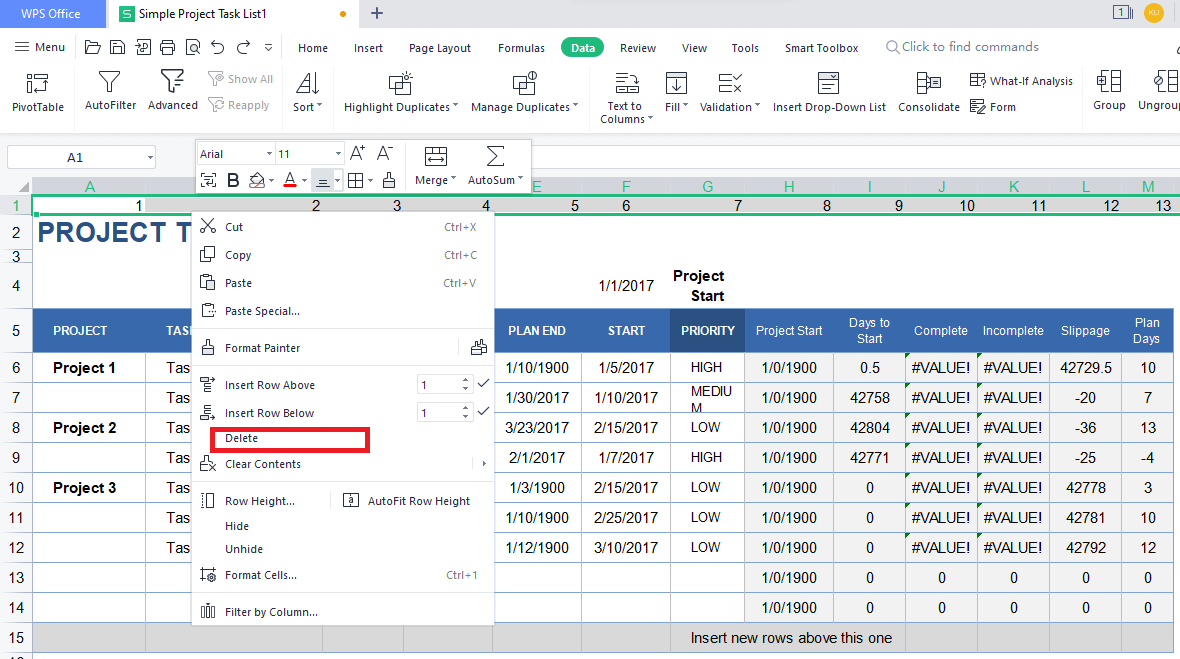
7. Your columns have been moved to their desired positions based on the specified sorting order. However, there is an extra step to remove the first row. Right-click on any cell in the first row of your spreadsheet.From the context menu, select "Delete".
Congratulations! Your data table is sorted in the desired order, with the columns moved accordingly.
Method 4: Move Columns with Sort Formula
The Sort function is helpful if you want to move data in a large spreadsheet with many columns. However, it is more complex than other methods we discussed before. Here's a step-by-step guide on how to rearrange columns in Excel using the SORT function:
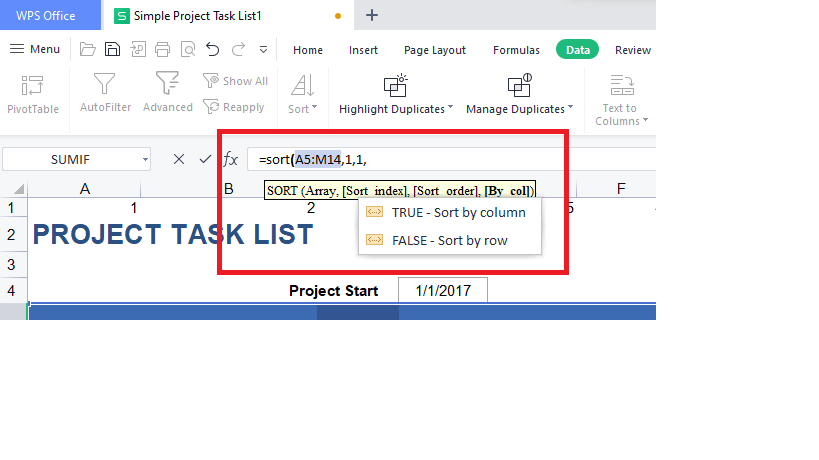
SORT(array, sort_index, sort_order, by_column)
1. Open your spreadsheet and identify the data table where you want to rearrange the columns. Add a row at the top as we did in the previous sample, and enter the column order numbers as per your requirement.
Click the cell where you want the new table, and enter the SORT function using the following syntax: =SORT(array, sort_index, sort_order, by_column)
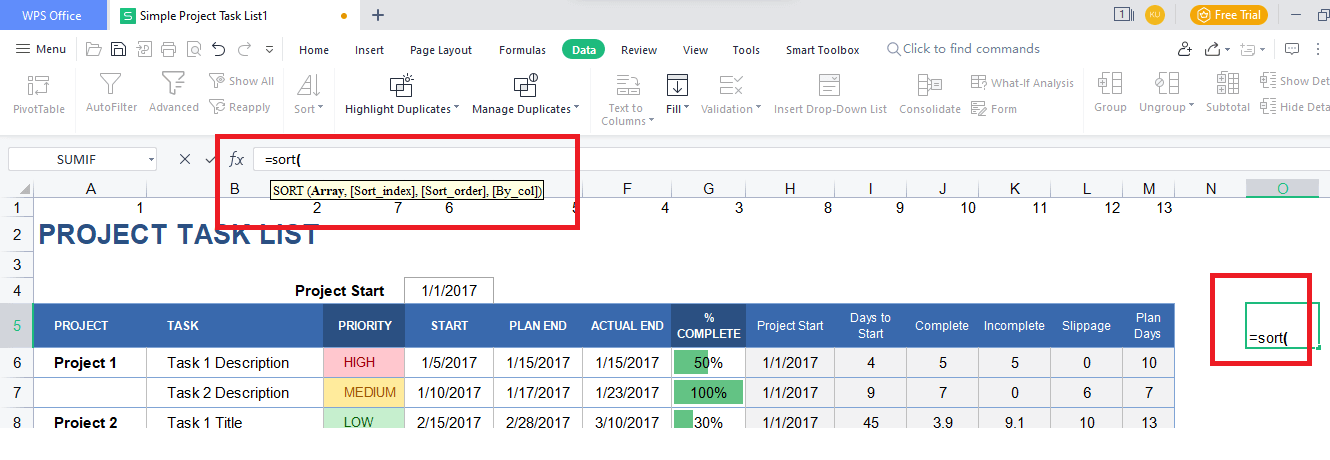
2. Replace "array" with the cell range that contains your data table. For example, if your table is in cells A5:M14, replace "array" with A5:M14.
Set "sort_index" to 1. This indicates that the first row in the table will be used as the sorting index. This is the row where you previously inserted the column order numbers.
Set "sort_order" to 1 for ascending order. This means the column marked as "1" will appear before the column labelled as "2," and so on.

3. Set "by_column" to true, as you want to sort the columns rather than the rows.
4. Press Enter to apply the SORT function. Now you have a rearranged copy of your columns in the desired order.
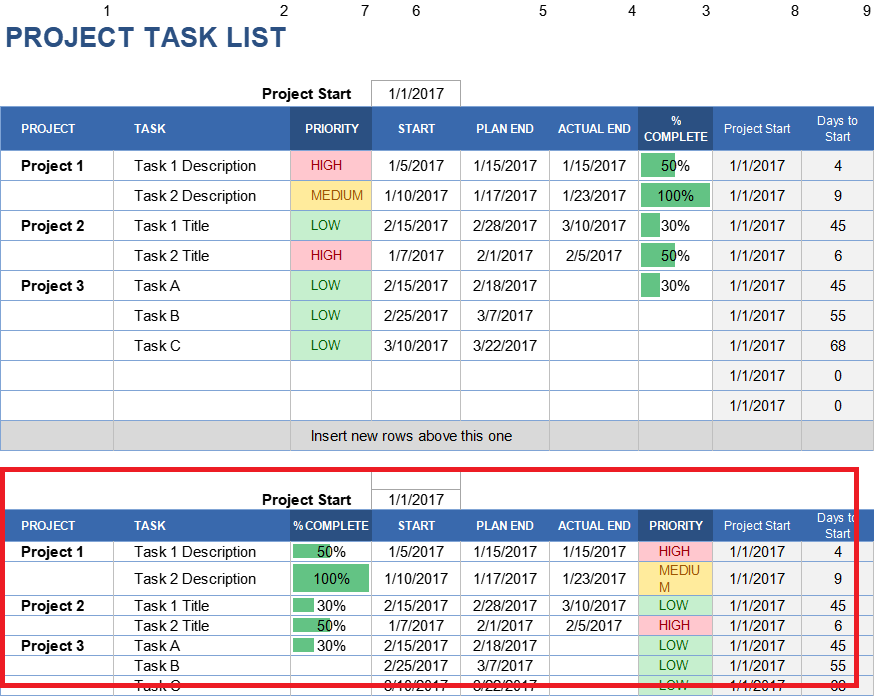
5. Note that the original table remains intact. You can delete the old table if you are satisfied with the new arrangement.
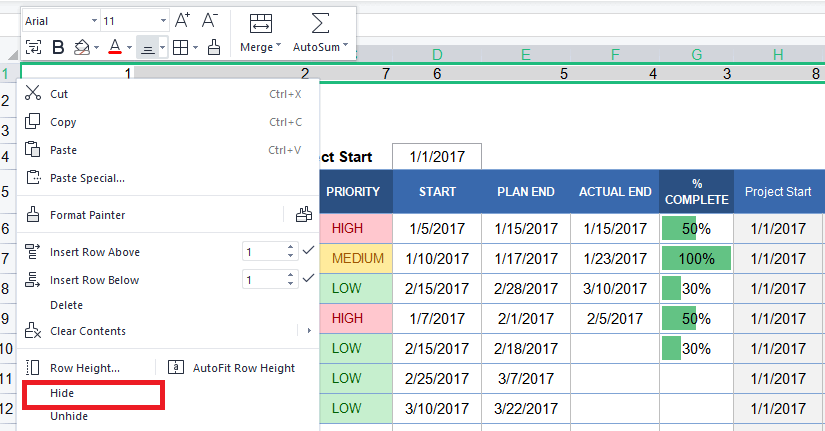
6. Right-click the row number to hide the unwanted top row created with the column orders. From the context menu, select "Hide Rows". This will hide the row containing the column orders.
Congratulations! You have successfully rearranged your columns using the SORT function in Excel. Remember to be cautious when deleting the old table, as it will permanently lose the original arrangement.
Free Office Suite - WPS Office

WPS Office is an excellent free office software that can be a great alternative to Office 365. It offers a range of features and compatibility with Microsoft Office applications, making it a top choice for many users. Whether you need to create Word documents, excel spreadsheets, or presentations, WPS Office has you covered.
One notable feature of WPS Office is its robust PDF reader, which allows you to view and edit PDF files. While the basic version is free, a paid version is available that offers additional PDF editing capabilities.
Main features
Seamless compatibility with Microsoft Office.
WPS Office is available across multiple platforms, including Microsoft Windows, Linux, iOS, macOS, and Android.
The software offers a user-friendly interface with hundreds of commonly used formulas and functions.
It allows you to create Word, excel and presentation files.


Price
The standard version of WPS Office is free of charge
WPS Office has received high ratings, with a fantastic 4.8-star rating on Trustpilot, indicating the satisfaction of many users.
Pros
Compatibility with Microsoft Office
It is a Free software
Supported over multiple platforms
System requirements
WPS Office is compatible with Microsoft Windows 7/8/10. It requires a dual-core processor or greater, a minimum of 2GB RAM, and at least 4GB of disk space.
Overall, WPS Office is a competent and feature-rich free office software that provides
an excellent alternative to Microsoft Office.
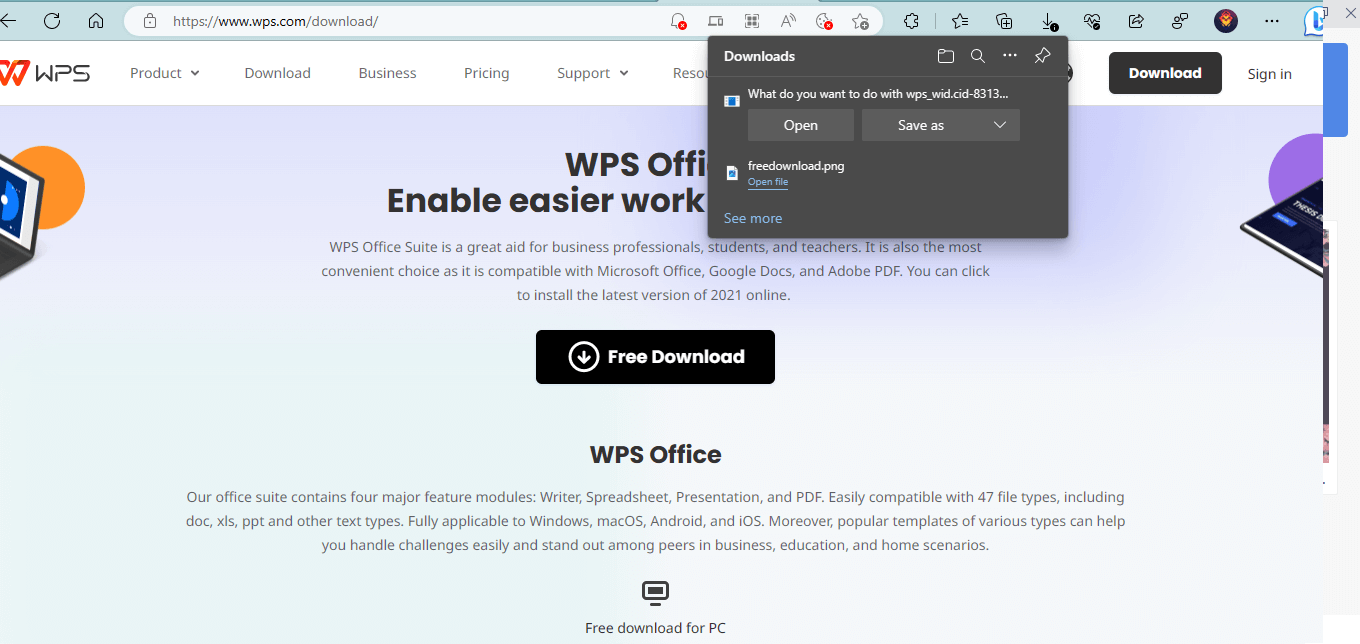
You can follow the steps below to download WPS Office.
1. Goto Free Download WPS Office for PC/ Windows/ Mac | Download Latest Version

Press the Free Download button. Once the download is complete open the .exe file from the download list. The WPS office wizard dialogue will appear and guide you through the setup.
FAQs
Q1: Some columns suddenly disappeared from Excel. How to Retrieve?
If some columns have suddenly disappeared from your Excel spreadsheet, they may have been hidden. Follow these steps to retrieve the hidden columns:
1. Select the entire range of cells surrounding the hidden columns' area.
2. Right-click on any of the selected column headers. A context menu will appear. Hover over the "Column" option. Click on "Unhide". This will reveal any hidden columns within the selected range.
Q2: How to Move Rows in Excel
Drag and drop is the easiest way to move rows in Excel.
Locate the Row you wish to move in your spreadsheet and Click on the Row number at the left to select the entire column.
Move your mouse cursor to the border of the selected Row. You will notice that the cursor transforms into a four-arrow icon. Press and hold the Shift key on your keyboard while the cursor is a four-arrow icon.
With the Shift key held down, click and drag the column to its new desired location within the spreadsheet.
Q3: Can I Copy cell values, cell formats, or formulas only
When you move or duplicate rows and columns in Excel, it automatically moves or replicates all the data within them.
This includes formulas and their calculated values, comments, cell formats, and hidden cells.
If you copy cells that contain a formula, the relative cell references are not adjusted automatically.
As a result, the contents of those cells and any cells that refer to them may display an error value such as #REF! You can manually adjust the references to resolve the issue if this occurs.
Summary
To get the most out of Excel's features, it's essential to learn basic Excel skills for beginners, which will help streamline tasks like navigating different views, formatting, and data organization. Learning how to move columns in Excel table can be a game-changer if you work with a lot of data. You can rearrange your columns effortlessly, saving precious time with simple steps.
But why stop at just Excel? If you want a more user-friendly experience, try WPS Office. Not only does it offer the same powerful column-moving capabilities, but it also presents a refreshing interface.
So, what are you waiting for? Dive into the world of WPS Office and Unleash your true potential.

'%3e%3cpath%20d='M19.9911%204.11386V6.471H18.5894C18.0775%206.471%2017.7322%206.57814%2017.5536%206.79243C17.3751%207.00671%2017.2858%207.32814%2017.2858%207.75671V9.44421H19.9019L19.5536%2012.0871H17.2858V18.8639H14.5536V12.0871H12.2769V9.44421H14.5536V7.49779C14.5536%206.39064%2014.8632%205.53201%2015.4822%204.92189C16.1013%204.31177%2016.9257%204.00671%2017.9554%204.00671C18.8304%204.00671%2019.509%204.04243%2019.9911%204.11386Z'%20fill='%23333333'/%3e%3c/g%3e%3cdefs%3e%3cclipPath%20id='clip0_2938_8199'%3e%3crect%20width='16'%20height='16'%20fill='white'%20transform='translate(8%204.00671)'/%3e%3c/clipPath%3e%3c/defs%3e%3c/svg%3e)
'%3e%3cpath%20d='M17.5237%2010.7813L23.4811%204H22.0699L16.8949%209.88693L12.7648%204H8L14.2469%2012.9029L8%2020.0133H9.4112L14.8725%2013.7952L19.2352%2020.0133H24M9.92053%205.04213H12.0885L22.0688%2019.0224H19.9003'%20fill='%23333333'/%3e%3c/g%3e%3cdefs%3e%3cclipPath%20id='clip0_2938_8200'%3e%3crect%20width='16'%20height='16.0134'%20fill='white'%20transform='translate(8%204)'/%3e%3c/clipPath%3e%3c/defs%3e%3c/svg%3e)


