
'%3e%3cpath%20d='M8%200C12.4183%200%2016%203.58172%2016%208C16%2012.4183%2012.4183%2016%208%2016C3.58172%2016%200%2012.4183%200%208C0%203.58172%203.58172%200%208%200ZM11.6162%204.38379C11.2257%203.99337%2010.5927%203.99338%2010.2021%204.38379L8%206.58594L5.79785%204.38379C5.40732%203.99334%204.77429%203.99329%204.38379%204.38379C3.99331%204.77429%203.99335%205.40733%204.38379%205.79785L6.58594%208L4.38379%2010.2021C3.99348%2010.5927%203.99341%2011.2257%204.38379%2011.6162C4.77426%2012.0066%205.40734%2012.0065%205.79785%2011.6162L8%209.41406L10.2021%2011.6162C10.5927%2012.0066%2011.2257%2012.0067%2011.6162%2011.6162C12.0067%2011.2257%2012.0066%2010.5927%2011.6162%2010.2021L9.41406%208L11.6162%205.79785C12.0066%205.40735%2012.0066%204.77429%2011.6162%204.38379Z'%20fill='%23080E17'%20fill-opacity='0.46'/%3e%3c/g%3e%3cdefs%3e%3cclipPath%20id='clip0_3761_713'%3e%3crect%20width='16'%20height='16'%20fill='white'/%3e%3c/clipPath%3e%3c/defs%3e%3c/svg%3e)


'%3e%3cpath%20fill-rule='evenodd'%20clip-rule='evenodd'%20d='M21.4999%2010.9993C21.4999%205.20009%2016.7986%200.498901%2010.9993%200.498901C5.19994%200.498901%200.498657%205.20009%200.498657%2010.9993C0.498657%2016.2404%204.33858%2020.5844%209.35855%2021.3722V14.0346H6.69238V10.9993H9.35855V8.68594C9.35855%206.05427%2010.9262%204.60062%2013.3248%204.60062C14.4736%204.60062%2015.6753%204.80571%2015.6753%204.80571V7.38979H14.3512C13.0468%207.38979%2012.64%208.19921%2012.64%209.0296V10.9993H15.5523L15.0867%2014.0346H12.64V21.3722C17.66%2020.5844%2021.4999%2016.2404%2021.4999%2010.9993Z'%20fill='%231568EA'/%3e%3c/g%3e%3c/svg%3e)


PowerPoint has solidified its reputation as a paramount tool for presentations in today's digital arena. With a growing community of Mac users, it becomes indispensable to possess a guide tailored to them. They need to know how to make a PowerPoint on Mac efficiently, creating captivating slides that captivate the audience.
A challenge arises when individuals are unaware of the process, especially given the unique interface of a Mac. So, the burning question is, how to make PowerPoint on Mac? Carefully read this article, where we will illuminate the pathway, ensuring you master how to easily make PowerPoint on Mac.
Plus, find out how to get PowerPoint on Mac for free and the nuances of crafting a ppt on a MacBook. Your journey to mastering how to make PowerPoint on MacBook starts now. Creating visually appealing presentations on your MacBook will be an easy thing by the end of this guide. Stay tuned!
Part 1: How to Make PowerPoint on Mac
Crafting a compelling presentation can effectively communicate your ideas. For Mac users, this might seem like a challenge, but fear not! Here is how to make PowerPoint on Mac with ease, both through Microsoft PowerPoint and Keynote.
Using Microsoft PowerPoint
For those accustomed to the Windows ecosystem, Microsoft PowerPoint remains a favorite. Let's guide you on how to make PowerPoint on Mac using this tool.
Step 1: Begin by downloading Microsoft PowerPoint. Visit the Microsoft website or the Mac App Store. For those wondering how to get PowerPoint on Mac for free, there is a trial version available, though it does come with limitations.

Step 2: Once installed, open PowerPoint. On the welcome screen, you will be presented with various templates. Choose one that fits your theme or select a blank presentation.
Step 3: A new slide will appear. Start by clicking on the text boxes to add a title and description. You can add more slides by navigating to “Slide” on the toolbar, then “New Slide.”
Step 4: Customize your presentation. Use the toolbar to insert images, videos, charts, and more. Remember to save your work periodically.
Step 5: Preview your presentation. Click on the “Slide Show” option in the toolbar. This allows you to view your presentation as it would appear during an actual presentation.
Remember, the key is practice. As you become familiar with the interface, you will find how to easily make PowerPoint on Mac a breeze.

Using Keynote
For those who desire a tool integrated into the Mac ecosystem, Apple’s Keynote is the go-to. Creating a presentation here is equally straightforward.
Step 1: Open Keynote, which comes pre-installed on most Macs. If you do not have it, download it from the App Store.
Step 2: Upon launch, you will be greeted with various design templates. Choose one or start from scratch.
Step 3: Much like PowerPoint, you can add text, images, and other elements to your slides using the toolbar. The “+” button on the toolbar lets you add more slides.
Step 4: Use transitions between your slides for a more dynamic presentation. Navigate to the "Animate" panel on the right and choose your desired effects.
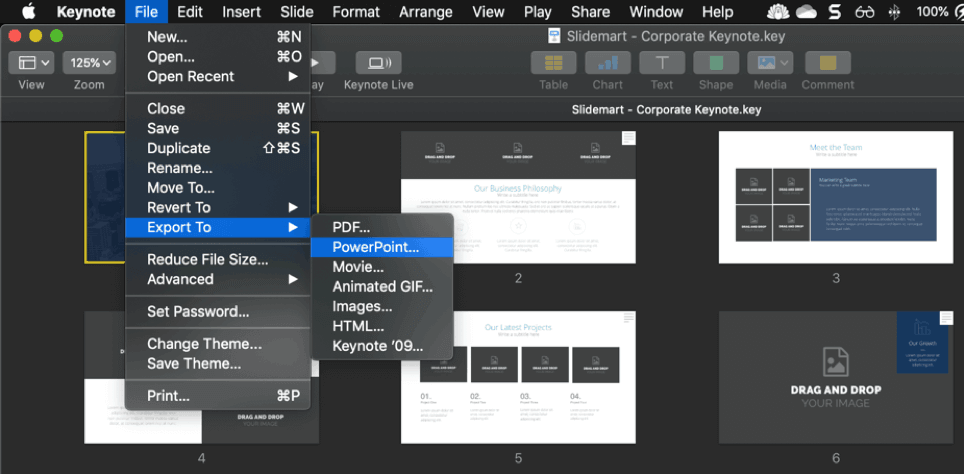
Step 5: Once satisfied, you can play your presentation by clicking on the "Play" button at the top.
For those wondering how to make ppt on MacBook beyond these tools, there are other software options available. However, PowerPoint and Keynote remain among the top choices for their robust features and user-friendly interfaces.
Regardless of your software choice, the steps to craft a captivating presentation remain largely similar. Practice, familiarize yourself with the tools, and soon, creating presentations will become second nature. Happy presenting!


Part 2: Free Alternative Choice — WPS Office
In the world of digital presentations, Microsoft's PowerPoint often grabs the spotlight. But for Mac users seeking an alternative, there is good news. WPS Office stands as a shining source, a modernized powerful office tool suite that not only matches the capabilities of mainstream applications but is also available at the tempting price of zero dollars. Yes, it is entirely free for users.
WPS Office is more than just an alternative; it is a comprehensive office solution. It encompasses a variety of tools that are integral for both students and professionals. From word processing to spreadsheets, and yes, presentations, WPS Office brings it all under one unified application.
Its interface is sleek, user-friendly, and most importantly, familiar. Those who have experience with other office applications will find the transition to WPS Office smooth and intuitive. But how does one get their hands on this free tool? Here is a guide on how to make PowerPoint on Mac using WPS Office:
How to Download WPS Office:
Step 1: Navigate to the official WPS Office website. The address is www.wps.com.
Step 2: On the homepage, you will find an option to download the software. Given that there are versions for various platforms, make sure to select the one compatible with Mac.
Step 3: Once you click the download button for Mac, the download process will initiate. Wait for the download to complete.
Step 4: Locate the downloaded file, usually in the "Downloads" folder unless you have specified another location.
Step 5: Double-click the downloaded file to begin the installation process. Follow the on-screen instructions, which are straightforward and similar to installing other Mac applications.
Step 6: Once installed, you can find WPS Office in your Applications folder. Launch it, and you are all set to begin creating presentations on your Mac.

It is crucial to note that while WPS Office is free, it does offer premium versions with additional features and no ads. However, for the average user, the free version provides a bounty of functionalities that cater to most needs.
So, if you are looking for an efficient way on how to make PowerPoint on Mac without consuming funds, WPS Office is a commendable option. It is not just an alternative but a robust competitor, offering a suite of tools that cater to a wide range of tasks. Embrace the world of free, high-quality software with WPS Office.
Advantages of Using WPS Office
WPS Office is not just another office suite; it is a powerhouse packed with features that give it an edge over many of its competitors. Here are some significant advantages of using WPS Office:
Cost-Effective: One of the standout advantages of WPS Office is its price point. The free version offers an array of features that usually come with premium-priced software, making it an economical choice for many users.
User-Friendly Interface: WPS Office boasts an intuitive interface, making it easy for both beginners and professionals to navigate and utilize its tools effectively.
Cross-Platform: Whether you use a Mac, Windows, Linux, or even Android, WPS Office has got you covered. This adaptability ensures seamless workflow across various devices.
Compatibility: WPS Office is highly compatible with other major office suites. This means you can easily open, edit, and save documents created in formats like Microsoft Word, Excel, and PowerPoint without any hitches.
Regular Updates: The team behind WPS Office is committed to improvement. Regular updates mean new features, enhanced security, and fixes for any potential bugs.
FAQs
1. Can I convert my PowerPoint presentation to PDF?
Certainly! Microsoft provides a straightforward feature allowing users to save their PowerPoint presentations as PDF files. When you have your presentation open, go to the ‘File’ menu, select ‘Save As’, and then choose the PDF option from the dropdown list. This process converts your presentation into a PDF, ensuring it looks consistent across different devices and platforms, irrespective of whether PowerPoint is installed.
2. How do I add speaker notes in PowerPoint on Mac?
Adding speaker notes in PowerPoint on a Mac is a breeze. Open your PowerPoint presentation and click on the slide you wish to add notes to. Below the slide, you will find a section labeled ‘Notes’. Click inside this box and begin typing your speaker or presenter notes. These notes are not visible to the audience during your presentation but can be immensely helpful for the presenter as cues or additional information reminders.
Summary
In our comprehensive guide on how to make PowerPoint on mac, we looked into the essence of creating presentations using Microsoft PowerPoint and Keynote. We outlined step-by-step methods to help users navigate the creation process seamlessly.
As a bonus, we introduced WPS Office, a modernized, powerful office tool application that stands out not just because it is free, but due to its rich feature set, cross-platform adaptability, and impressive compatibility with major office suites. WPS Office; it is essential to note that this software provides a free and robust alternative to mainstream office suites.
With an easy-to-navigate interface, cloud integration, and a commitment to continuous improvement, WPS Office is indeed a top choice for both individuals and businesses. Whether you are new to creating presentations or a seasoned pro, the tools and tips discussed in this guide are invaluable.

'%3e%3cpath%20d='M19.9911%204.11386V6.471H18.5894C18.0775%206.471%2017.7322%206.57814%2017.5536%206.79243C17.3751%207.00671%2017.2858%207.32814%2017.2858%207.75671V9.44421H19.9019L19.5536%2012.0871H17.2858V18.8639H14.5536V12.0871H12.2769V9.44421H14.5536V7.49779C14.5536%206.39064%2014.8632%205.53201%2015.4822%204.92189C16.1013%204.31177%2016.9257%204.00671%2017.9554%204.00671C18.8304%204.00671%2019.509%204.04243%2019.9911%204.11386Z'%20fill='%23333333'/%3e%3c/g%3e%3cdefs%3e%3cclipPath%20id='clip0_2938_8199'%3e%3crect%20width='16'%20height='16'%20fill='white'%20transform='translate(8%204.00671)'/%3e%3c/clipPath%3e%3c/defs%3e%3c/svg%3e)
'%3e%3cpath%20d='M17.5237%2010.7813L23.4811%204H22.0699L16.8949%209.88693L12.7648%204H8L14.2469%2012.9029L8%2020.0133H9.4112L14.8725%2013.7952L19.2352%2020.0133H24M9.92053%205.04213H12.0885L22.0688%2019.0224H19.9003'%20fill='%23333333'/%3e%3c/g%3e%3cdefs%3e%3cclipPath%20id='clip0_2938_8200'%3e%3crect%20width='16'%20height='16.0134'%20fill='white'%20transform='translate(8%204)'/%3e%3c/clipPath%3e%3c/defs%3e%3c/svg%3e)


