
'%3e%3cpath%20d='M8%200C12.4183%200%2016%203.58172%2016%208C16%2012.4183%2012.4183%2016%208%2016C3.58172%2016%200%2012.4183%200%208C0%203.58172%203.58172%200%208%200ZM11.6162%204.38379C11.2257%203.99337%2010.5927%203.99338%2010.2021%204.38379L8%206.58594L5.79785%204.38379C5.40732%203.99334%204.77429%203.99329%204.38379%204.38379C3.99331%204.77429%203.99335%205.40733%204.38379%205.79785L6.58594%208L4.38379%2010.2021C3.99348%2010.5927%203.99341%2011.2257%204.38379%2011.6162C4.77426%2012.0066%205.40734%2012.0065%205.79785%2011.6162L8%209.41406L10.2021%2011.6162C10.5927%2012.0066%2011.2257%2012.0067%2011.6162%2011.6162C12.0067%2011.2257%2012.0066%2010.5927%2011.6162%2010.2021L9.41406%208L11.6162%205.79785C12.0066%205.40735%2012.0066%204.77429%2011.6162%204.38379Z'%20fill='%23080E17'%20fill-opacity='0.46'/%3e%3c/g%3e%3cdefs%3e%3cclipPath%20id='clip0_3761_713'%3e%3crect%20width='16'%20height='16'%20fill='white'/%3e%3c/clipPath%3e%3c/defs%3e%3c/svg%3e)


'%3e%3cpath%20fill-rule='evenodd'%20clip-rule='evenodd'%20d='M21.4999%2010.9993C21.4999%205.20009%2016.7986%200.498901%2010.9993%200.498901C5.19994%200.498901%200.498657%205.20009%200.498657%2010.9993C0.498657%2016.2404%204.33858%2020.5844%209.35855%2021.3722V14.0346H6.69238V10.9993H9.35855V8.68594C9.35855%206.05427%2010.9262%204.60062%2013.3248%204.60062C14.4736%204.60062%2015.6753%204.80571%2015.6753%204.80571V7.38979H14.3512C13.0468%207.38979%2012.64%208.19921%2012.64%209.0296V10.9993H15.5523L15.0867%2014.0346H12.64V21.3722C17.66%2020.5844%2021.4999%2016.2404%2021.4999%2010.9993Z'%20fill='%231568EA'/%3e%3c/g%3e%3c/svg%3e)


Creating a spreadsheet in Google Sheets may diverge from the conventional path, offering a unique experience compared to Excel. However, when it comes to printing, encountering challenges is not uncommon. In this article, we'll guide you through the process of printing in Google Sheets, shedding light on the nuances and addressing potential hurdles. Learn the intricacies of how to set the print area in Google Sheets to streamline your document creation and achieve optimal results.

How to Set the Print Area in Google Sheets?
In this section, we will explore how to set the print area in Google Sheets across various platforms, including Windows, Mac, iOS, and Android. This guide aims to assist you in establishing your print area seamlessly, ensuring a smooth printing experience irrespective of the platform you are using.
For Windows & Mac
Printing a specific portion of your spreadsheet is a straightforward process, whether you are using a Windows or Mac computer; the procedure remains consistent.
Step 1: Open your Google Sheet.
Step 2: Select the cells you intend to print. You can achieve this by clicking on a cell and dragging your cursor to the adjacent cells for selection. In our example, we will designate cells A1:F18 as our print area.
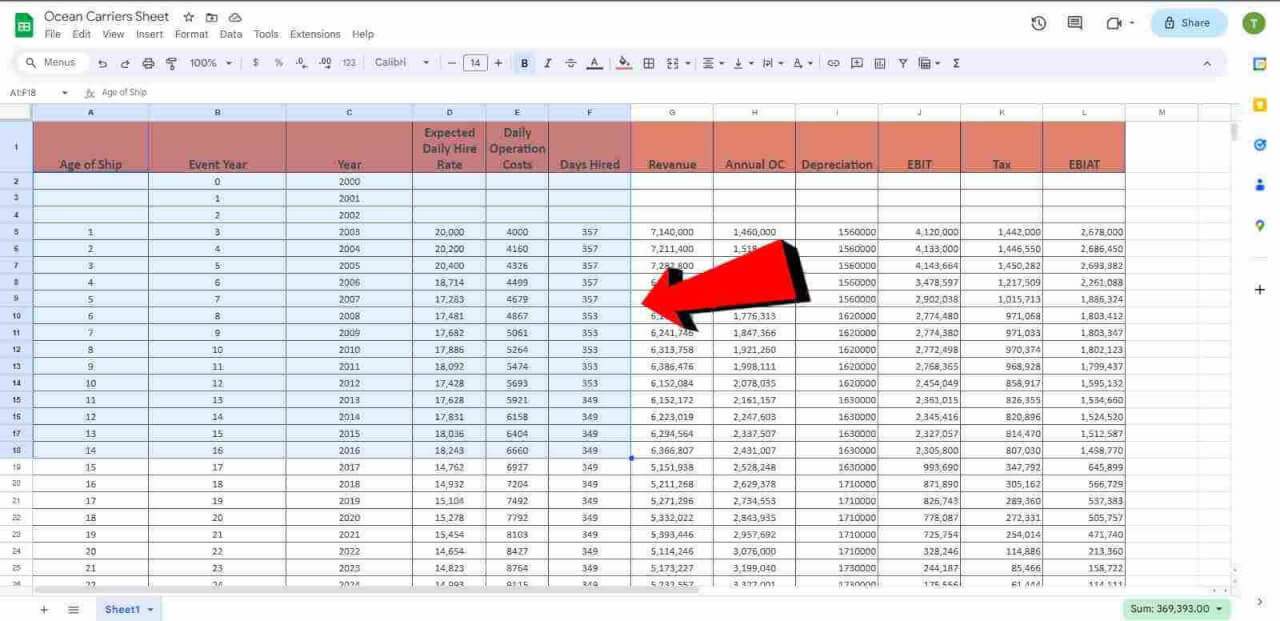
Step 3: Once you have chosen the desired cells, navigate to the File menu located at the top left of your Google Sheets interface and click on Print.

Alternatively, users can utilize keyboard shortcuts, such as "CTRL + P" on Windows or "COMMAND + P" on Mac, to access the print functionality.
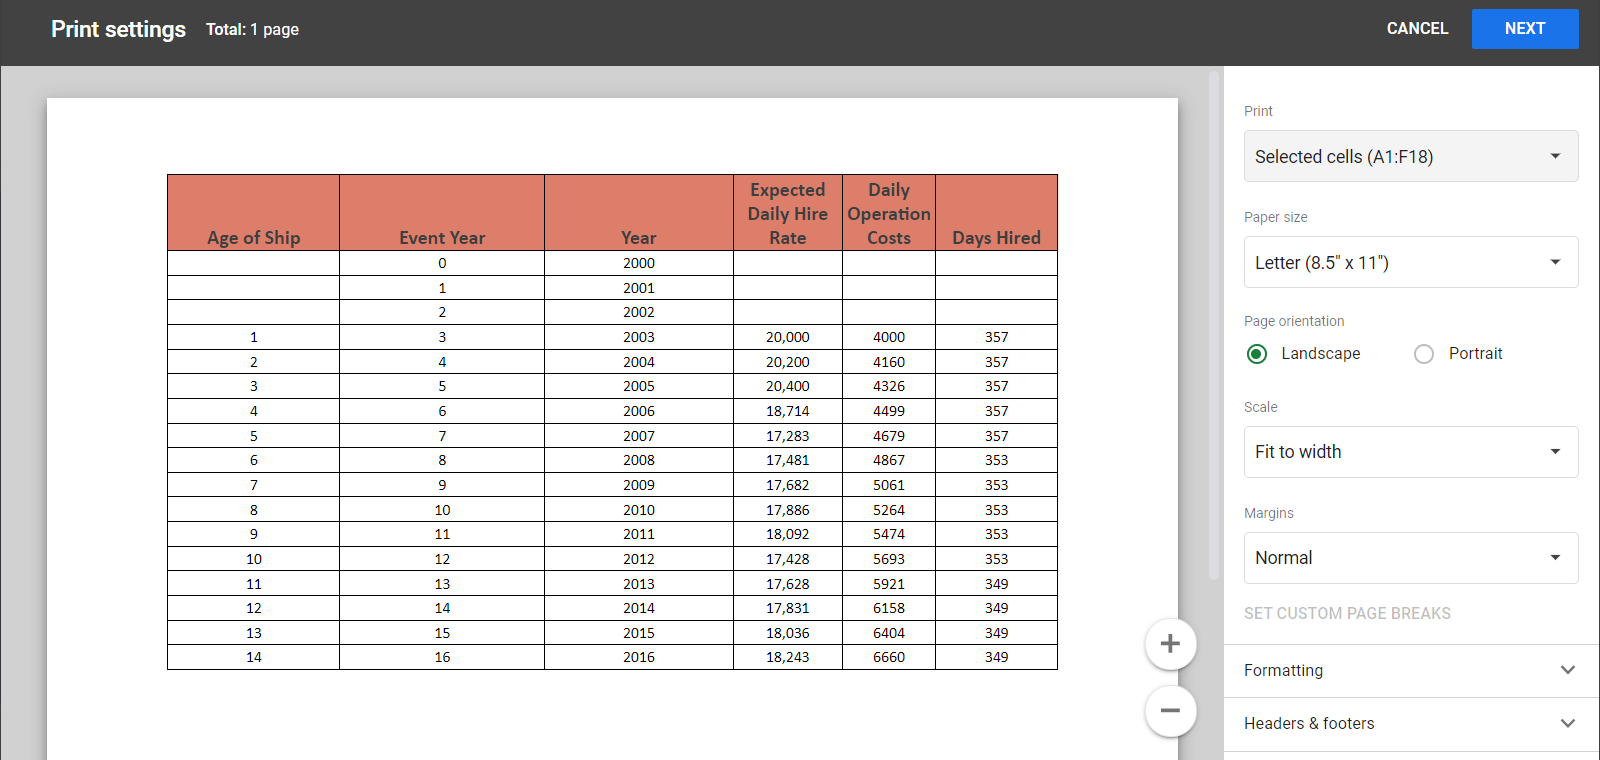
Step 4: In the Print settings window, click on the Print field and choose "Selected cells".

Step 5: Before proceeding with the printing of your sheet, explore additional available options and configure them according to your requirements.
With these steps completed, you have successfully designated a new print area. Google Sheets will now exclusively print the specified area.
For iOS
To set the print area in Google Sheets on iOS:
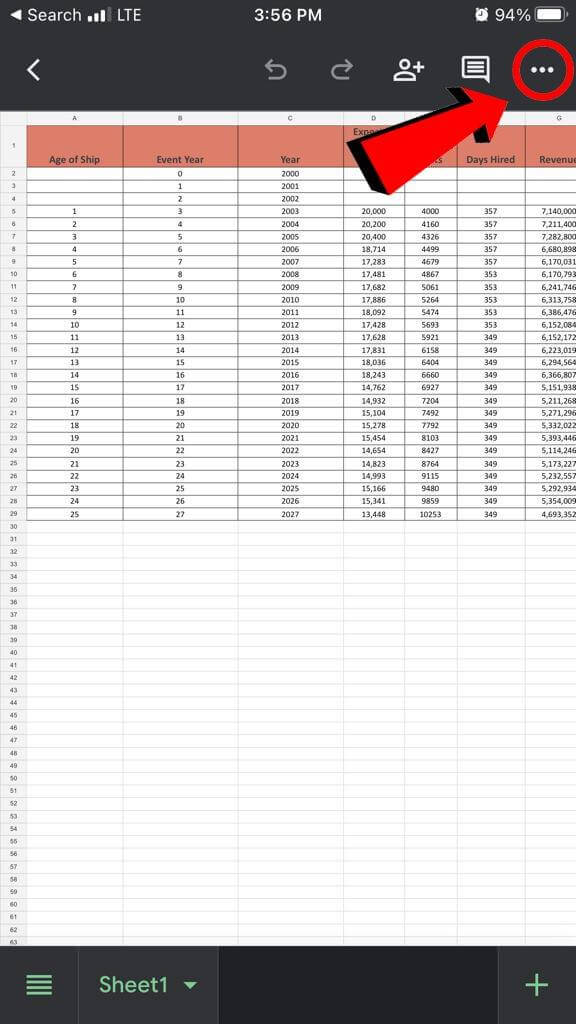
Step 1: Open the Google Sheets app on your iPhone or iPad and access the sheet you intend to print.
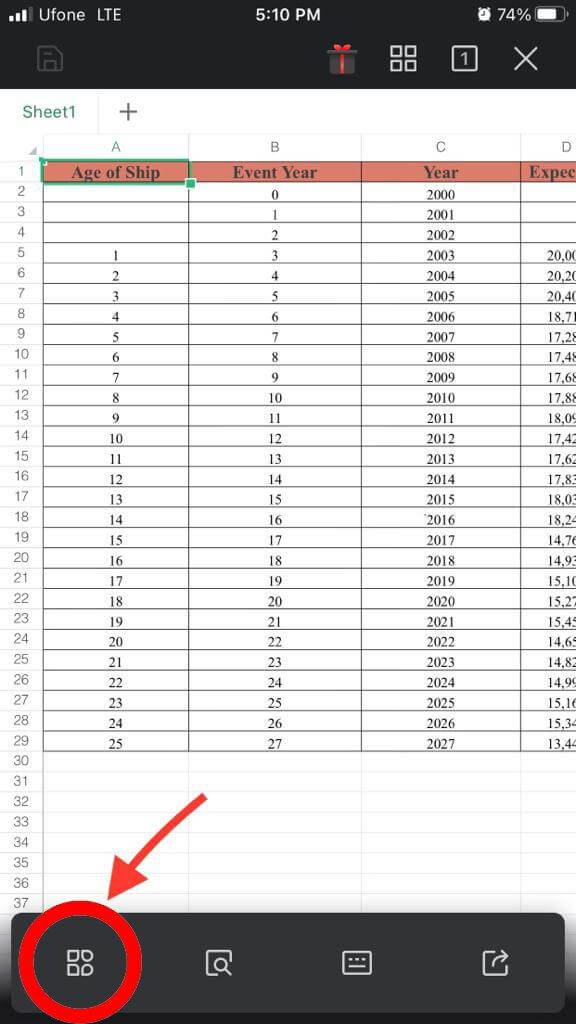
Step 2: Click on the "More options" icon located at the top right corner.
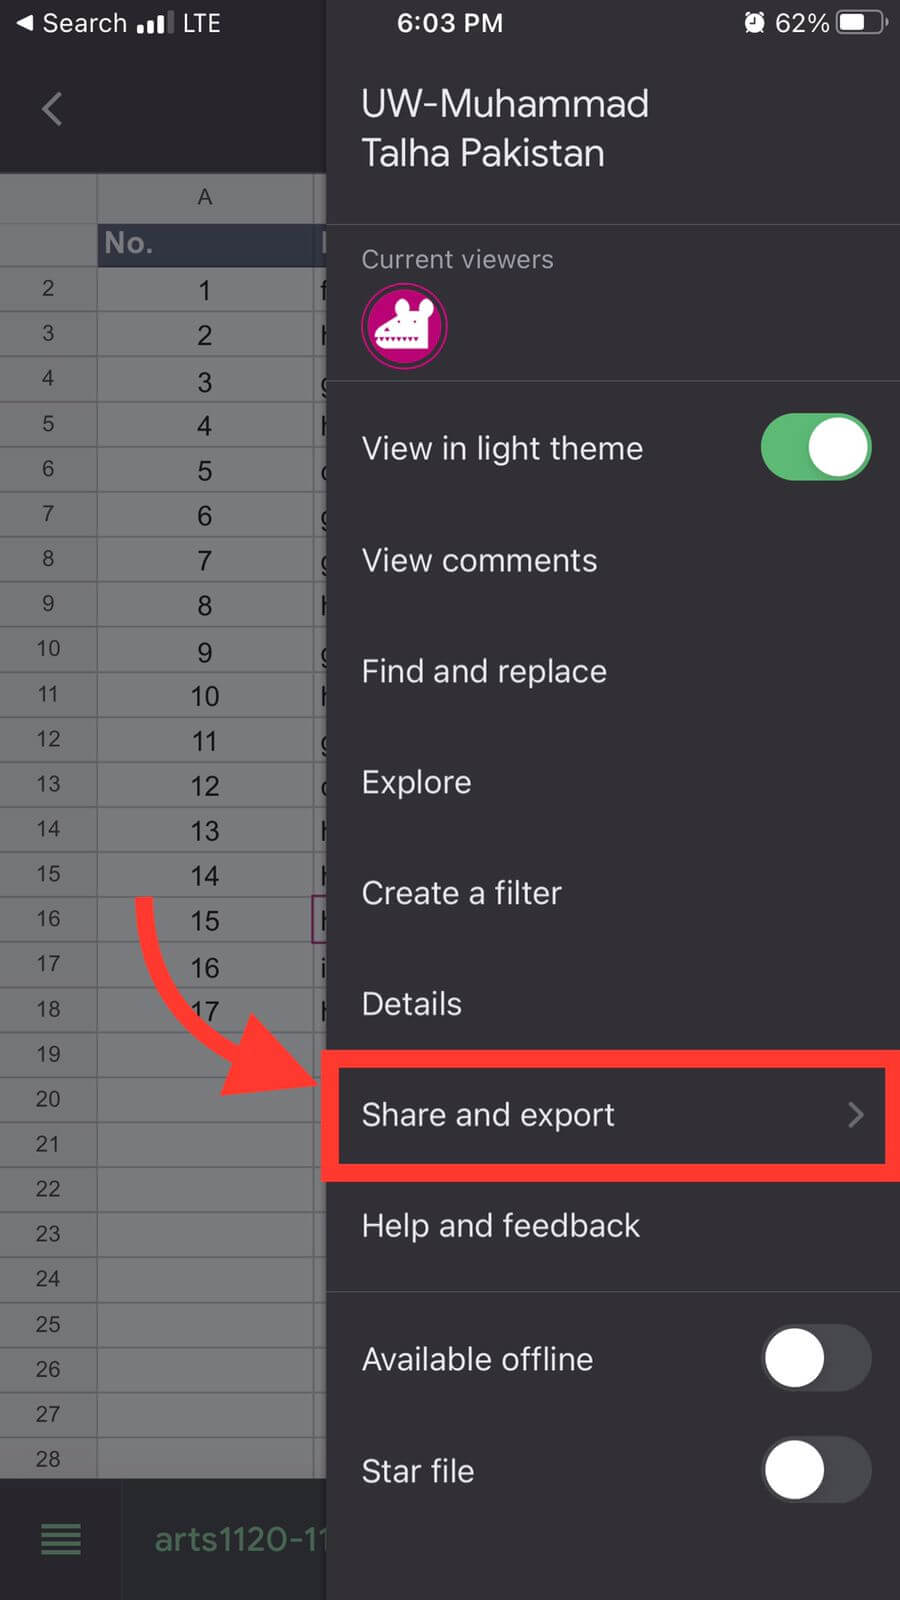
Step 3: In the More options menu, select "Share and Export".
Step 4: Within the Share and Export options, choose the "Print" option to initiate the document printing process.

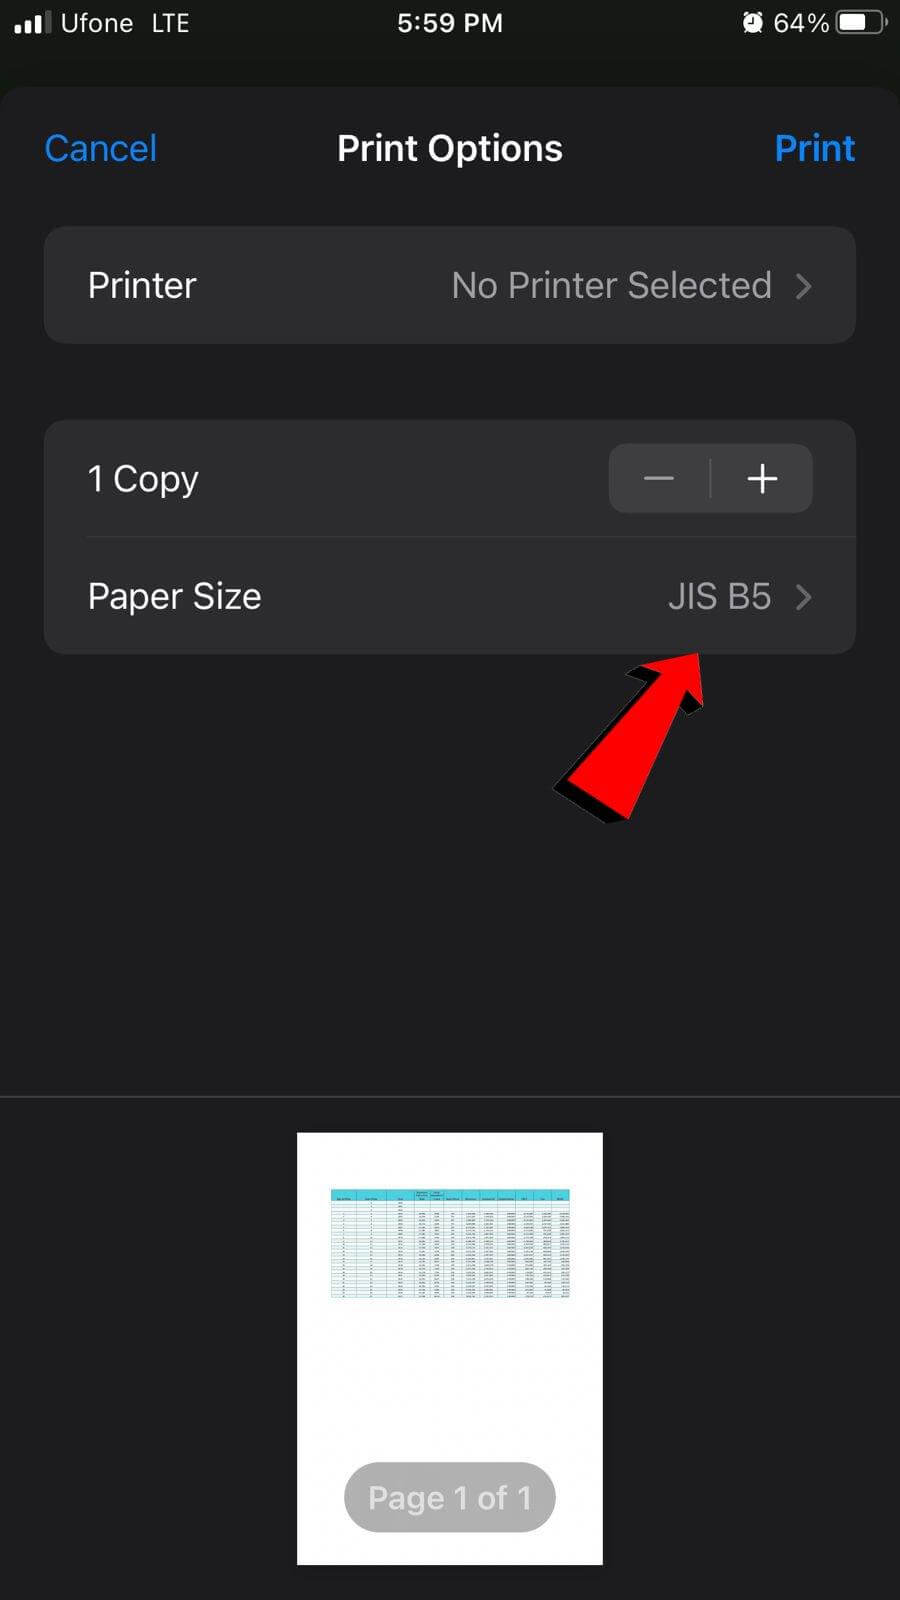
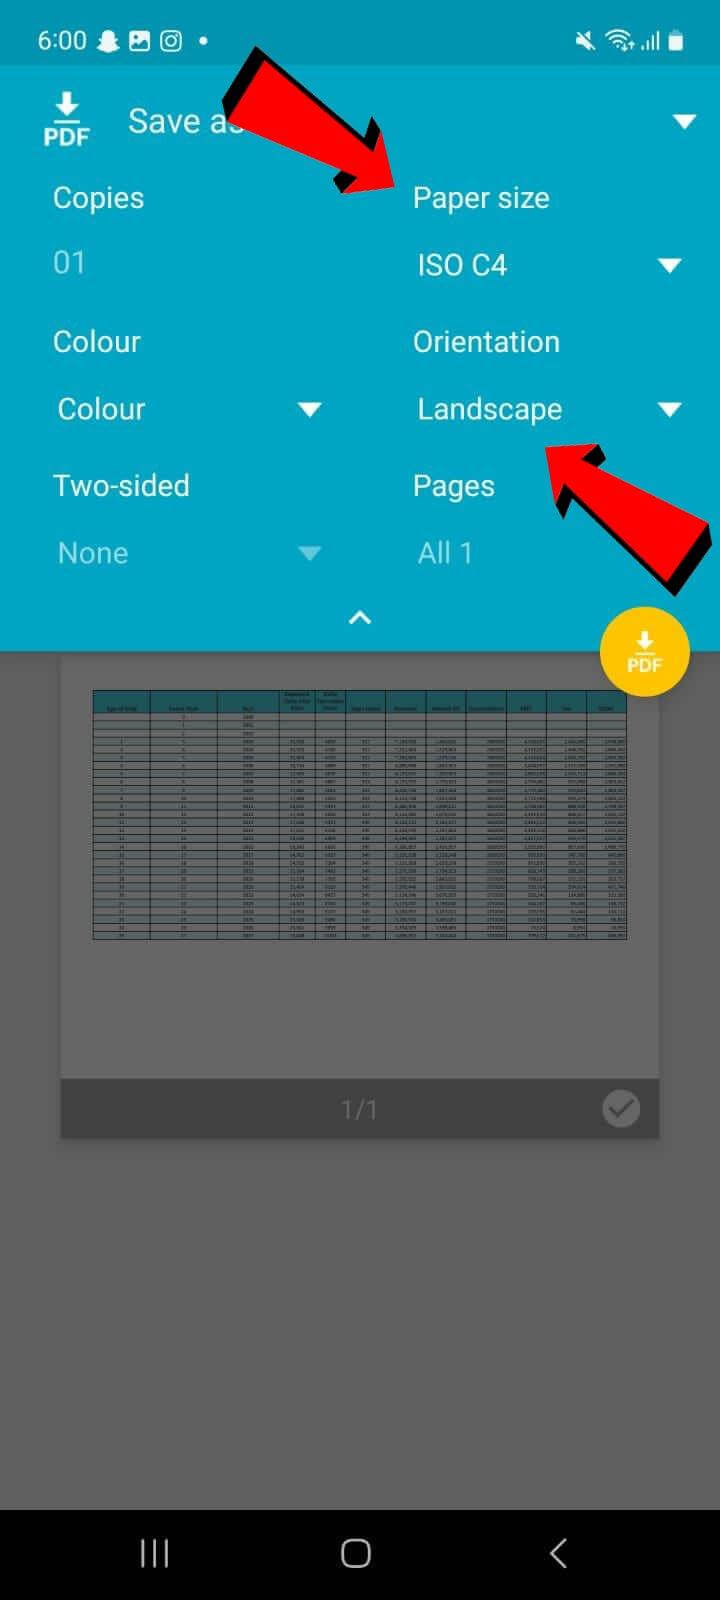
Step 5: Configure your print settings, including selecting the printer and adjusting page settings, before proceeding to print your document.

Step 6: To set a bigger print area in Google Sheets on iOS, choose a paper size. Note that options are limited on iOS.
For Android
Setting the print area on Android follows a similar process to iOS, with slight interface differences:
Step 1: Open the Google Sheets app on Android and navigate to the sheet you want to print.
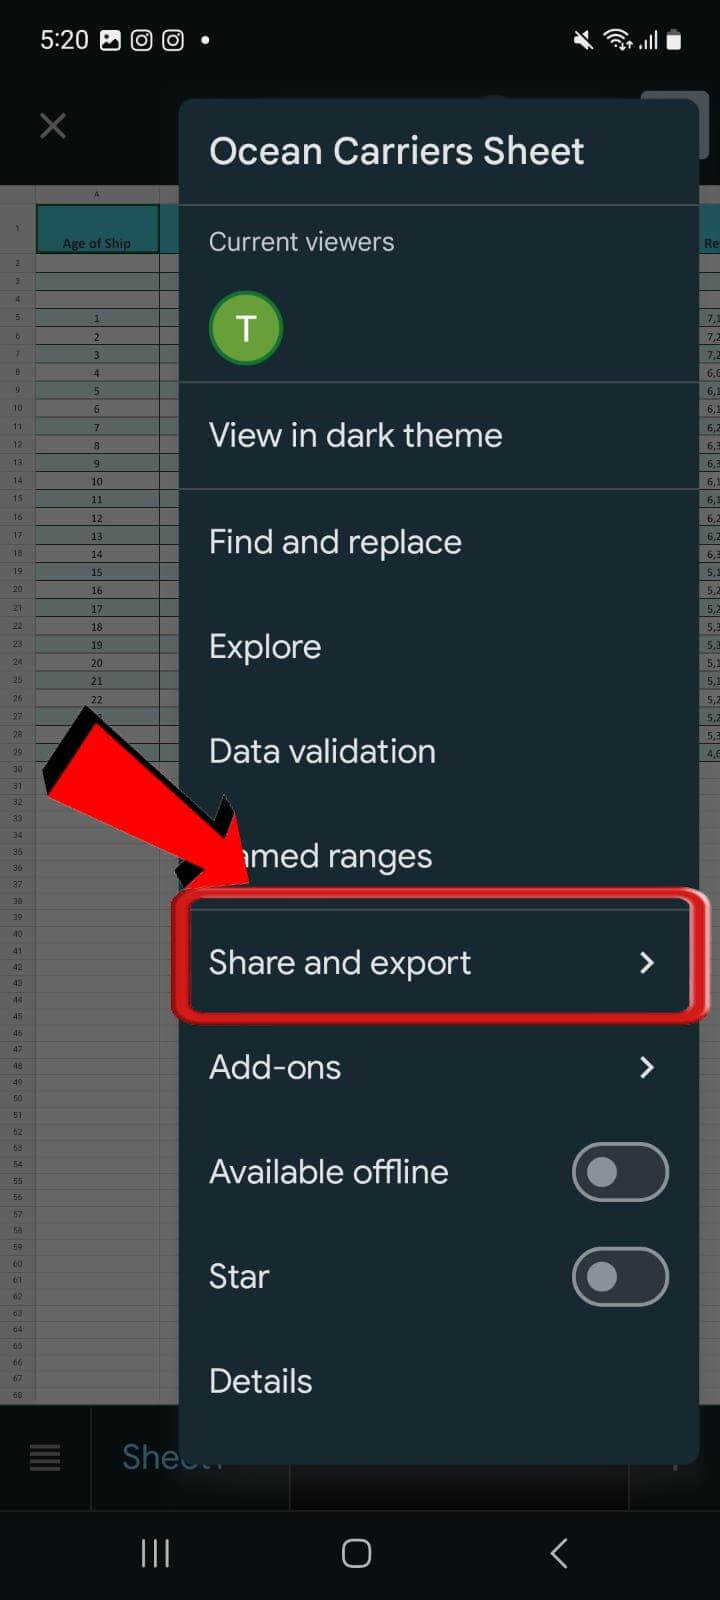
Step 2: Click on the "More Options" icon at the top right corner.

Step 3: Since printing involves sharing a hard copy of your sheets, select "Share and Export" to access the print option.
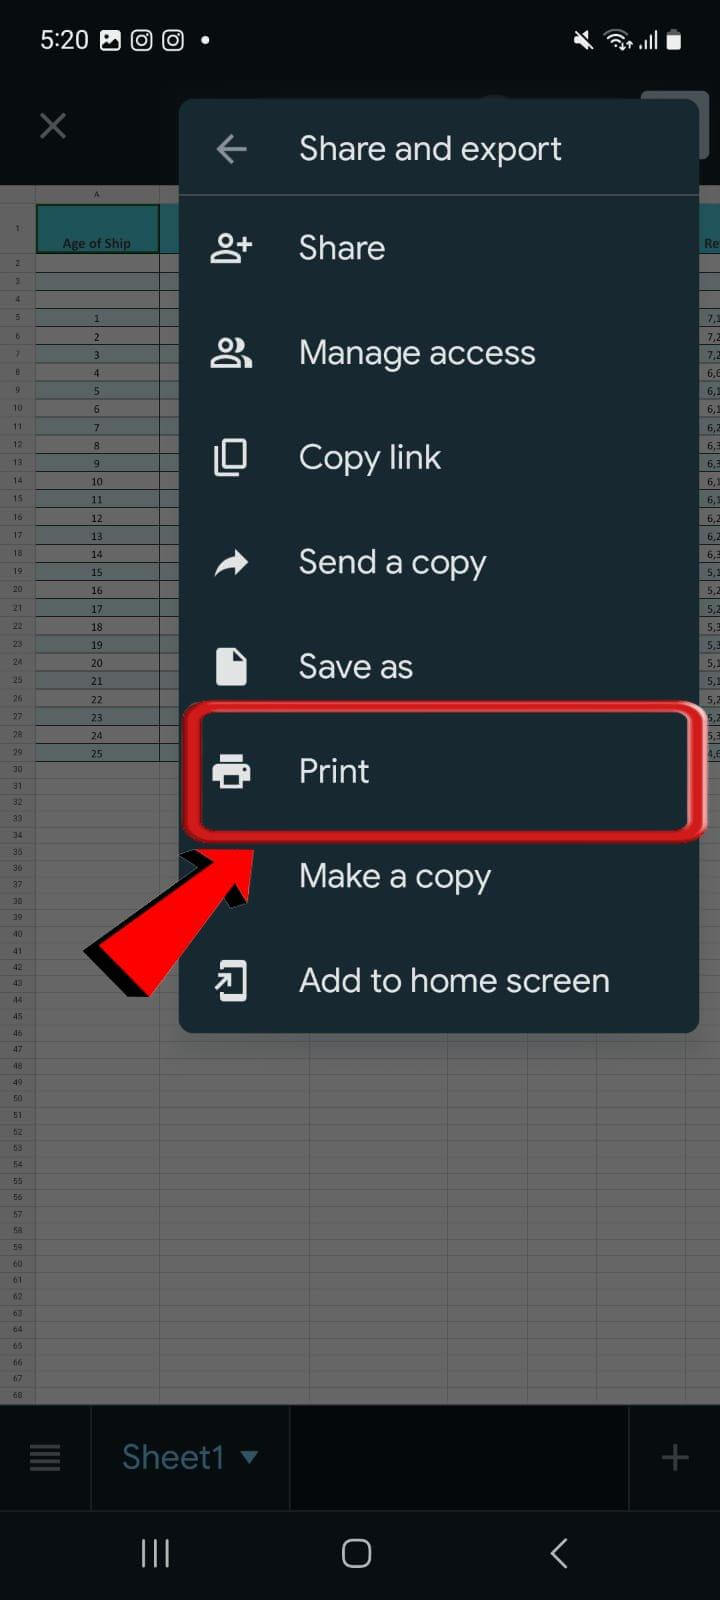
Step 4: In the Share and Export window, click on "Print" to proceed to the printing options.
Step 5: Click on the arrow to open the dropdown menu and configure your printing settings before initiating the printing process.
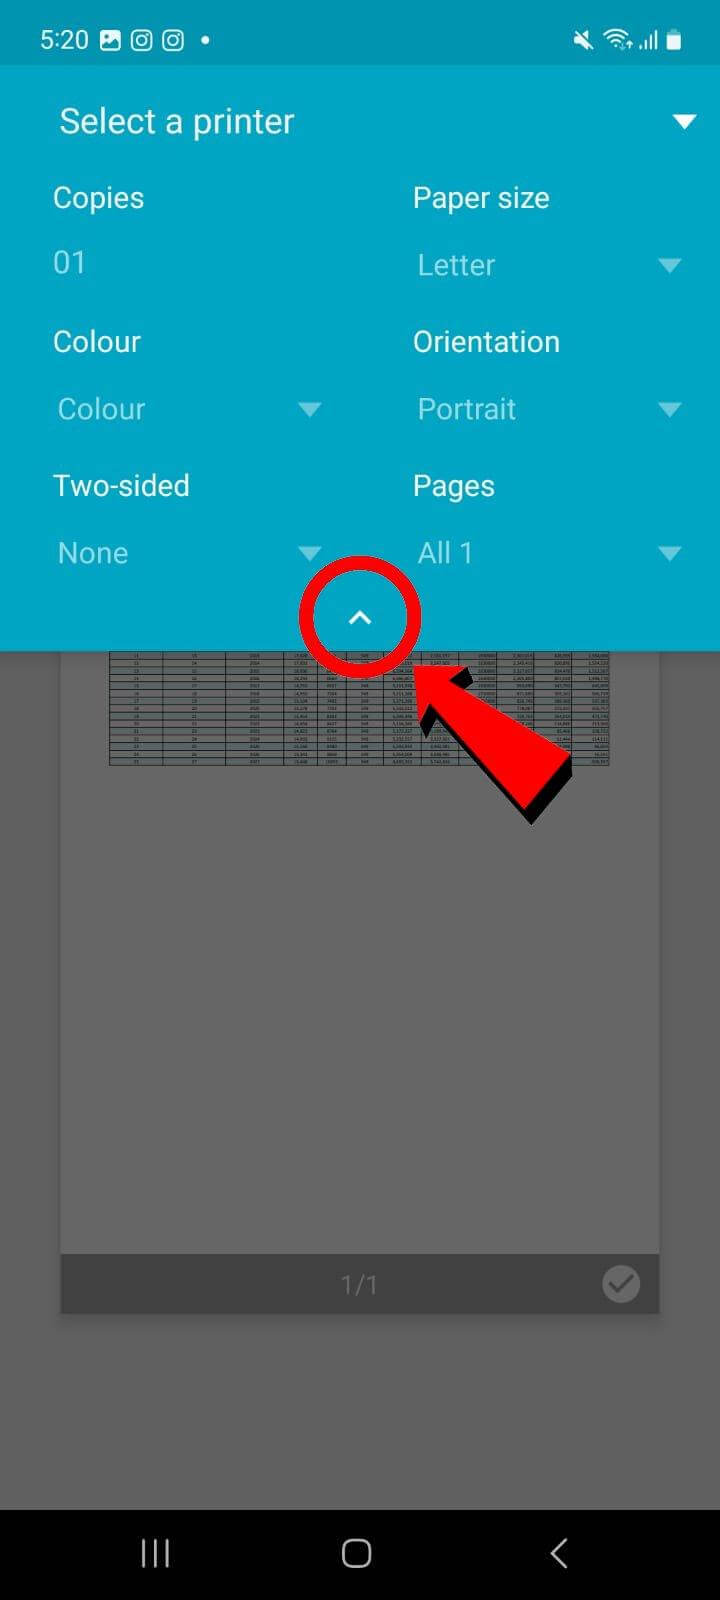
Step 6: If you want to set a bigger print area in Google Sheets on Android, modify the page settings from Portrait to Landscape or adjust the paper size accordingly.
Bonus Method for Mobile Users
Unfortunately, Google Sheets mobile does not offer a direct method for setting a print area. However, WPS Office Mobile provides a more robust solution, especially for iOS users:
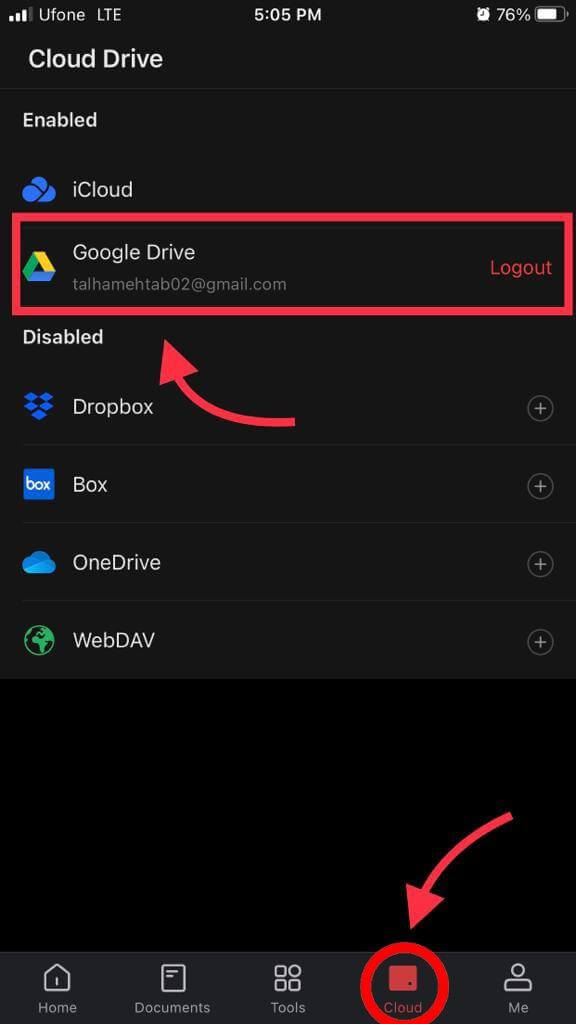
Step 1: Open WPS Office Mobile and click on the "Cloud" icon located in the taskbar below.
Step 2: WPS Office allows access to various cloud platforms; click on "Google Drive" to access files stored on Google Drive. First-time users will need to sign in to access their Google Drive.
Step 3: Open the Google Sheet stored on Google Drive on WPS Office Mobile.
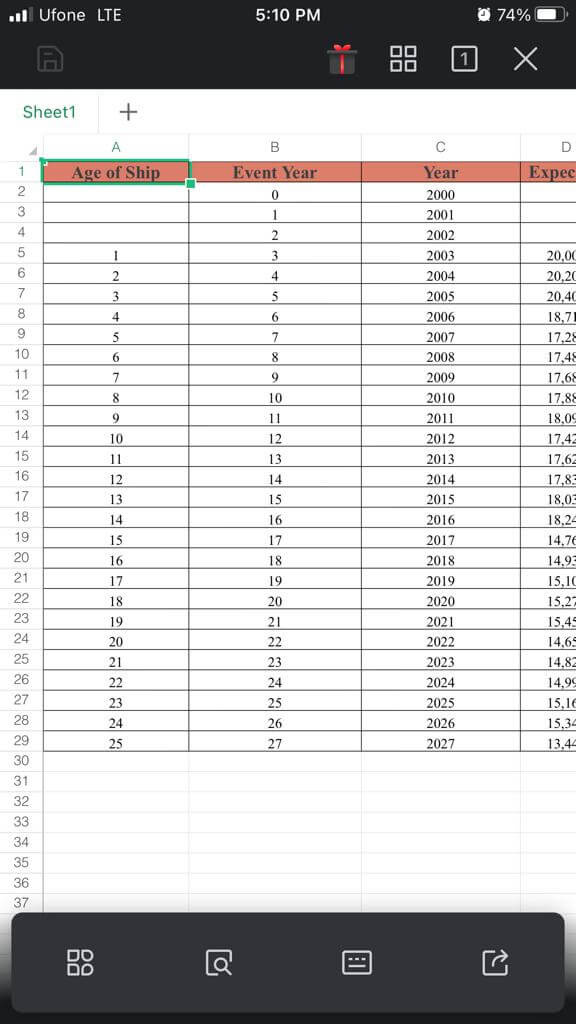
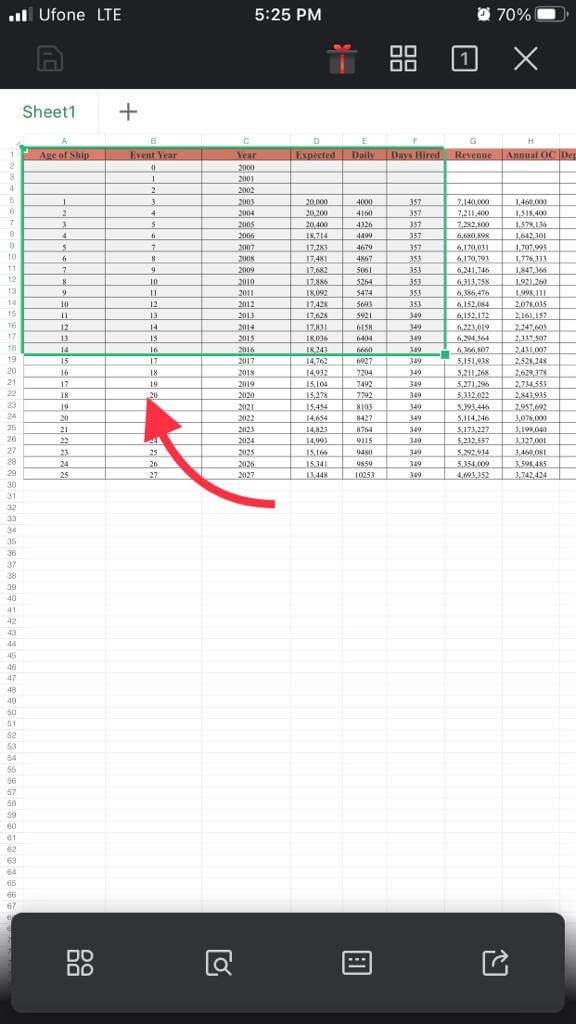
Step 4: Click on a cell and drag the bottom-right border to select the adjacent cells you wish to print.
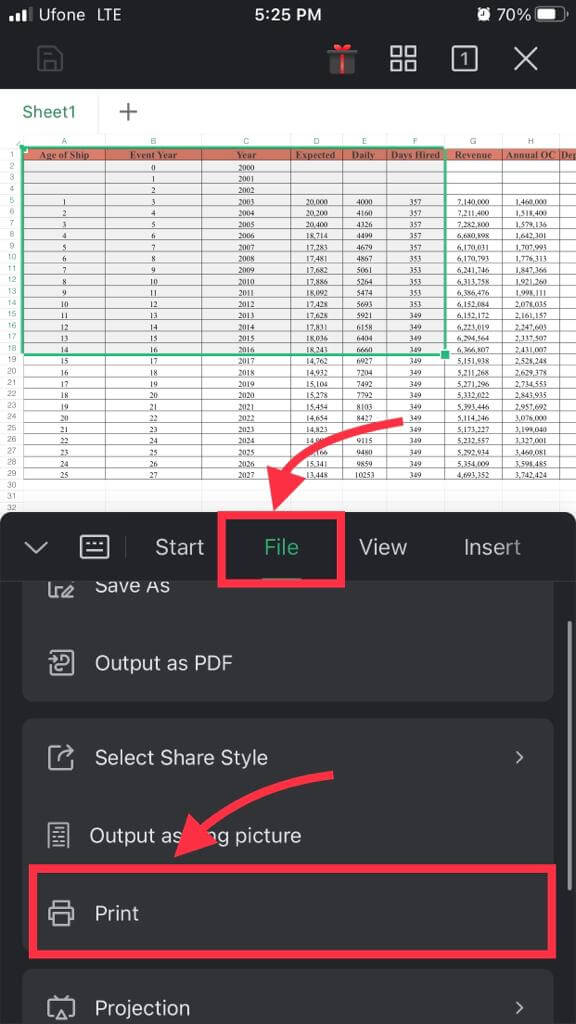
Step 5: Click on the "Main Menu" icon at the bottom left corner.
Step 6: Go to the "File" tab, scroll down, and select the "Print" option.
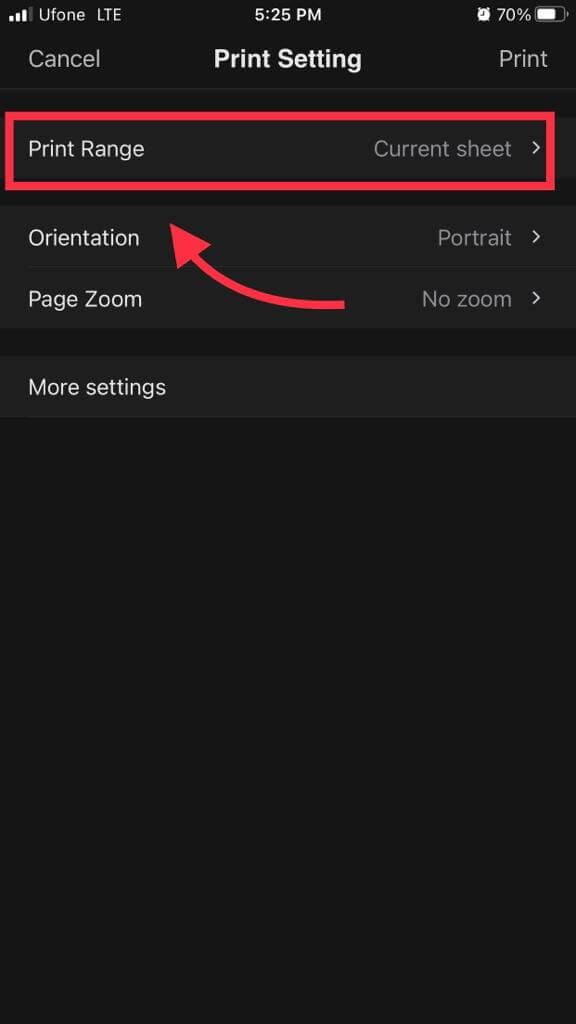
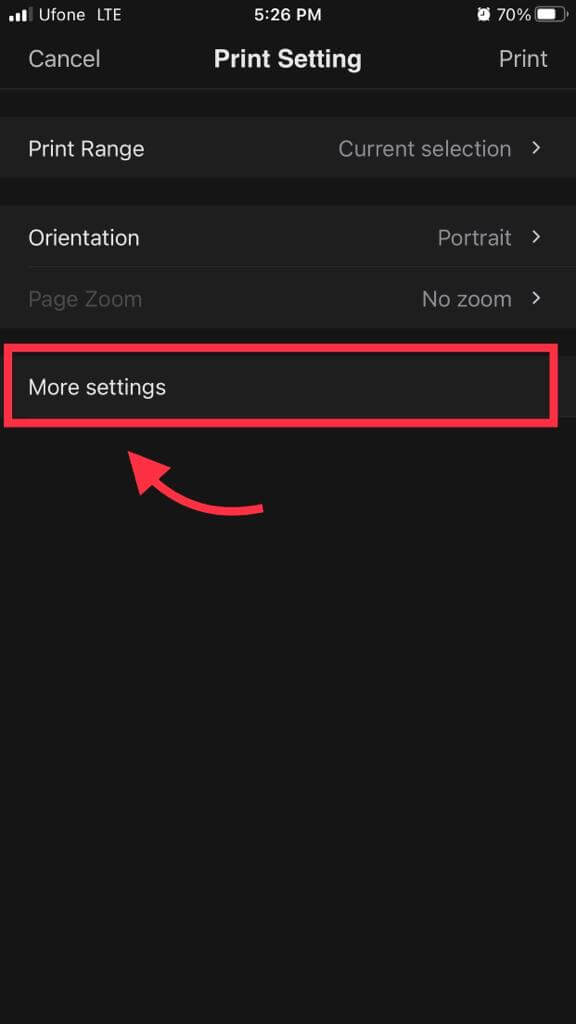
Step 7: In the Print settings screen, change the Print range field to set the print area. Click on the "Print Range" field.
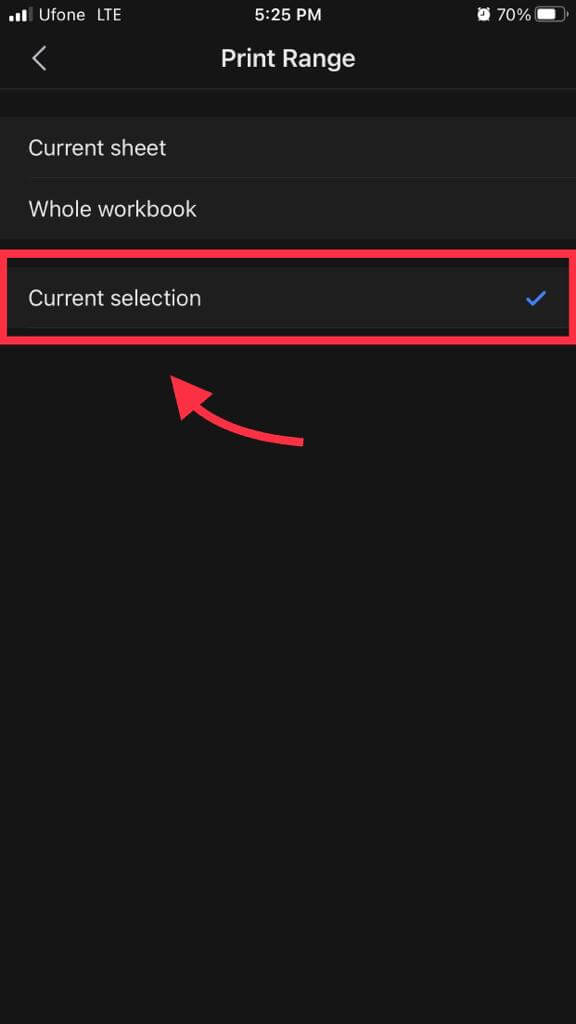
Step 8: To print the selected cells from step 4, choose "Current Selection".
Step 9: You're all set. If users want to explore additional printing options on WPS Office Mobile, they can click on "More Settings".
WPS Office is a versatile office suite, providing features that are often absent in other renowned office suites. Users can set the print area, utilize the PDF toolkit available on WPS Office Mobile, and more—all for free.
How to Change the Size of the Printed Sheet?
In this section, we'll walk through the steps on how to set the print area bigger in Google Sheets on both Windows and Mac, let's get started:
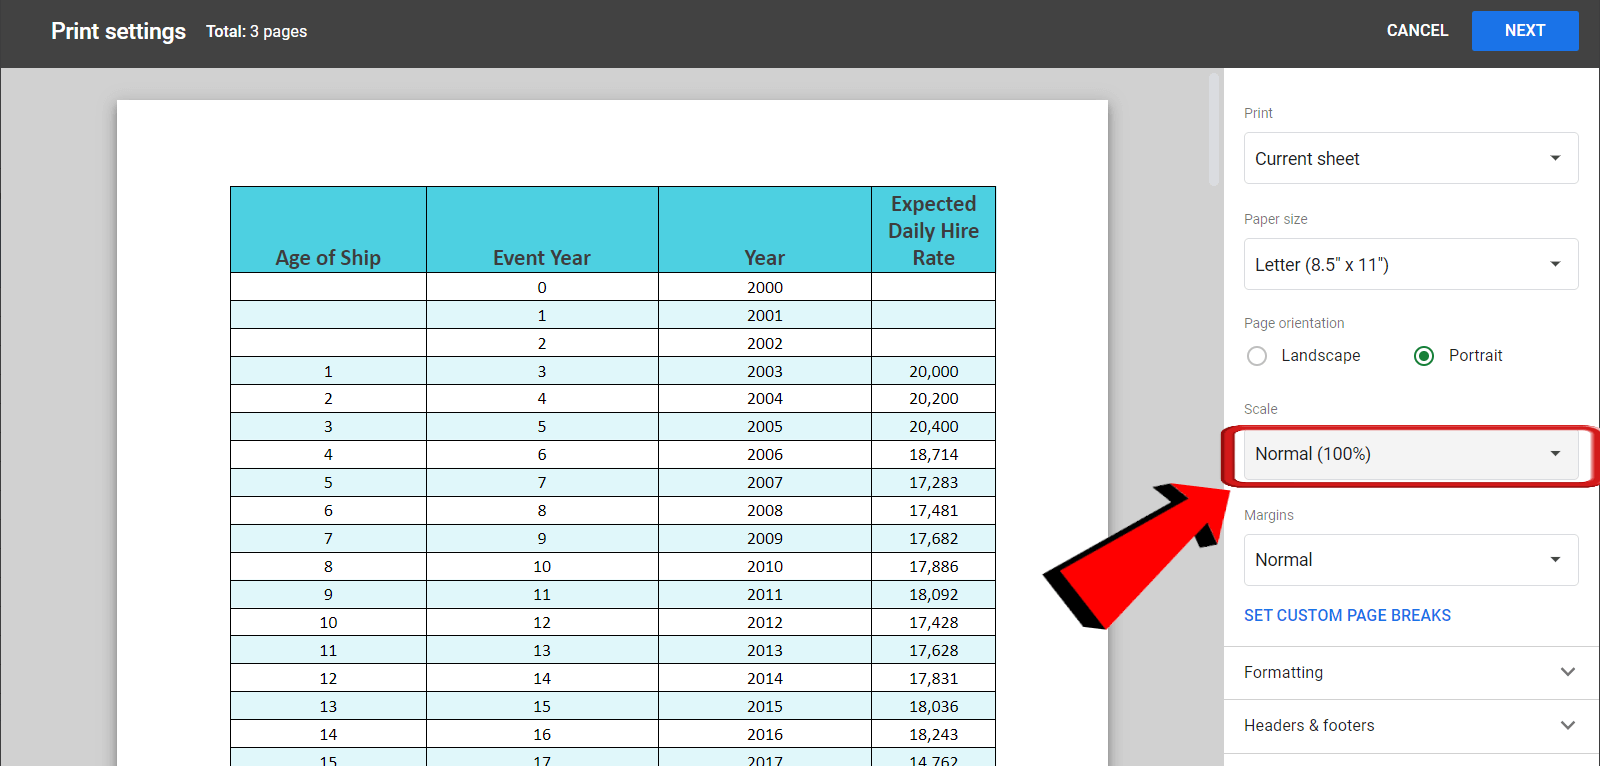
Step 1: Begin by accessing Print Preview in your Google Sheet to review your current print settings.

Step 2: Click on the "Scale" field. Take note of the current setting; commonly, it's set to "Normal (100%)".
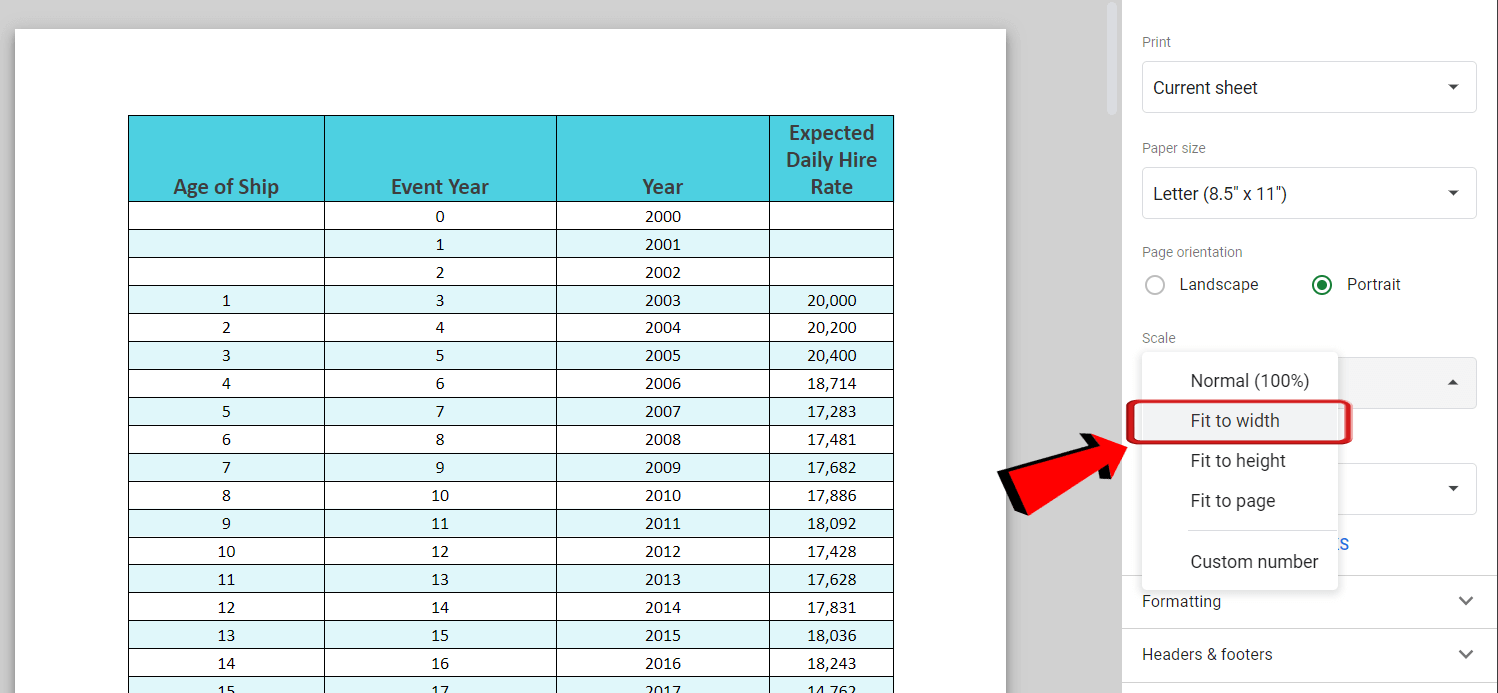
Step 3: To ensure all columns fit automatically on the width of the page, consider changing the setting to "Fit to Width".
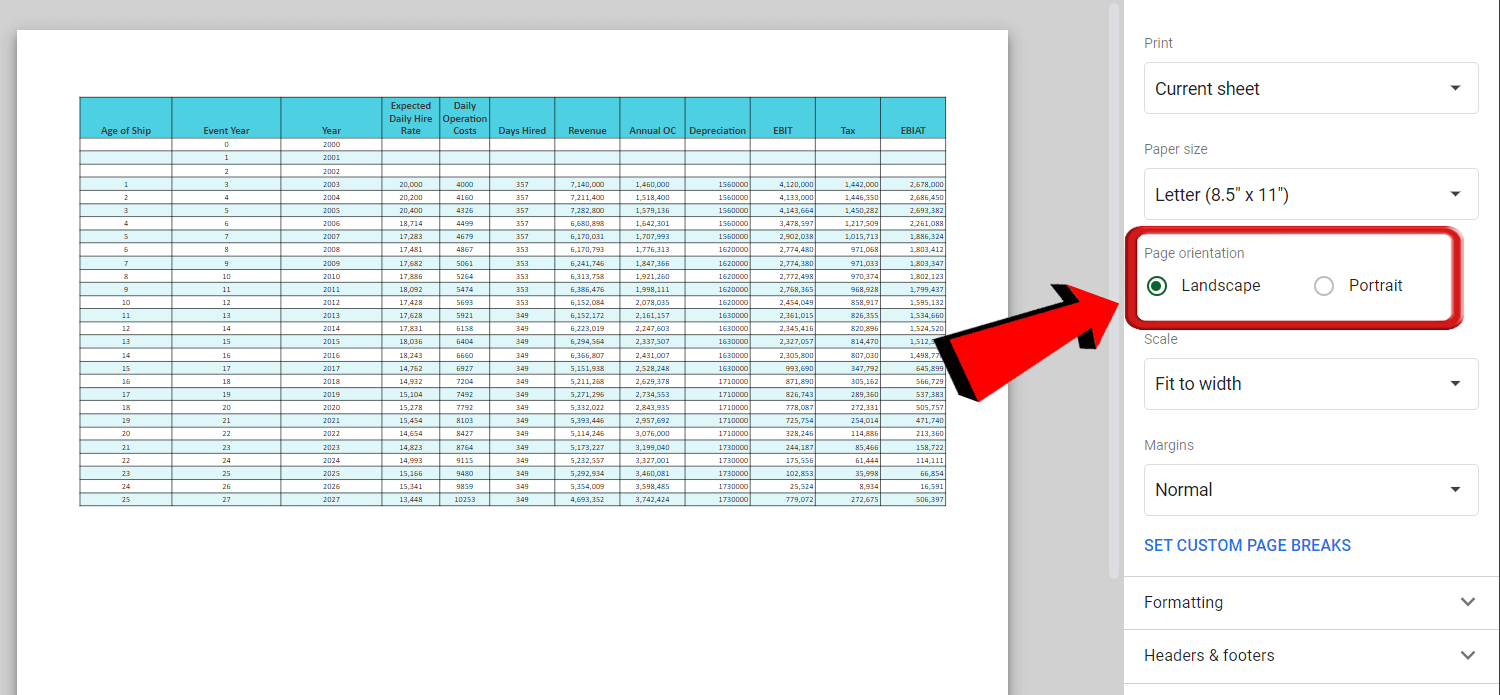
Step 4: Customize your sheet's margins using the "Margins" field.
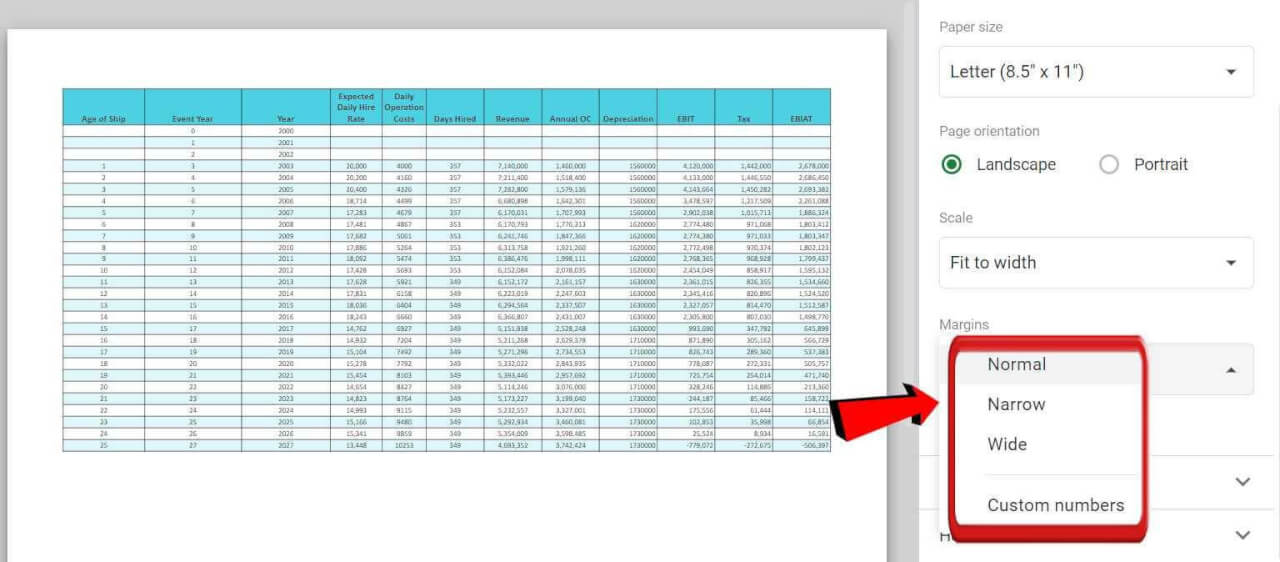
Step 5: Lastly, for a more significant and efficient use of paper space, consider changing the sheet orientation to "Landscape" using the “Page Orientation” field. This adjustment can make the printed sheet larger and optimize paper utilization.
This concise guide aims to assist users in learning how to set the print area bigger in Google Sheets on iOS and Android, empowering them to make the most out of their available space while printing their sheets.
Tips for Using Google Sheets
Import from One Sheet to Another: Instead of juggling data across multiple sheets, streamline your process by importing from one sheet to another. Updating just one place saves you time and effort.
Translate Text with GOOGLETRANSLATE Function: If your sheet has text in different languages, use GOOGLETRANSLATE Function to automatically translate values into another language.
Analyze Google Forms Data in Google Sheets: Once you've gathered responses through Google Forms, leverage Google Sheets for seamless data analysis and visualization.
Power of Keyboard Shortcuts: Save time in Google Sheets with keyboard shortcuts. Clear formatting, add comments, or hide rows effortlessly.
Share Google Sheets with Ease: To simplify sharing, copy a link to grant team access without individual invitations. Click “Share” at the top-right, choose “Anyone with the link” under “Restricted”, and assign roles like Viewer, Commentator, or Editor. After selecting options, click “Copy link” and share it with your team!
Optimize Comment Sharing: In collaborative spreadsheet work, comments play a key role in communication. To ensure a specific team member is notified, simply add a comment as usual. At the end, use the ‘+’ or ‘@’ symbol to bring up your email directory. Type the name or email of the person, press Enter, and even assign them the comment for clarity.
Best Free Alternative to Google Sheets - WPS Office
What is WPS Office
WPS Office is a comprehensive office suite that serves as a robust alternative to Microsoft Office and Google Docs. It encompasses word processing, spreadsheet, and presentation tools, providing users with a versatile and user-friendly platform for various document-related tasks. WPS Office is known for its clean interface, offline functionality, and extensive template library, making it an excellent choice for users seeking an efficient and feature-rich office suite.

When it comes to printing, WPS Office excels in providing a streamlined and user-friendly process. Its seamless compatibility with LibreOffice, Microsoft Office, and Google Workspace enables users to effortlessly print documents in various formats. WPS Office is dedicated to understanding the customer journey, offering unparalleled freedom in document management, and providing a suite of free office tools to enhance productivity. Discover WPS Office for yourself and become part of its satisfied user community!
How to Download WPS Office
Step 1: To initiate your engagement with WPS Office, launch your web browser on your computer and navigate to the WPS Office website, which serves as the gateway to this comprehensive productivity suite.

Step 2: To commence the process of acquiring WPS Office, locate and click on the prominent "Free Download" button, usually positioned in the central or upper right-hand corner of the homepage.

Step 3: Venture into your downloads directory and seek out the "wps_wid.cid" setup file. Upon locating it, click it to embark on the installation process for WPS Office.

Step 4: Identify the small box situated alongside the terms and conditions and click on it to acknowledge your agreement. Next, proceed to click on the prominent "Install Now" button to commence the installation process.

Step 5: Once the installation process has concluded successfully, WPS Office will effortlessly launch, providing you with immediate access to its comprehensive suite of productivity tools.

How to Set Print Area in WPS Office
Let's explore how to set the print area in WPS Office:
Step 1: Open your spreadsheet using WPS Office on your system.
Step 2: Select the cells intended for the print area. Click and hold a cell, then drag your cursor over thedesired cell range. The selected cells will turn gray to indicate the selection.
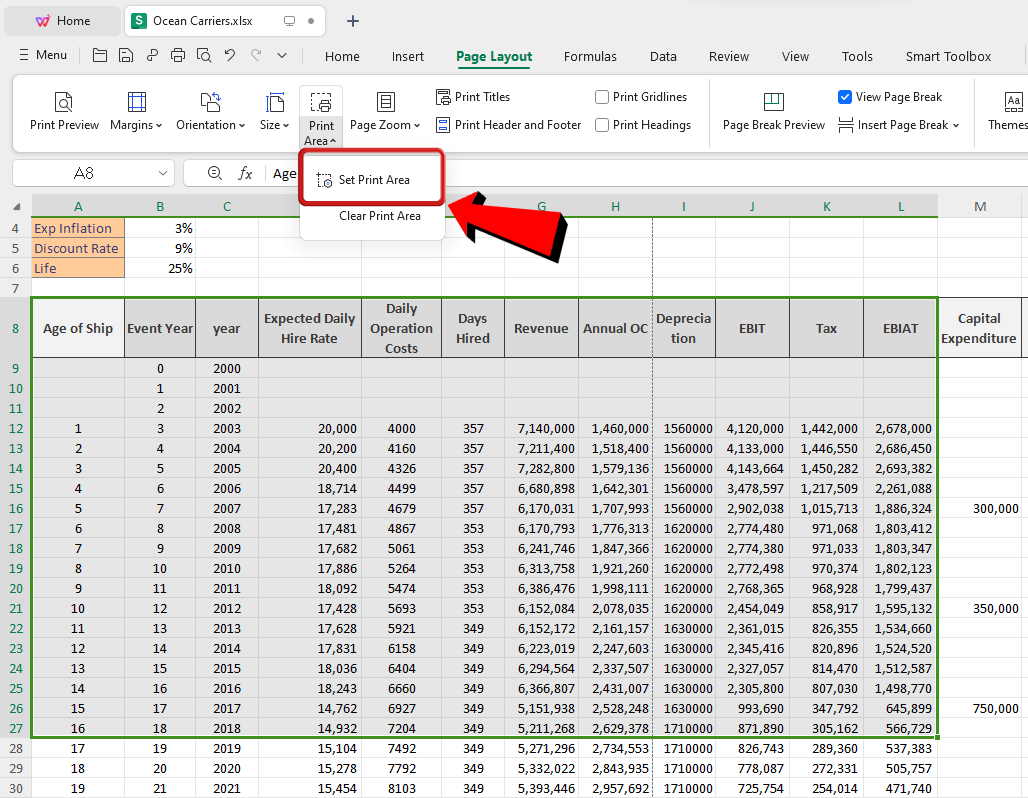
Step 3: After selection, navigate to the Page Layout tab and click on the "Print Area" option in the ribbon.
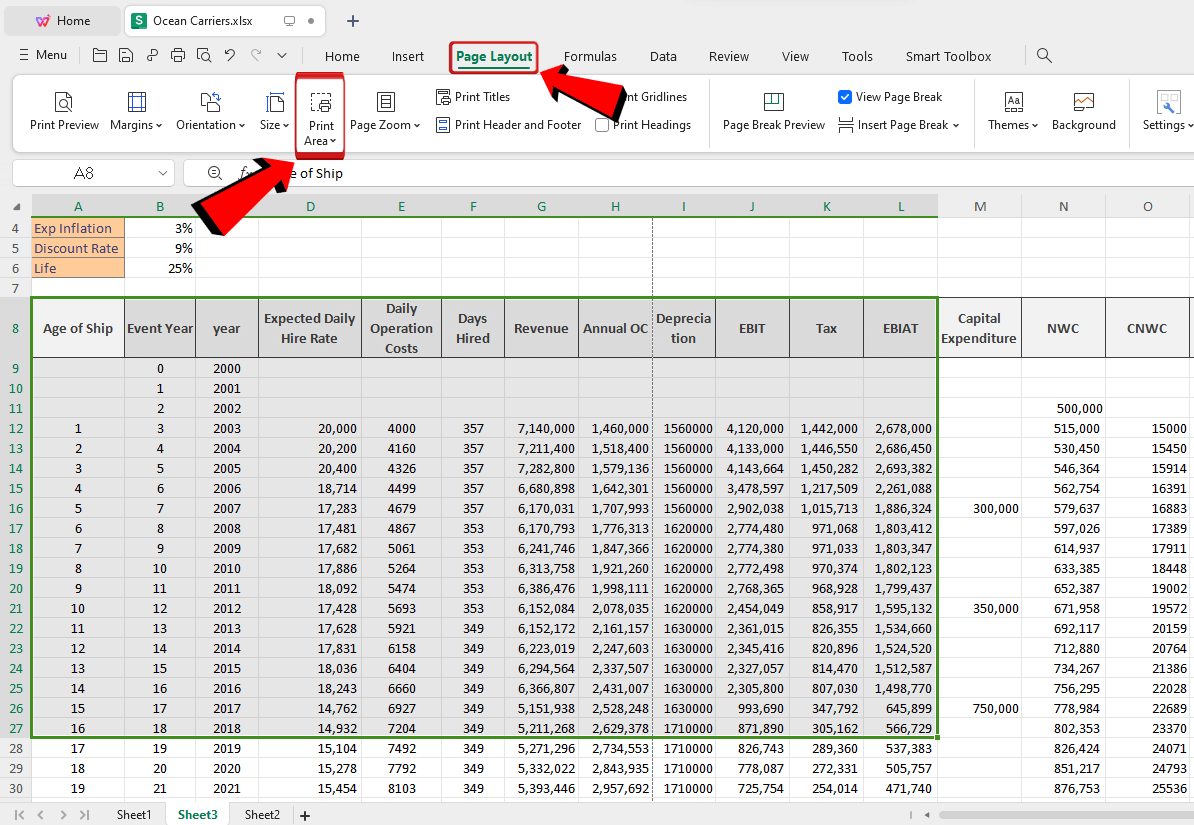
Step 4: In the Print Area drop-down menu, choose "Set Print Area".
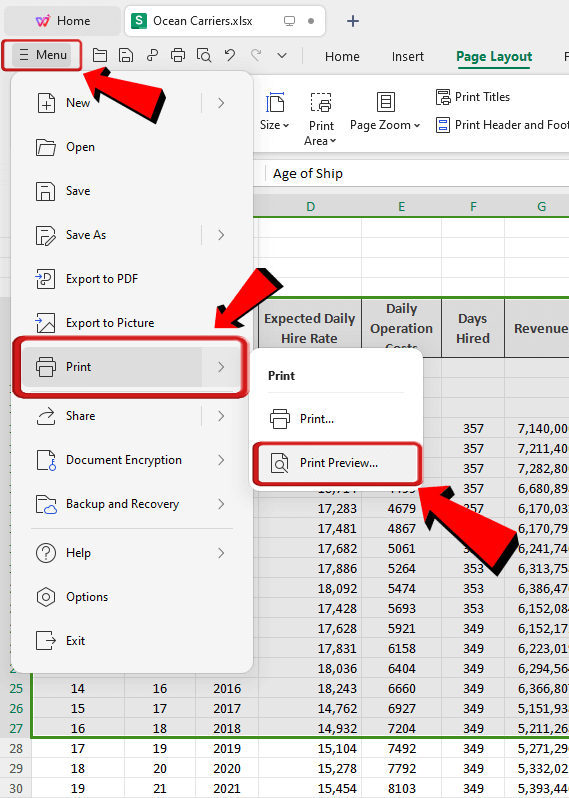
Step 5: To view the Print Area, go to the Main Menu > Print > Print Preview.
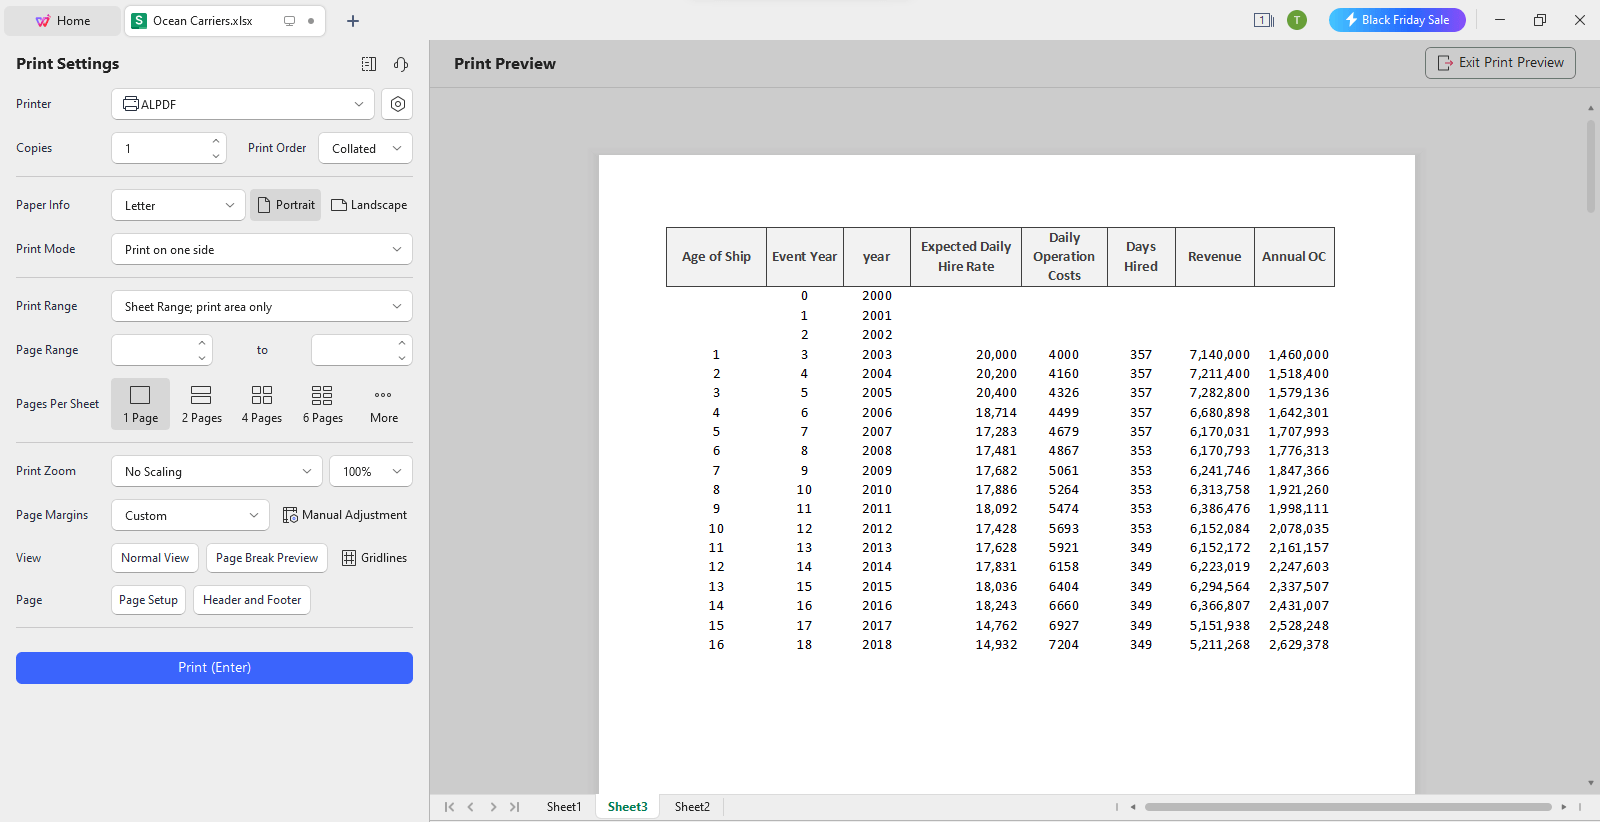
Step 6: In the Print Preview, observe that only the cells set for printing are visible.
WPS Office simplifies the process of printing specific sets of your spreadsheet with user-friendly steps and a comprehensive interface. The clean layout and easily accessible options make navigation and exploration straightforward, even for users new to this office suite.
FAQs
Q1. Is Google Sheets better than Excel?
Choosing between Google Sheets and Excel depends on your needs. Google Sheets excels in collaboration, user-friendliness, and cost-effectiveness, ideal for teams and straightforward tasks. Excel is powerful for advanced data analysis and individual work and is more suitable for complex tasks. Consider collaboration needs, data complexity, and budget for the right fit. Google Sheets is great for basics, while Excel suits managing extensive data. Evaluate costs, collaboration features, statistical tools, and ease of use for the best decision.
Q2. Why is setting an optimal print area important in Google Sheets?
Defining an optimal print area in Google Sheets is essential to present crucial data clearly, eliminating unnecessary details and enhancing overall readability in printed sheets. It is paramount because it allows you to present only the vital information, avoiding clutter from unnecessary data. This practice contributes to effective communication and ensures a polished and professional presentation.
Q3. Under what circumstances is it advisable to maximize the print area on Google Sheets?
Expanding the print area in Google Sheets is advisable when dealing with large datasets or complex charts, as it ensures all relevant data is incorporated when printed. This approach comes in handy for presenting a comprehensive and coherent picture in print, enabling readers to grasp the full scope and details of the information.
Sheet Success Summed
Learning how to set the print area in Google Sheets empowers users to selectively print essential parts of a spreadsheet. This ensures that viewers can concentrate on the pertinent data or store necessary information efficiently, plus printing the entire sheet may result in a cluttered appearance.
However, if you're looking for a more efficient solution, consider exploring WPS Office. With its advanced PDF capabilities, WPS Office elevates the printing experience. Why settle for the ordinary when you can embrace a tool that streamlines tasks and enhances efficiency? Give it a try and download WPS Office now to unlock a new level of productivity.

'%3e%3cpath%20d='M19.9911%204.11386V6.471H18.5894C18.0775%206.471%2017.7322%206.57814%2017.5536%206.79243C17.3751%207.00671%2017.2858%207.32814%2017.2858%207.75671V9.44421H19.9019L19.5536%2012.0871H17.2858V18.8639H14.5536V12.0871H12.2769V9.44421H14.5536V7.49779C14.5536%206.39064%2014.8632%205.53201%2015.4822%204.92189C16.1013%204.31177%2016.9257%204.00671%2017.9554%204.00671C18.8304%204.00671%2019.509%204.04243%2019.9911%204.11386Z'%20fill='%23333333'/%3e%3c/g%3e%3cdefs%3e%3cclipPath%20id='clip0_2938_8199'%3e%3crect%20width='16'%20height='16'%20fill='white'%20transform='translate(8%204.00671)'/%3e%3c/clipPath%3e%3c/defs%3e%3c/svg%3e)
'%3e%3cpath%20d='M17.5237%2010.7813L23.4811%204H22.0699L16.8949%209.88693L12.7648%204H8L14.2469%2012.9029L8%2020.0133H9.4112L14.8725%2013.7952L19.2352%2020.0133H24M9.92053%205.04213H12.0885L22.0688%2019.0224H19.9003'%20fill='%23333333'/%3e%3c/g%3e%3cdefs%3e%3cclipPath%20id='clip0_2938_8200'%3e%3crect%20width='16'%20height='16.0134'%20fill='white'%20transform='translate(8%204)'/%3e%3c/clipPath%3e%3c/defs%3e%3c/svg%3e)


