
'%3e%3cpath%20d='M8%200C12.4183%200%2016%203.58172%2016%208C16%2012.4183%2012.4183%2016%208%2016C3.58172%2016%200%2012.4183%200%208C0%203.58172%203.58172%200%208%200ZM11.6162%204.38379C11.2257%203.99337%2010.5927%203.99338%2010.2021%204.38379L8%206.58594L5.79785%204.38379C5.40732%203.99334%204.77429%203.99329%204.38379%204.38379C3.99331%204.77429%203.99335%205.40733%204.38379%205.79785L6.58594%208L4.38379%2010.2021C3.99348%2010.5927%203.99341%2011.2257%204.38379%2011.6162C4.77426%2012.0066%205.40734%2012.0065%205.79785%2011.6162L8%209.41406L10.2021%2011.6162C10.5927%2012.0066%2011.2257%2012.0067%2011.6162%2011.6162C12.0067%2011.2257%2012.0066%2010.5927%2011.6162%2010.2021L9.41406%208L11.6162%205.79785C12.0066%205.40735%2012.0066%204.77429%2011.6162%204.38379Z'%20fill='%23080E17'%20fill-opacity='0.46'/%3e%3c/g%3e%3cdefs%3e%3cclipPath%20id='clip0_3761_713'%3e%3crect%20width='16'%20height='16'%20fill='white'/%3e%3c/clipPath%3e%3c/defs%3e%3c/svg%3e)


'%3e%3cpath%20fill-rule='evenodd'%20clip-rule='evenodd'%20d='M21.4999%2010.9993C21.4999%205.20009%2016.7986%200.498901%2010.9993%200.498901C5.19994%200.498901%200.498657%205.20009%200.498657%2010.9993C0.498657%2016.2404%204.33858%2020.5844%209.35855%2021.3722V14.0346H6.69238V10.9993H9.35855V8.68594C9.35855%206.05427%2010.9262%204.60062%2013.3248%204.60062C14.4736%204.60062%2015.6753%204.80571%2015.6753%204.80571V7.38979H14.3512C13.0468%207.38979%2012.64%208.19921%2012.64%209.0296V10.9993H15.5523L15.0867%2014.0346H12.64V21.3722C17.66%2020.5844%2021.4999%2016.2404%2021.4999%2010.9993Z'%20fill='%231568EA'/%3e%3c/g%3e%3c/svg%3e)


Upgrading your iPhone feels exciting until you hit that wall of data transfer worries,losing years of photos, contacts, or work docs can turn joy into stress. Readers upgrading in 2025 want foolproof ways to move everything safely, whether via quick start iPhone setup or after initial use. What if you've already started the new phone? No sweat. This guide shares four solid methods for how to transfer iPhone to iPhone, plus a productivity boost with WPS Office. Let's keep your world intact and seamless.
Method 1: Transfer iPhone to iPhone Using Quick Start

Quick Start makes how to transfer iPhone to iPhone a breeze, relying on Bluetooth and close proximity for a wireless handoff. It grabs apps, settings, photos, messages, and even Face ID data without cables, ideal for fresh setups on iOS 11 or later. But it ties up both phones for a bit, so plan ahead. In 2025, with iOS 18's tweaks, it's faster for big libraries like mine,think 50GB in under 30 minutes on strong Wi-Fi. I always charge both devices first; nothing kills momentum like a low battery pop-up.
Step 1: Prep and Place Devices Update your old iPhone to the latest iOS. Turn on the new one and set it next to the old,within a few inches. A Quick Start animation pops on the new screen.

Step 2: Scan and Authenticate Use the old iPhone's camera to scan the swirling pattern on the new one. Enter your Apple ID and passcode when asked to verify.

Step 3: Choose Transfer Option On the new iPhone, select "Transfer from iPhone." Pick what to move,everything or specifics like photos only. It estimates time based on your data.

Step 4: Wait and Finish Keep devices close and plugged in. Once done, set up Face ID and sign into iCloud. Apps redownload in the background.

Step 5: Verify and Tweak Check key apps like Messages for full threads. If something's missing, sync via iCloud,it's rare, but hey, tech happens.
Last upgrade from iPhone 14 to 16, Quick Start flew through my 80GB setup in 25 minutes,way snappier than iCloud's hour-long waits. No glitches, unlike my old wired tries that tangled cables everywhere. But if Wi-Fi dips, it pauses; that's when I switch to iTunes for reliability. Overall, it's my go-to for that "just works" vibe, though I double-check Health data post-transfer since it needs encryption.
Method 2: Transfer iPhone to iPhone via iCloud Backup
iCloud shines for how to transfer data from one iPhone to another, especially post-setup or without the old phone nearby. It backs up to the cloud, then restores everything,apps, settings, even passwords,over Wi-Fi. Free 5GB starts it, but upgrade to 200GB for $2.99/month if you're photo-heavy like me. In 2025, Apple's temporary storage boost during buys gives three weeks extra space, no charge. Drawback? It needs solid internet; spotty connections stretch hours into days.
Step 1: Back Up Old iPhone On the old device, go to Settings > [Your Name] > iCloud > iCloud Backup. Toggle it on, then tap Back Up Now. Stay on Wi-Fi till the bar fills.

Step 2: Erase New iPhone If Needed If already set up, head to Settings > General > Transfer or Reset iPhone > Erase All Content and Settings. Confirm and wait for the wipe.

Step 3: Start Restore on New Device Power on the new iPhone. Follow prompts to language and Wi-Fi, then at Apps & Data, tap Restore from iCloud Backup.

Step 4: Select and Download Sign in with your Apple ID. Pick the latest backup by date and size. Enter passcode if prompted; the download kicks off.
Step 5: Complete and Sync Stay plugged in,photos and apps trickle in over hours. Sign into accounts as asked, then verify messages and calendars.
Switched to iPhone 15 via iCloud after setup; my 60GB backed up overnight, restored in two hours on gigabit Wi-Fi. Beats Quick Start for remote work trips,no old phone required. But once, a weak hotel signal stalled it; that's my cue for Finder backups. Compared to Quick Start, it's more flexible but hungrier on data caps,worth the 50GB plan for peace.
Method 3: Transfer iPhone to iPhone Using iTunes/Finder
For offline reliability, iTunes (Windows) or Finder (Mac) nails how to transfer iPhone to iPhone with encrypted backups that snag health data and passwords iCloud skips. It's cable-based, so no Wi-Fi woes, perfect for big transfers in 2025's spotty networks. Encrypt for full coverage,passwords stay safe. Takes 10-30 minutes for 100GB, but needs a trusted computer.
Step 1: Connect and Back Up Old iPhone Plug the old iPhone into your Mac (Finder) or PC (iTunes). Select the device, check "Encrypt local backup," set a password, then hit Back Up Now.

Step 2: Erase New iPhone On the new device, go to Settings > General > Transfer or Reset iPhone > Erase All Content and Settings. Let it reset fully.

Step 3: Connect New iPhone Swap cables to the new iPhone. In Finder/iTunes, select it when it appears,trust the computer if prompted.

Step 4: Restore Backup Click Restore Backup. Choose the fresh one by date, enter the encryption password, and confirm. The process spins up.

Step 5: Finish Setup Wait for completion, then sign into iCloud. Apps and media redownload; check for full message history.
Finder on my M2 Mac zipped my iPhone 13's 120GB to a 16 in 20 minutes,flawless for travel sans Wi-Fi. Encryption saved my Fitness logs, which iCloud fumbled once. Versus iCloud, it's quicker offline but tethers you to a desk. I prefer it for sensitive work files; just remember that password or you're locked out.
Boost Your iPhone Experience with WPS Office

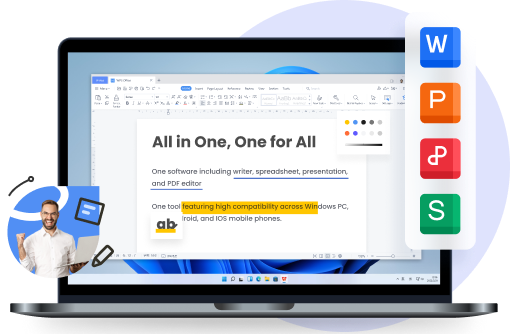
Once you've mastered how to transfer iPhone to iPhone, amp up the new device with WPS Office,a Kingsoft gem since 1988, serving 600M+ users with a 4.8 Trustpilot score. It's free for Writer, Spreadsheet, Presentation (Word/Excel/PPT rivals), plus PDF basics,no ads, no fuss. AI tools like Chat PDF summarize docs fast, and 1GB cloud syncs across iOS, Android, Mac, Windows, Linux. At $29/year for pro PDF, it's a steal versus Adobe. Post-transfer, it organizes your moved files into a productivity beast.
Step 1: Install from App Store Search WPS Office, download the 214MB app. Open and skip sign-in for trial,files pull from iCloud instantly.

Step 2: Scan and Import Docs Tap the camera icon to scan paper notes into editable PDFs. Or import transferred .docx from your library.

Step 3: Edit with AI Magic Highlight text for AI rewrites or translations. In Spreadsheet, auto-fill budgets from imported data,saves hours.

Step 4: Collaborate on the Fly Share links for real-time edits with colleagues. Export to email or WPS Cloud for cross-device access.

Step 5: Secure and Template Up Use file repair for glitchy transfers. Grab free templates for reports,my resume builder polished a CV in minutes.
After Quick Starting to my iPhone 16, WPS opened a transferred 40-page proposal seamlessly, AI trimming fluff while I commuted. Its light footprint beats Microsoft 365's drain, and offline mode trumps Google Docs on flights. Sync to my Linux laptop? Spot-on. Drawback: No VBA for macros, but for 90% of my office grind, it's a winner over pricier rivals.
FAQs
Q1: How long does it take to transfer data from one iPhone to another?
Quick Start: 15-60 minutes for 50-100GB; iCloud: 1-3 hours on good Wi-Fi; Finder/iTunes: 10-30 minutes wired.
Q2: Can I transfer data between iPhones of different iOS versions?
Quick Start needs iOS 12.4+; iCloud and Finder/iTunes handle older, but update for iOS 18's full features in 2025.
Q3: Is it possible to transfer iPhone data without using Wi-Fi?
Yes,Quick Start direct or Finder/iTunes via cable skips networks entirely.
Q4: Will my iMessages and photos transfer automatically?
All methods include them; for extras like PDFs, upload to WPS Cloud pre-transfer.
Q5: Can WPS help me continue working after transferring iPhone data?
Totally,its AI edits and cloud sync pick up right where you left off, no downtime.

'%3e%3cpath%20d='M19.9911%204.11386V6.471H18.5894C18.0775%206.471%2017.7322%206.57814%2017.5536%206.79243C17.3751%207.00671%2017.2858%207.32814%2017.2858%207.75671V9.44421H19.9019L19.5536%2012.0871H17.2858V18.8639H14.5536V12.0871H12.2769V9.44421H14.5536V7.49779C14.5536%206.39064%2014.8632%205.53201%2015.4822%204.92189C16.1013%204.31177%2016.9257%204.00671%2017.9554%204.00671C18.8304%204.00671%2019.509%204.04243%2019.9911%204.11386Z'%20fill='%23333333'/%3e%3c/g%3e%3cdefs%3e%3cclipPath%20id='clip0_2938_8199'%3e%3crect%20width='16'%20height='16'%20fill='white'%20transform='translate(8%204.00671)'/%3e%3c/clipPath%3e%3c/defs%3e%3c/svg%3e)
'%3e%3cpath%20d='M17.5237%2010.7813L23.4811%204H22.0699L16.8949%209.88693L12.7648%204H8L14.2469%2012.9029L8%2020.0133H9.4112L14.8725%2013.7952L19.2352%2020.0133H24M9.92053%205.04213H12.0885L22.0688%2019.0224H19.9003'%20fill='%23333333'/%3e%3c/g%3e%3cdefs%3e%3cclipPath%20id='clip0_2938_8200'%3e%3crect%20width='16'%20height='16.0134'%20fill='white'%20transform='translate(8%204)'/%3e%3c/clipPath%3e%3c/defs%3e%3c/svg%3e)


