
'%3e%3cpath%20d='M8%200C12.4183%200%2016%203.58172%2016%208C16%2012.4183%2012.4183%2016%208%2016C3.58172%2016%200%2012.4183%200%208C0%203.58172%203.58172%200%208%200ZM11.6162%204.38379C11.2257%203.99337%2010.5927%203.99338%2010.2021%204.38379L8%206.58594L5.79785%204.38379C5.40732%203.99334%204.77429%203.99329%204.38379%204.38379C3.99331%204.77429%203.99335%205.40733%204.38379%205.79785L6.58594%208L4.38379%2010.2021C3.99348%2010.5927%203.99341%2011.2257%204.38379%2011.6162C4.77426%2012.0066%205.40734%2012.0065%205.79785%2011.6162L8%209.41406L10.2021%2011.6162C10.5927%2012.0066%2011.2257%2012.0067%2011.6162%2011.6162C12.0067%2011.2257%2012.0066%2010.5927%2011.6162%2010.2021L9.41406%208L11.6162%205.79785C12.0066%205.40735%2012.0066%204.77429%2011.6162%204.38379Z'%20fill='%23080E17'%20fill-opacity='0.46'/%3e%3c/g%3e%3cdefs%3e%3cclipPath%20id='clip0_3761_713'%3e%3crect%20width='16'%20height='16'%20fill='white'/%3e%3c/clipPath%3e%3c/defs%3e%3c/svg%3e)


'%3e%3cpath%20fill-rule='evenodd'%20clip-rule='evenodd'%20d='M21.4999%2010.9993C21.4999%205.20009%2016.7986%200.498901%2010.9993%200.498901C5.19994%200.498901%200.498657%205.20009%200.498657%2010.9993C0.498657%2016.2404%204.33858%2020.5844%209.35855%2021.3722V14.0346H6.69238V10.9993H9.35855V8.68594C9.35855%206.05427%2010.9262%204.60062%2013.3248%204.60062C14.4736%204.60062%2015.6753%204.80571%2015.6753%204.80571V7.38979H14.3512C13.0468%207.38979%2012.64%208.19921%2012.64%209.0296V10.9993H15.5523L15.0867%2014.0346H12.64V21.3722C17.66%2020.5844%2021.4999%2016.2404%2021.4999%2010.9993Z'%20fill='%231568EA'/%3e%3c/g%3e%3c/svg%3e)


Working with PowerPoint and other office software is becoming increasingly popular, especially since the onset of COVID-19. Alongside this trend, users facing challenges have become more common, with their presentations occasionally getting lost due to PowerPoint errors or unexpected interruptions in PowerPoint. However, there's no need to worry; PowerPoint presentations can be recovered. In this article, we will discuss methods to recover unsaved presentations on both Mac and Windows. So, let's proceed to recover your presentation!

How to Recover Unsaved PowerPoint on Windows (In Easy Steps)
In this section, we will learn how to recover unsaved PowerPoint files on Windows, so, let's get started!
Method1: Using the “Recover Unsaved Presentations” Feature in PowerPoint
In this method, we will utilize PowerPoint's built-in feature called "Recover Unsaved Presentations:
Step 1: Open the PowerPoint app on your Windows system and go to the "Open" tab in the sidebar. There, you will find the option for "Recover Unsaved Presentation".

Step 2: The system will then prompt you to the location of unsaved files within File Explorer. You can also manually navigate to the directory.

Step 3: In the directory, you will see a list of recoverable PPT files. Select the latest version to restore.
Step 4: Make sure to save your recovered PowerPoint file in a safe and easily accessible location. It's recommended to save it as a copy.
Method 2: Using the AutoRecover Feature to Recover Unsaved PowerPoint
Step 1: Open PowerPoint, click "File" in the upper left corner, and select "Options" from the dropdown.

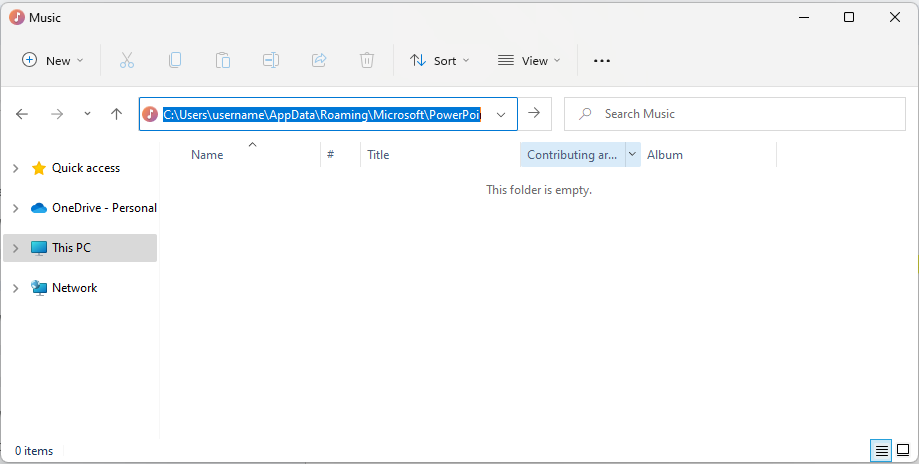
Step 2: In the PowerPoint Options window, choose "Save" from the left-hand menu, locate "AutoRecover file location", and copy the following path:
C:\Users\username\AppData\Roaming\Microsoft\PowerPoint

Step 3: Open File Explorer, then paste and browse the copied path to locate the unsaved file you need.
Step 4: Copy the unsaved file to a secure location, change its file extension to .pptx or .ppt, and attempt to open and save it in another location.
How to Recover Unsaved PowerPoint on Mac (Easy & Quick)
Mac users can recover their unsaved presentation files easily as follows:
Method 1: Check Recent Files on Mac
Step 1:Start the PowerPoint application on your Mac.
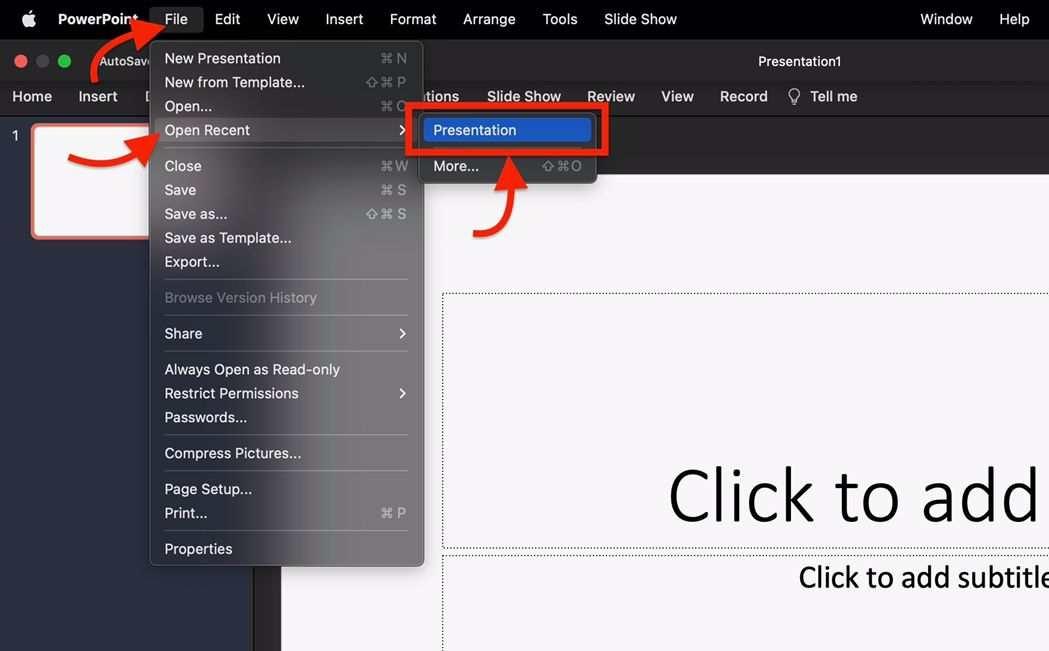
Step 2: Navigate to the menu bar at the top of your screen. Click on "File" and select "Open Recent" from the dropdown menu. Click on Presentation to move forward.
Step 3: Choose the file you need, and it will open in PowerPoint.
Step 4: Now, go to "File" again, but this time, select "Save As" and pick your desired location to save the file.

Method 2: Using AutoSave Feature on Mac (If Enabled)
Step 1: Open PowerPoint on your Mac, then go to "Preferences".

Step 2: In the Preferences menu, click on "Save" in the Preference window.

Step 3: Make sure the box next to "Save AutoRecover info every" is checked, this enables AutoSave.

To Find the AutoRecovery Folder:
Step 1: Quickly locate the PowerPoint AutoSave folder on your Mac. Open Finder, click "Go" in the menu, and select "Go to Folder".

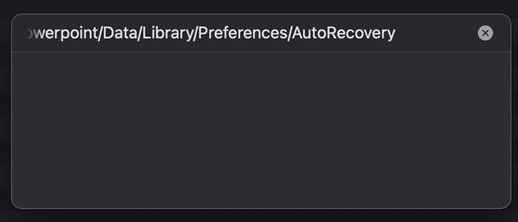
Step 2: Copy and paste the following folder path in the search field, replacing "username" with your username:
/Users/username/Library/Containers/com.Microsoft.Powerpoint/Data/Library/Preferences/AutoRecovery
Step 2: Once you find the necessary file, you can either drag and drop it into a different folder or open the PPT presentation and click "File" > "Save as".
How to Avoid PowerPoint from Being Unsaved Again
What Is WPS Office and Why Choose it?
Unexpected power outages and computer crashes can disrupt your work at any moment. To maintain productivity and safeguard your work, it's crucial to utilize the right resources. WPS Office offers a solution by providing cloud storage options that automatically save your work as you progress. This comprehensive office suite is highly compatible, allowing you to seamlessly work on documents, presentations, and spreadsheets without any concerns. Plus, its compatibility with Microsoft Office ensures smooth collaboration and hassle-free document sharing.

Edit Your PowerPoint Presentations with WPS Office
Step 1: To kickstart the editing process, the initial step involves downloading WPS Office. Head to the official WPS Office website to initiate the download.

Step 2: Open the WPS Office application once it has been successfully downloaded.

Step 3: After launching WPS Office, choose "Slides" from the Side Bar, and then you’ll see the “Open” icon, click on it to open your PowerPoint Presentation.

Step 4: Elevate the quality of your presentation with ease by making use of the diverse editing tools available in WPS Presentation!

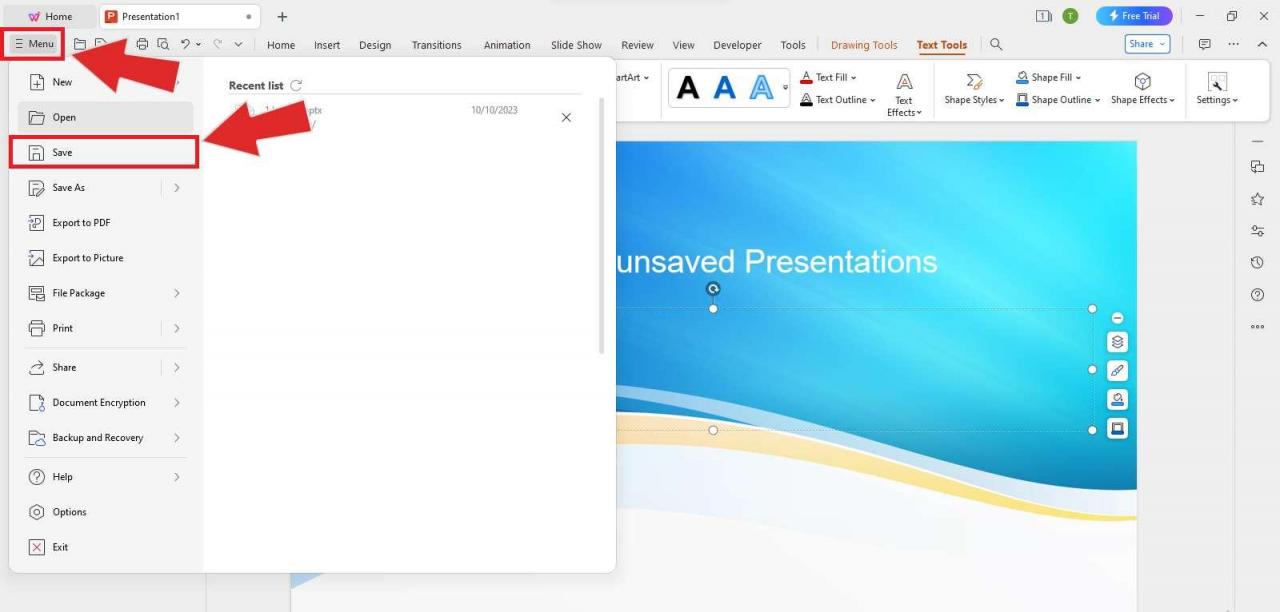
Step 5: Once your presentation is ready, click on the menu in the top left corner. Then, select the "Save" option to store your presentation safely on your computer.
Use Cloud Storage Service
WPS Cloud is a comprehensive document storage and management service integrated with WPS Office. It offers users 1GB of free storage space for files and rich media. Documents are automatically saved to WPS Cloud, allowing file roaming and cross-device accessibility.

Creating a New Folder:
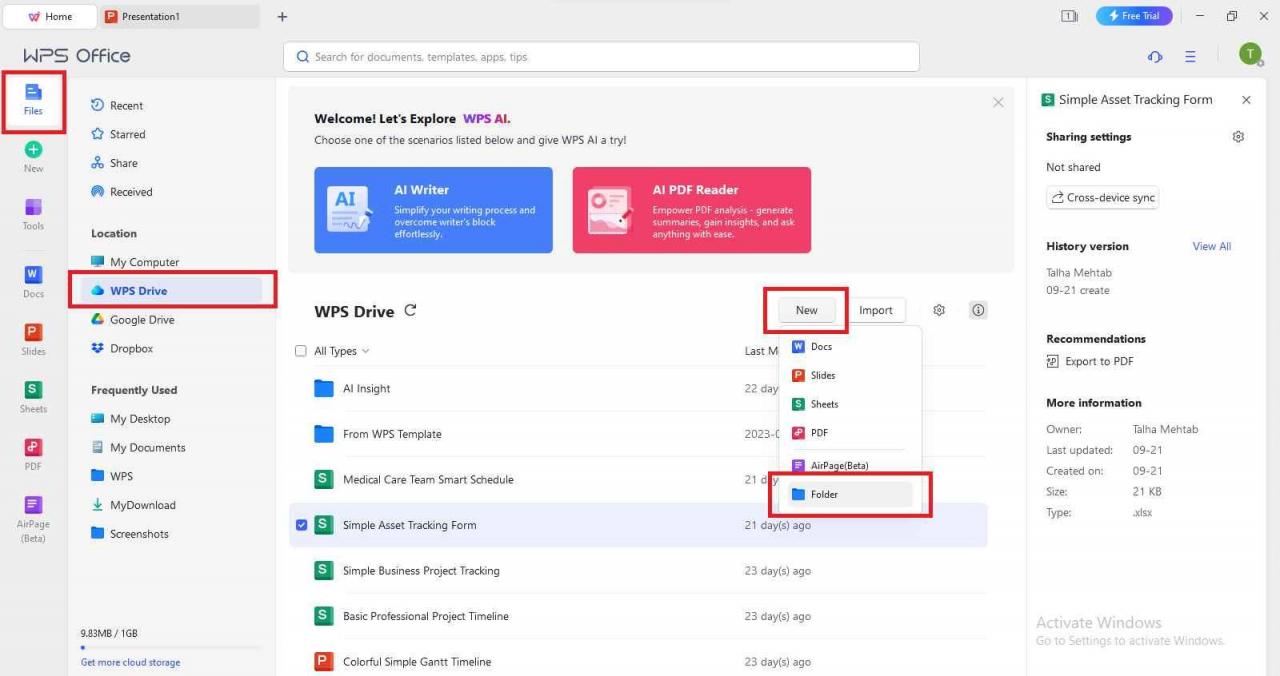
Step 1: In WPS Office, click on "Files" in the sidebar menu.
Step 2: Select "WPS Drive." You'll see all your files stored in WPS Cloud. Now, click on "New" and then choose "Folder" to create a new folder in WPS Cloud.
To delete a single file:
Step 1: Go back to "WPS Drive" and locate the file you want to delete.
Step 2: Right-click on the file, then choose "Delete" from the context menu to remove it from WPS Drive.

Downloading Files:
Step 1: In "WPS Drive", locate the file you wish to download.
Step 2: Right-click on the file and select "Export" from the context menu.
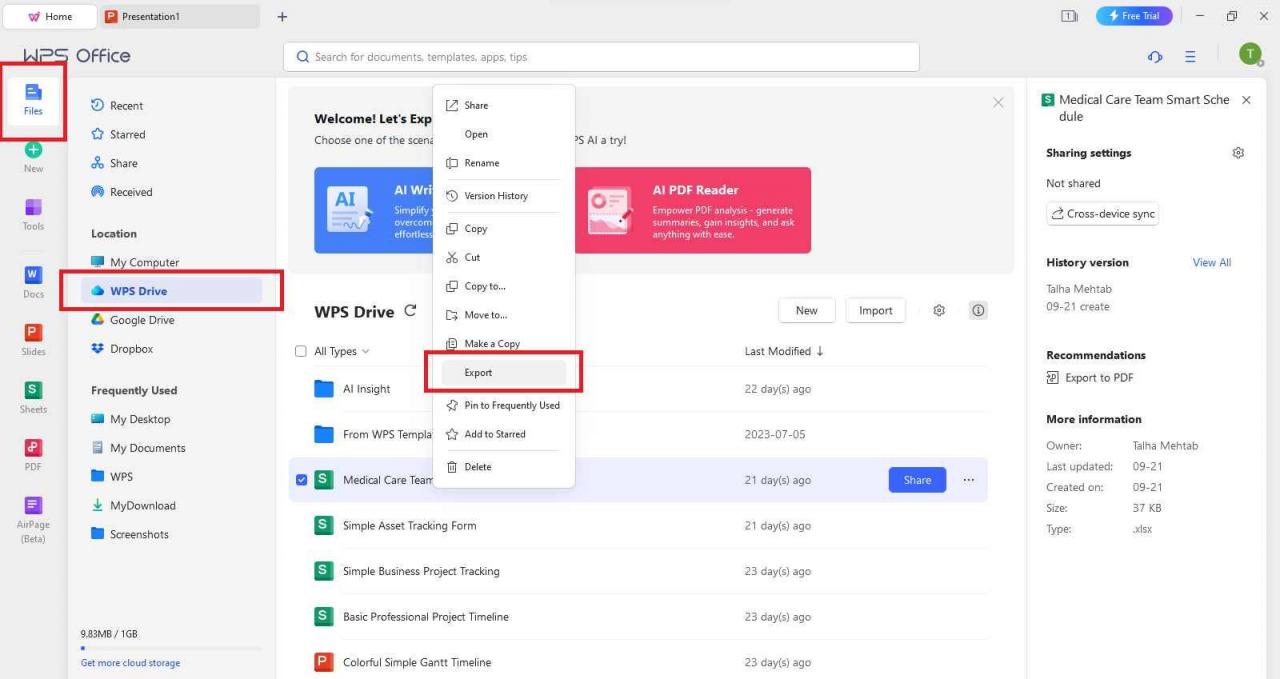
Step 3: Choose the location to save the file and click "Save".


FAQs
Q1. What is the standard storage space provided for a WPS account?
A standard WPS account comes with 1 GB of storage in the cloud. You can save documents, spreadsheets, and other files there. But if you need additional space, you can get a Premium account. You get 20 GB of storage with a Premium account. You have to pay for Premium every month for a monthly subscription. It is practical if you usually make and save big files using WPS.
Q2. Do PowerPoint presentations save automatically?
Yes, PowerPoint presentations do have an autosave feature. By default, PowerPoint autosaves your work every 10 minutes. This feature protects your work in case of unforeseen issues like power outages or program crashes. But it's still a good practice to save your work yourself regularly. If you want to retrieve an autosaved file, you can do so from the Backstage view in PowerPoint.
Q3. How do I change the AutoSave frequency in PowerPoint?
To modify how often PowerPoint saves your work automatically, follow this straight-forward step-by-step guide:
Step 1: Open PowerPoint and click on the "File” menu. You can locate this on the Left side.
Step 2: From the menu that displays, select "Options".
Step 3: In the Options window, click on "Save".
Step 4: Look for the "Save AutoRecover information every [X] minutes" field under "Save presentations".
Step 5: Adjust the number in this field to set how often PowerPoint saves your work automatically.
Remember that saving more frequently will secure your work but may slow down the PowerPoint. Therefore, find the ideal option that suits your preferences.
Empower Your PowerPoint Journey with Recovery and Enhancement
However, sometimes, due to power outages or app malfunctions, our hard work in crafting a presentation isn't saved. In this article, we have explored how to recover our unsaved presentations. WPS Office offers the convenience of cloud storage, allowing you to seamlessly recover unsaved presentations. Download WPS Office today and streamline your presentation-making process.

'%3e%3cpath%20d='M19.9911%204.11386V6.471H18.5894C18.0775%206.471%2017.7322%206.57814%2017.5536%206.79243C17.3751%207.00671%2017.2858%207.32814%2017.2858%207.75671V9.44421H19.9019L19.5536%2012.0871H17.2858V18.8639H14.5536V12.0871H12.2769V9.44421H14.5536V7.49779C14.5536%206.39064%2014.8632%205.53201%2015.4822%204.92189C16.1013%204.31177%2016.9257%204.00671%2017.9554%204.00671C18.8304%204.00671%2019.509%204.04243%2019.9911%204.11386Z'%20fill='%23333333'/%3e%3c/g%3e%3cdefs%3e%3cclipPath%20id='clip0_2938_8199'%3e%3crect%20width='16'%20height='16'%20fill='white'%20transform='translate(8%204.00671)'/%3e%3c/clipPath%3e%3c/defs%3e%3c/svg%3e)
'%3e%3cpath%20d='M17.5237%2010.7813L23.4811%204H22.0699L16.8949%209.88693L12.7648%204H8L14.2469%2012.9029L8%2020.0133H9.4112L14.8725%2013.7952L19.2352%2020.0133H24M9.92053%205.04213H12.0885L22.0688%2019.0224H19.9003'%20fill='%23333333'/%3e%3c/g%3e%3cdefs%3e%3cclipPath%20id='clip0_2938_8200'%3e%3crect%20width='16'%20height='16.0134'%20fill='white'%20transform='translate(8%204)'/%3e%3c/clipPath%3e%3c/defs%3e%3c/svg%3e)


