
'%3e%3cpath%20d='M8%200C12.4183%200%2016%203.58172%2016%208C16%2012.4183%2012.4183%2016%208%2016C3.58172%2016%200%2012.4183%200%208C0%203.58172%203.58172%200%208%200ZM11.6162%204.38379C11.2257%203.99337%2010.5927%203.99338%2010.2021%204.38379L8%206.58594L5.79785%204.38379C5.40732%203.99334%204.77429%203.99329%204.38379%204.38379C3.99331%204.77429%203.99335%205.40733%204.38379%205.79785L6.58594%208L4.38379%2010.2021C3.99348%2010.5927%203.99341%2011.2257%204.38379%2011.6162C4.77426%2012.0066%205.40734%2012.0065%205.79785%2011.6162L8%209.41406L10.2021%2011.6162C10.5927%2012.0066%2011.2257%2012.0067%2011.6162%2011.6162C12.0067%2011.2257%2012.0066%2010.5927%2011.6162%2010.2021L9.41406%208L11.6162%205.79785C12.0066%205.40735%2012.0066%204.77429%2011.6162%204.38379Z'%20fill='%23080E17'%20fill-opacity='0.46'/%3e%3c/g%3e%3cdefs%3e%3cclipPath%20id='clip0_3761_713'%3e%3crect%20width='16'%20height='16'%20fill='white'/%3e%3c/clipPath%3e%3c/defs%3e%3c/svg%3e)


'%3e%3cpath%20fill-rule='evenodd'%20clip-rule='evenodd'%20d='M21.4999%2010.9993C21.4999%205.20009%2016.7986%200.498901%2010.9993%200.498901C5.19994%200.498901%200.498657%205.20009%200.498657%2010.9993C0.498657%2016.2404%204.33858%2020.5844%209.35855%2021.3722V14.0346H6.69238V10.9993H9.35855V8.68594C9.35855%206.05427%2010.9262%204.60062%2013.3248%204.60062C14.4736%204.60062%2015.6753%204.80571%2015.6753%204.80571V7.38979H14.3512C13.0468%207.38979%2012.64%208.19921%2012.64%209.0296V10.9993H15.5523L15.0867%2014.0346H12.64V21.3722C17.66%2020.5844%2021.4999%2016.2404%2021.4999%2010.9993Z'%20fill='%231568EA'/%3e%3c/g%3e%3c/svg%3e)


You may need to create forms for your surveys, online orders, job application forms, and more. However, you may need clarification about the steps and easy methods for creating a fillable form in Excel. What are some easy ways to make a fillable form in Excel? How does it go? This article will provide you with a complete guide on how to create a fillable form in Excel.
How to Make a Fillable Data Entry Form in a Spreadsheet
We will learn how to create a form in spreadsheet based on three methods.
1. Creating a Fillable Data Entry Form in Excel
Step 1: In an Excel file, type in the headings as shown below.

Step 2: Choose the heading row and convert it into a table as shown below.

Step 3: Move to the file tab.

Step 4: Click on the options as shown.

Step 5: Select Customized Ribbon, Insert, Then New group, and click Rename.
Give your group name as shown below. Here, we have ‘Insert Name’ and then hit OK.

Step 6: Select Command Not in the Ribbon in the Choose Command section.
Choose Form, then Add, followed by Insert Form. Click Ok.

Step 7: Choose the header row and move to Insert, then Form.
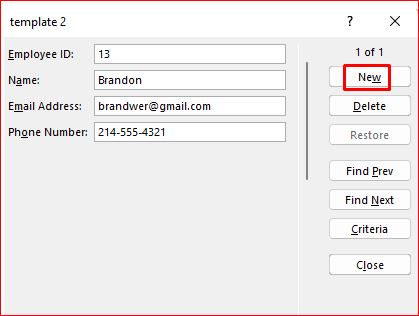
Step 8: A dialogue box, as shown below, will appear. Include the relevant data, i.e., Employee data, and click New. That is how you add employee data.
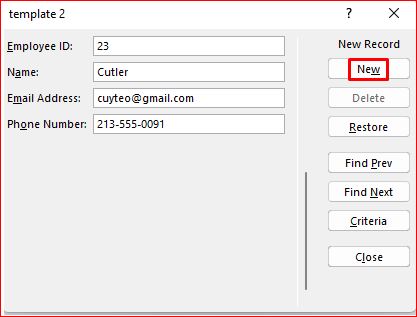
Step 9: Add another data and again click on New.
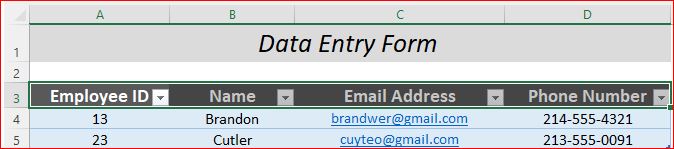
Step 10: After this, another data appears below the first. As shown below.
2. Making Fillable Forms from Available Templates Excel
WPS Office provides a valuable resource of free Excel templates with fillable forms, offering users efficiency, convenience, and customization options for various business and personal tasks.
Users can access templates like;
Company Sales Statement: For recording sales data.
Simple delivery templates allow calculating all accounting details via automatic spreadsheet formulas.

Product inspection checklist: This checklist is fully edited and available online for free.

3. Apply data validation to cells
Video link
Step 1: Choose the cells you want to create a rule for.
Step 2: Click on Data, then followed by Data Validation.
Step 3: In the Data Validation dialog box, go to the Settings tab.
Step 4: Under the "Allow" section, select the type of data validation you want to apply:
- Whole Number: Allows only whole numbers.
- Decimal: Allows only decimal numbers.
- List: Creates a drop-down list for users to select from.
- Date: Accepts only date values.
- Time: Accepts only time values.
- Text Length: Sets a limit on the length of the text.
- Custom: Allows you to create a custom formula for data validation.
Step 5: Based on the selection in the previous step, adjust the required values under the "Data" section.
Step 6: Move to the Input Message tab and customize a message users will see when entering data.
Step 7: Check the "Show input message when the cell is selected" checkbox to display the message when the user interacts with the cell(s).
Step 8: Switch to the Error Alert tab to customize the error message when an invalid value is entered, and choose an appropriate error style.
Step 9: Click OK to apply the data validation. Validated data ensures cleaner datasets, which improves the accuracy of Excel data analysis later on.
Here's a brief overview of the differences between the three methods
Creating a Fillable Data Entry Form in Excel:
Quickness: It involves creating a custom data entry form in Excel, which may take some time, especially for beginners.
Simplicity: This method might be a bit more complex for beginners due to the multiple steps involved
Making Fillable Form from Available Templates of Excel:
Quickness: This is the quickest method involving pre-designed templates with fillable forms.
Simplicity: This method is straightforward and user-friendly, especially for beginners, as it eliminates the need for complex setup or customization.
Apply Data Validation to Cells:
Quickness: The speed of this method depends on the complexity of the data validation rules you want to apply.
Simplicity: This method can be straightforward for basic data validation but may become more complex when creating custom validation rules.
Recommendation Based on my Experience:
The "Making Fillable Form from Available Templates of Excel" method is recommended for beginners or those looking for a quick and straightforward solution. It's efficient, user-friendly, and provides access to ready-made templates, saving you time and effort.
If you require more customization and have some familiarity with Excel, you can explore the "Apply Data Validation to Cells" method. It offers flexibility but may involve a learning curve for those new to Excel.
The "Creating a Fillable Data Entry Form in Excel" method is best suited for users with specific customization needs and willing to invest time in setting up a custom data entry form in Excel.
Best Alternative to Make a Printable Form——WPS Office
WPS is a powerful office software with stable operation and fashionable design.
It can perform tasks such as;
Text processing,
Table production,
Slide production,
Graphic image processing,
Simple database processing.
My personal experience with WPS Office has been great. WPS Office offers a free standard for a versatile suite of office applications. It's compatible with various platforms and offers cost-effective premium and business plans.
It offers almost all services present in Microsoft Office but with the added advantage of effective costing.
WPS Office is more suitable for individuals, students, and small businesses looking for a cost-effective office solution with essential features.
How to download WPS Office for free?
Let’s learn the steps right away;
Step 1: Select a browser and access the WPS Office Official Site.

Step 2: Press on ‘Get store app’

Step 3: Click on ‘Open Microsoft store’

Step 4: Press ‘Get’ to download the software.

Step 5: Downloading begins right away.

Step 6: Press on ‘Open’ to access the software.

Step 7: Press ‘Agree and continue’ into the software interface.

Step 8: You can now access the software for documents, spreadsheets, PowerPoint, and more.


FAQs
How do I create a fillable PDF from Excel?
To create a fillable PDF from an Excel spreadsheet, you can follow these steps;
Step 1: Convert Excel Spreadsheet to PDF:
Open your Excel file.
Click "File" and then select "Save As" or "Print."
In the "Save As" dialog, choose the option to save as a PDF. You can find this option in the dropdown list of file formats.
Alternatively, you can create a PDF by using the Foxit Add-in in Microsoft Excel.
Step 2: Recognition of the Form Fields:
Open the PDF document you've converted from the Excel spreadsheet in Foxit PDF Editor.
Navigate to the "Form" menu within Foxit PDF Editor.
Select "Run Form Field Recognition." This step will identify the areas in the PDF where form fields should be created.
You can further edit or customize the recognized form fields as needed.
How do I create an automated form in Excel?
Step 1: Open the Excel file for the data you want to work with.
Step 2: Locate the Quick Access Toolbar at the top of the Excel window (usually below the ribbon).
Step 3: In the drop-down menu, select More commands.
Step 4: In the dialog box, under "Choose commands from," select "All Commands." That will display a list of all available Excel commands.
Step 5: Select "Form" and click the "Add>>" button to add it to the Quick Access Toolbar, and then OK.
Step 6: Return to your datasheet and select all the data you want to work with. You can do this by clicking and dragging to select a range or pressing "Ctrl + A" to select the entire sheet.
Step 7: Once your data is selected, click the "Form" button on your Quick Access Toolbar.
The Excel data entry form will be presented to you. This form allows you to:
Enter new data.
Edit existing data.
Delete data.
Search for specific data using criteria.
Step 8: After adding the "Form" command to your Quick Access Toolbar, you can access it whenever you work with large data sheets in Excel.
Summary
The guide offers a comprehensive guide on creating a data form in Excel. It highlights the user-friendly nature of making Form from Available Templates of Excel, its simplicity and efficiency, making it a recommended choice, especially for beginners. Be sure to consider WPS Office. It is a cost-effective alternative to Microsoft Office, suitable for individuals and small businesses, citing its rich features and stability.

'%3e%3cpath%20d='M19.9911%204.11386V6.471H18.5894C18.0775%206.471%2017.7322%206.57814%2017.5536%206.79243C17.3751%207.00671%2017.2858%207.32814%2017.2858%207.75671V9.44421H19.9019L19.5536%2012.0871H17.2858V18.8639H14.5536V12.0871H12.2769V9.44421H14.5536V7.49779C14.5536%206.39064%2014.8632%205.53201%2015.4822%204.92189C16.1013%204.31177%2016.9257%204.00671%2017.9554%204.00671C18.8304%204.00671%2019.509%204.04243%2019.9911%204.11386Z'%20fill='%23333333'/%3e%3c/g%3e%3cdefs%3e%3cclipPath%20id='clip0_2938_8199'%3e%3crect%20width='16'%20height='16'%20fill='white'%20transform='translate(8%204.00671)'/%3e%3c/clipPath%3e%3c/defs%3e%3c/svg%3e)
'%3e%3cpath%20d='M17.5237%2010.7813L23.4811%204H22.0699L16.8949%209.88693L12.7648%204H8L14.2469%2012.9029L8%2020.0133H9.4112L14.8725%2013.7952L19.2352%2020.0133H24M9.92053%205.04213H12.0885L22.0688%2019.0224H19.9003'%20fill='%23333333'/%3e%3c/g%3e%3cdefs%3e%3cclipPath%20id='clip0_2938_8200'%3e%3crect%20width='16'%20height='16.0134'%20fill='white'%20transform='translate(8%204)'/%3e%3c/clipPath%3e%3c/defs%3e%3c/svg%3e)


