
'%3e%3cpath%20d='M8%200C12.4183%200%2016%203.58172%2016%208C16%2012.4183%2012.4183%2016%208%2016C3.58172%2016%200%2012.4183%200%208C0%203.58172%203.58172%200%208%200ZM11.6162%204.38379C11.2257%203.99337%2010.5927%203.99338%2010.2021%204.38379L8%206.58594L5.79785%204.38379C5.40732%203.99334%204.77429%203.99329%204.38379%204.38379C3.99331%204.77429%203.99335%205.40733%204.38379%205.79785L6.58594%208L4.38379%2010.2021C3.99348%2010.5927%203.99341%2011.2257%204.38379%2011.6162C4.77426%2012.0066%205.40734%2012.0065%205.79785%2011.6162L8%209.41406L10.2021%2011.6162C10.5927%2012.0066%2011.2257%2012.0067%2011.6162%2011.6162C12.0067%2011.2257%2012.0066%2010.5927%2011.6162%2010.2021L9.41406%208L11.6162%205.79785C12.0066%205.40735%2012.0066%204.77429%2011.6162%204.38379Z'%20fill='%23080E17'%20fill-opacity='0.46'/%3e%3c/g%3e%3cdefs%3e%3cclipPath%20id='clip0_3761_713'%3e%3crect%20width='16'%20height='16'%20fill='white'/%3e%3c/clipPath%3e%3c/defs%3e%3c/svg%3e)


'%3e%3cpath%20fill-rule='evenodd'%20clip-rule='evenodd'%20d='M21.4999%2010.9993C21.4999%205.20009%2016.7986%200.498901%2010.9993%200.498901C5.19994%200.498901%200.498657%205.20009%200.498657%2010.9993C0.498657%2016.2404%204.33858%2020.5844%209.35855%2021.3722V14.0346H6.69238V10.9993H9.35855V8.68594C9.35855%206.05427%2010.9262%204.60062%2013.3248%204.60062C14.4736%204.60062%2015.6753%204.80571%2015.6753%204.80571V7.38979H14.3512C13.0468%207.38979%2012.64%208.19921%2012.64%209.0296V10.9993H15.5523L15.0867%2014.0346H12.64V21.3722C17.66%2020.5844%2021.4999%2016.2404%2021.4999%2010.9993Z'%20fill='%231568EA'/%3e%3c/g%3e%3c/svg%3e)


Background graphics add elegance to presentations in PowerPoint. Honestly, I've never seen a great presentation without a resonating background! A cluttered background can make it difficult for your readers to grasp your message. So, if your background graphic is slightly off, then my friend, there's only one way to fix that: change it!
Yet, some users often find this tricky, while most get stuck in the process. So, how do we change background graphics in PowerPoint? This guide will explain how to change background graphics in PowerPoint and reveal other interesting background tips. Read on!
How to Edit Background Graphics in PowerPoint (In Easy Steps)
Editing a background graphic sounds like a job for professional PowerPoint users alone, but I guarantee it isn't. If beginners can't do it, then how can they create the exact presentation slide like those in their creative realms?
In this guide, I will picture three common scenarios you may find yourself in and explain how to change the background graphics in each scenario in easy steps. Let's move on, shall we?
Situation 1: Only One Specific Slide
Here, the user wants to edit the background graphic of only one slide in the entire presentation. With this, you can ensure the specific slide is more captivating than the others. Also, your edits will not affect the other slides, retaining their uniqueness.
So, If you are in this situation, wanting to edit the background graphics of a specific slide in PowerPoint, here are the easy steps to take:
Step 1: Open the presentation slide with the background graphic you want to edit.

Step 2: Scroll down to the slide whose background graphic you want to change or select the slide on the left-hand side.

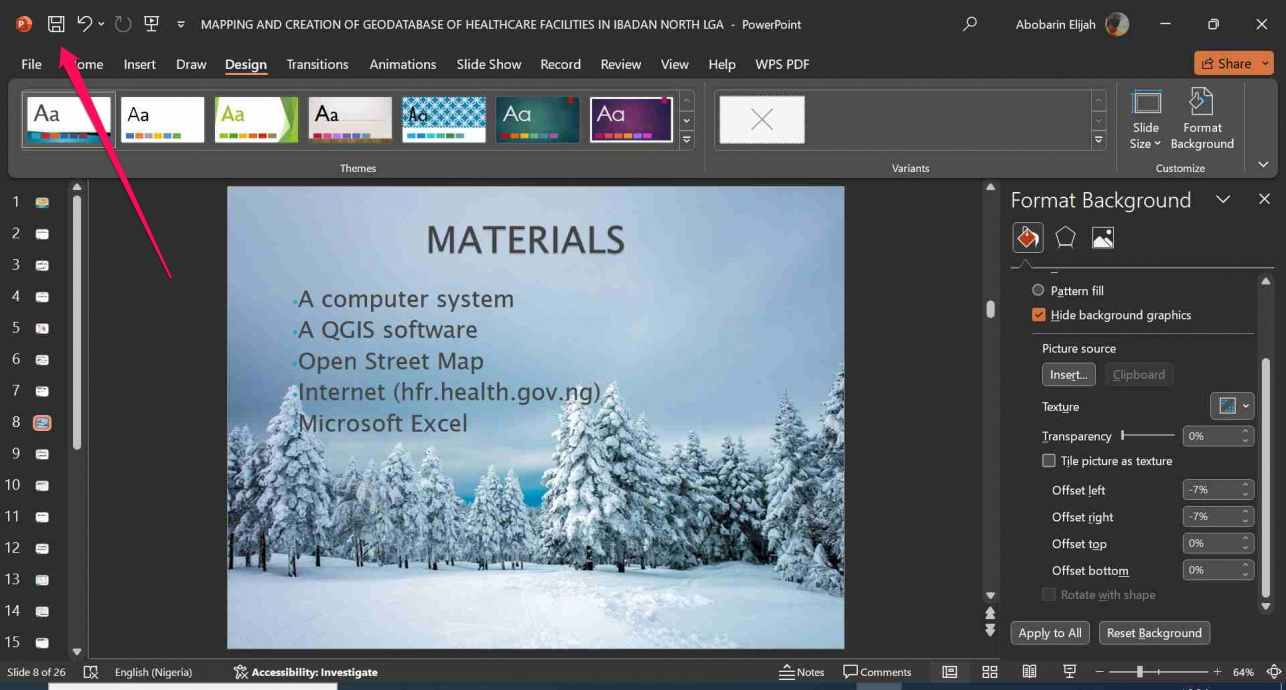
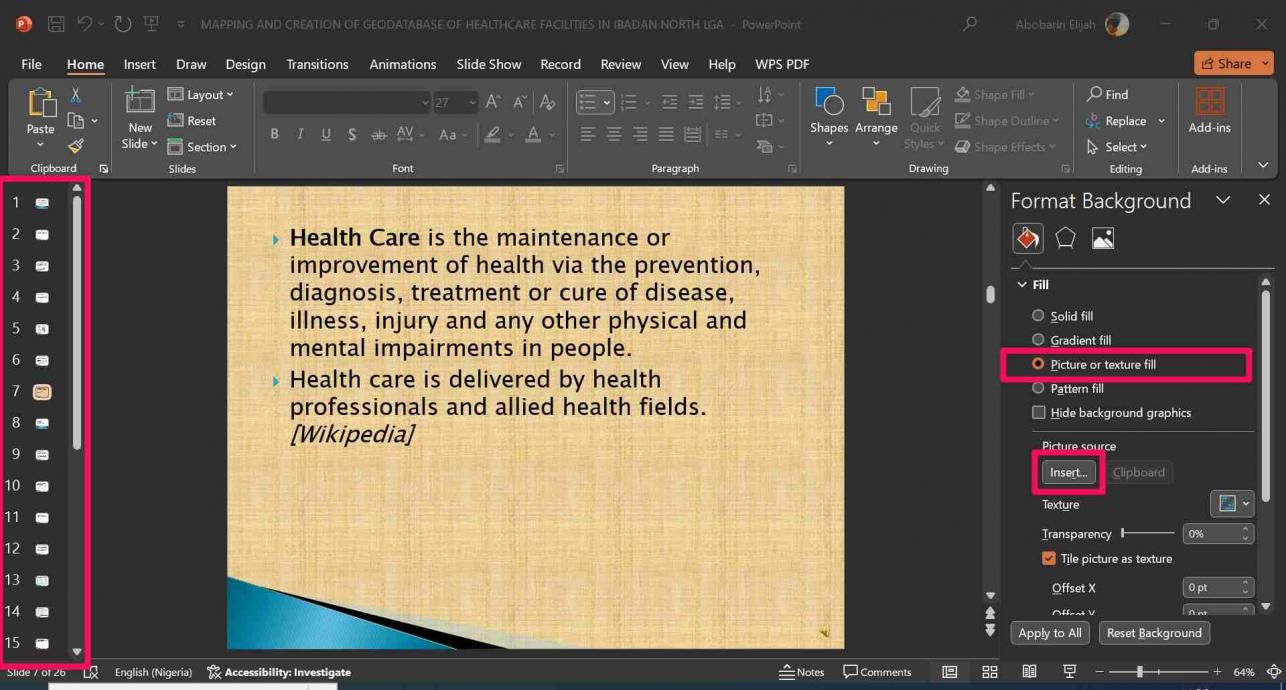
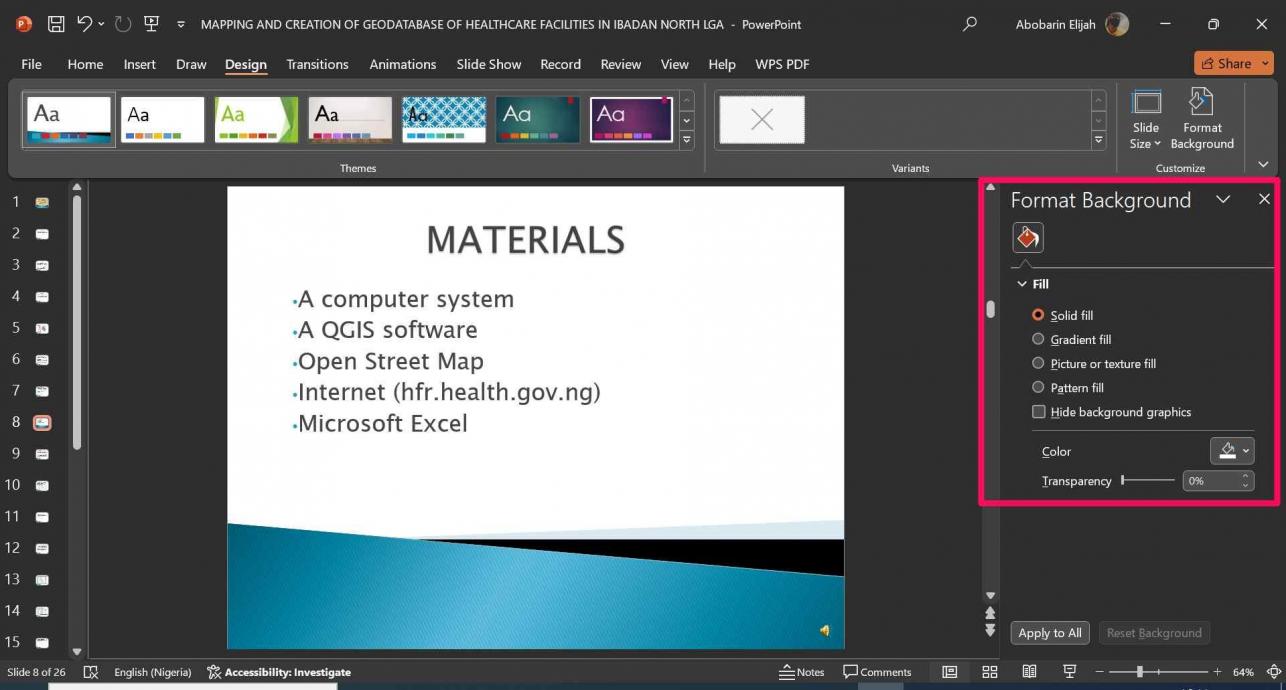
Step 3: Right-click on an empty part of the slide without a text box or element. Select the "Format Background" option from the pop-up list, which opens up a pane on the right-hand side.
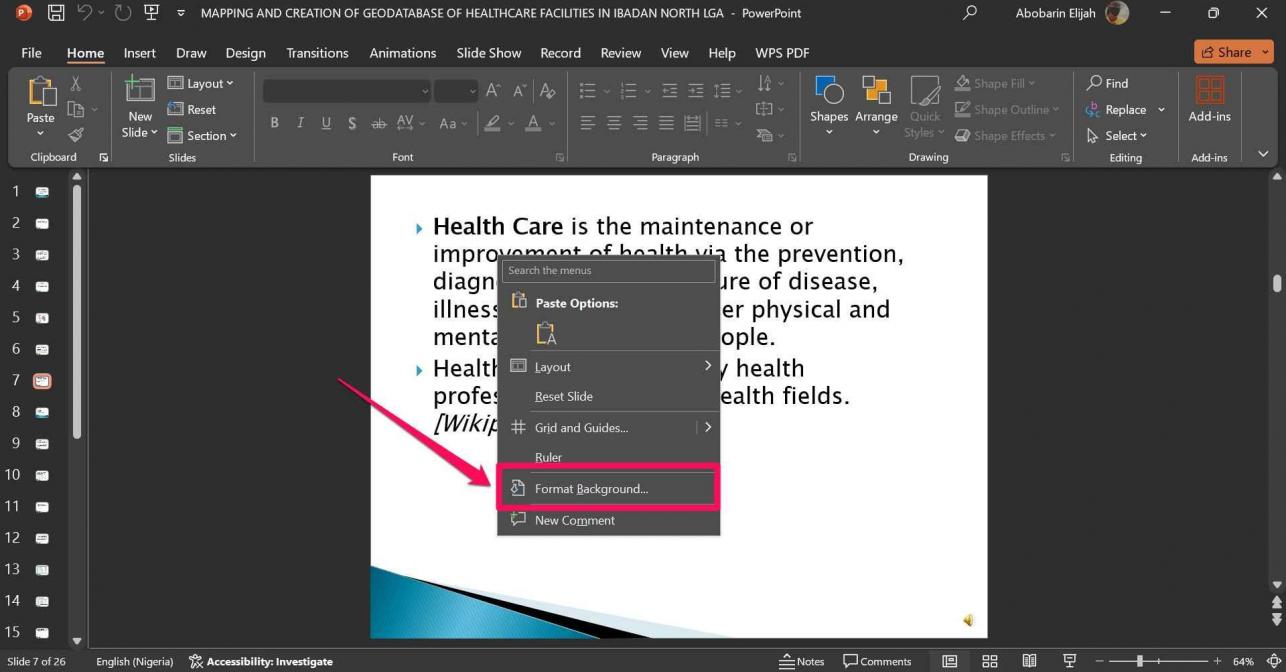
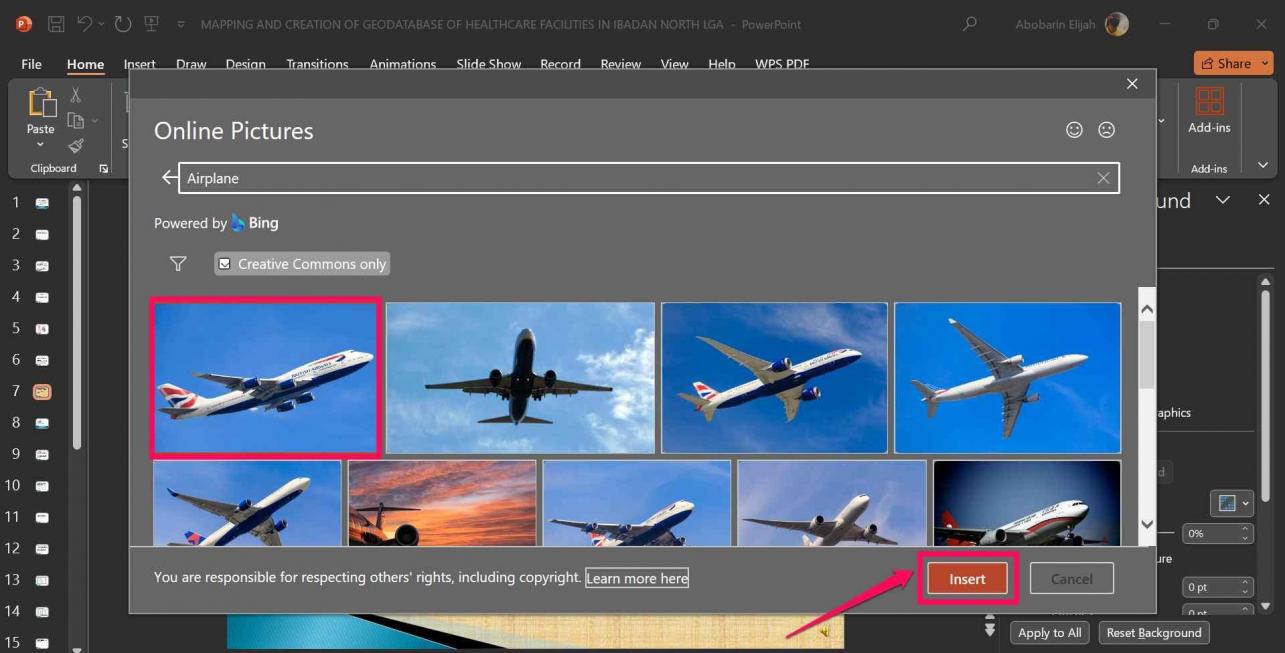
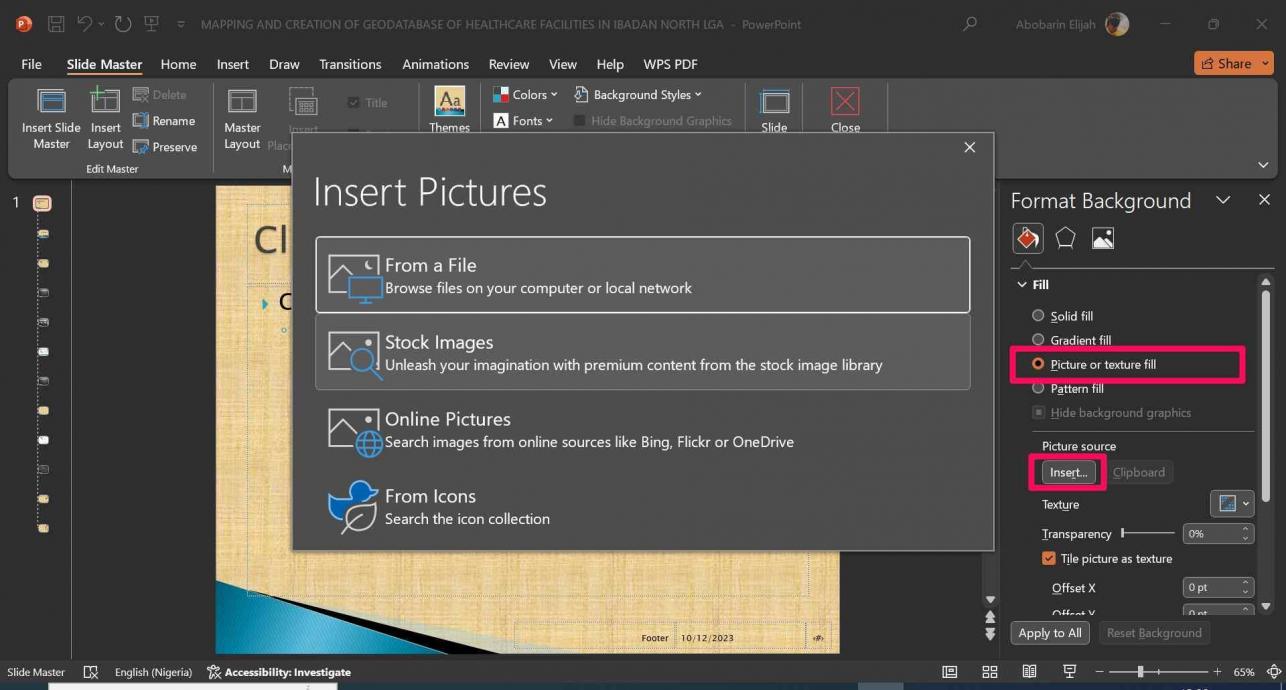
Step 4: Select the "Picture or text fill" option on the pane. Then, click Insert to choose the source of the background graphic (From file or online pictures).
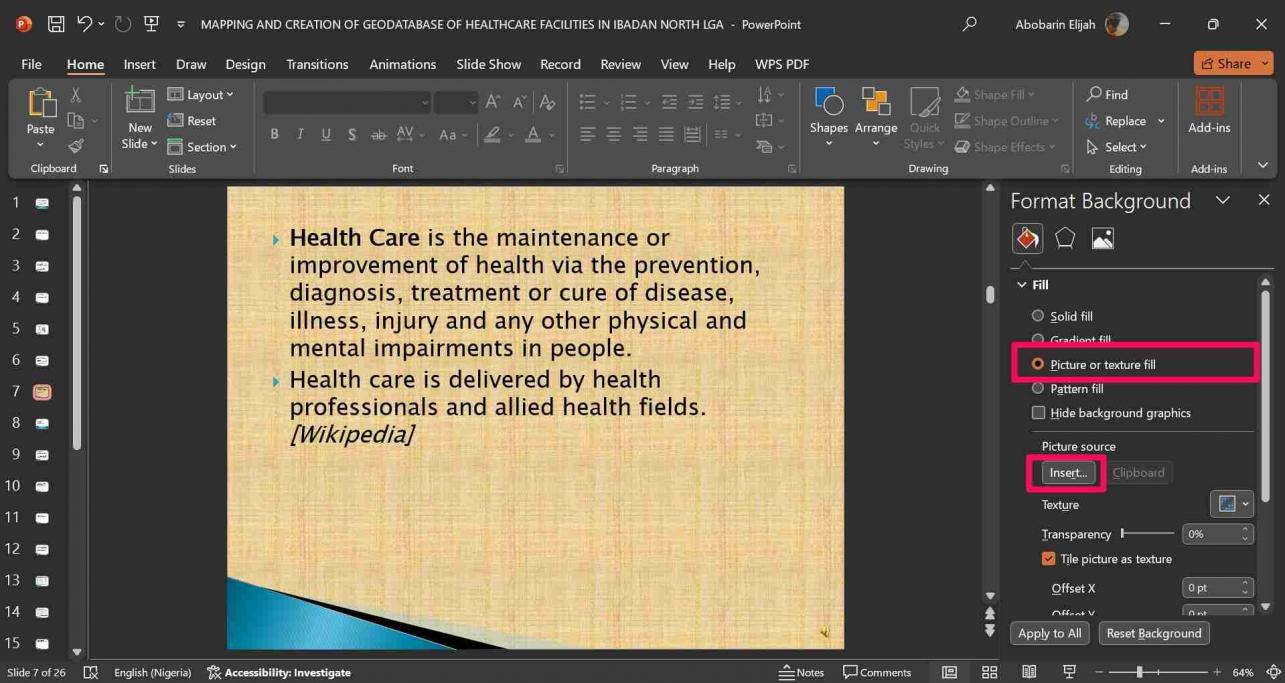
Step 5: Choose the best picture for your new background graphic and click Insert.

You can also adjust the picture on the slide using the crop, resize, move, and format options to define the background to your best taste. Once this is complete, save your edits, and your PowerPoint presentation slide will be in a new shape! Clicking a non-empty slide part in step 3 won't show the format background option.
Situation 2: Specific Slides
In this case, the user wants to edit the background graphics of several specific slides in the presentation. With this, you can keep your readers' mouths wide open in awe of the unique, beautiful background graphics they see as they turn over each slide, haha!
Below are steps to follow if you still don't have a clue about how to change background graphics in PowerPoint for specific slides:
Step 1: Open the presentation slides you wish to change the background graphics in PowerPoint.
Step 2: Click on "Design" and then select the "Format Background" option.
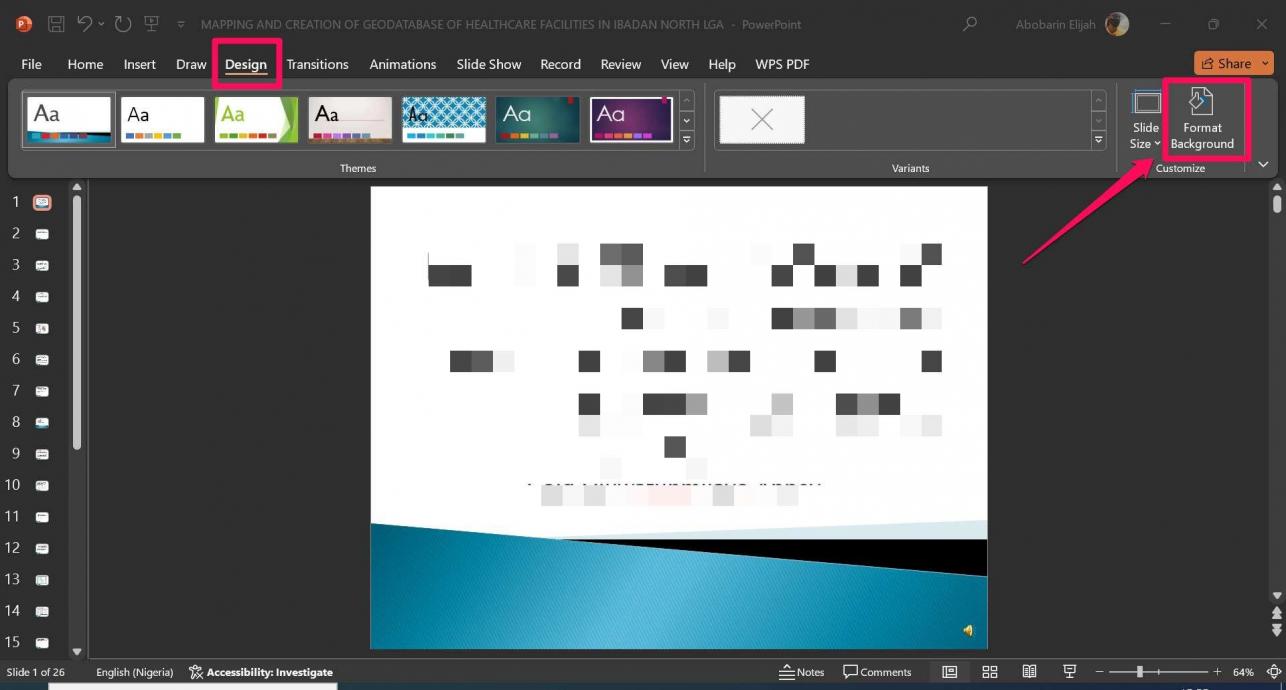
Step 3: From the list, you can select the Solid, Gradient, Pattern, Picture, or Text Fill option.

Step 4: If you want to use a picture, select "Picture or Text Fill" and click "Insert" to choose the source of the background graphic – File or online.
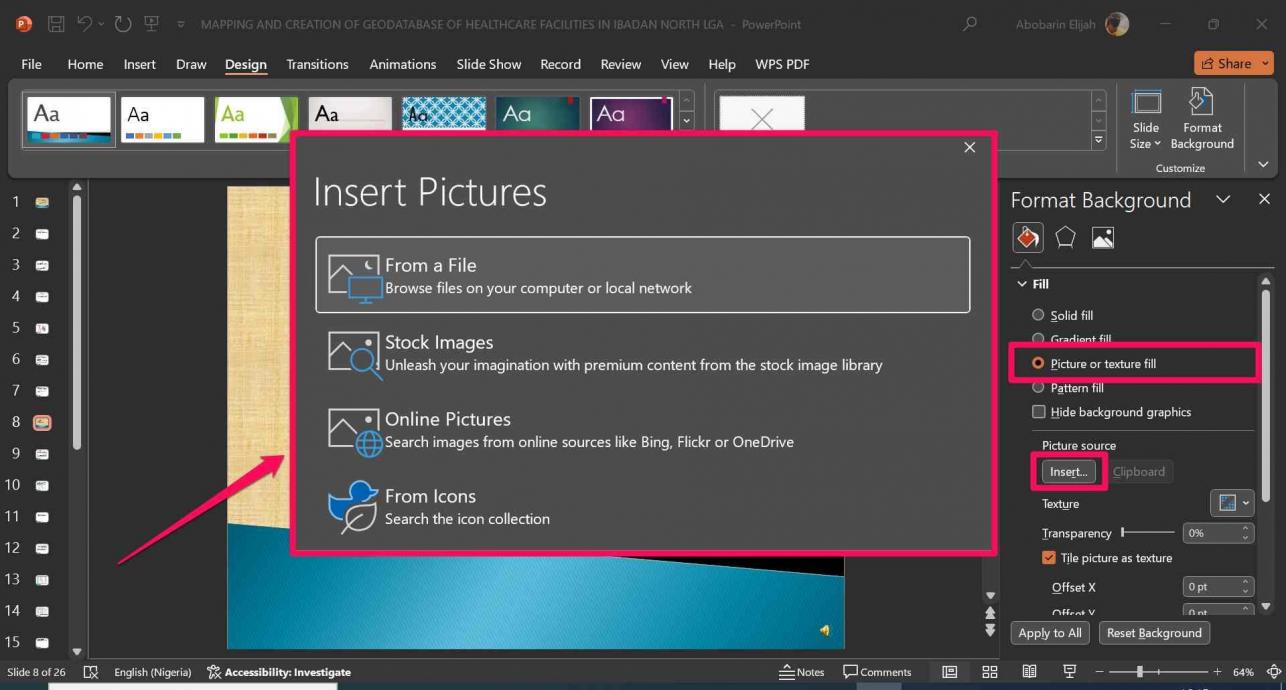
Step 5: Choose a picture for your new background graphic and Click Insert.

Step 6: After doing that, scroll and click on the next specific slide, then select the fill option you want from the "Format Background Pane" on the right-hand side. Repeat steps 3-5 for all the specific slides you want to change the background.

Step 7: You can adjust your new background pictures to fit each slide using PowerPoint's resize, crop, and format options.

Step 8: Once you're finished, Save the presentation.
Situation 3: All the Slides
Are you wondering what changing background graphics on all the slides signifies? It means you will maintain a uniform background graphic in the entire presentation slides. I barely use uniform PowerPoint background graphics due to my artistic nature. Still, I strongly recommend using it for formal presentations, like school projects.
One background graphic on all the slides will retain the tone of your message and reduce reading distractions caused by excessive background art. Thus, below are steps to follow if you're seeking how to change background graphics in PowerPoint on all slides:
Step 1: Open the presentation file with PowerPoint.
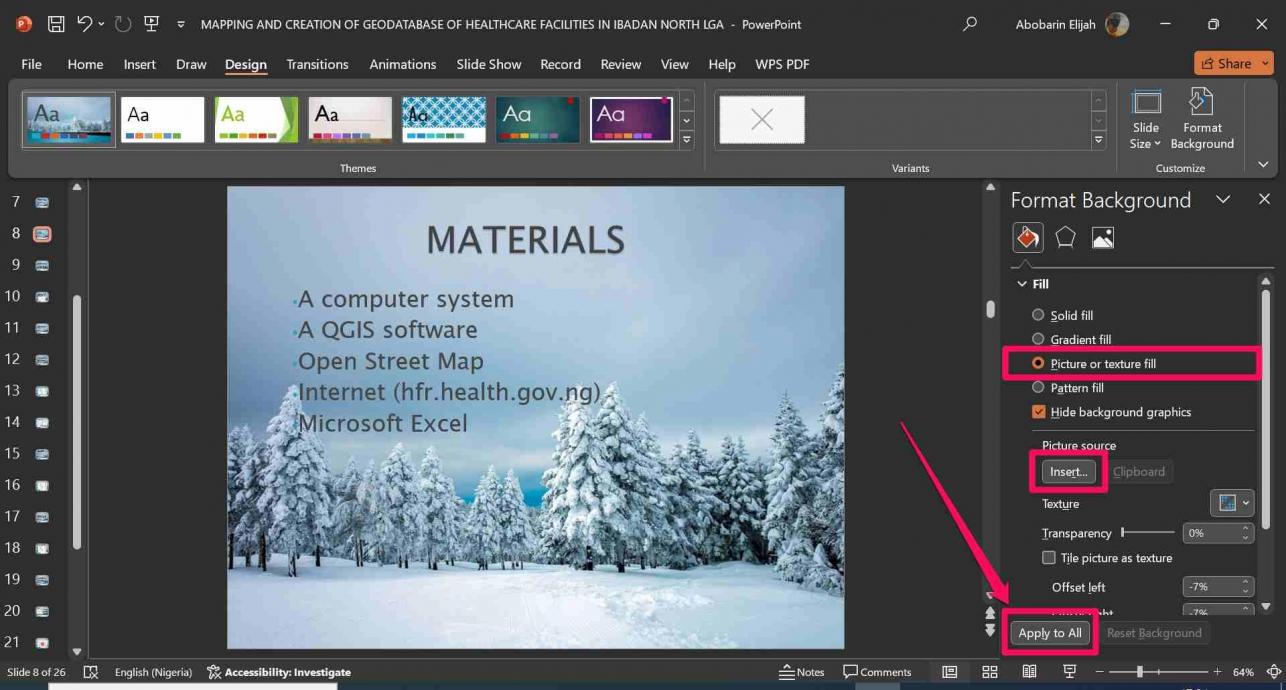
Step 2: Right-click anywhere on the slide, select "Format Background," and then the "Picture or Text Fill" option from the list.

Step 3: Select the source from where you want to add your background graphic – File, Clipboard, or online.

Step 4: Choose the picture you want as your new background and click "Insert."

Step 5: Click the "Apply to All" button at the bottom of the list.
Immediately, the new picture will appear as the background graphic for all the slides in your presentation. Remember to save your new changes before closing PowerPoint.
How to Alter Background Graphics in PowerPoint Through Slide Master
You can also change the background with the Slide Master feature on MS PowerPoint. This tool is very useful for creating a consistent background look and feel for your presentation slides. Also, it allows you to edit the background graphics of multiple slides at once.
So, like the previous section, I will give easy steps to alter background graphics in three common situations that editors usually find themselves in.
Situation 1: Only One Specific Slide
If you want to alter the background graphic of a single slide in your PowerPoint presentation, here's what you must do:
Step 1: Open the presentation file in PowerPoint.
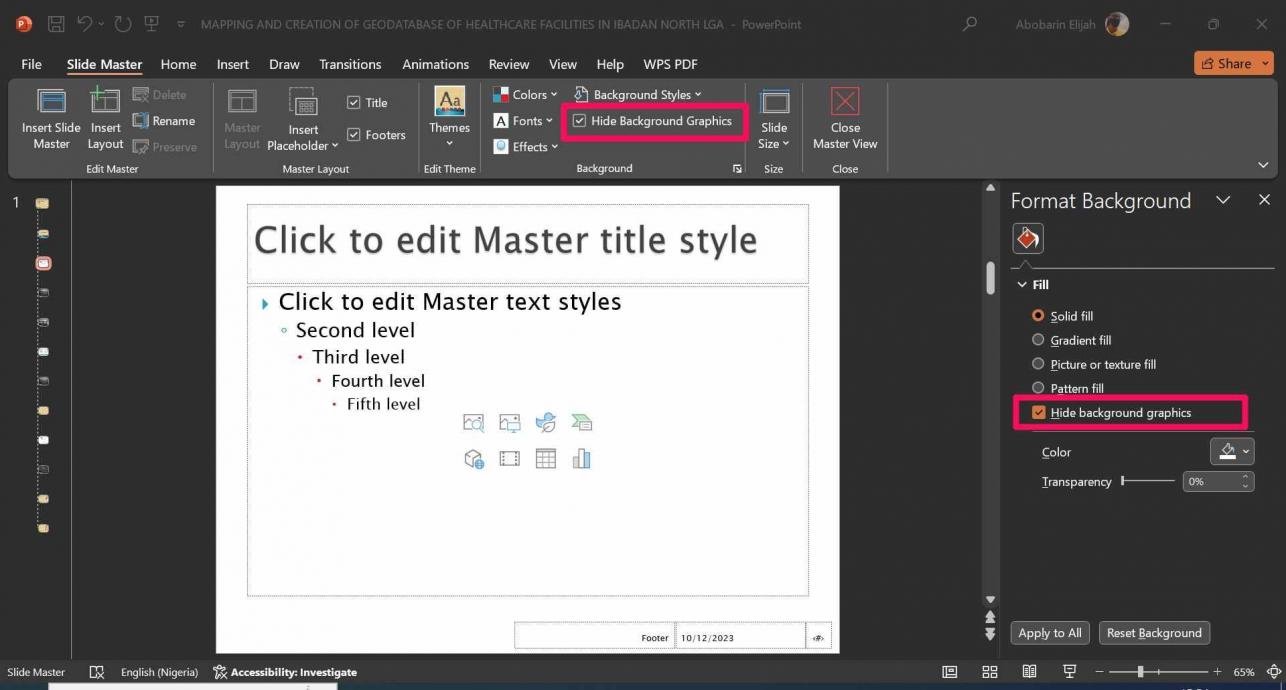
Step 2: Select the "View" tab and click "Slide Master."

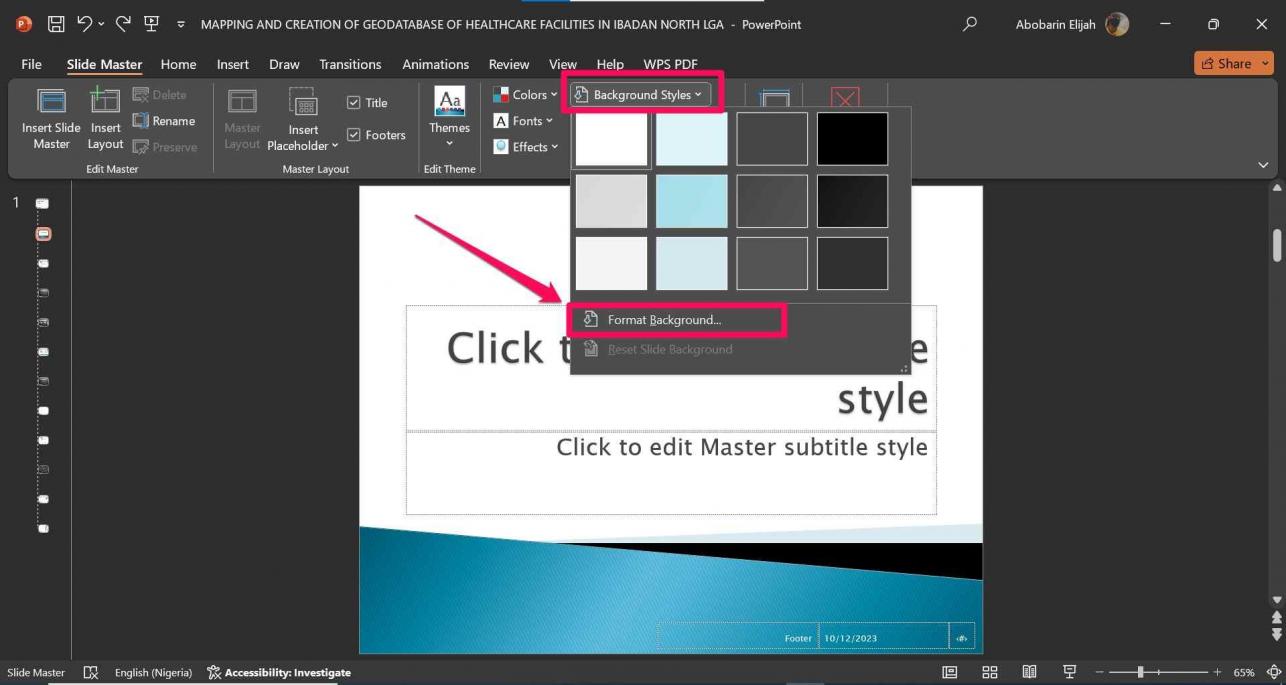
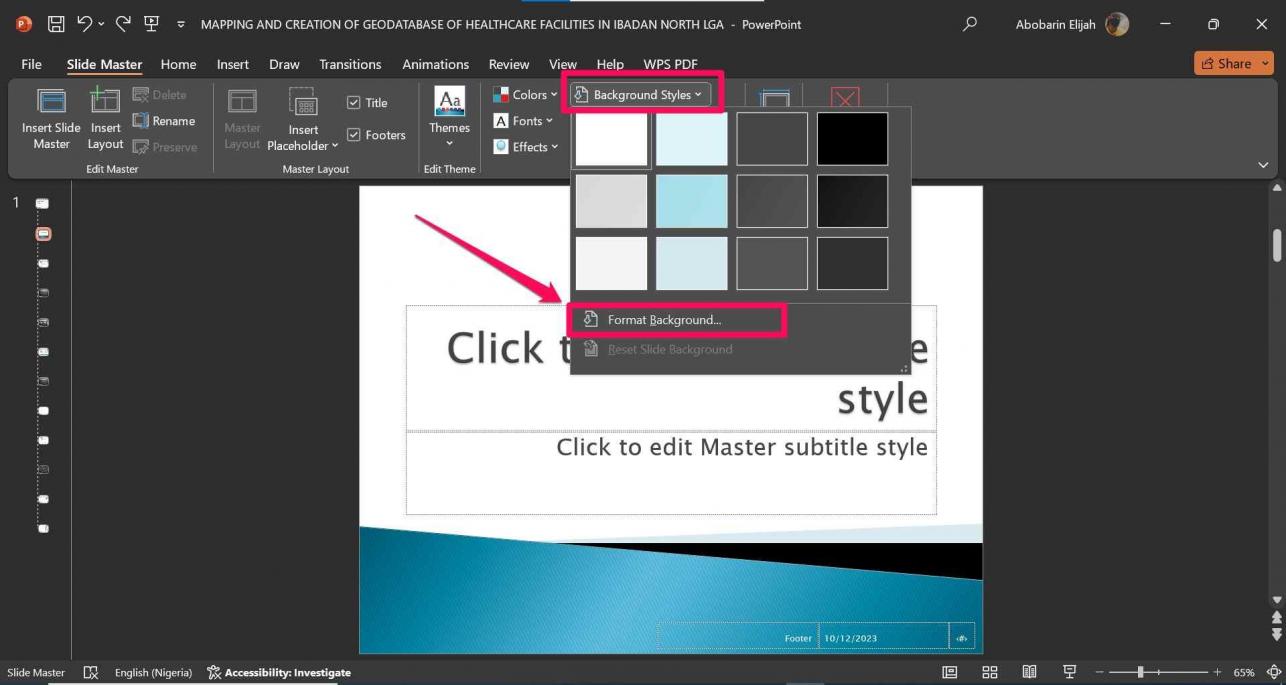
Step 3: On the Slide Master ribbon, click "Background Styles" and then select "Format Background."

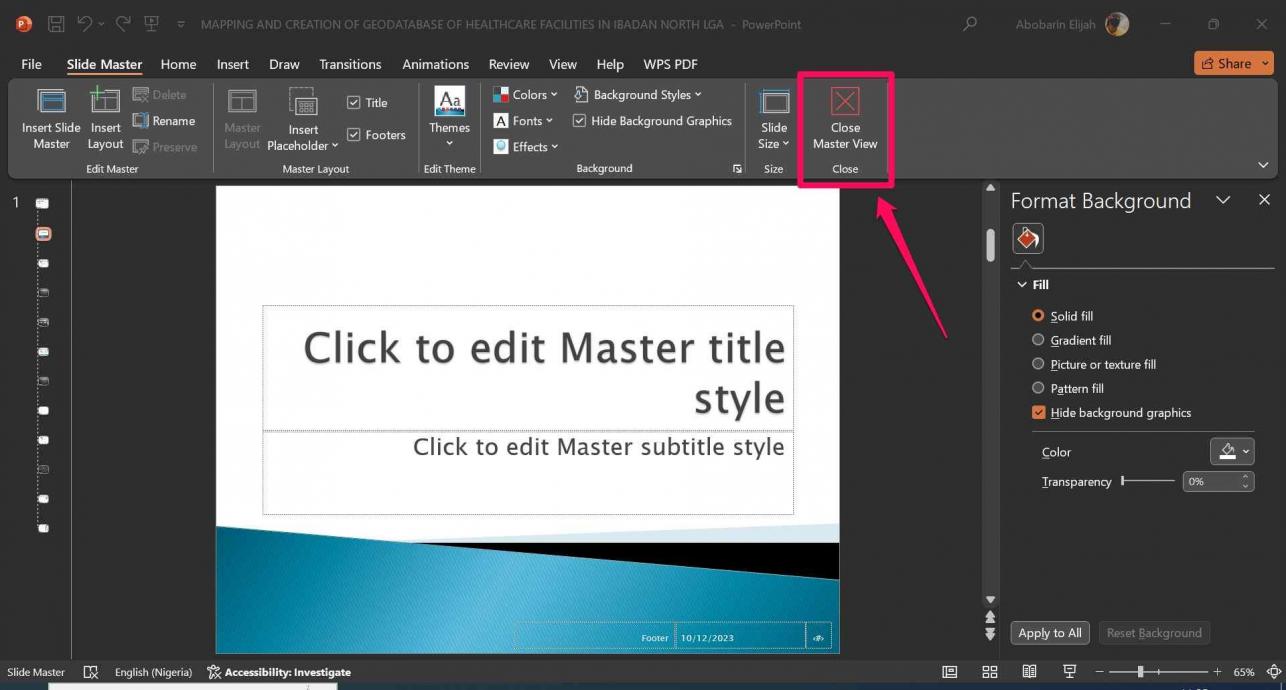
Step 4: Doing the above displays the format background pane on the right-hand side; then click "Close Master View."

Step 5: Select the slide whose background you want to edit. Click the Picture or text fill and select the source where you want to add your background graphics.
Step 6: Choose your desired picture and click Insert.
Step 7: Save your presentation.
Situation 2: Specific Slides
When editing specific slides in your presentation, your actions may affect other slides. However, I will reveal the safest and fastest way to use the Slide Master View to edit specific slides in your presentation. Let's see how to change background graphics in PowerPoint to specific slides via the slide master:
Step 1: Open the presentation in PowerPoint.
Step 2: Enable Slide Master View by clicking Slide Master in the Views tab.

Step 3: On the Slide Master ribbon, click "Background Styles" and then select "Format Background."

Step 4: Once the format background pane displays on the right-hand side, click "Close Master View."

Step 5: Select the slide whose background you want to edit. Click the Picture or text fill and select the source to add the background graphics. Choose your desired picture and click Insert.

Step 6: Select other specific slides you want to alter, then repeat the previous step and Save your presentation.
Situation 3: All the Slides
In this case, after editing with Slide Master, your entire presentation will have a single background graphic. Here's how you do it:
Step 1: Open the presentation in PowerPoint.
Step 2: Enable Slide Master View by clicking Slide Master in the Views tab.

Step 3: From the list of slides, select the Master Slide (the first slide that is bigger than the others).

Step 4: Next, you must right-click anywhere on the Master Slide and select the Background Styles option. You can also click "Background Styles" and then select "Format Background" on the Slide Master ribbon.
Step 4: The previous step brings out the format background pane, so click the Picture or text fill and select the source to add the background graphics. Choose your desired picture and click Insert.
Step 5: Make the necessary edits on the Master Slide, i.e., change the background photo and add logos, shapes, and other essential background decorations. Whatever edit you make on the Master Slide will automatically reflect on all the slides in your presentation.
How to Modify Background Graphics in PowerPoint for FREE with WPS Office

Alright, listen up, fellas. I know we cherish the quality that MS PowerPoint provides – and that's fine. But I also know we frown at the subscription prices to access its features.
So, I have a solution for you! There's a FREE tool that you can use to do just about everything you do on MS PowerPoint: the WPS Presentation tool in the WPS Office Suite.
What is WPS Office?
WPS Office Suite is the best free alternative to MS Office. It offers a wide spectrum of documenting services, and its results are wonders! WPS Office features several tools, including WPS Presentation, for creating, sharing, and editing presentation slides with other platforms, such as PowerPoint.
So, what makes WPS Office unique and the best choice for handling presentation projects?
It is FREE! Each time I write about the importance of this tool, I like to resonate with this particular one. I mean, why should I pay to get a tool service when I can acquire one that'll provide results of equal quality and professionalism? WPS Office is available for free download for a variety of devices, and that, for me, is a standout benefit.
WPS Office has high Cost-effectiveness. When you use a free, high-quality tool for your presentations, you get to save more and spend less. That's just how it is with WPS Office!
When compared to other tools, WPS Office has a much friendlier UI (User Interface). In fact, even beginners can easily find their way around it.
WPS Office's top-quality features allow you to add, lock, unlock, copy, and change background graphics in your presentation slides. It is indeed a feature-rich solution to modern documenting.
How to Change Background in WPS Presentation
As I mentioned earlier, "whatever MS Office PowerPoint can do, WPS Office can do – for free," and that includes changing the background graphics of your slides. We've learned how to change background graphics in PowerPoint, so let's learn the process of doing the same on its free alternative: WPS Office.
Below are steps to take if you intend to edit background graphics with WPS Office:
Step 1: Open the presentation file in WPS Presentation.
Step 2: Click on the Design tab.
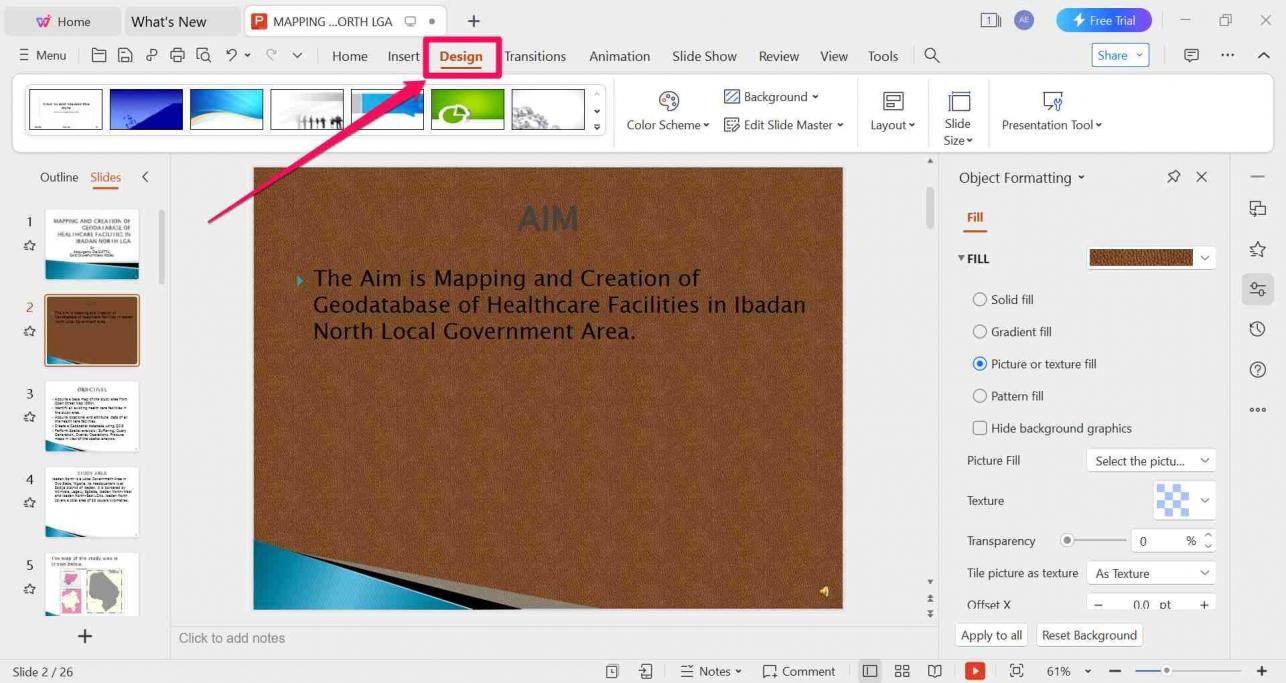
Step 3: Navigate via the Design ribbon and click "Background" to display the Object Formatting pane on the right-hand side.
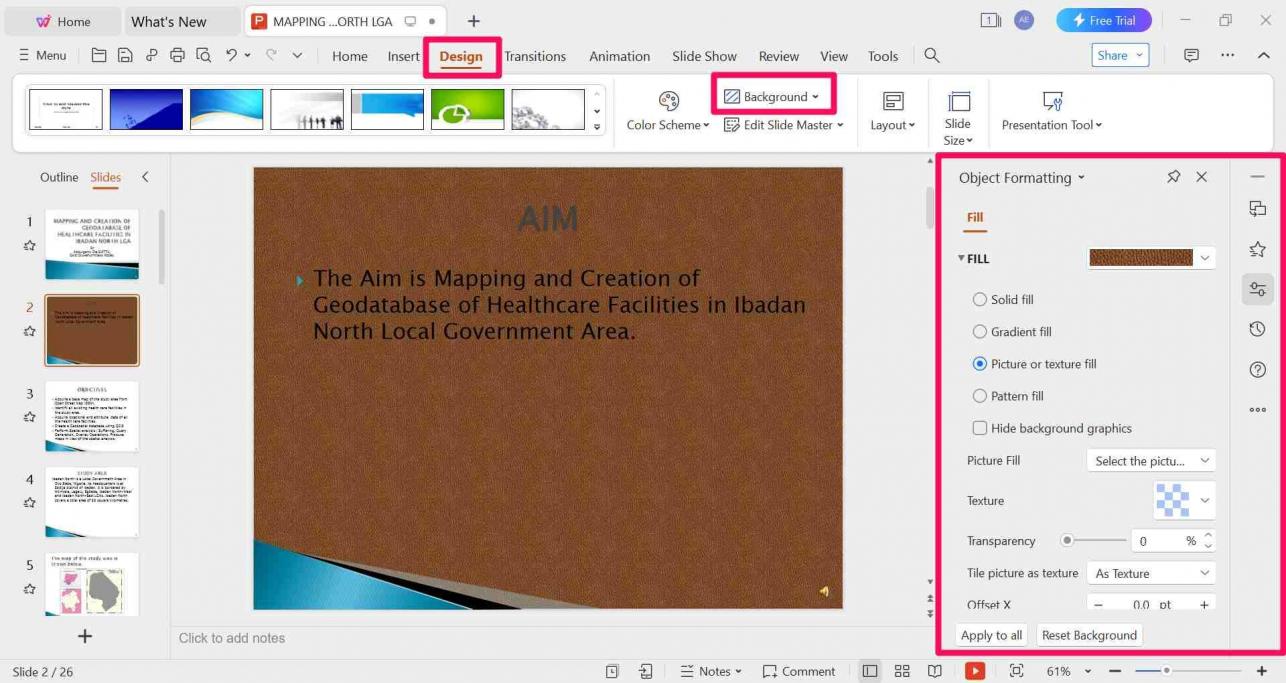
Step 4: In the pane on the right, there are four types of background available (Solid fill, Gradient fill, Picture or texture fill, and Pattern fill). Select "Picture or Texture Fill" if you intend to use a customized picture as the background.

Step 5: If you want to customize the background, click on the Format Background option. Here, you can add color, change positions, resize, and personalize the background graphic. Once you're finished, Save your changes and click Close.
Use Word, Excel, and PPT for FREE, No Ads.
Edit PDF files with the powerful PDF toolkit.
Microsoft-like interface. Easy to learn. 100% Compatibility.
Boost your productivity with WPS's abundant free Word, Excel, PPT, and CV templates.


FAQs
How Do I Add or Remove Graphics in PowerPoint?
Step 1: Go to View > Slide Master.

< PowerPoint slide master>
Step 2: To add a background graphic, right-click anywhere on the slide and select Background > Picture or text fill. Choose your desired picture and click Insert.

< PowerPoint graphic source>
Step 3: To remove background graphics, check the "Hide Background Graphics" box on the Slide Master ribbon.
Step 4: Save your changes and click Close Master View.
How Do I Edit an Existing PowerPoint Template?
Step 1: Launch PowerPoint and open the template.

Step 2: Choose View > Slide Master and select the slide masters that you want to edit.

Step 3: On the Slide Master ribbon, click "Background Styles" and then select "Format Background."
Step 4: Make your desired changes in the format background pane on the right-hand side.
Step 5: Click Close Master View to save your changes.

Summary
Background graphics give your presentations more clarity, and the right one draws the reader's attention to your content. So, choosing the perfect background graphics for your slides is essential. To help you with that, I showed you how to change background graphics on PowerPoint and WPS Office – the best free alternative to MS Office.
If you need a cost-effective tool to handle your presentation projects, WPS Office is your go-to. It is free, fast, user-friendly, and has high compatibility with a wide range of other tools and devices. So, pick your device today and get the WPS Office for free!

'%3e%3cpath%20d='M19.9911%204.11386V6.471H18.5894C18.0775%206.471%2017.7322%206.57814%2017.5536%206.79243C17.3751%207.00671%2017.2858%207.32814%2017.2858%207.75671V9.44421H19.9019L19.5536%2012.0871H17.2858V18.8639H14.5536V12.0871H12.2769V9.44421H14.5536V7.49779C14.5536%206.39064%2014.8632%205.53201%2015.4822%204.92189C16.1013%204.31177%2016.9257%204.00671%2017.9554%204.00671C18.8304%204.00671%2019.509%204.04243%2019.9911%204.11386Z'%20fill='%23333333'/%3e%3c/g%3e%3cdefs%3e%3cclipPath%20id='clip0_2938_8199'%3e%3crect%20width='16'%20height='16'%20fill='white'%20transform='translate(8%204.00671)'/%3e%3c/clipPath%3e%3c/defs%3e%3c/svg%3e)
'%3e%3cpath%20d='M17.5237%2010.7813L23.4811%204H22.0699L16.8949%209.88693L12.7648%204H8L14.2469%2012.9029L8%2020.0133H9.4112L14.8725%2013.7952L19.2352%2020.0133H24M9.92053%205.04213H12.0885L22.0688%2019.0224H19.9003'%20fill='%23333333'/%3e%3c/g%3e%3cdefs%3e%3cclipPath%20id='clip0_2938_8200'%3e%3crect%20width='16'%20height='16.0134'%20fill='white'%20transform='translate(8%204)'/%3e%3c/clipPath%3e%3c/defs%3e%3c/svg%3e)


