
'%3e%3cpath%20d='M8%200C12.4183%200%2016%203.58172%2016%208C16%2012.4183%2012.4183%2016%208%2016C3.58172%2016%200%2012.4183%200%208C0%203.58172%203.58172%200%208%200ZM11.6162%204.38379C11.2257%203.99337%2010.5927%203.99338%2010.2021%204.38379L8%206.58594L5.79785%204.38379C5.40732%203.99334%204.77429%203.99329%204.38379%204.38379C3.99331%204.77429%203.99335%205.40733%204.38379%205.79785L6.58594%208L4.38379%2010.2021C3.99348%2010.5927%203.99341%2011.2257%204.38379%2011.6162C4.77426%2012.0066%205.40734%2012.0065%205.79785%2011.6162L8%209.41406L10.2021%2011.6162C10.5927%2012.0066%2011.2257%2012.0067%2011.6162%2011.6162C12.0067%2011.2257%2012.0066%2010.5927%2011.6162%2010.2021L9.41406%208L11.6162%205.79785C12.0066%205.40735%2012.0066%204.77429%2011.6162%204.38379Z'%20fill='%23080E17'%20fill-opacity='0.46'/%3e%3c/g%3e%3cdefs%3e%3cclipPath%20id='clip0_3761_713'%3e%3crect%20width='16'%20height='16'%20fill='white'/%3e%3c/clipPath%3e%3c/defs%3e%3c/svg%3e)


'%3e%3cpath%20fill-rule='evenodd'%20clip-rule='evenodd'%20d='M21.4999%2010.9993C21.4999%205.20009%2016.7986%200.498901%2010.9993%200.498901C5.19994%200.498901%200.498657%205.20009%200.498657%2010.9993C0.498657%2016.2404%204.33858%2020.5844%209.35855%2021.3722V14.0346H6.69238V10.9993H9.35855V8.68594C9.35855%206.05427%2010.9262%204.60062%2013.3248%204.60062C14.4736%204.60062%2015.6753%204.80571%2015.6753%204.80571V7.38979H14.3512C13.0468%207.38979%2012.64%208.19921%2012.64%209.0296V10.9993H15.5523L15.0867%2014.0346H12.64V21.3722C17.66%2020.5844%2021.4999%2016.2404%2021.4999%2010.9993Z'%20fill='%231568EA'/%3e%3c/g%3e%3c/svg%3e)


What could be more effective in maintaining focus on your tasks than a well-organized checklist? Checklists are a valuable tool, and when digitized, they offer the convenience of instant access to your to-do list. In this article, we'll delve into the process of how to create a checklist in Word, and putting the power of efficient task management right at your fingertips.
Why Create Checklists in Word?
There are endless reasons for why you should maintain a checklist. Still thinking about learning how to create a checklist in Word. We have listed some of the major reasons that should convince you into creating a checklist.
Enhance Task Recall: A checklist in Word is a valuable tool for bolstering your task recall. Whether you're managing daily errands, maintaining a dynamic grocery list, or ensuring weekly professional tasks are on track, a checklist keeps essential items within easy reach.
Optimize Task Sequencing: By structuring tasks in a specific sequence, you ensure no critical steps are overlooked. This becomes especially helpful when tackling tasks with a defined order, such as assembling a complex project or executing a multi-step process.
Requirement Tracking Made Easy: Checklists prove invaluable when tasks involve specific prerequisites. For instance, in the process of evaluating software options for your organization, you can create a checklist detailing the essential requirements and tasks each software solution must fulfill. This facilitates a thorough review, aiding in the selection of the most suitable product.
Streamline Idea Brainstorming: Compile a checklist that not only captures the proposed ideas but also highlights the benefits and advantages of each. By systematically assessing each idea based on a set of checkboxes, you gain valuable insights to determine the most viable option.
Empower Decision-making: Facing a decision between two alternatives? Employ a Word checklist to create a comprehensive pros and cons list for each option. You can further distribute this checklist as a printed document during meetings, allowing everyone to review and contribute to the assessment. By comparing data points, identifying overlaps, and evaluating the merits of each option, you empower effective decision-making processes.
How to Create a Checklist in Word (Step-by-Step)
Creating a checklist form in Excel may be commonplace, but Word offers a superior option for crafting visually appealing and polished fillable forms with checklists. Learning how to create a checklist in Word holds significant potential across diverse fields. Educators and researchers, for instance, can take advantage of this technique to design dynamic fillable forms with checklists. Curious about how to make a checklist in your attendance sheet? Let’s create one right away:
Step 1: Open Microsoft Word on your system and visit the File menu at the top left corner.
Step 2: In the Sidebar Menu, select “Option”.

Step 3: In Word Options, visit the “Customize Ribbon” and make sure the “Developer” tab is enabled. Press “OK”.

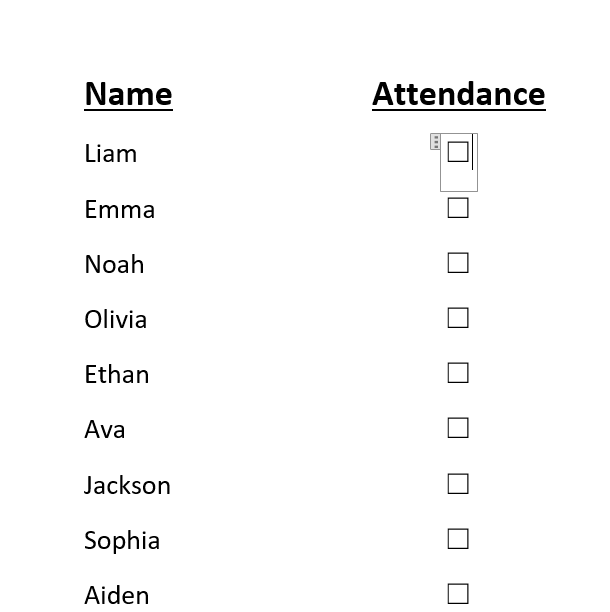
Once the Developer tab has been enabled, head over to your attendance sheet.
Step 4: Visit the Developer Tab and find the “Check-box” icon in the Control section.

Step 5: Click on the “Checklist” icon. This will add a checklist under the attendance column. Add a checklist next to each name to complete your attendance sheet.
For readers looking to learn how to create a checklist in Word on MAC devices, simply launch Microsoft Word on your MAC device and follow the same steps.
How to Modify the Standard Checkbox Symbol?
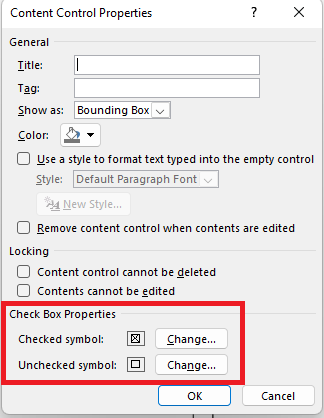
Step 1: After creating a checklist in Word, visit the Developer tab and find Properties option in the Control section.

Step 2: In the “Content Control Properties”, click on “Change” to configure the checklist symbols.
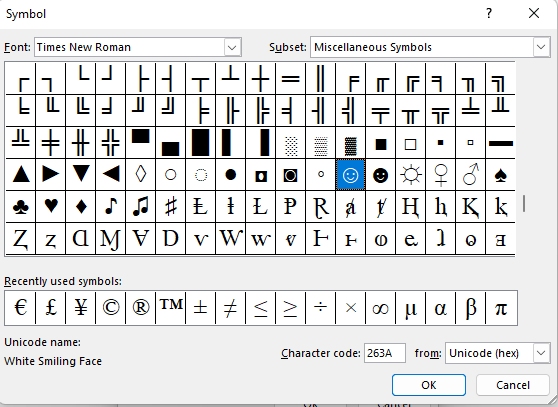
Step 3: Scroll through the symbols and select the symbol you prefer for your checklist.
How Can the Check List Be Locked to Prevent Unauthorized Changes?
Step 1: Select all the text along with the checklist.
Step 2: Navigate to the "Developer" tab and locate the "Group" option within the Controls section.

Step 3: The checklist is now secure and cannot be altered or removed. Users can only check or uncheck the tick boxes.
Step 4: If you need to make changes, use the adjacent "Ungroup" option in the Developer tab. This will allow modifications to the checklist as required.


Creating a Print-Only Checklist in Word
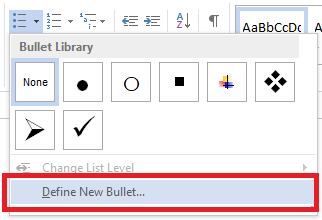
Step 1: Go to the "Home" tab and locate the “bullet” icons within the Paragraph section.
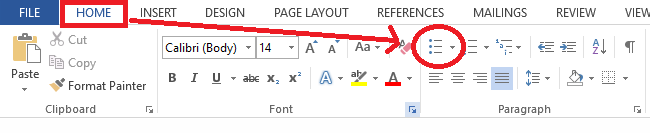
Step 2: Click the small arrow under the bullet icon to open the bullet drop-down menu.
Step 3: From the drop-down, choose "Define New Bullet".
Step 4: In the "Define New Bullet" window, click on "Symbol".
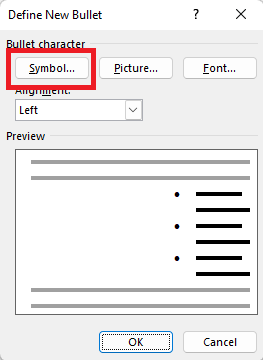
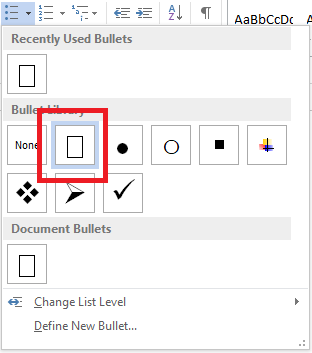
Step 5: Browse and select the "Checklist" symbol from the displayed symbols, then click "OK".

Step 6: Highlight all the text that needs checklists and apply the bullet formatting.
Step 7: The checklist is now in place, and the checkboxes are fixed, preventing any edits.
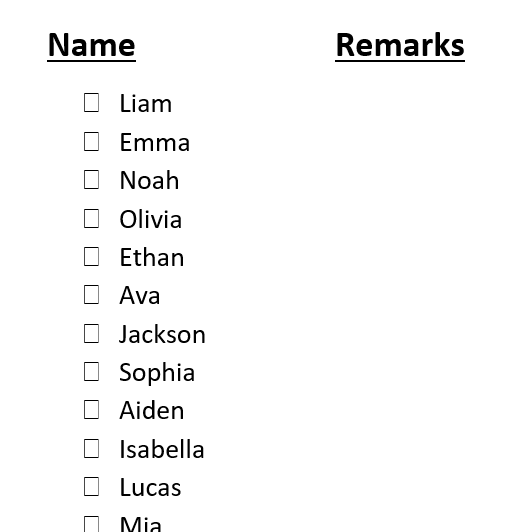
Step 8: Print a hard copy to maintain attendance records for your students.
How to Edit Microsoft Office Documents for Free?
If you need to edit or create Microsoft Office documents, such as Word, Excel, or PowerPoint files, you don’t have to pay for a subscription. You can use WPS Office, a free and versatile office suite that works in your browser and on your devices.

WPS Office is compatible with Microsoft Office and other popular office suites, and it offers many features and benefits, such as:
You can view, edit, read, and collaborate on Office documents online or offline.
You can convert Office documents to and from PDF files online for free.
You can access thousands of free templates for various purposes.
You can use cloud storage and sync services to store and share your files across devices.
You can use advanced editing tools, such as OCR, signatures, watermarks, bookmarks, and passwords.
Step 1: Launch WPS Office on your PC and locate the desired Word/Excel/PowerPoint file by browsing your system.
Step 3: Open the file on WPS Office for easy editing.
Step 4: Use WPS Office's wide range of tools to easily edit your Microsoft Office documents.

Alt text: WPS Writer tools
FAQS:
Q1. Can I use images in my Word checklist?
The answer to this question is yes. You can include images in your Word checklist to enhance its effectiveness and clarity. These visual aids can illustrate tasks, provide references, and provide step-by-step instructions, making the checklist more engaging and informative.
Q2. Is it possible to share my checklist online?
Yes. Sharing your Word checklist online is trouble-free with cloud storage platforms like Google Drive, Microsoft OneDrive, or Dropbox. You can upload the checklist to the cloud, share it with others, and grant specific access. Alternatively, you can send the checklist as an email attachment, improving collaboration and accessibility. Both methods enhance accessibility and collaboration in your checklist.
Elevate Efficiency: Create Dynamic Checklists in Word
Now that you've learnt how to create checklists in Word, this newfound skill is set to elevate your productivity. By becoming more organized and efficient, you'll notice a marked improvement in task management. And the good news is, you can seamlessly replicate this process in WPS Writer, ensuring a consistent experience. WPS Office is the best free solution for your Office needs. Download WPS Office today and start editing your Office documents with ease.

'%3e%3cpath%20d='M19.9911%204.11386V6.471H18.5894C18.0775%206.471%2017.7322%206.57814%2017.5536%206.79243C17.3751%207.00671%2017.2858%207.32814%2017.2858%207.75671V9.44421H19.9019L19.5536%2012.0871H17.2858V18.8639H14.5536V12.0871H12.2769V9.44421H14.5536V7.49779C14.5536%206.39064%2014.8632%205.53201%2015.4822%204.92189C16.1013%204.31177%2016.9257%204.00671%2017.9554%204.00671C18.8304%204.00671%2019.509%204.04243%2019.9911%204.11386Z'%20fill='%23333333'/%3e%3c/g%3e%3cdefs%3e%3cclipPath%20id='clip0_2938_8199'%3e%3crect%20width='16'%20height='16'%20fill='white'%20transform='translate(8%204.00671)'/%3e%3c/clipPath%3e%3c/defs%3e%3c/svg%3e)
'%3e%3cpath%20d='M17.5237%2010.7813L23.4811%204H22.0699L16.8949%209.88693L12.7648%204H8L14.2469%2012.9029L8%2020.0133H9.4112L14.8725%2013.7952L19.2352%2020.0133H24M9.92053%205.04213H12.0885L22.0688%2019.0224H19.9003'%20fill='%23333333'/%3e%3c/g%3e%3cdefs%3e%3cclipPath%20id='clip0_2938_8200'%3e%3crect%20width='16'%20height='16.0134'%20fill='white'%20transform='translate(8%204)'/%3e%3c/clipPath%3e%3c/defs%3e%3c/svg%3e)


