
'%3e%3cpath%20d='M8%200C12.4183%200%2016%203.58172%2016%208C16%2012.4183%2012.4183%2016%208%2016C3.58172%2016%200%2012.4183%200%208C0%203.58172%203.58172%200%208%200ZM11.6162%204.38379C11.2257%203.99337%2010.5927%203.99338%2010.2021%204.38379L8%206.58594L5.79785%204.38379C5.40732%203.99334%204.77429%203.99329%204.38379%204.38379C3.99331%204.77429%203.99335%205.40733%204.38379%205.79785L6.58594%208L4.38379%2010.2021C3.99348%2010.5927%203.99341%2011.2257%204.38379%2011.6162C4.77426%2012.0066%205.40734%2012.0065%205.79785%2011.6162L8%209.41406L10.2021%2011.6162C10.5927%2012.0066%2011.2257%2012.0067%2011.6162%2011.6162C12.0067%2011.2257%2012.0066%2010.5927%2011.6162%2010.2021L9.41406%208L11.6162%205.79785C12.0066%205.40735%2012.0066%204.77429%2011.6162%204.38379Z'%20fill='%23080E17'%20fill-opacity='0.46'/%3e%3c/g%3e%3cdefs%3e%3cclipPath%20id='clip0_3761_713'%3e%3crect%20width='16'%20height='16'%20fill='white'/%3e%3c/clipPath%3e%3c/defs%3e%3c/svg%3e)


'%3e%3cpath%20fill-rule='evenodd'%20clip-rule='evenodd'%20d='M21.4999%2010.9993C21.4999%205.20009%2016.7986%200.498901%2010.9993%200.498901C5.19994%200.498901%200.498657%205.20009%200.498657%2010.9993C0.498657%2016.2404%204.33858%2020.5844%209.35855%2021.3722V14.0346H6.69238V10.9993H9.35855V8.68594C9.35855%206.05427%2010.9262%204.60062%2013.3248%204.60062C14.4736%204.60062%2015.6753%204.80571%2015.6753%204.80571V7.38979H14.3512C13.0468%207.38979%2012.64%208.19921%2012.64%209.0296V10.9993H15.5523L15.0867%2014.0346H12.64V21.3722C17.66%2020.5844%2021.4999%2016.2404%2021.4999%2010.9993Z'%20fill='%231568EA'/%3e%3c/g%3e%3c/svg%3e)


When it comes to creating impactful presentations, removing distractions is key. In this guide, we'll show you how to remove backgrounds from pictures in PowerPoint, saving you space and making your slides more effective, and also introduce how WPS AI can make the process faster and more convenient. Throughout, we'll share tips and insights to enhance your experience with pictures of PowerPoint.
Part 1: Remove the background from a picture using the Remove Background tool

Learn how to easily remove backgrounds from images in PowerPoint using the 'Remove Background' tool. We'll guide you through the steps for Windows, Mac, and mobile devices, providing clear instructions and useful tips. This technique helps create clean and focused presentations, saving space and highlighting important content.
But before anything else, make sure you have a reliable Powerpoint download.
Windows
Step 1: Open your PowerPoint presentation and select the image you want to edit.
Step 2: Click on the "Format" tab in the Ribbon.

Step 3: Locate and click on "Remove Background" in the Adjust group.

Step 4: PowerPoint will automatically attempt to select the background. Adjust the selection as needed.
Step 5: Click "Keep Changes" when you're satisfied with the selection.

Mac
Step 1: Launch PowerPoint and open your presentation containing the image.
Step 2: Select the image and navigate to the "Format" menu.

Step 3: Choose "Remove Background" from the drop-down menu.

Step 4: PowerPoint will make an initial selection of the background; refine it if necessary.
Step 5: Click "Keep Changes" to finalize the removal.
Mobile
Step 1: Open PowerPoint on your mobile device and access the presentation.

Step 2: Select the image that requires background removal.
Step 3: Tap on the image and select "Remove Background."
Step 4: Adjust the selection if needed and confirm the changes.

The three methods described above are all effective for removing backgrounds from images. However, each method has its own strengths and weaknesses.
Windows: The Remove Background tool in PowerPoint is a quick and easy way to remove backgrounds from images. However, it can sometimes produce inaccurate results, especially for images with complex backgrounds.
Mac: The Instant Alpha tool in Preview is a more powerful tool for removing backgrounds from images. However, it can be more time-consuming to use than the Remove Background tool in PowerPoint.
Mobile: The freeform crop tool in the Photos app (iOS) and Google Photos app (Android) is a good option for removing backgrounds from images with simple backgrounds. However, it can be difficult to use for images with complex backgrounds.
The best method for removing the background from an image will depend on the specific image and the desired results.
Part 2: Remove the background from a picture by changing the background to a transparent color
if you're looking to give your images a sleek, professional look by eliminating the background, follow these simple steps:
Step 1: Open your image in PowerPoint and select it.
Step 2: Navigate to the 'Picture Tools Format' tab and choose 'Remove Background'.
Step 3: PowerPoint will automatically guess which parts of the image to keep and which to remove. Adjust the selection as needed.

Step 4: Once you're satisfied, right-click and choose 'Save as Picture'. Save it in a format that supports transparency, like PNG.

Step 5: Now, insert the edited image into your presentation. You'll see that the background is now transparent, seamlessly blending into your slides.
Part 3: How to Edit PowerPoint Presentations for Free with WPS Office

WPS Presentation is a free office suite that allows you to open, create, edit, and save Microsoft Office PowerPoint files. It is fully compatible with Windows and Mac, and it offers a wide range of features for creating professional-looking presentations.
What I really like about WPS Presentation is that it’s integrated with WPS AI. This intelligent feature makes everyday presentation tasks much easier. Simple things like handling images or refining slides take far less effort, as WPS AI helps streamline editing and reduce manual adjustments. Instead of switching between different tools or troubleshooting issues step by step, I can focus more on improving the overall quality and clarity of my presentation.
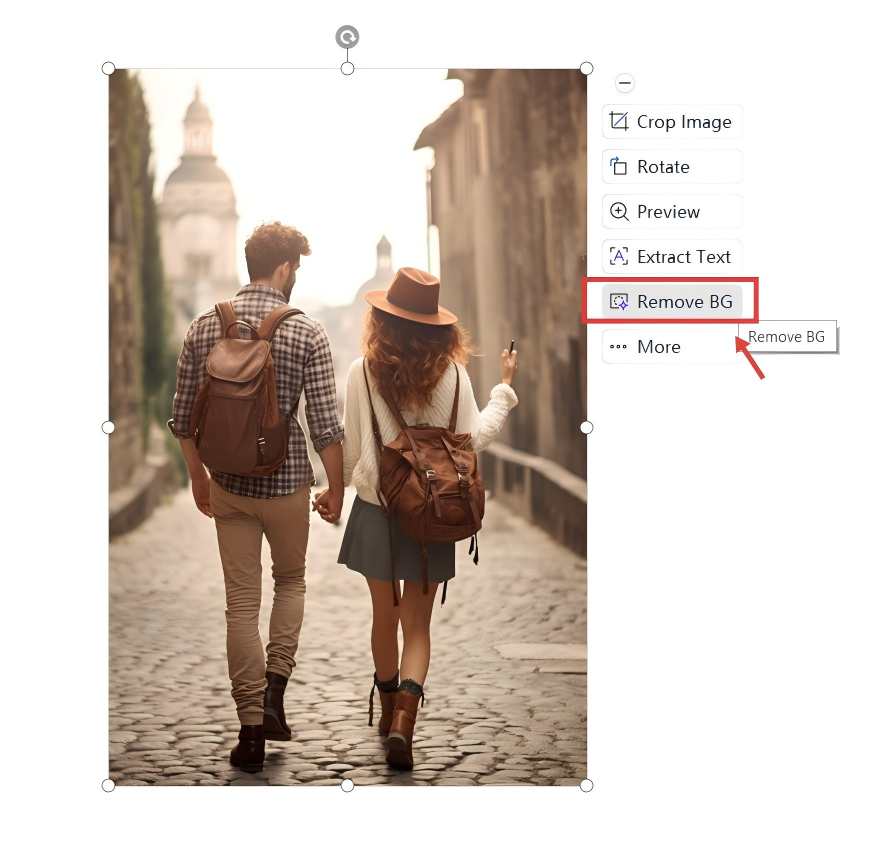
How to remove picture background in WPS Presentations with WPS AI
Step 1: Open the presentation that contains the picture you want to remove the background from.
Step 2: Click on the picture to select it. An AI image editing panel will automatically appear on the right side of the interface.
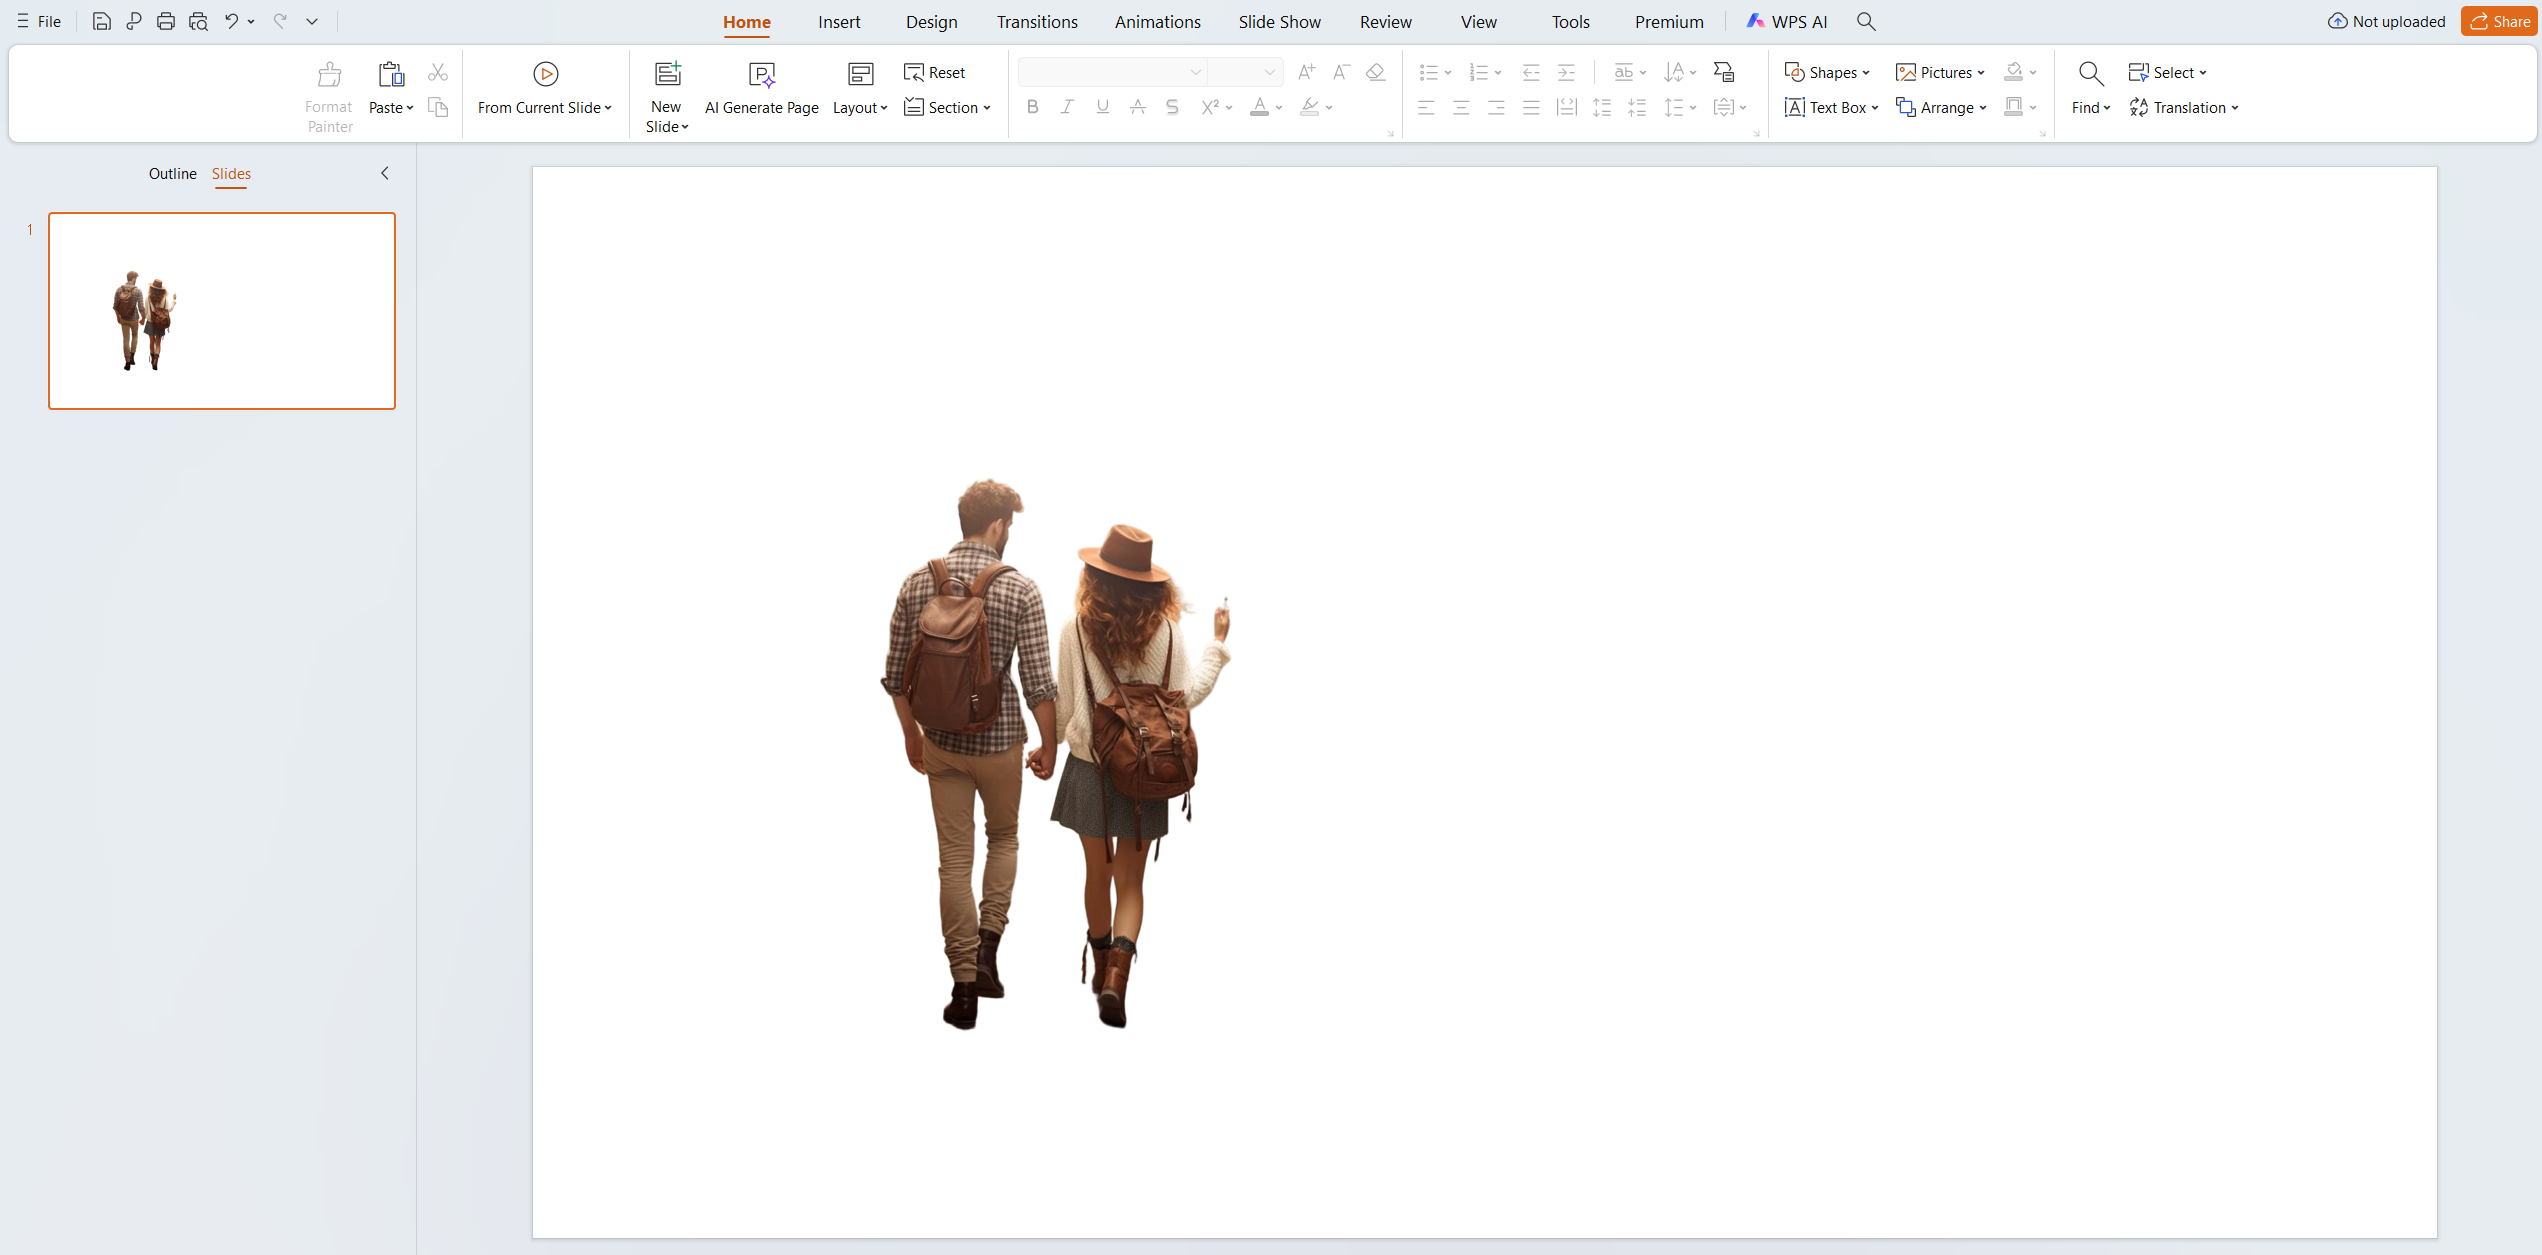
Step 3: Click "Remove Background". WPS AI will automatically detect the main subject and remove the background within seconds, without requiring manual selection.
Step 4: If you are satisfied with the result, click on any space to save.
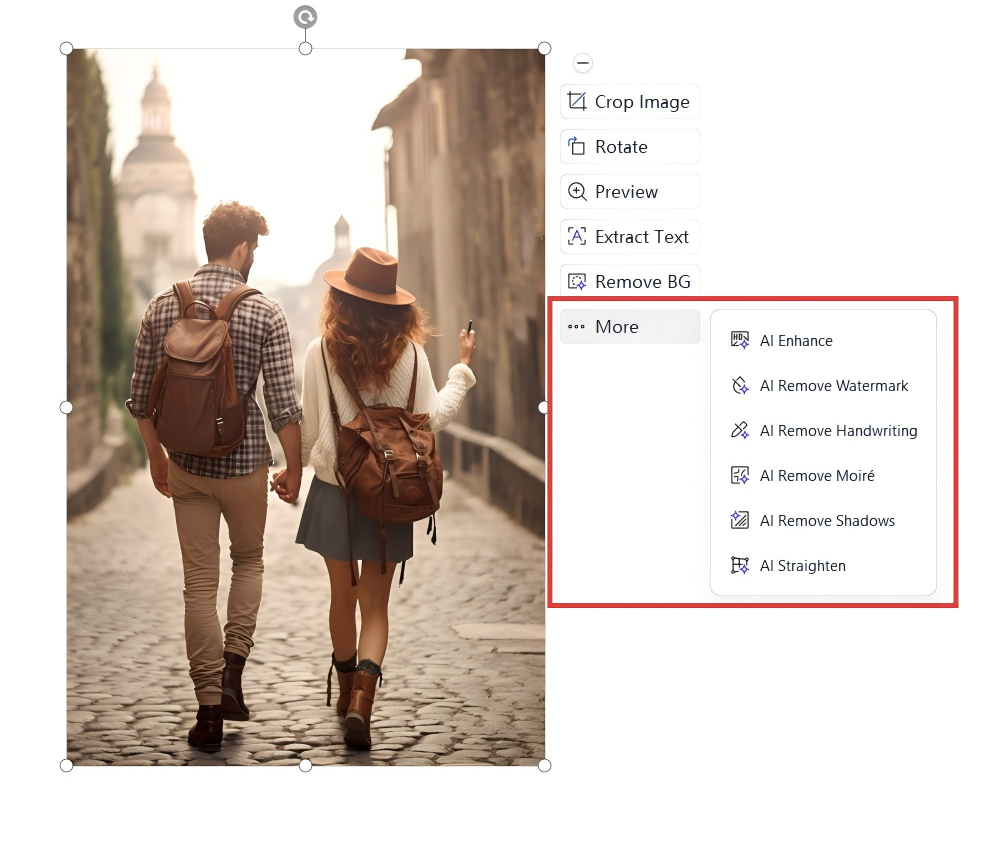
Step 5: Enhance the image with Additional AI Tools. Under the More option, you can access advanced AI features.
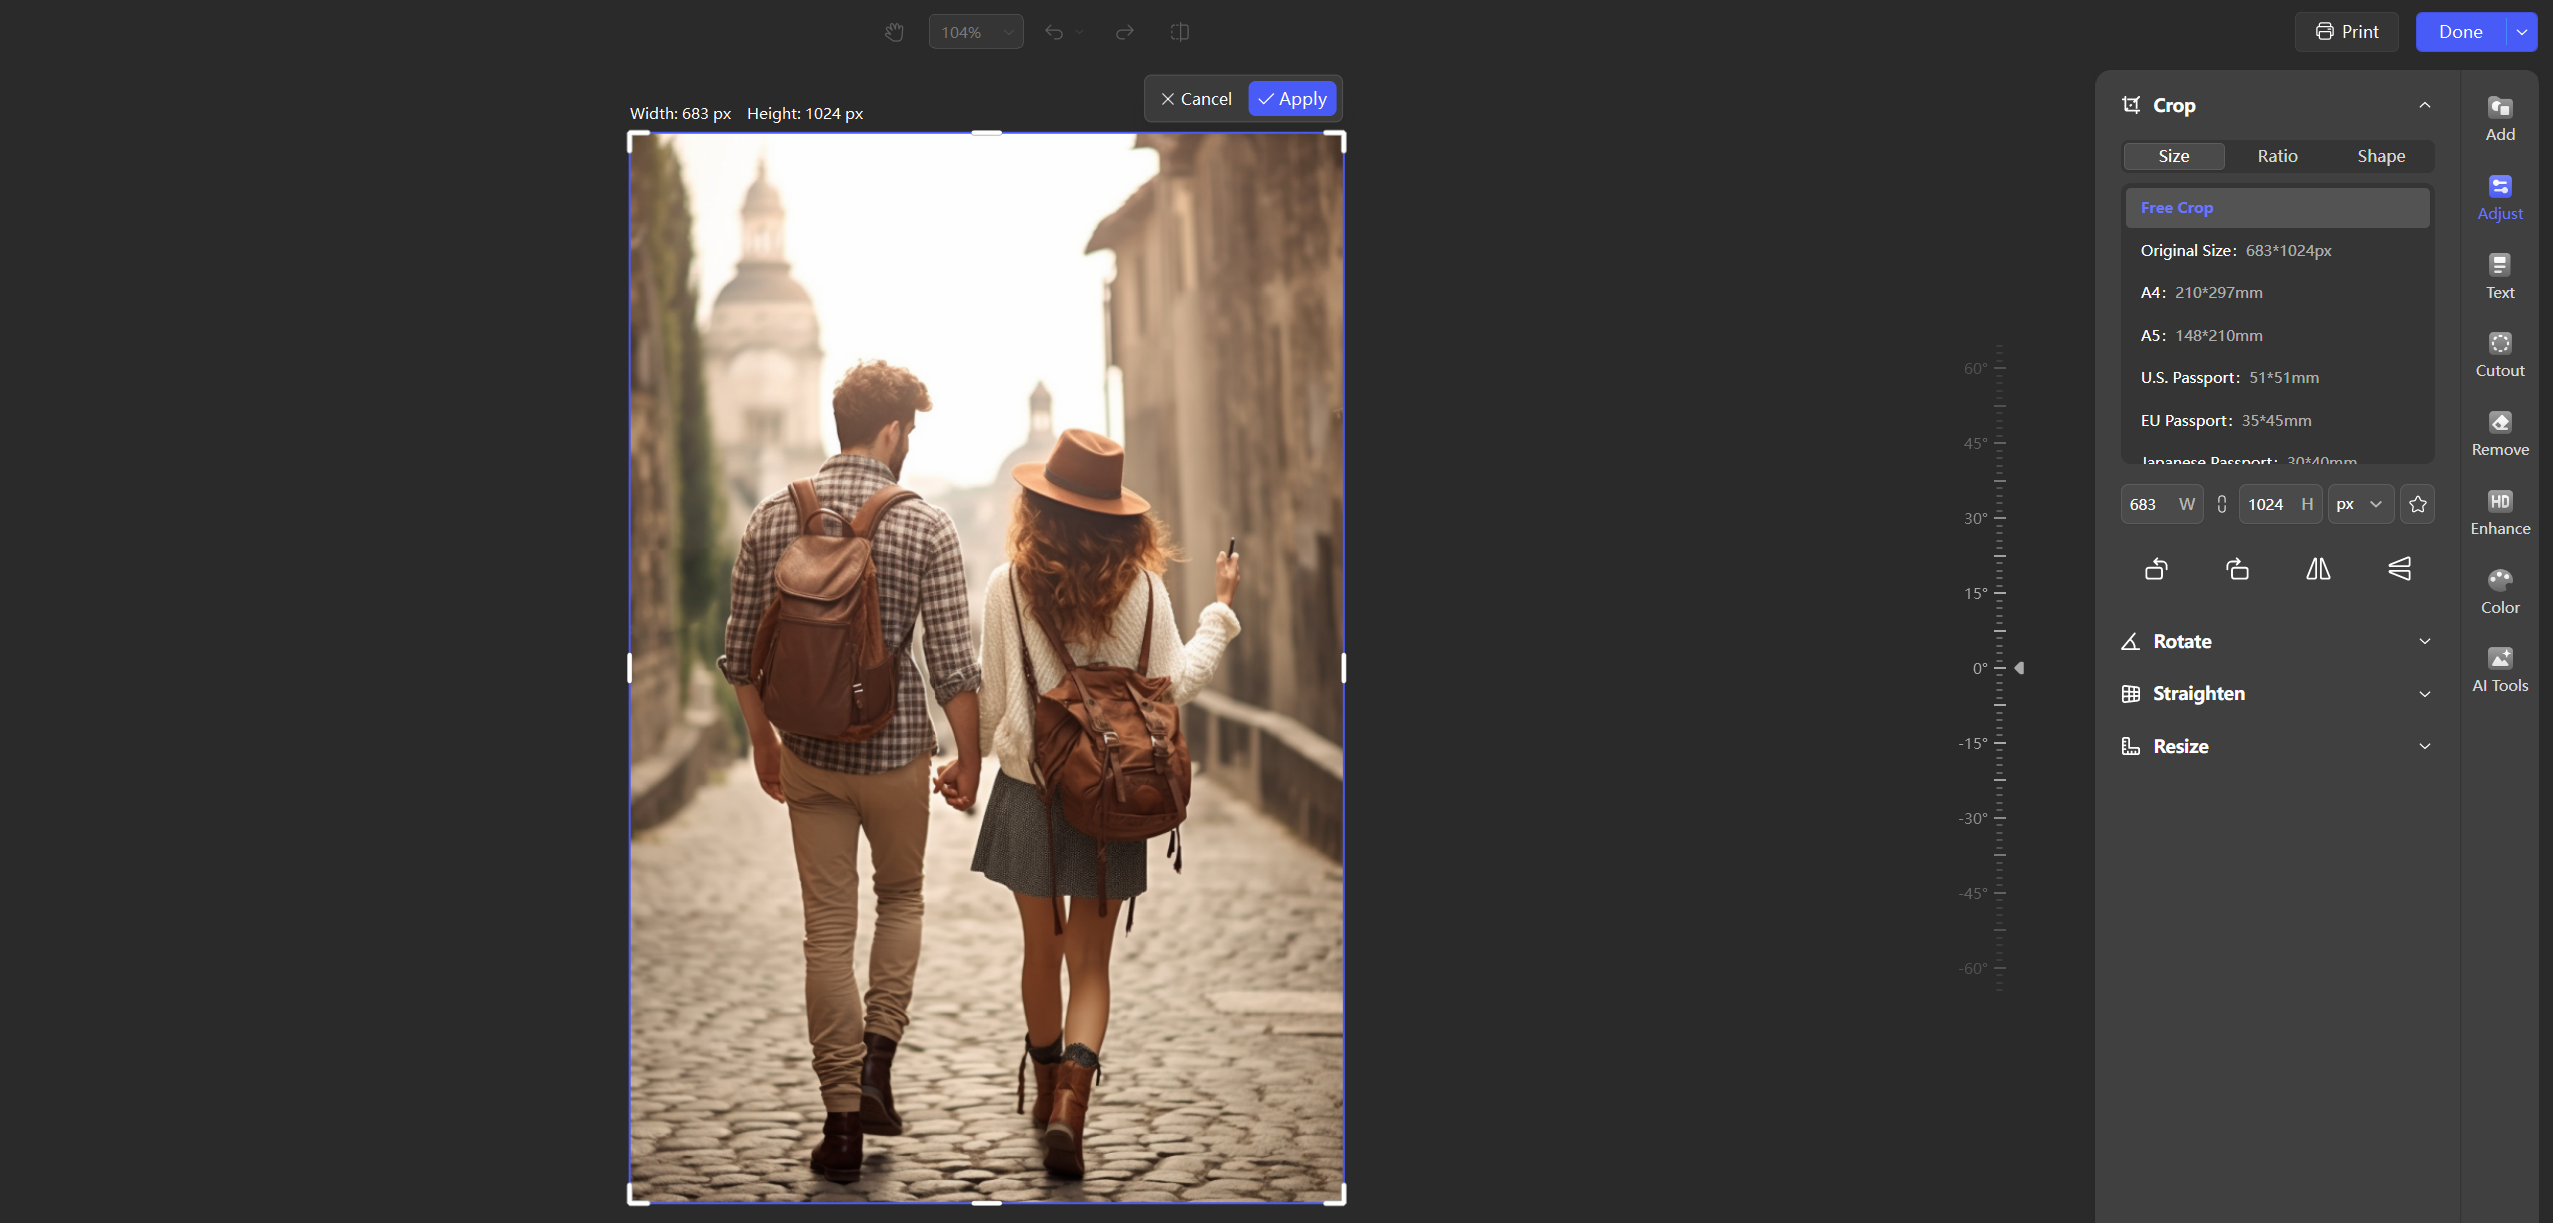
Extended Editing with a View–Edit Integrated Image Workflow:
For users who need more advanced image control, WPS also offers a view–edit integrated image workflow. This mode allows you to switch smoothly between viewing and editing images within a single interface. In addition to background removal, it supports cropping, rotation, resizing, annotations, AI OCR for extracting text from images, AI text editing, filters, and color adjustments.
By combining image viewing and editing into one continuous workflow, WPS shortens the path from opening an image to final output, making image background removal and enhancement easier even for beginners.
How to download WPS Presentation
Step 1: Go to the WPS Office website: https://www.wps.com/d/?from=t

Step 2: Click on the Download button.
Step 3: Select the appropriate version of WPS Office for your operating system.
Step 4: Follow the on-screen instructions to install WPS Office.

Benefits of using WPS Presentation
Free to use
Fully compatible with Microsoft Office PowerPoint
Wide range of features for creating professional-looking presentations
Small file size
Fast and easy to use
fast and easy to convert PDF to PDF, and PPT to PDF
WPS Presentation is a great option for anyone who is looking for a free and easy-to-use presentation software. It offers a wide range of features that are sure to meet the needs of most users.


FAQs
Q1: How do I make a logo background transparent in PowerPoint?
To make a logo's background transparent in PowerPoint, follow these steps:
Step 1: Open PowerPoint: Launch PowerPoint and open the presentation where you want to insert the logo.
Step 2: Insert the Logo: Go to the slide where you want to add the logo. Click on the 'Insert' tab in the ribbon at the top of the screen. Select 'Pictures' or 'Picture from File' and choose your logo from your computer.

Step 3: Select the Logo: Click on the logo to select it. You'll see a new tab, 'Picture Tools Format', appear in the ribbon.
Step 4: Remove the Background:
Click on the 'Picture Tools Format' tab.
In the Adjust group, select 'Remove Background'.
PowerPoint will attempt to guess which part of the image to keep and which to remove. It will mark the areas it intends to remove with a pinkish-purple color.
Step 5: Adjust the Selection:
Use the 'Mark Areas to Keep' and 'Mark Areas to Remove' tools to refine the selection. Click and drag to draw lines to specify areas to keep or remove.
Step 6: Preview the Result: Click outside the image to see how the image will look with the background removed. Make further adjustments if necessary.
Step 7: Save the Image:
Once you're satisfied, right-click the image and choose 'Save as Picture'. Save it in a format that supports transparency, such as PNG.

Your logo now has a transparent background and can be seamlessly integrated into your PowerPoint presentation.
Q2: How do you remove the background of a picture in PowerPoint Mac?
To remove the background of a picture in PowerPoint on a Mac, follow these steps:
Step 1: Open PowerPoint: Launch PowerPoint and open the presentation containing the image you want to edit.
Step 2: Insert the Picture: Navigate to the slide where you want to add the picture. Click on the 'Insert' tab in the ribbon at the top, then select 'Pictures' or 'Picture from File'. Choose the image from your computer.
Step 3: Select the Picture: Click on the picture to select it. You'll see a new tab, 'Format', appear in the ribbon.
Step 4: Remove Background:
Click on the 'Format' tab.
In the Adjust group, select 'Remove Background'.
PowerPoint will try to automatically detect the background to remove. It will highlight the areas it intends to remove in pinkish-purple.
Step 5: Refine the Selection:
Use the 'Mark Areas to Keep' and 'Mark Areas to Remove' tools to adjust the selection. Click and drag to draw lines to specify areas to keep or remove.
Step 6: Preview the Result: Click outside the image to see how it looks with the background removed. Make further adjustments if needed.
Step 7: Save the Image:
Once you're satisfied, right-click the image and select 'Save as Picture'. Save it in a format that supports transparency, such as PNG.
Now, you've successfully removed the background from the picture using PowerPoint on a Mac.
Summary
This comprehensive guide on removing backgrounds in PowerPoint offers step-by-step instructions for various platforms, including Windows, Mac, and mobile devices. It emphasizes user-friendly techniques to save space and highlight crucial elements, preventing distractions. With clear visuals and informative FAQs, this guide aims to streamline the background removal process, enhancing the overall PowerPoint experience.
Additionally, the article introduces WPS AI as a more convenient way to handle background removal and image editing tasks. WPS Office serves as a compatible and free alternative for creating, editing, and saving Microsoft Office files. For users without access to Microsoft PowerPoint, WPS Office with WPS AI provides a flexible and effective solution.

'%3e%3cpath%20d='M19.9911%204.11386V6.471H18.5894C18.0775%206.471%2017.7322%206.57814%2017.5536%206.79243C17.3751%207.00671%2017.2858%207.32814%2017.2858%207.75671V9.44421H19.9019L19.5536%2012.0871H17.2858V18.8639H14.5536V12.0871H12.2769V9.44421H14.5536V7.49779C14.5536%206.39064%2014.8632%205.53201%2015.4822%204.92189C16.1013%204.31177%2016.9257%204.00671%2017.9554%204.00671C18.8304%204.00671%2019.509%204.04243%2019.9911%204.11386Z'%20fill='%23333333'/%3e%3c/g%3e%3cdefs%3e%3cclipPath%20id='clip0_2938_8199'%3e%3crect%20width='16'%20height='16'%20fill='white'%20transform='translate(8%204.00671)'/%3e%3c/clipPath%3e%3c/defs%3e%3c/svg%3e)
'%3e%3cpath%20d='M17.5237%2010.7813L23.4811%204H22.0699L16.8949%209.88693L12.7648%204H8L14.2469%2012.9029L8%2020.0133H9.4112L14.8725%2013.7952L19.2352%2020.0133H24M9.92053%205.04213H12.0885L22.0688%2019.0224H19.9003'%20fill='%23333333'/%3e%3c/g%3e%3cdefs%3e%3cclipPath%20id='clip0_2938_8200'%3e%3crect%20width='16'%20height='16.0134'%20fill='white'%20transform='translate(8%204)'/%3e%3c/clipPath%3e%3c/defs%3e%3c/svg%3e)


