

'%3e%3cpath%20d='M8%200C12.4183%200%2016%203.58172%2016%208C16%2012.4183%2012.4183%2016%208%2016C3.58172%2016%200%2012.4183%200%208C0%203.58172%203.58172%200%208%200ZM11.6162%204.38379C11.2257%203.99337%2010.5927%203.99338%2010.2021%204.38379L8%206.58594L5.79785%204.38379C5.40732%203.99334%204.77429%203.99329%204.38379%204.38379C3.99331%204.77429%203.99335%205.40733%204.38379%205.79785L6.58594%208L4.38379%2010.2021C3.99348%2010.5927%203.99341%2011.2257%204.38379%2011.6162C4.77426%2012.0066%205.40734%2012.0065%205.79785%2011.6162L8%209.41406L10.2021%2011.6162C10.5927%2012.0066%2011.2257%2012.0067%2011.6162%2011.6162C12.0067%2011.2257%2012.0066%2010.5927%2011.6162%2010.2021L9.41406%208L11.6162%205.79785C12.0066%205.40735%2012.0066%204.77429%2011.6162%204.38379Z'%20fill='%23080E17'%20fill-opacity='0.46'/%3e%3c/g%3e%3cdefs%3e%3cclipPath%20id='clip0_3761_713'%3e%3crect%20width='16'%20height='16'%20fill='white'/%3e%3c/clipPath%3e%3c/defs%3e%3c/svg%3e)



'%3e%3cpath%20fill-rule='evenodd'%20clip-rule='evenodd'%20d='M21.4999%2010.9993C21.4999%205.20009%2016.7986%200.498901%2010.9993%200.498901C5.19994%200.498901%200.498657%205.20009%200.498657%2010.9993C0.498657%2016.2404%204.33858%2020.5844%209.35855%2021.3722V14.0346H6.69238V10.9993H9.35855V8.68594C9.35855%206.05427%2010.9262%204.60062%2013.3248%204.60062C14.4736%204.60062%2015.6753%204.80571%2015.6753%204.80571V7.38979H14.3512C13.0468%207.38979%2012.64%208.19921%2012.64%209.0296V10.9993H15.5523L15.0867%2014.0346H12.64V21.3722C17.66%2020.5844%2021.4999%2016.2404%2021.4999%2010.9993Z'%20fill='%231568EA'/%3e%3c/g%3e%3c/svg%3e)


'%3e%3cpath%20d='M2.42045%2022.1876H6.31818V12.7217L0.75%208.54553V20.5171C0.75%2021.4414%201.49892%2022.1876%202.42045%2022.1876Z'%20fill='%234285F4'/%3e%3cpath%20d='M19.682%2022.1876H23.5797C24.5041%2022.1876%2025.2502%2021.4387%2025.2502%2020.5171V8.54553L19.682%2012.7217'%20fill='%2334A853'/%3e%3cpath%20d='M19.682%205.48293V12.7216L25.2502%208.54543V6.31816C25.2502%204.25236%2022.8921%203.07469%2021.2411%204.31361'%20fill='%23FBBC04'/%3e%3cpath%20d='M6.31824%2012.7217V5.48303L13.0001%2010.4944L19.6819%205.48303V12.7217L13.0001%2017.733'%20fill='%23EA4335'/%3e%3cpath%20d='M0.75%206.31816V8.54543L6.31818%2012.7216V5.48293L4.75909%204.31361C3.10534%203.07469%200.75%204.25236%200.75%206.31816Z'%20fill='%23C5221F'/%3e%3c/g%3e%3cdefs%3e%3cclipPath%20id='clip0_2954_7305'%3e%3crect%20width='24.5'%20height='18.375'%20fill='white'%20transform='translate(0.75%203.8125)'/%3e%3c/clipPath%3e%3c/defs%3e%3c/svg%3e)


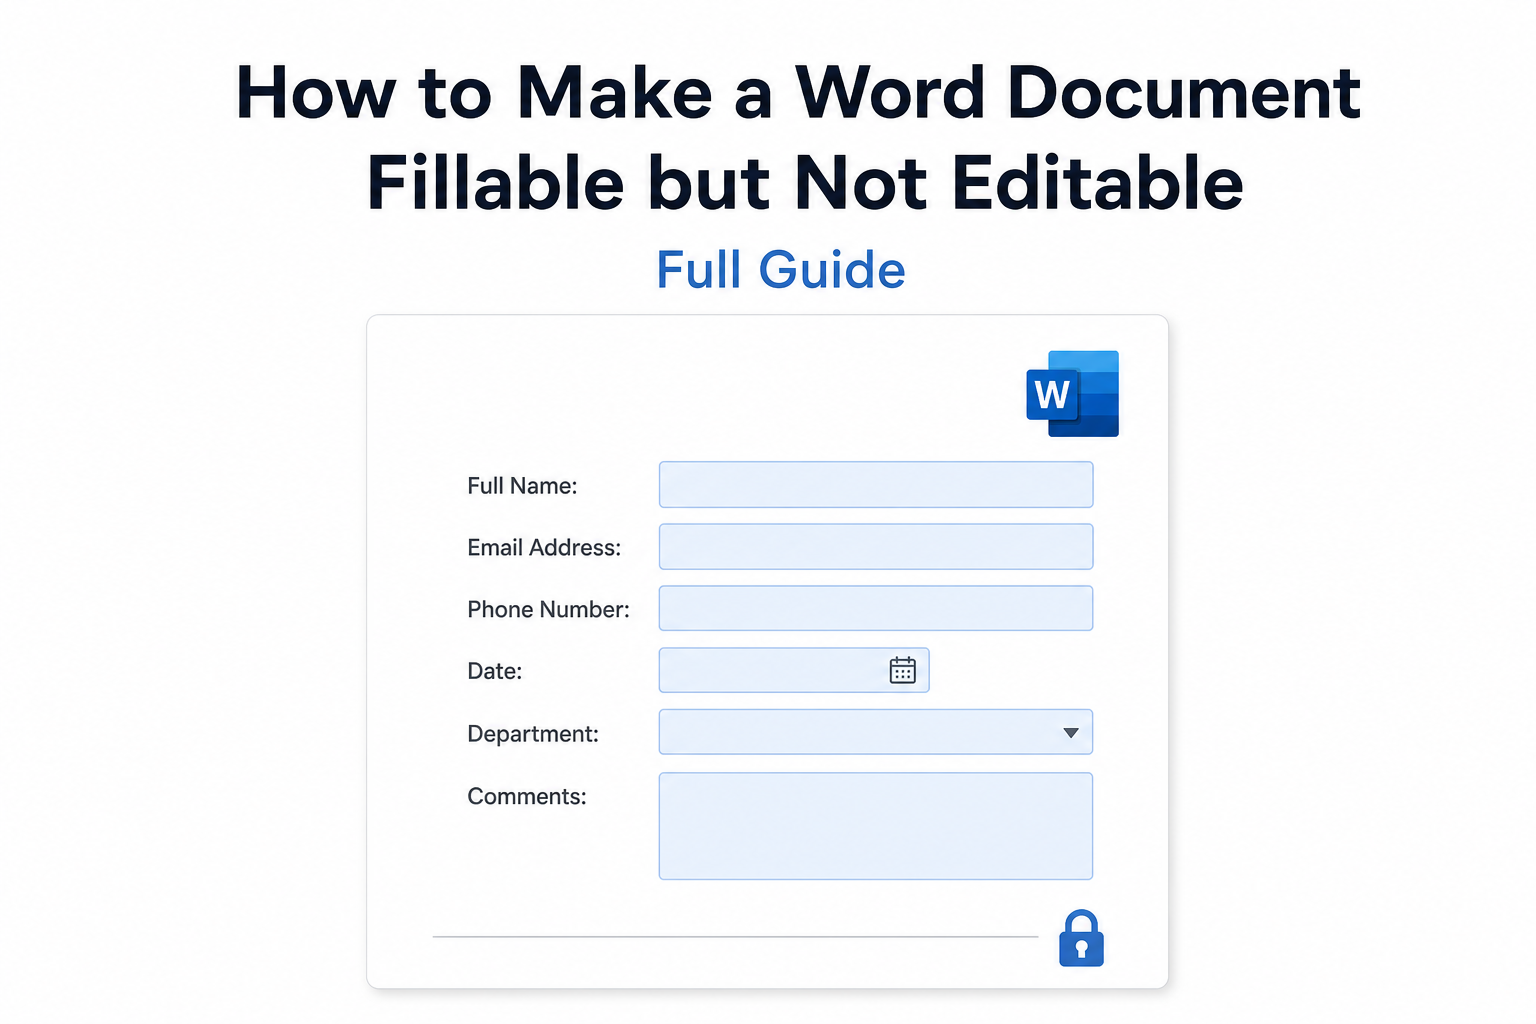
You can make a Word document fillable but not editable for templates, forms, and checklists. Users can type in fields and check boxes, while titles, instructions, and layout stay locked—so nobody can rewrite or delete your fixed content.
Quick answer: Insert fillable content controls first → go to Review → Restrict Editing → choose Filling in forms → start protection (optional password) → save as .docx.
Why Restrict Editing While Keeping Fields Fillable?
Keep official forms and templates looking consistent
Stop people from changing fixed labels, titles, and layout
Still let users complete the blanks you designed
How to Make Word Fillable but Not Editable (Windows)
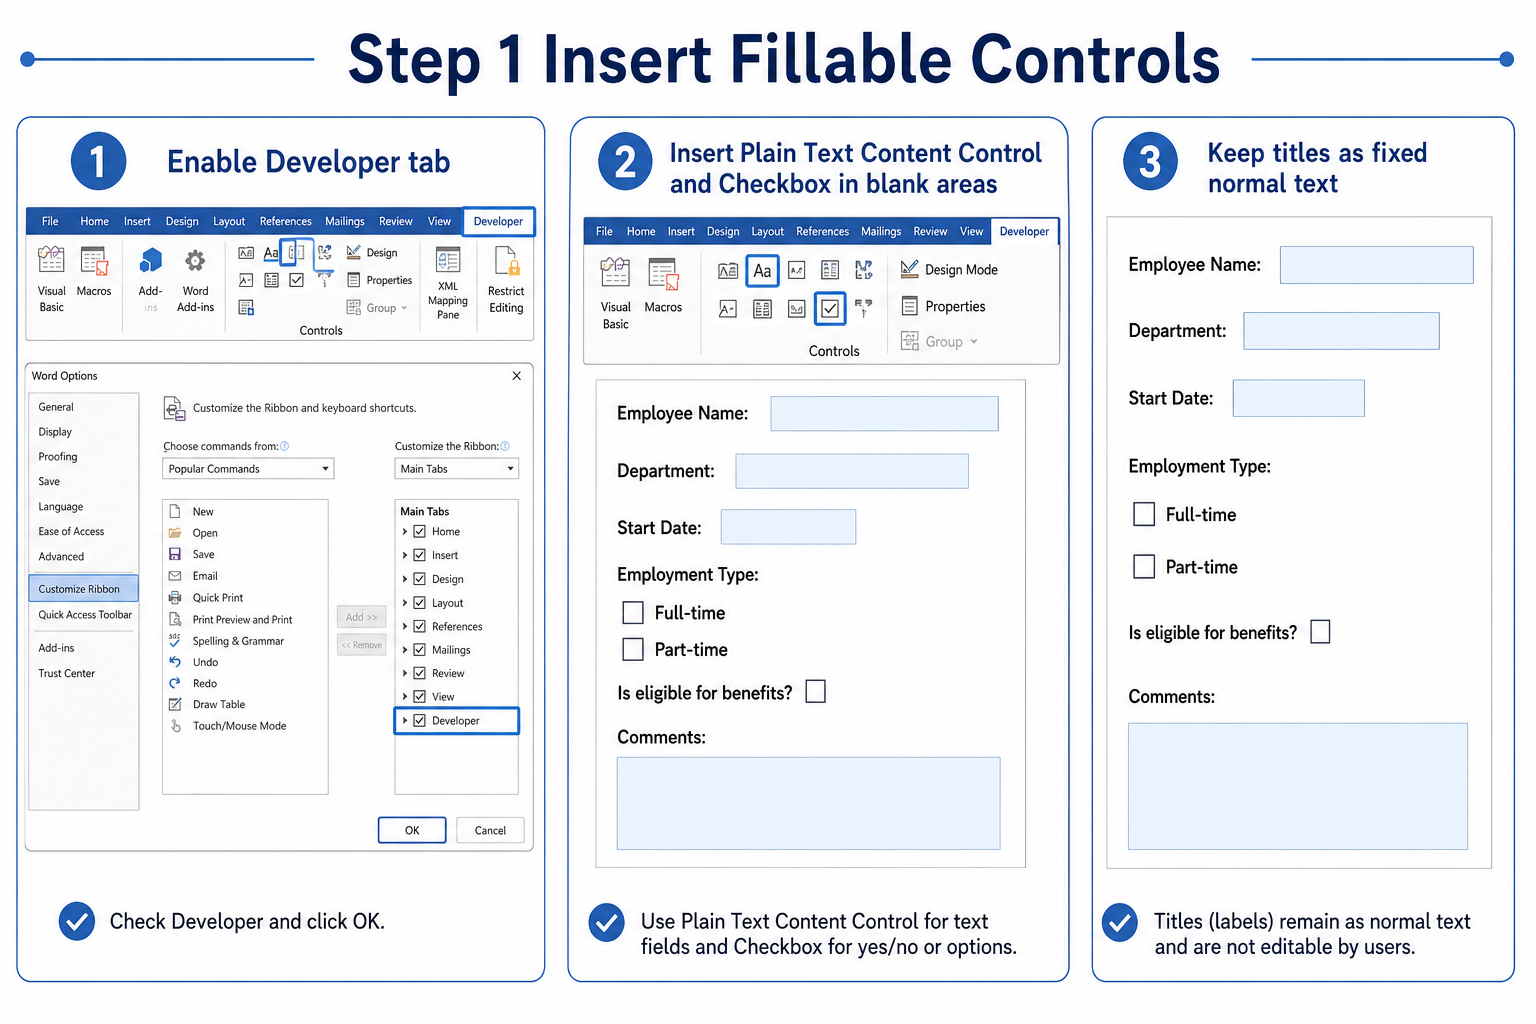
Step 1: Insert fillable content controls
Enable the Developer tab (File → Options → Customize Ribbon, then check Developer).
Place your cursor where users should type or select an answer.
Insert a Plain Text Content Control, Check Box Content Control, or Drop-Down List.
Leave titles and instructions as normal text—do not put them inside the controls.
Step 2: Turn on Restrict Editing
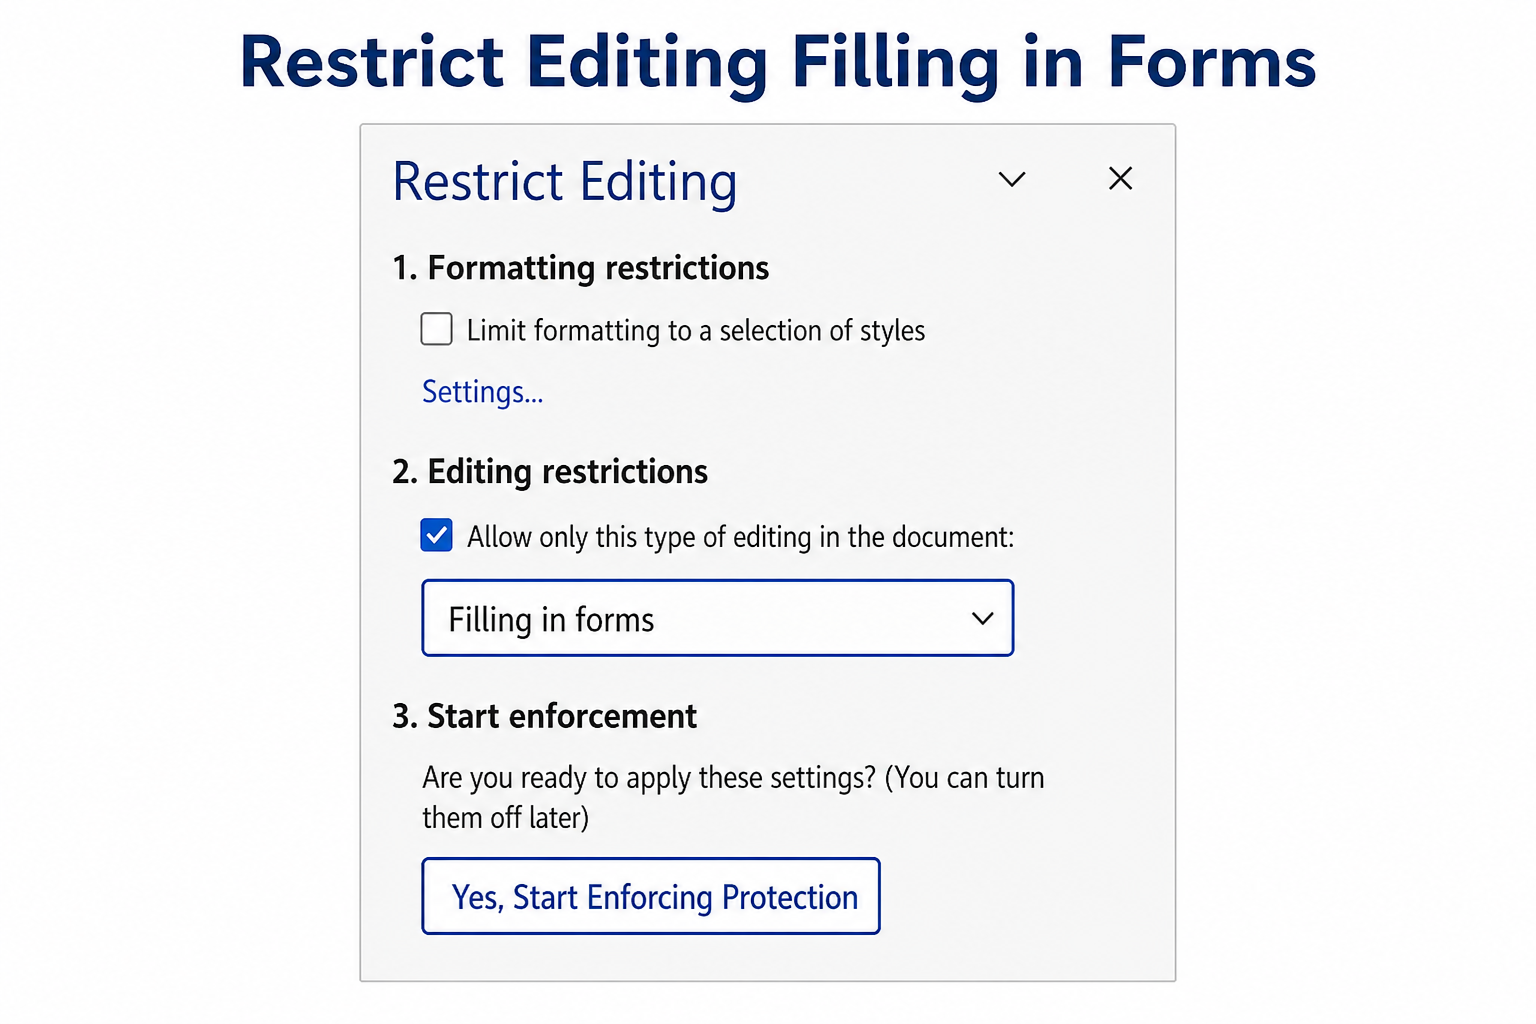
Go to Review → Restrict Editing.
Check Allow only this type of editing in the document.
Choose Filling in forms.
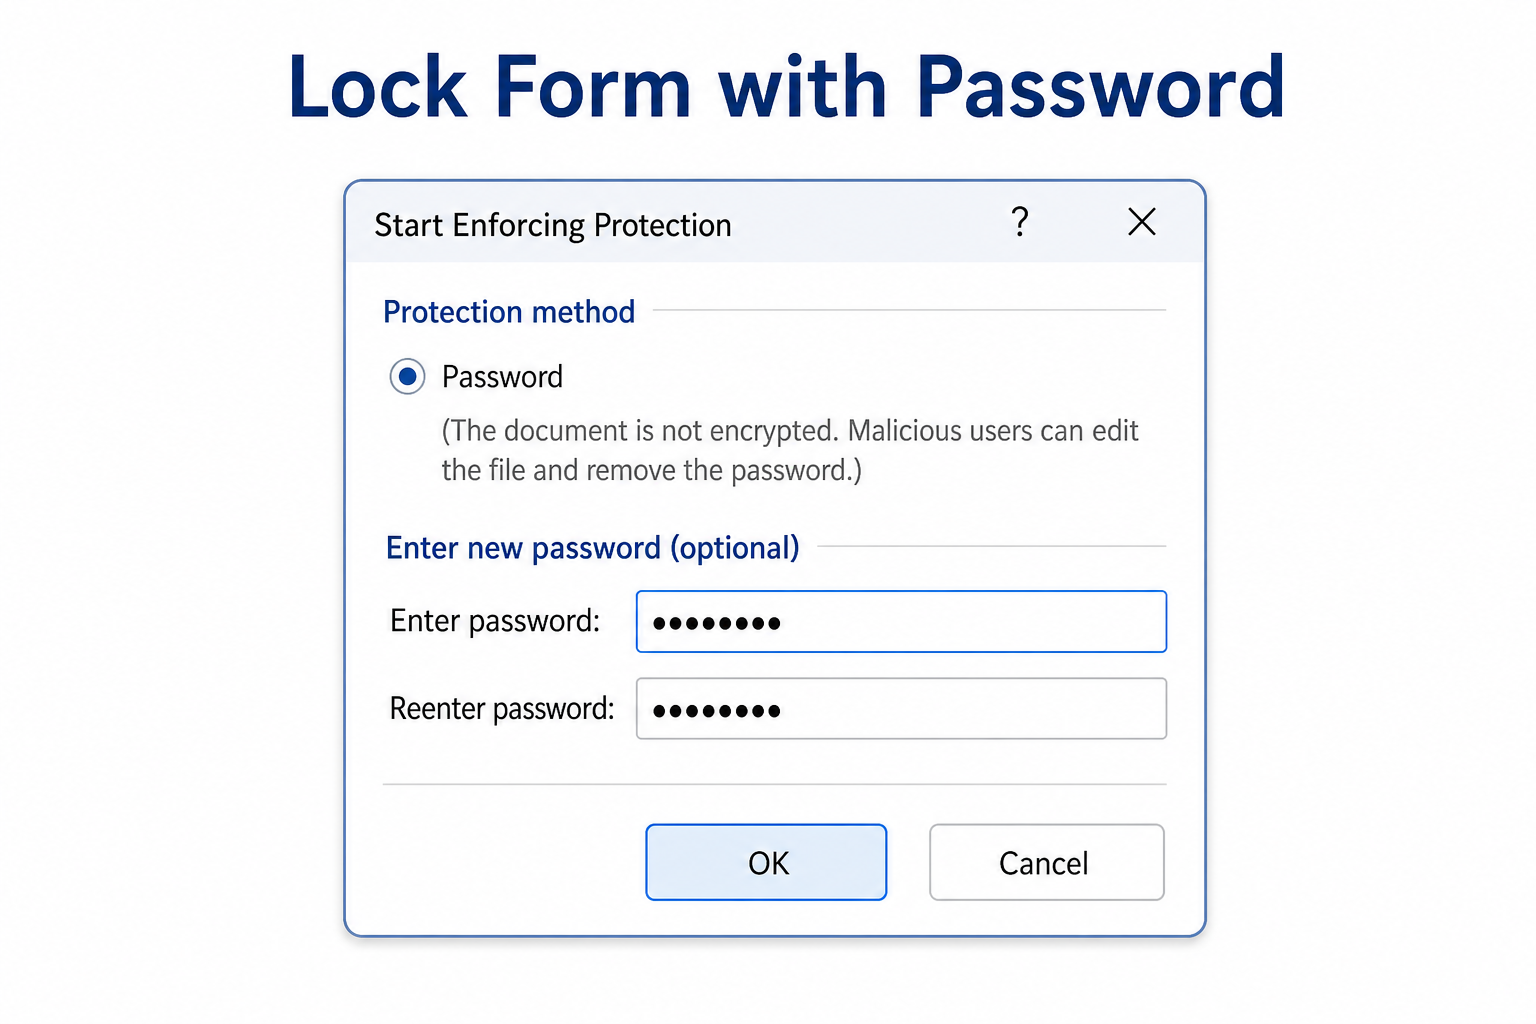
Step 3: Lock it with a password
Click Yes, Start Enforcing Protection.
Set a password so others cannot turn protection off easily.
Save the file as a template or standard .docx.
How to Make Word Fillable but Not Editable (Mac)
Enable the Developer tab in Word → Preferences → Ribbon & Toolbar.
Insert the text fields, check boxes, and other form controls you need.
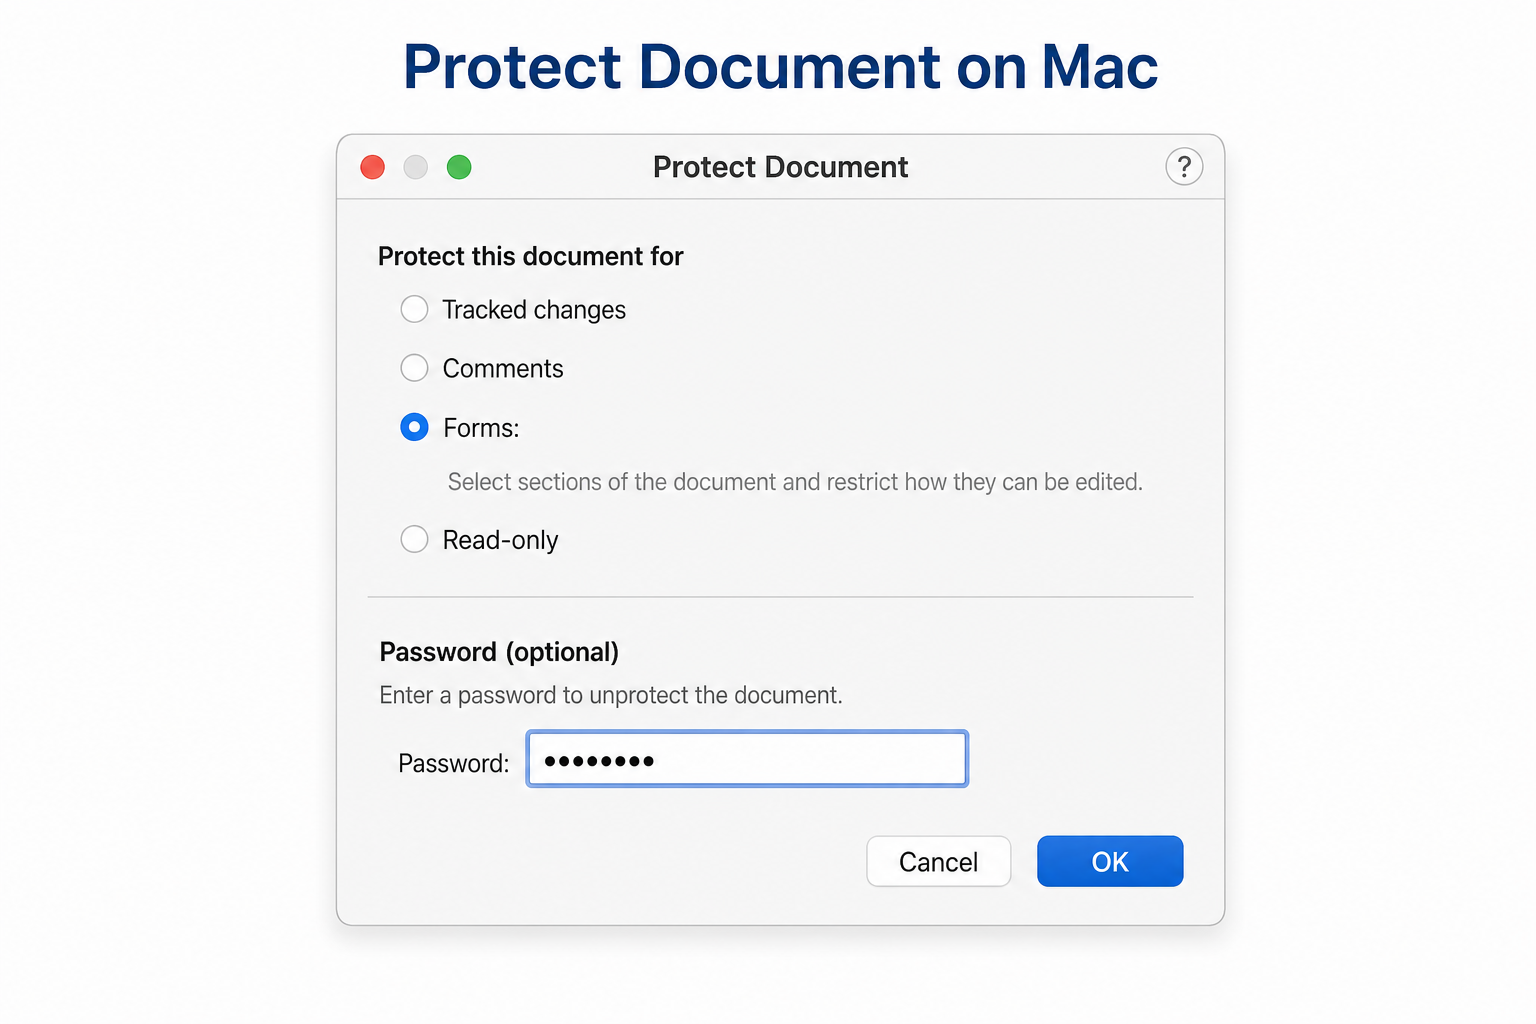
Go to Review → Protect Document (wording may vary by Word version).
Choose forms-style protection and set a password.
Save the locked fillable document.
Common Problem: The Whole Document Is Locked
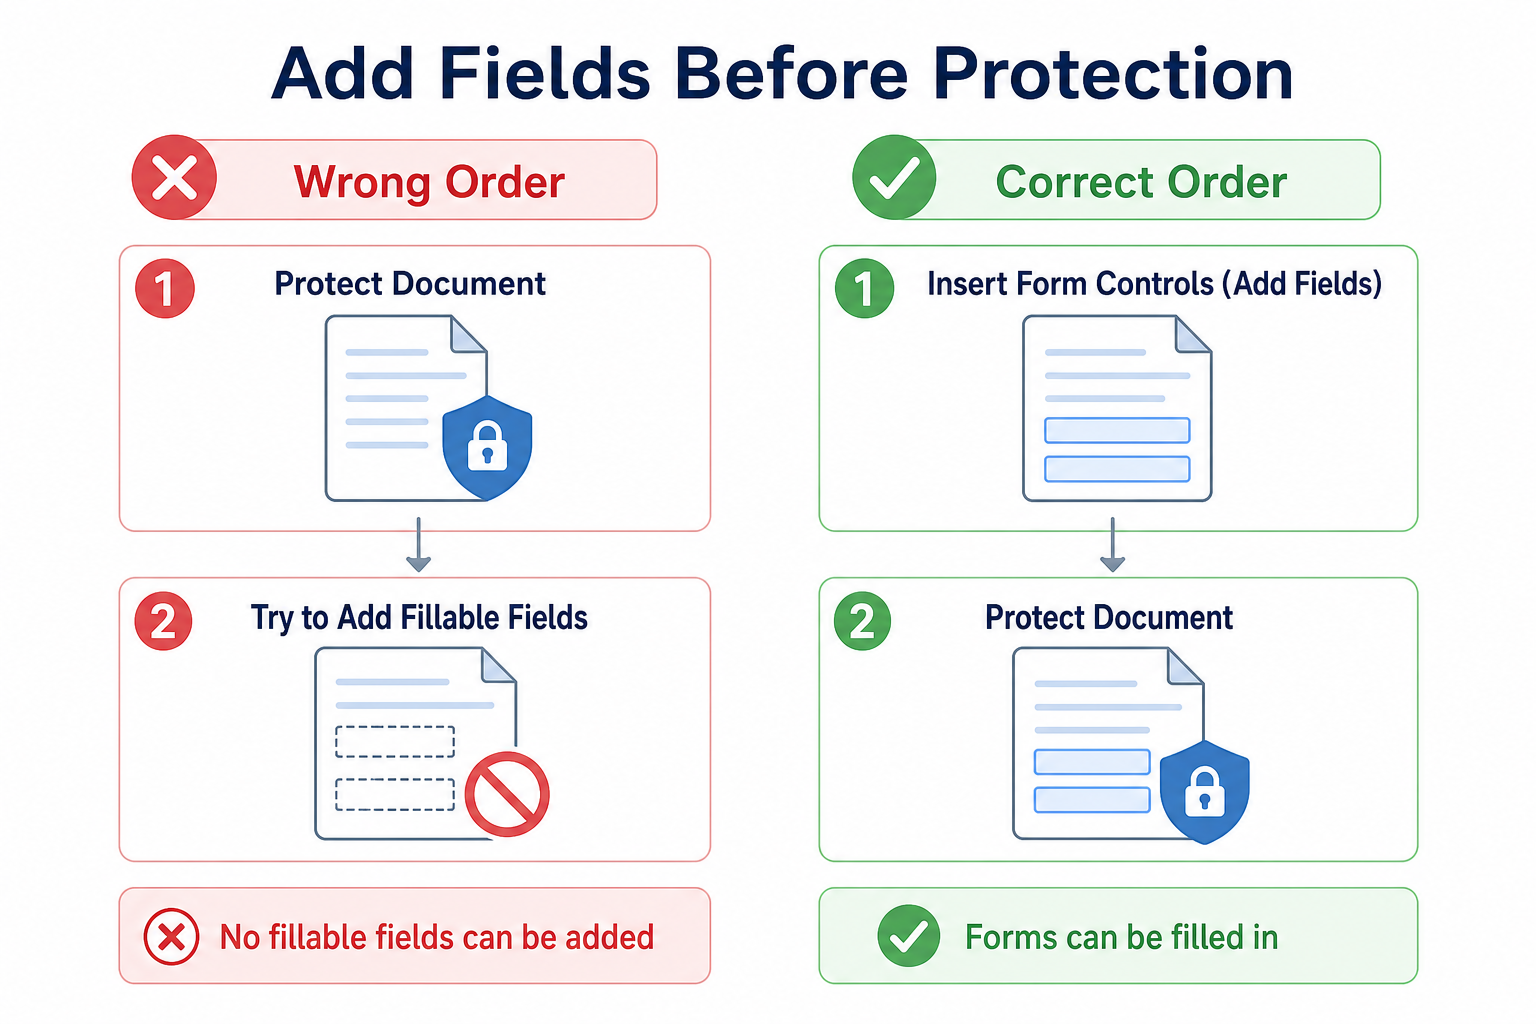
If you turn on protection before you insert content controls, nothing is fillable—the entire file feels locked. Always add fillable fields first, then enforce Filling in forms.
How to Unlock a Protected Word Document
Need to edit the template again? Remove protection first:
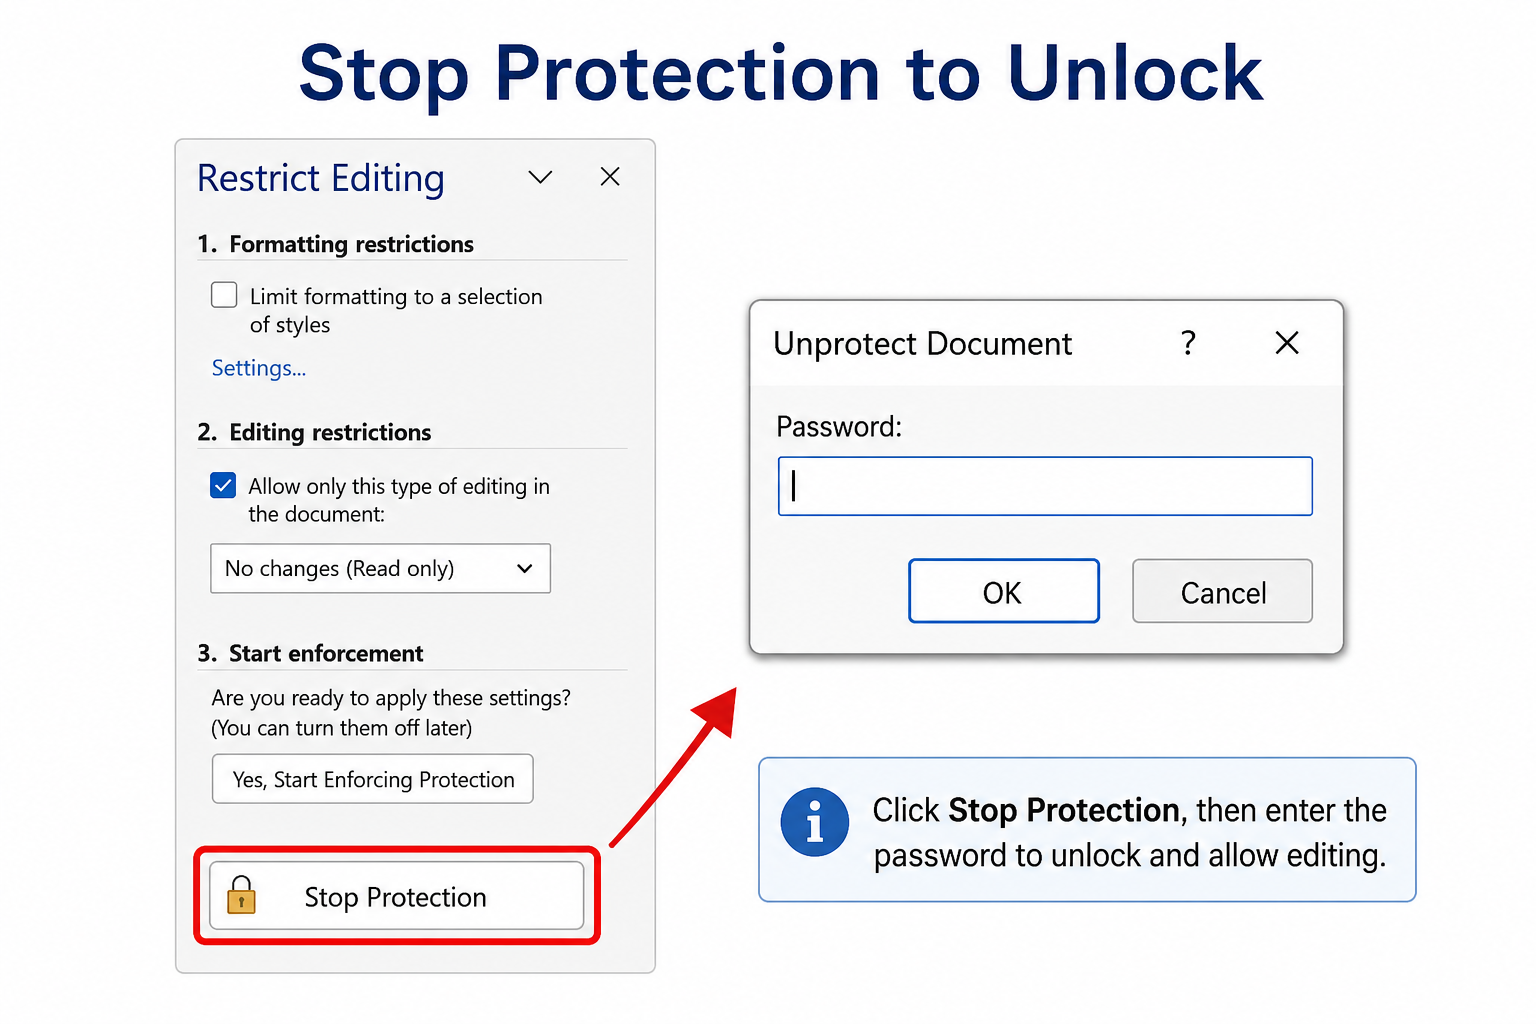
Go to Review → Restrict Editing.
Click Stop Protection in the pane.
Enter the password if you set one.
Edit fields, labels, or layout, then protect the document again when you are done.
Free Method Without Microsoft 365
Some free Word setups and Word on the web hide full Restrict Editing options. If you need locked fillable forms without a Microsoft 365 subscription, WPS Writer is a free, Word-compatible option.
In WPS Writer you can insert form controls, protect the document, and keep fixed text locked—then save as .docx for sharing in Microsoft Word.
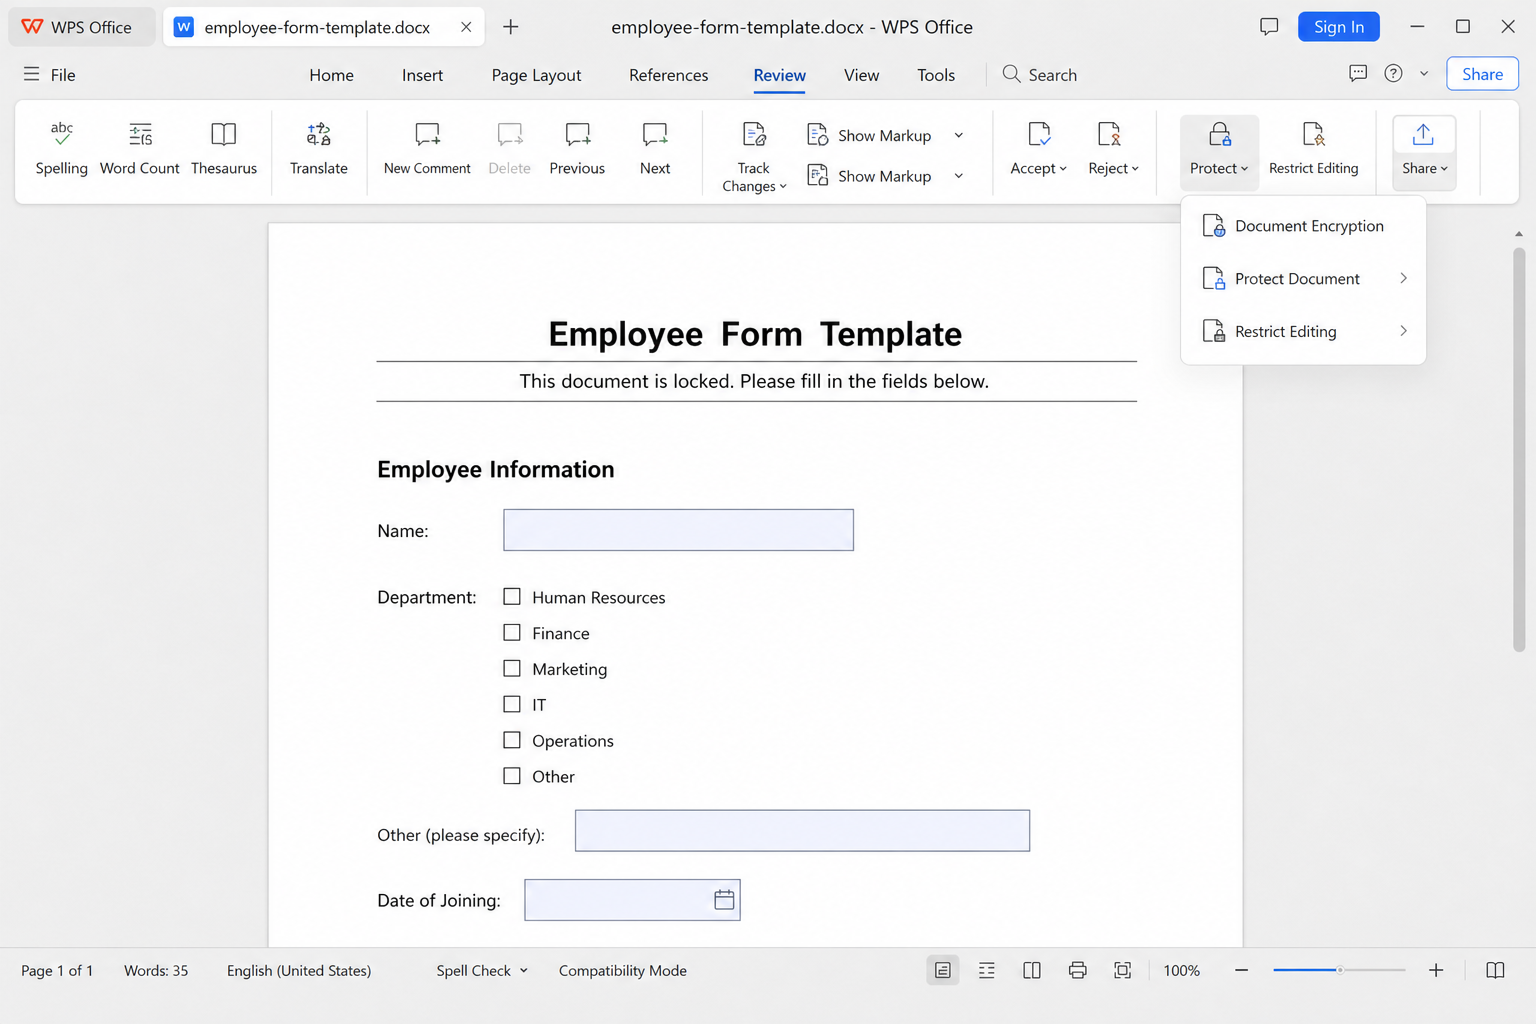
No paid subscription required — Core form and protection tools for daily use
Strong Word compatibility — Share common .docx templates with Word users
Straightforward setup — Build fields, lock the layout, save, and send
Cross-platform — Windows, Mac, Android, and iOS
FAQ
What does “fillable but not editable” mean in Word?
Users can complete blank form fields, but they cannot change fixed text, titles, or layout.
Why can’t I type after I turn on protection?
You probably protected the file before adding content controls. Stop protection, insert fillable fields, then turn Filling in forms back on.
Can I create locked fillable Word templates for free?
Yes. Static workarounds are limited in some Word setups; WPS Writer can create fillable protected forms without Microsoft 365.
Are WPS form templates compatible with Microsoft Word?
Yes—when you save as a standard Word format, recipients can usually open and fill the file in Microsoft Word.
Conclusion
To make a Word document fillable but not editable, insert content controls first, then lock the file with Restrict Editing → Filling in forms. That keeps templates and official forms consistent while still letting people complete the blanks. If you do not have Microsoft 365, WPS Writer is a practical free way to build compatible locked fillable Word documents.



'%3e%3cpath%20d='M19.9911%204.11386V6.471H18.5894C18.0775%206.471%2017.7322%206.57814%2017.5536%206.79243C17.3751%207.00671%2017.2858%207.32814%2017.2858%207.75671V9.44421H19.9019L19.5536%2012.0871H17.2858V18.8639H14.5536V12.0871H12.2769V9.44421H14.5536V7.49779C14.5536%206.39064%2014.8632%205.53201%2015.4822%204.92189C16.1013%204.31177%2016.9257%204.00671%2017.9554%204.00671C18.8304%204.00671%2019.509%204.04243%2019.9911%204.11386Z'%20fill='%23333333'/%3e%3c/g%3e%3cdefs%3e%3cclipPath%20id='clip0_2938_8199'%3e%3crect%20width='16'%20height='16'%20fill='white'%20transform='translate(8%204.00671)'/%3e%3c/clipPath%3e%3c/defs%3e%3c/svg%3e)
'%3e%3cpath%20d='M17.5237%2010.7813L23.4811%204H22.0699L16.8949%209.88693L12.7648%204H8L14.2469%2012.9029L8%2020.0133H9.4112L14.8725%2013.7952L19.2352%2020.0133H24M9.92053%205.04213H12.0885L22.0688%2019.0224H19.9003'%20fill='%23333333'/%3e%3c/g%3e%3cdefs%3e%3cclipPath%20id='clip0_2938_8200'%3e%3crect%20width='16'%20height='16.0134'%20fill='white'%20transform='translate(8%204)'/%3e%3c/clipPath%3e%3c/defs%3e%3c/svg%3e)


