

'%3e%3cpath%20d='M8%200C12.4183%200%2016%203.58172%2016%208C16%2012.4183%2012.4183%2016%208%2016C3.58172%2016%200%2012.4183%200%208C0%203.58172%203.58172%200%208%200ZM11.6162%204.38379C11.2257%203.99337%2010.5927%203.99338%2010.2021%204.38379L8%206.58594L5.79785%204.38379C5.40732%203.99334%204.77429%203.99329%204.38379%204.38379C3.99331%204.77429%203.99335%205.40733%204.38379%205.79785L6.58594%208L4.38379%2010.2021C3.99348%2010.5927%203.99341%2011.2257%204.38379%2011.6162C4.77426%2012.0066%205.40734%2012.0065%205.79785%2011.6162L8%209.41406L10.2021%2011.6162C10.5927%2012.0066%2011.2257%2012.0067%2011.6162%2011.6162C12.0067%2011.2257%2012.0066%2010.5927%2011.6162%2010.2021L9.41406%208L11.6162%205.79785C12.0066%205.40735%2012.0066%204.77429%2011.6162%204.38379Z'%20fill='%23080E17'%20fill-opacity='0.46'/%3e%3c/g%3e%3cdefs%3e%3cclipPath%20id='clip0_3761_713'%3e%3crect%20width='16'%20height='16'%20fill='white'/%3e%3c/clipPath%3e%3c/defs%3e%3c/svg%3e)



'%3e%3cpath%20fill-rule='evenodd'%20clip-rule='evenodd'%20d='M21.4999%2010.9993C21.4999%205.20009%2016.7986%200.498901%2010.9993%200.498901C5.19994%200.498901%200.498657%205.20009%200.498657%2010.9993C0.498657%2016.2404%204.33858%2020.5844%209.35855%2021.3722V14.0346H6.69238V10.9993H9.35855V8.68594C9.35855%206.05427%2010.9262%204.60062%2013.3248%204.60062C14.4736%204.60062%2015.6753%204.80571%2015.6753%204.80571V7.38979H14.3512C13.0468%207.38979%2012.64%208.19921%2012.64%209.0296V10.9993H15.5523L15.0867%2014.0346H12.64V21.3722C17.66%2020.5844%2021.4999%2016.2404%2021.4999%2010.9993Z'%20fill='%231568EA'/%3e%3c/g%3e%3c/svg%3e)


'%3e%3cpath%20d='M2.42045%2022.1876H6.31818V12.7217L0.75%208.54553V20.5171C0.75%2021.4414%201.49892%2022.1876%202.42045%2022.1876Z'%20fill='%234285F4'/%3e%3cpath%20d='M19.682%2022.1876H23.5797C24.5041%2022.1876%2025.2502%2021.4387%2025.2502%2020.5171V8.54553L19.682%2012.7217'%20fill='%2334A853'/%3e%3cpath%20d='M19.682%205.48293V12.7216L25.2502%208.54543V6.31816C25.2502%204.25236%2022.8921%203.07469%2021.2411%204.31361'%20fill='%23FBBC04'/%3e%3cpath%20d='M6.31824%2012.7217V5.48303L13.0001%2010.4944L19.6819%205.48303V12.7217L13.0001%2017.733'%20fill='%23EA4335'/%3e%3cpath%20d='M0.75%206.31816V8.54543L6.31818%2012.7216V5.48293L4.75909%204.31361C3.10534%203.07469%200.75%204.25236%200.75%206.31816Z'%20fill='%23C5221F'/%3e%3c/g%3e%3cdefs%3e%3cclipPath%20id='clip0_2954_7305'%3e%3crect%20width='24.5'%20height='18.375'%20fill='white'%20transform='translate(0.75%203.8125)'/%3e%3c/clipPath%3e%3c/defs%3e%3c/svg%3e)


To cite in Word, open the References tab, choose a citation style, select Insert Citation → Add New Source, enter the source details, and insert a bibliography when your paper is complete. Microsoft Word can reuse sources throughout the document and format the end list in APA, MLA, Chicago, and other available styles.
Key Takeaways
- Choose the required style before adding sources so Word formats each citation consistently.
- Create one accurate source record, then reuse it wherever the same work is quoted or paraphrased.
- Add page numbers through Citation Options → Edit Citation rather than typing inside the citation field.
- Generate the bibliography only after the sources are entered, then update it after later edits.
- Word automates formatting, but you still need to check names, capitalization, dates, URLs, DOIs, and assignment-specific rules.
How to Cite in Word: Complete Workflow
The built-in citation workflow connects three things: a source record, an in-text citation, and the bibliography at the end of the document. Complete the following steps in order so Word can keep those elements linked.
Step 1: Choose a Citation Style
- Open the document in Microsoft Word.
- Select the References tab on the ribbon.
- In the Citations & Bibliography group, open the Style menu.
- Choose the style required by your instructor, school, publisher, or organization, such as APA, MLA, or an available Chicago option.
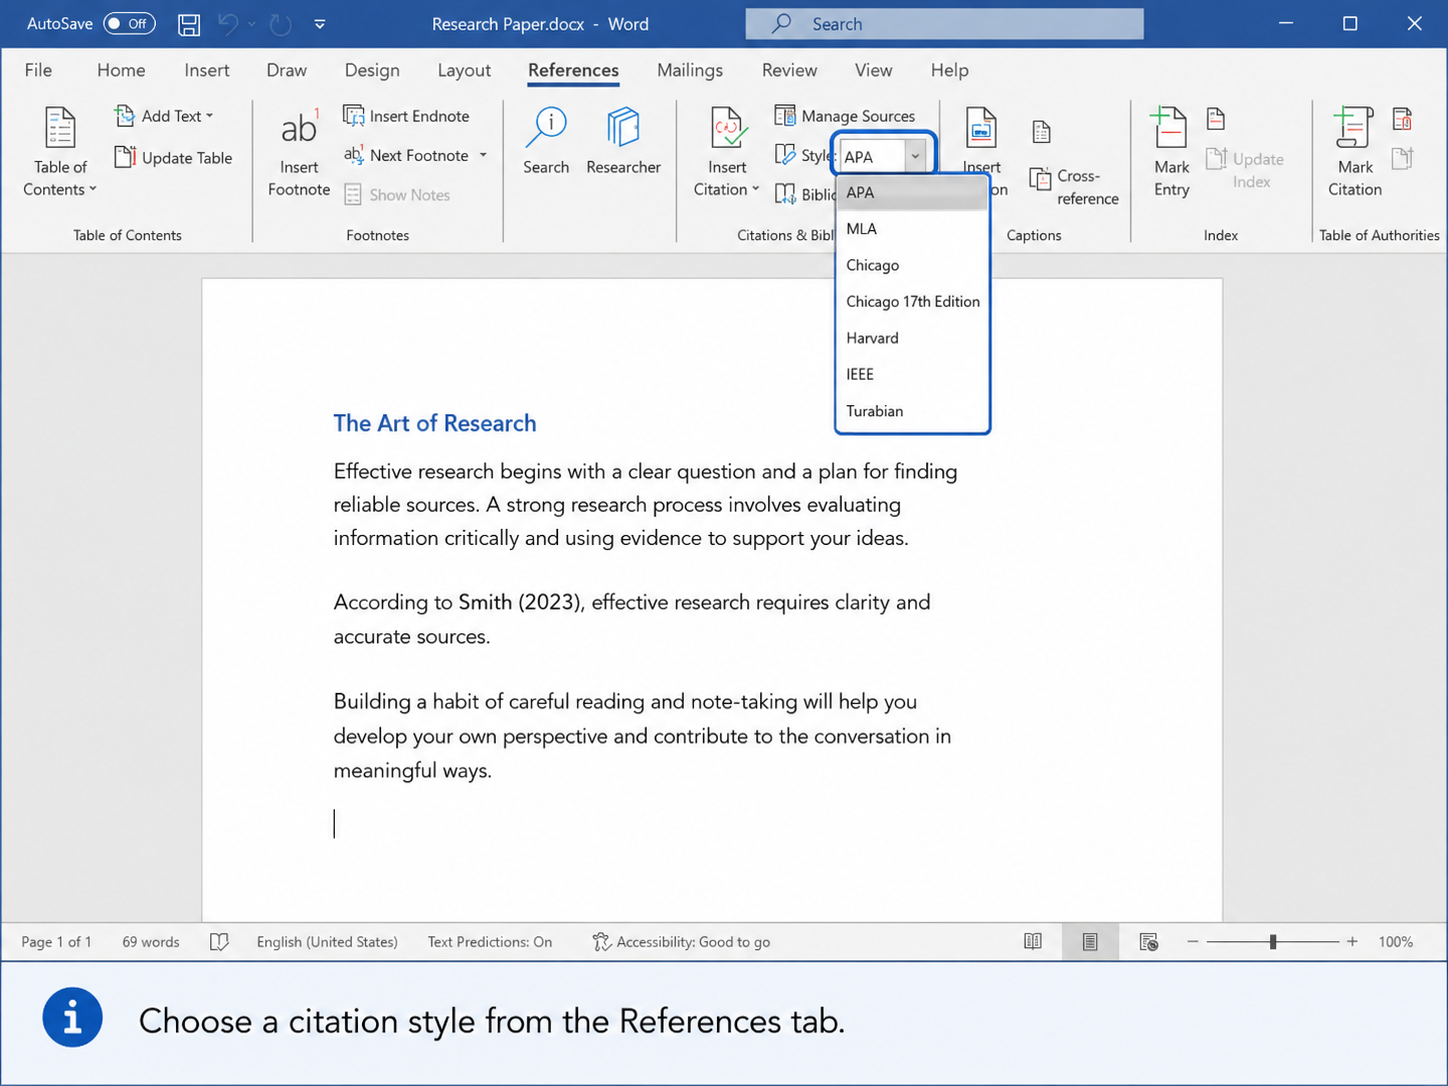
Set the style before adding the first source. Word can reformat existing citation fields after a style change, but changing styles late in the project may expose incomplete fields or details that the new style requires.
Step 2: Add a New Source
- Place the cursor at the end of the sentence or phrase that needs a citation.
- Select Insert Citation → Add New Source.
- Choose the correct Type of Source, such as Book, Journal Article, Website, Report, or Conference Proceedings.
- Enter the author, title, year, publisher, URL, DOI, page range, and other available details.
- Select Show All Bibliography Fields when the standard form does not show edition, volume, issue, translator, or other necessary information.
- Click OK. Word inserts the citation and saves the source for reuse.
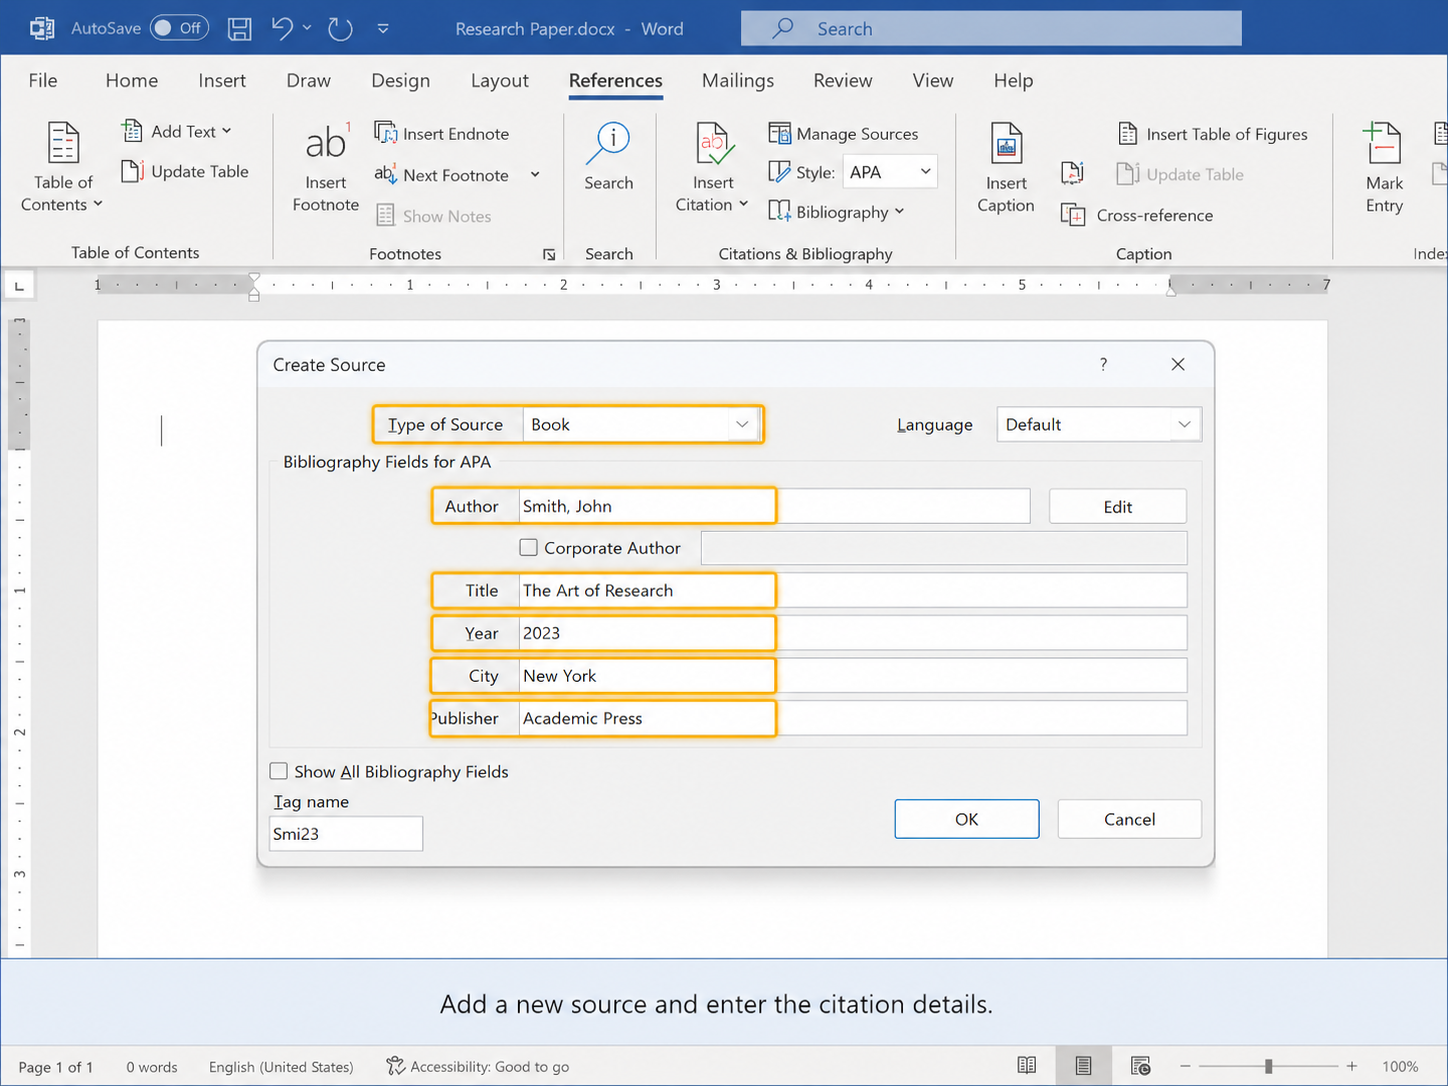
Do not choose the source type based only on how you received the file. A journal article downloaded as a PDF should still be entered as a journal article, while a government PDF may be a report.
Step 3: Insert the In-Text Citation
- Click immediately after the quotation, paraphrase, statistic, or claim that needs credit.
- Go to References → Insert Citation.
- Select the source already saved in the document.
- Repeat this process each time you use the source. Reuse the existing record instead of creating a duplicate.
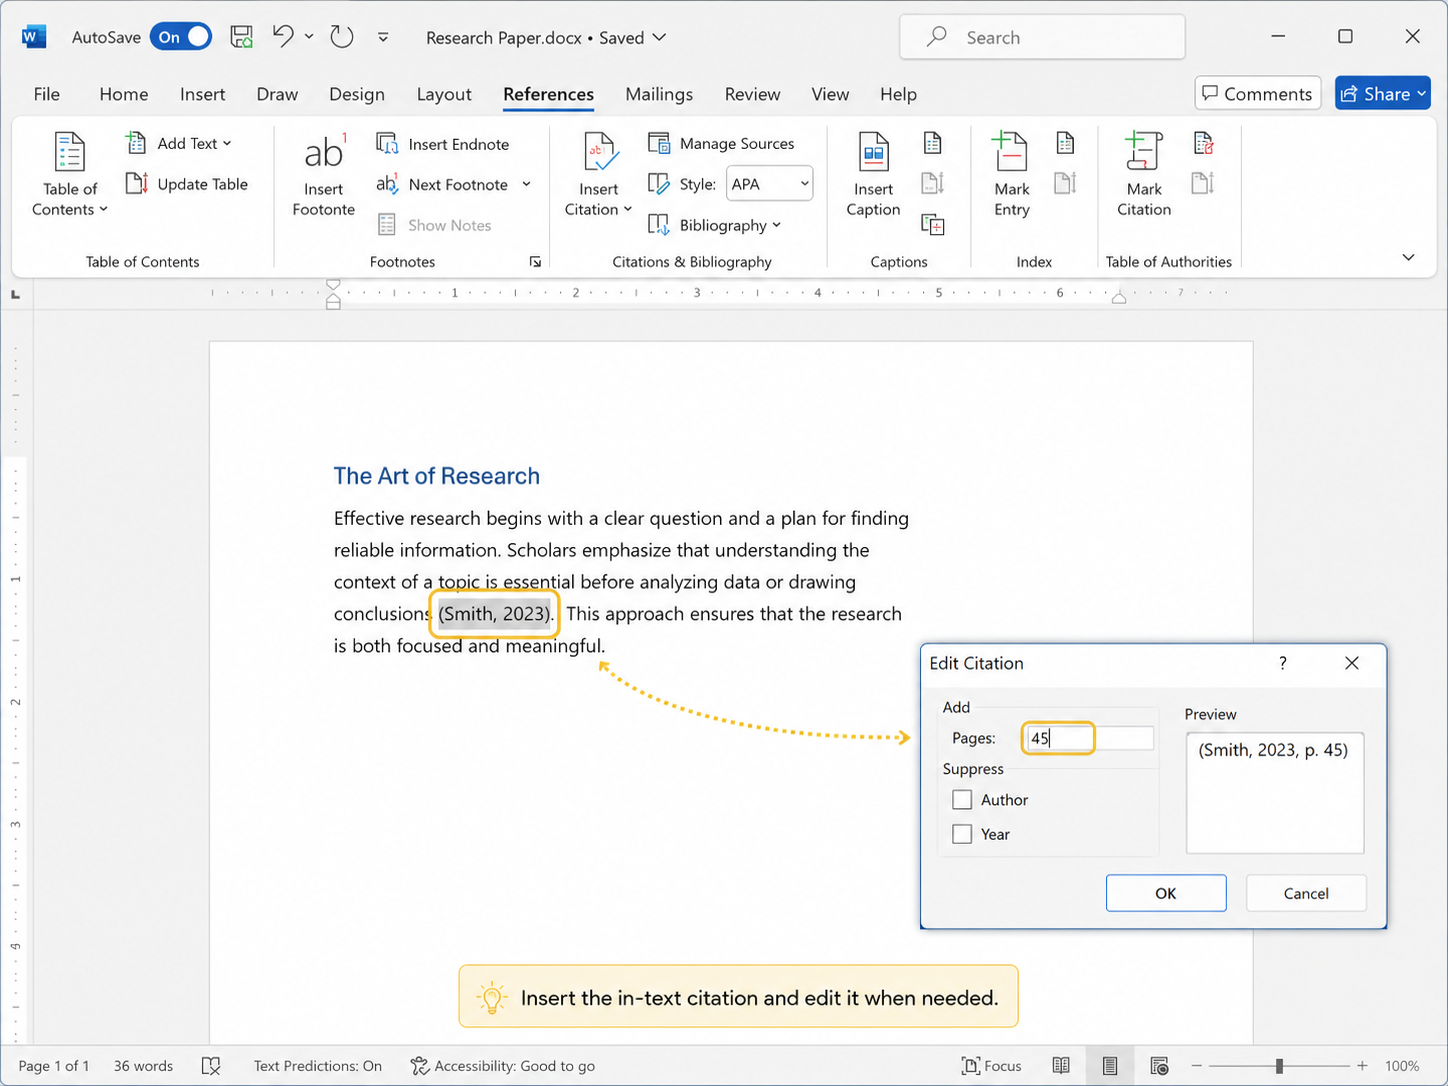
A citation field may look like ordinary text, but Word uses it to connect that mention with the source record. Editing the source through Word's citation tools is safer than manually retyping the author or year inside the field.
Step 4: Edit the Citation or Add Page Numbers
- Select the inserted citation.
- Open Citation Options and choose Edit Citation.
- Enter the page number or range required for a direct quotation.
- Use options such as Suppress Author or Suppress Year only when the citation style and sentence structure require them.
For example, if the sentence already names the author, APA may allow the author to appear in the sentence while the year remains in parentheses. In MLA, the page number is especially important for sources with numbered pages. For more formatting cases, see how to format in-text citations step by step.
Step 5: Create a Bibliography, Works Cited, or References List
- Place the cursor at the end of the paper, normally on a new page.
- Open References → Bibliography.
- Choose a built-in list such as Bibliography, References, or Works Cited.
- Review the generated entries for missing or incorrect source information.
- After editing or adding sources, click the list and update the citations and bibliography, or reinsert the list if your version does not show an update command.
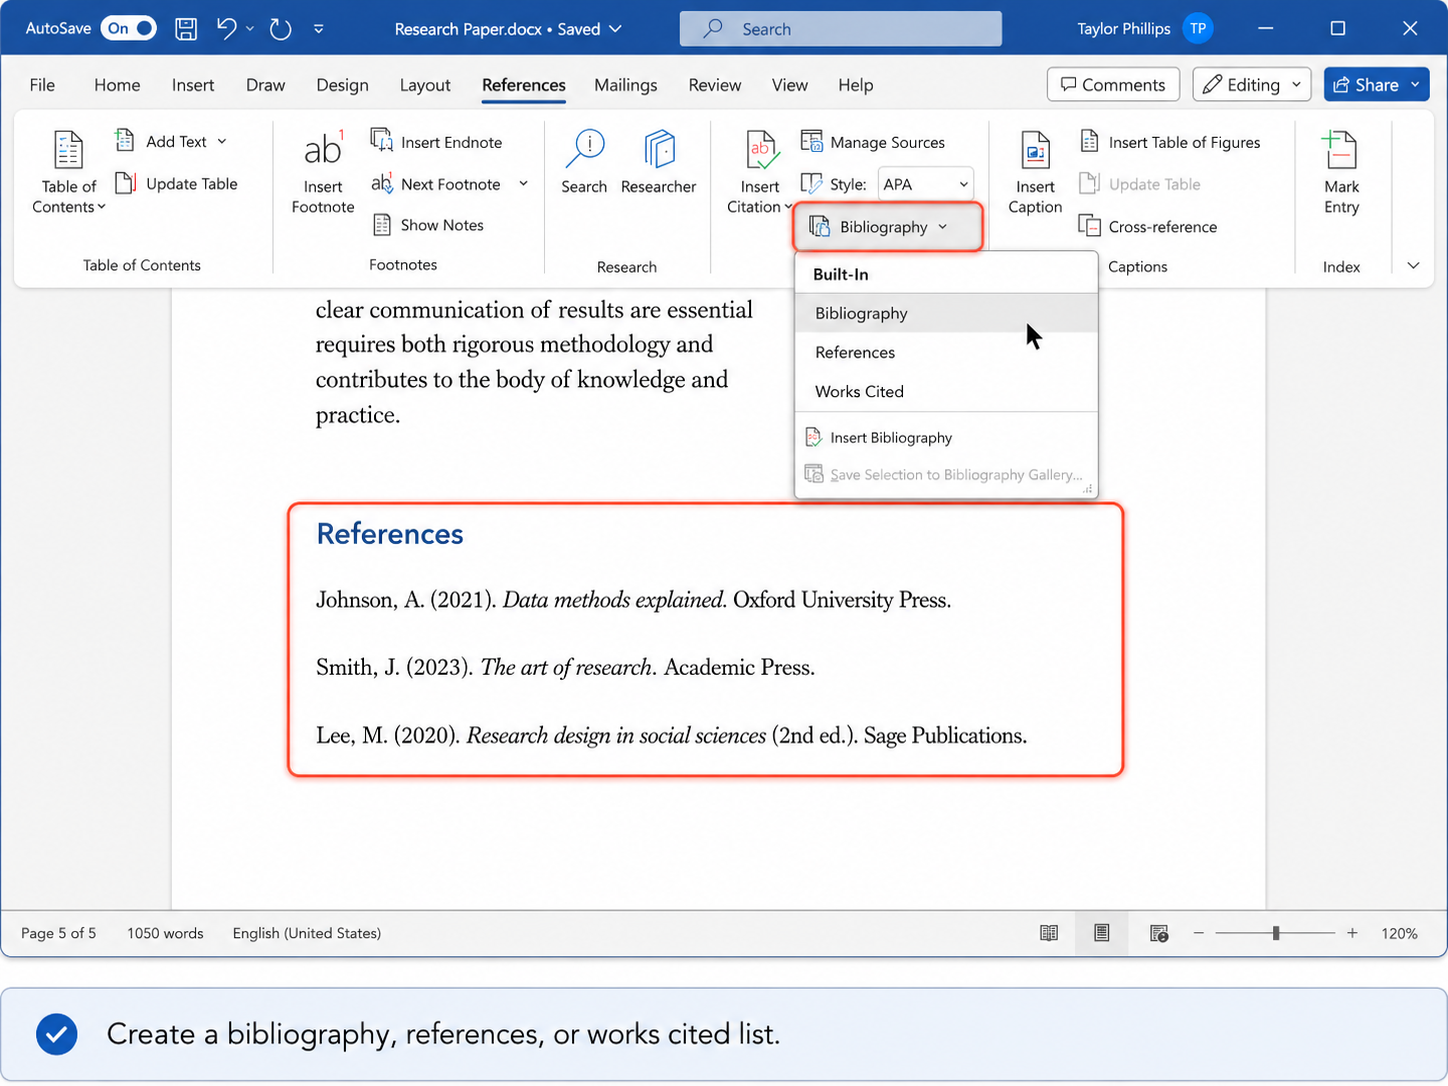
The heading depends on the style and assignment. APA normally uses References, MLA uses Works Cited, and Chicago may use Bibliography or References depending on the system.
How Word Stores and Reuses Citation Sources
Word separates source information from the formatted citation. This makes it possible to cite the same book or article many times without entering it again.
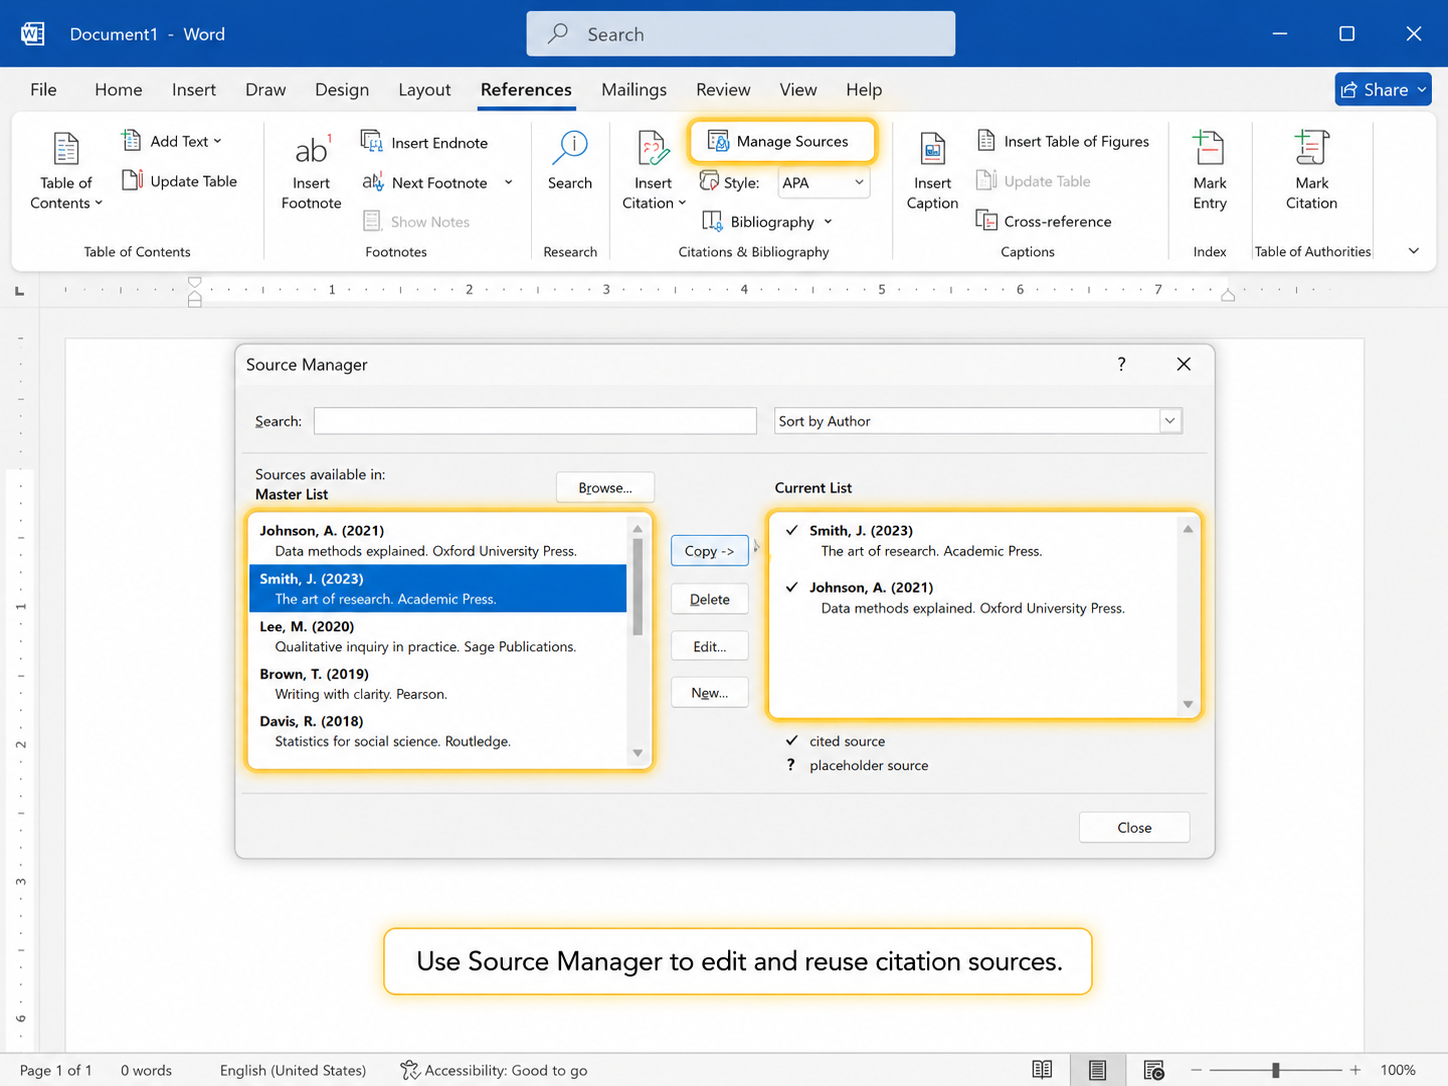
- Current List: sources available to the open document.
- Master List: sources saved for reuse in other Word documents on the same computer or user profile.
- Manage Sources: the workspace for finding, copying, editing, and organizing source records.
- Go to References → Manage Sources.
- Search for the source by author, title, year, or tag name.
- Select a source and choose Edit to correct its metadata.
- Copy a source between the Master List and Current List when it needs to be reused in another document.
- Check the document again after merging files from classmates or collaborators, because the same source may have been entered more than once.
Use Word's author editor when a source has multiple authors, an organization as author, or a complex name. Entering the full name into a single field can lead to incorrect initials or alphabetical sorting.
How to Add In-Text Citations in Word
Word can insert and format a citation field, but it cannot decide whether a claim needs a citation or whether the selected source actually supports the statement. That decision remains part of the writing and research process.
Paraphrases and Direct Quotes
A paraphrase restates another author's idea in your own words and still requires a citation. A direct quote reproduces the source's words and usually needs a page number, paragraph number, timestamp, or another locator when one is available.
Place the citation close enough to the borrowed material that the reader can identify what it supports. Avoid placing one citation at the end of a long paragraph when several sentences come from different sources.
APA, MLA, and Chicago In-Text Citation Basics
| Style | Typical in-text pattern | Example | End list |
|---|---|---|---|
| APA | Author and year | (Smith, 2024) | References |
| MLA | Author and page | (Smith 24) | Works Cited |
| Chicago author-date | Author, year, and optional page | (Smith 2024, 24) | References |
| Chicago notes-bibliography | Footnote or endnote number | 1 | Bibliography |
This table shows only the basic patterns. Multiple authors, organizations, missing dates, secondary sources, block quotations, and repeated notes require additional rules that should not be guessed from Word's automatic output.
How to Cite Different Sources in Word
The most important choice in the Create Source dialog is the source type. It controls which fields Word requests and how the final entry is arranged.
Cite a Book or Book Chapter
For a whole book, enter the author or editor, book title, publication year, city or publisher when requested by the selected style, and edition when it is not the first. A chapter in an edited book is different: the chapter author and title must be separated from the editor and book title.
Cite a Journal Article
Choose Journal Article and enter the article title, journal title, year, volume, issue, page range, and DOI when available. Do not place the journal title in the article-title field. Word can only apply italics and punctuation correctly when the metadata is separated into the right fields.
Cite a Website
Enter the individual author or organization, webpage title, website name, publication or update date, URL, and access date when your style requires it. Do not automatically use the website name as the author; first check whether a person or organization is credited on the page.
Cite a PDF
A PDF is a file format rather than a citation category. Identify whether the PDF is a journal article, report, book, conference paper, thesis, or another source, then select that underlying type in Word. When the file has incomplete metadata, you can compare PDF citation generators, but verify the generated author, title, date, DOI, and source type before using the result.
APA, MLA, and Chicago Citations in Word
The workflow inside Word is similar across styles, but the information emphasized by each style is different. Choose the required style rather than the one that looks most familiar.
APA Citation in Word
APA commonly uses author-date in-text citations and a final References page. Select an available APA option from the Style menu, add complete source metadata, and use Edit Citation for page numbers on direct quotations. For broader rules on headings, spacing, references, and source examples, use the APA format and citation guides.
MLA Citation in Word
MLA usually uses author-page citations and a Works Cited page. Word can store the source and generate the entry, but the rest of the paper still needs the correct heading, margins, line spacing, and title treatment. See how to format an MLA paper and citations in Word.
Chicago Citation in Word
Chicago has two major systems: notes-bibliography and author-date. Confirm which one your assignment requires before choosing Word's style or inserting footnotes. When you need a draft entry for a difficult source, you can use a Chicago citation maker and then check it against the required Chicago system.
When to Use a Citation Generator with Word
Word's built-in source manager works well when you want citation fields connected to a bibliography. A citation generator can be faster when you have a DOI, ISBN, webpage URL, or PDF and want a draft entry created from available metadata.
| Use Word's citation tools when... | Use a citation generator when... |
|---|---|
| You want citations and the bibliography linked inside the document. | You need to retrieve metadata from a DOI, ISBN, URL, or uploaded file. |
| You plan to reuse sources throughout a long paper. | You are creating a small number of standalone citation entries. |
| You need to switch the whole document between supported styles. | The source is difficult to enter manually or Word lacks the exact style version. |
Generated citations are drafts, not guaranteed final answers. Check capitalization, author order, dates, edition, page range, DOI, URL, and access date. For a browser-based workflow, see how to generate citations with EasyBib before copying or exporting the verified result into Word.
Article Titles in Citations: Italics or Quotation Marks?
Article titles and the titles of the larger works that contain them are not formatted the same way. A journal article, webpage, or chapter is normally treated as part of a larger container such as a journal, website, or book. The selected citation style determines whether quotation marks, sentence case, title case, or italics appear in the final entry.
Enter the article title and container title in their separate Word fields rather than adding italics or quotation marks manually. For style-by-style examples, check whether article titles should be italicized or placed in quotation marks.
How to Cite in WPS Writer
WPS Writer can open and edit Word-format papers, including documents that already contain citations and reference lists. The exact citation commands available can vary by WPS Office version, region, and installed add-ins, so check the current References tab before relying on a specific automated workflow.
- Open the `.docx` paper in WPS Writer.
- Check whether existing in-text citations, footnotes, and the bibliography display correctly.
- Continue editing the paper without converting citation fields to plain text.
- Use the available References tools or a supported citation add-in when your build provides them.
- Before submission, refresh and verify the citation fields in the application used to create them, then review the final layout and export.
For a separate References-tab walkthrough, see how to insert a citation in Word with WPS Academy. Treat menu screenshots as version-specific and verify them against the WPS Writer build currently installed.


Common Citation Problems in Word
Insert Citation or Style Is Missing
Make sure the desktop document is open in an editable Word format and that the full ribbon is visible. Protected View, simplified ribbon layouts, older file formats, or a restricted web interface can hide commands. Search the ribbon for “Insert Citation,” or open the document in a current desktop version when the required controls are unavailable.
The Citation Shows the Wrong Author or Year
Open References → Manage Sources, edit the source record, and check how the author name is divided into first, middle, and last-name fields. Then update the document's citation fields and bibliography. Avoid correcting only the visible citation, because the source record may remain wrong elsewhere.
Page Numbers Do Not Appear
Select the citation and use Citation Options → Edit Citation. Typing a page number after the citation can look correct but will not remain connected to the field and may break after a style change.
The Bibliography Does Not Update
Click inside the bibliography and choose the available update command. If no update option appears, remove and reinsert the built-in bibliography after confirming that the source is cited in the document. Also check whether the bibliography was converted to plain text.
Duplicate Sources Appear
Open Manage Sources and compare titles, years, authors, and tag names. Merge the document around one accurate source entry, replace citations that use the duplicate, and remove the unnecessary record from the Current List.
Citations Became Plain Text
This can happen after copying content through an application that does not preserve fields or saving to an older format such as `.doc`. Keep a `.docx` master copy and test the final document before deleting the editable version.
FAQs About Citing in Word
Where is Insert Citation in Word?
Open the References tab and look in the Citations & Bibliography group. Select Insert Citation to add a new source or reuse one already saved.
How do I add page numbers to a citation in Word?
Select the citation, open Citation Options, and choose Edit Citation. Enter the page number or page range in the Pages field.
Can Word automatically create a bibliography?
Yes. After inserting citations, go to References → Bibliography and choose a built-in Bibliography, References, or Works Cited layout. Review the output because Word relies on the metadata you entered.
How do I cite a website in Word?
Select Insert Citation → Add New Source, choose Website as the source type when appropriate, and enter the author or organization, page title, site name, date, and URL.
How do I cite a PDF in Word?
Identify the type of work contained in the PDF first. Enter it as a journal article, report, book, thesis, or other underlying source type rather than treating “PDF” as the citation category.
Why is my bibliography not updating?
The bibliography may be static text, the source may not be cited, or the field may need refreshing. Click the list and use the update command, or reinsert it from the References tab.
Can I cite sources in Word for the web?
Current Word for the web versions support citation and bibliography workflows, although the available controls can differ from desktop Word. Open the desktop app when a source-management or field-editing option is missing.
Can WPS Writer open a document with Word citations?
WPS Writer can open `.docx` documents containing citation content. Check the citations and bibliography after editing, because field behavior can depend on the document and software version.
Summary
How to cite in Word: select the citation style, add one accurate record for each source, insert the saved source after borrowed material, add locators through Edit Citation, and generate the bibliography at the end. Use the main Word workflow for the complete task, then follow the linked APA, MLA, Chicago, in-text citation, PDF, and citation-generator guides only when you need a more specific rule or tool.

'%3e%3cpath%20d='M19.9911%204.11386V6.471H18.5894C18.0775%206.471%2017.7322%206.57814%2017.5536%206.79243C17.3751%207.00671%2017.2858%207.32814%2017.2858%207.75671V9.44421H19.9019L19.5536%2012.0871H17.2858V18.8639H14.5536V12.0871H12.2769V9.44421H14.5536V7.49779C14.5536%206.39064%2014.8632%205.53201%2015.4822%204.92189C16.1013%204.31177%2016.9257%204.00671%2017.9554%204.00671C18.8304%204.00671%2019.509%204.04243%2019.9911%204.11386Z'%20fill='%23333333'/%3e%3c/g%3e%3cdefs%3e%3cclipPath%20id='clip0_2938_8199'%3e%3crect%20width='16'%20height='16'%20fill='white'%20transform='translate(8%204.00671)'/%3e%3c/clipPath%3e%3c/defs%3e%3c/svg%3e)
'%3e%3cpath%20d='M17.5237%2010.7813L23.4811%204H22.0699L16.8949%209.88693L12.7648%204H8L14.2469%2012.9029L8%2020.0133H9.4112L14.8725%2013.7952L19.2352%2020.0133H24M9.92053%205.04213H12.0885L22.0688%2019.0224H19.9003'%20fill='%23333333'/%3e%3c/g%3e%3cdefs%3e%3cclipPath%20id='clip0_2938_8200'%3e%3crect%20width='16'%20height='16.0134'%20fill='white'%20transform='translate(8%204)'/%3e%3c/clipPath%3e%3c/defs%3e%3c/svg%3e)


