

'%3e%3cpath%20d='M8%200C12.4183%200%2016%203.58172%2016%208C16%2012.4183%2012.4183%2016%208%2016C3.58172%2016%200%2012.4183%200%208C0%203.58172%203.58172%200%208%200ZM11.6162%204.38379C11.2257%203.99337%2010.5927%203.99338%2010.2021%204.38379L8%206.58594L5.79785%204.38379C5.40732%203.99334%204.77429%203.99329%204.38379%204.38379C3.99331%204.77429%203.99335%205.40733%204.38379%205.79785L6.58594%208L4.38379%2010.2021C3.99348%2010.5927%203.99341%2011.2257%204.38379%2011.6162C4.77426%2012.0066%205.40734%2012.0065%205.79785%2011.6162L8%209.41406L10.2021%2011.6162C10.5927%2012.0066%2011.2257%2012.0067%2011.6162%2011.6162C12.0067%2011.2257%2012.0066%2010.5927%2011.6162%2010.2021L9.41406%208L11.6162%205.79785C12.0066%205.40735%2012.0066%204.77429%2011.6162%204.38379Z'%20fill='%23080E17'%20fill-opacity='0.46'/%3e%3c/g%3e%3cdefs%3e%3cclipPath%20id='clip0_3761_713'%3e%3crect%20width='16'%20height='16'%20fill='white'/%3e%3c/clipPath%3e%3c/defs%3e%3c/svg%3e)



'%3e%3cpath%20fill-rule='evenodd'%20clip-rule='evenodd'%20d='M21.4999%2010.9993C21.4999%205.20009%2016.7986%200.498901%2010.9993%200.498901C5.19994%200.498901%200.498657%205.20009%200.498657%2010.9993C0.498657%2016.2404%204.33858%2020.5844%209.35855%2021.3722V14.0346H6.69238V10.9993H9.35855V8.68594C9.35855%206.05427%2010.9262%204.60062%2013.3248%204.60062C14.4736%204.60062%2015.6753%204.80571%2015.6753%204.80571V7.38979H14.3512C13.0468%207.38979%2012.64%208.19921%2012.64%209.0296V10.9993H15.5523L15.0867%2014.0346H12.64V21.3722C17.66%2020.5844%2021.4999%2016.2404%2021.4999%2010.9993Z'%20fill='%231568EA'/%3e%3c/g%3e%3c/svg%3e)


'%3e%3cpath%20d='M2.42045%2022.1876H6.31818V12.7217L0.75%208.54553V20.5171C0.75%2021.4414%201.49892%2022.1876%202.42045%2022.1876Z'%20fill='%234285F4'/%3e%3cpath%20d='M19.682%2022.1876H23.5797C24.5041%2022.1876%2025.2502%2021.4387%2025.2502%2020.5171V8.54553L19.682%2012.7217'%20fill='%2334A853'/%3e%3cpath%20d='M19.682%205.48293V12.7216L25.2502%208.54543V6.31816C25.2502%204.25236%2022.8921%203.07469%2021.2411%204.31361'%20fill='%23FBBC04'/%3e%3cpath%20d='M6.31824%2012.7217V5.48303L13.0001%2010.4944L19.6819%205.48303V12.7217L13.0001%2017.733'%20fill='%23EA4335'/%3e%3cpath%20d='M0.75%206.31816V8.54543L6.31818%2012.7216V5.48293L4.75909%204.31361C3.10534%203.07469%200.75%204.25236%200.75%206.31816Z'%20fill='%23C5221F'/%3e%3c/g%3e%3cdefs%3e%3cclipPath%20id='clip0_2954_7305'%3e%3crect%20width='24.5'%20height='18.375'%20fill='white'%20transform='translate(0.75%203.8125)'/%3e%3c/clipPath%3e%3c/defs%3e%3c/svg%3e)


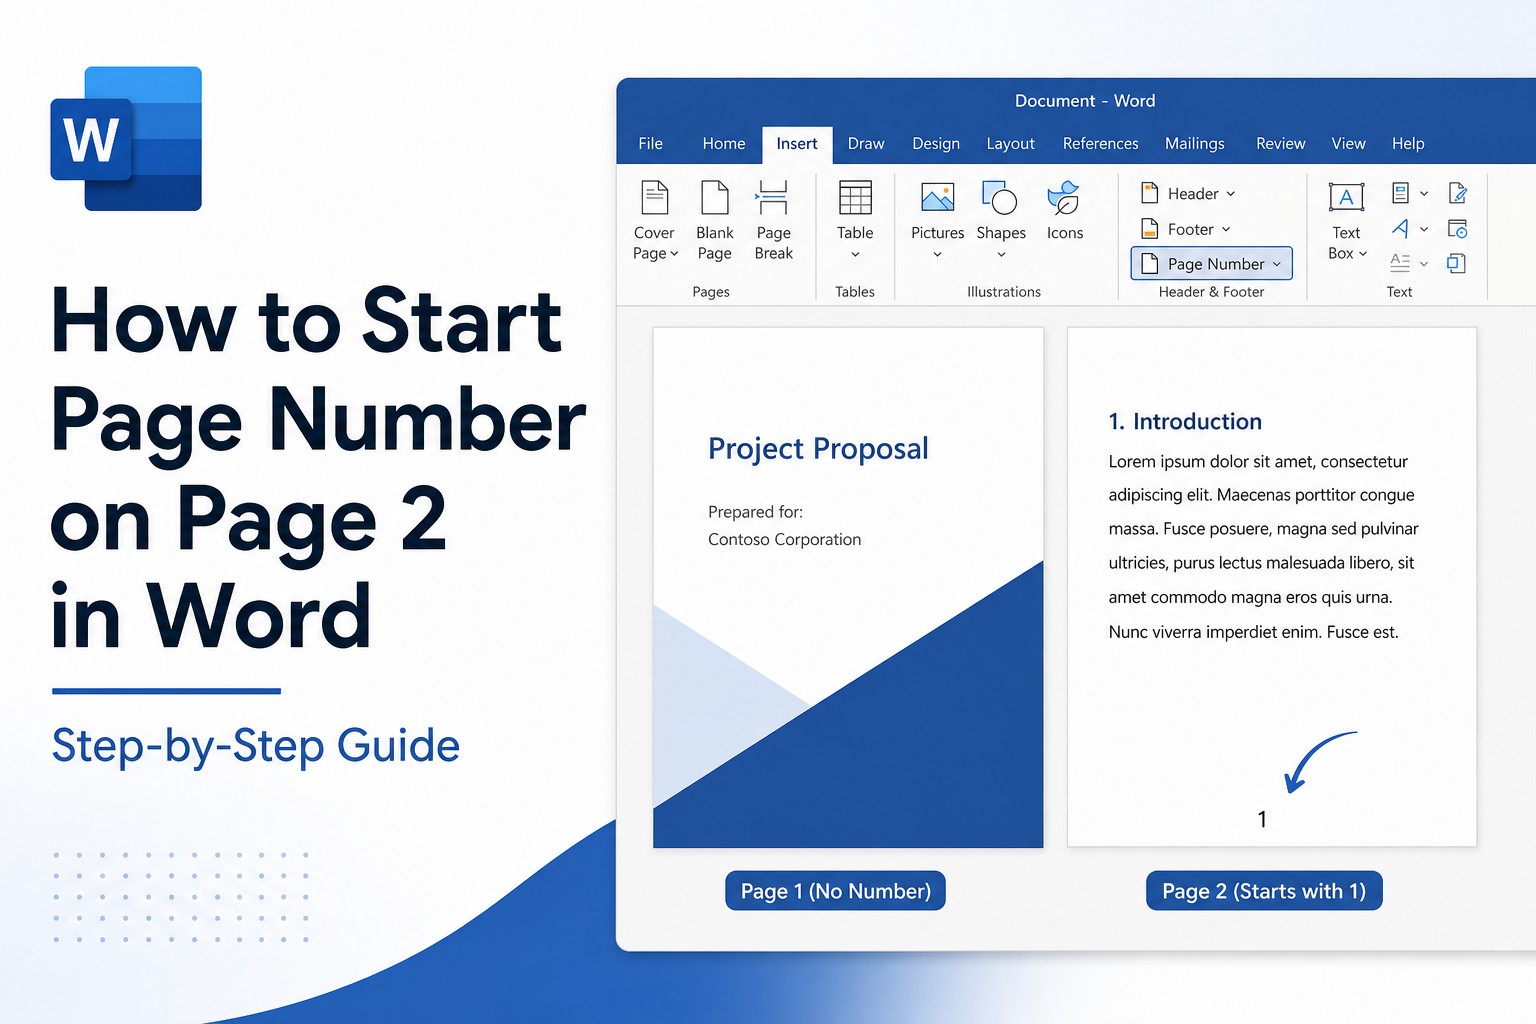
Starting page numbers on page 2 is one of the most common formatting tasks in Microsoft Word. Cover pages, title pages, and table-of-contents pages usually stay unnumbered, while the main body begins at page 1 (or page 2 in print view). This guide shows you exactly how to start page numbering on page 2 in Word—using section breaks, footer settings, and page number formatting.
Why Start Page Numbers on Page 2?
Cover pages stay clean — No page number on the title or cover page
Meet academic standards — APA, MLA, and many university templates require it
Professional reports — Business documents often skip numbering on the first page
Correct table of contents — TOC entries match the actual numbered pages in the body
Before You Start
Open your Word document and identify two parts:
Page 1 — Cover, title page, or table of contents (no page number)
Page 2 onward — Main content (numbering starts here)
You will insert a section break between these two parts so Word treats them as separate sections.
Method 1: Start Page Numbers on Page 2 (Recommended)
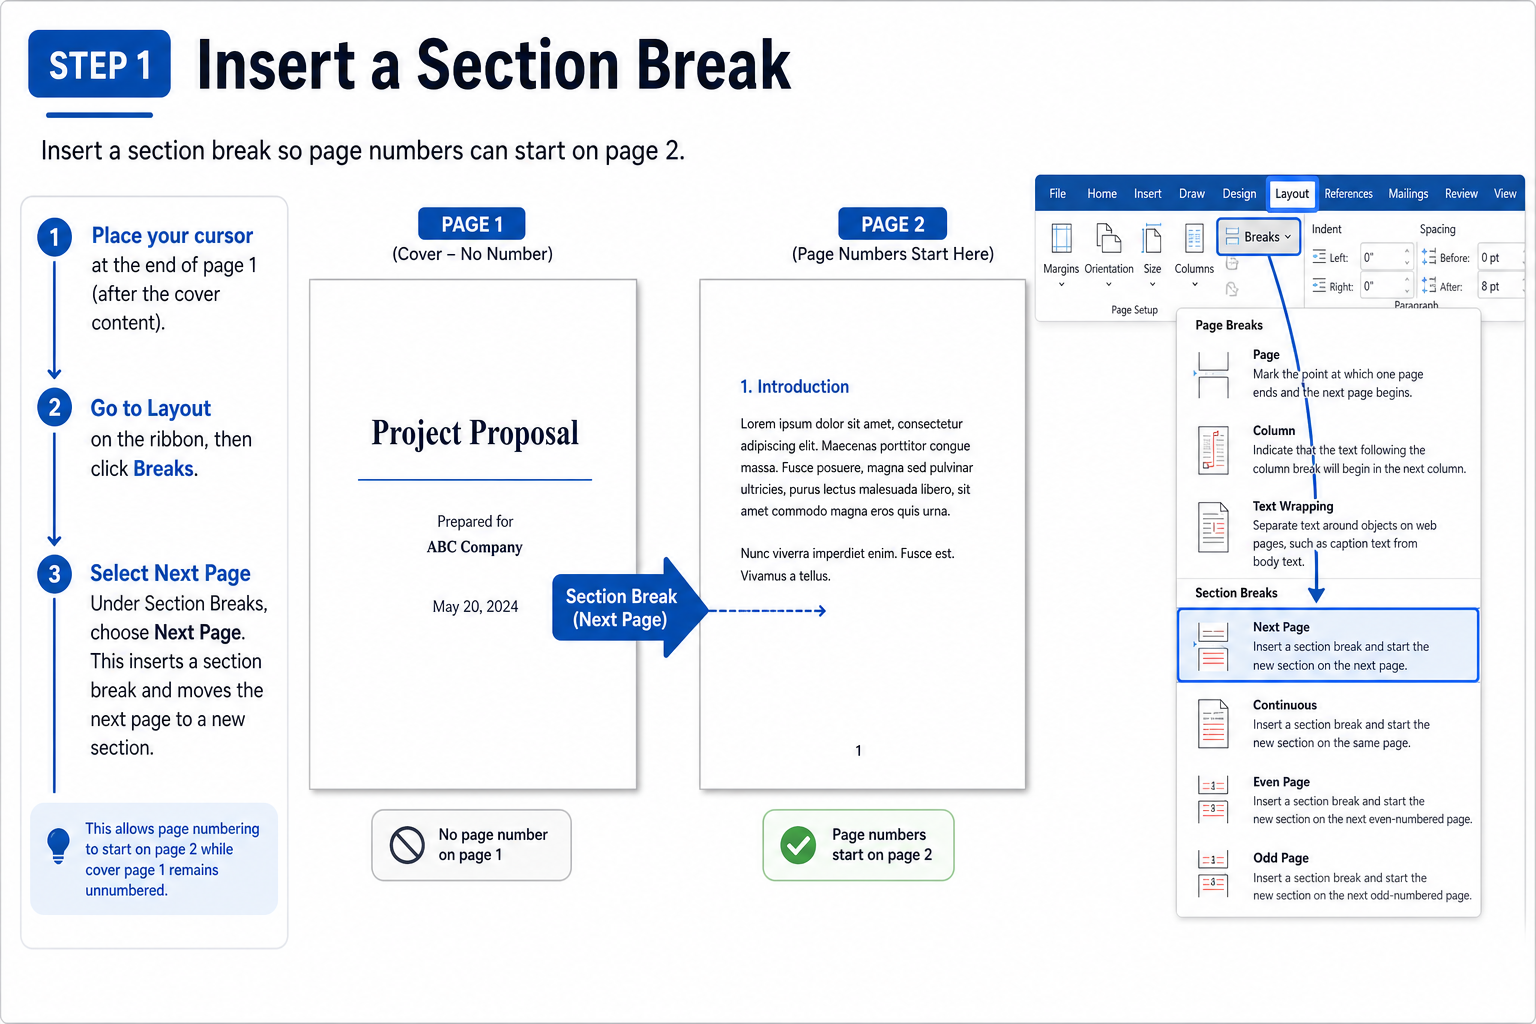
Step 1: Insert a Section Break
Place your cursor at the end of page 1 (after the last character on the cover or title page).
Go to Layout > Breaks > Next Page.
Word creates a new section starting on page 2.
Step 2: Unlink the Footer on Page 2
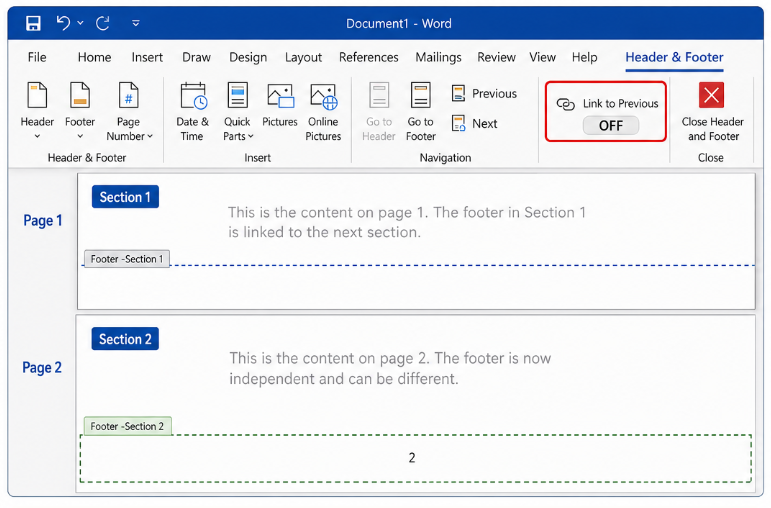
Double-click the footer area on page 2.
On the Header & Footer tab, click Link to Previous to turn it off.
The footer on page 2 is now independent from page 1.
Important: If Link to Previous stays on, page 1 and page 2 share the same footer—and page numbers will appear on both pages.
Step 3: Insert Page Numbers Starting from 1
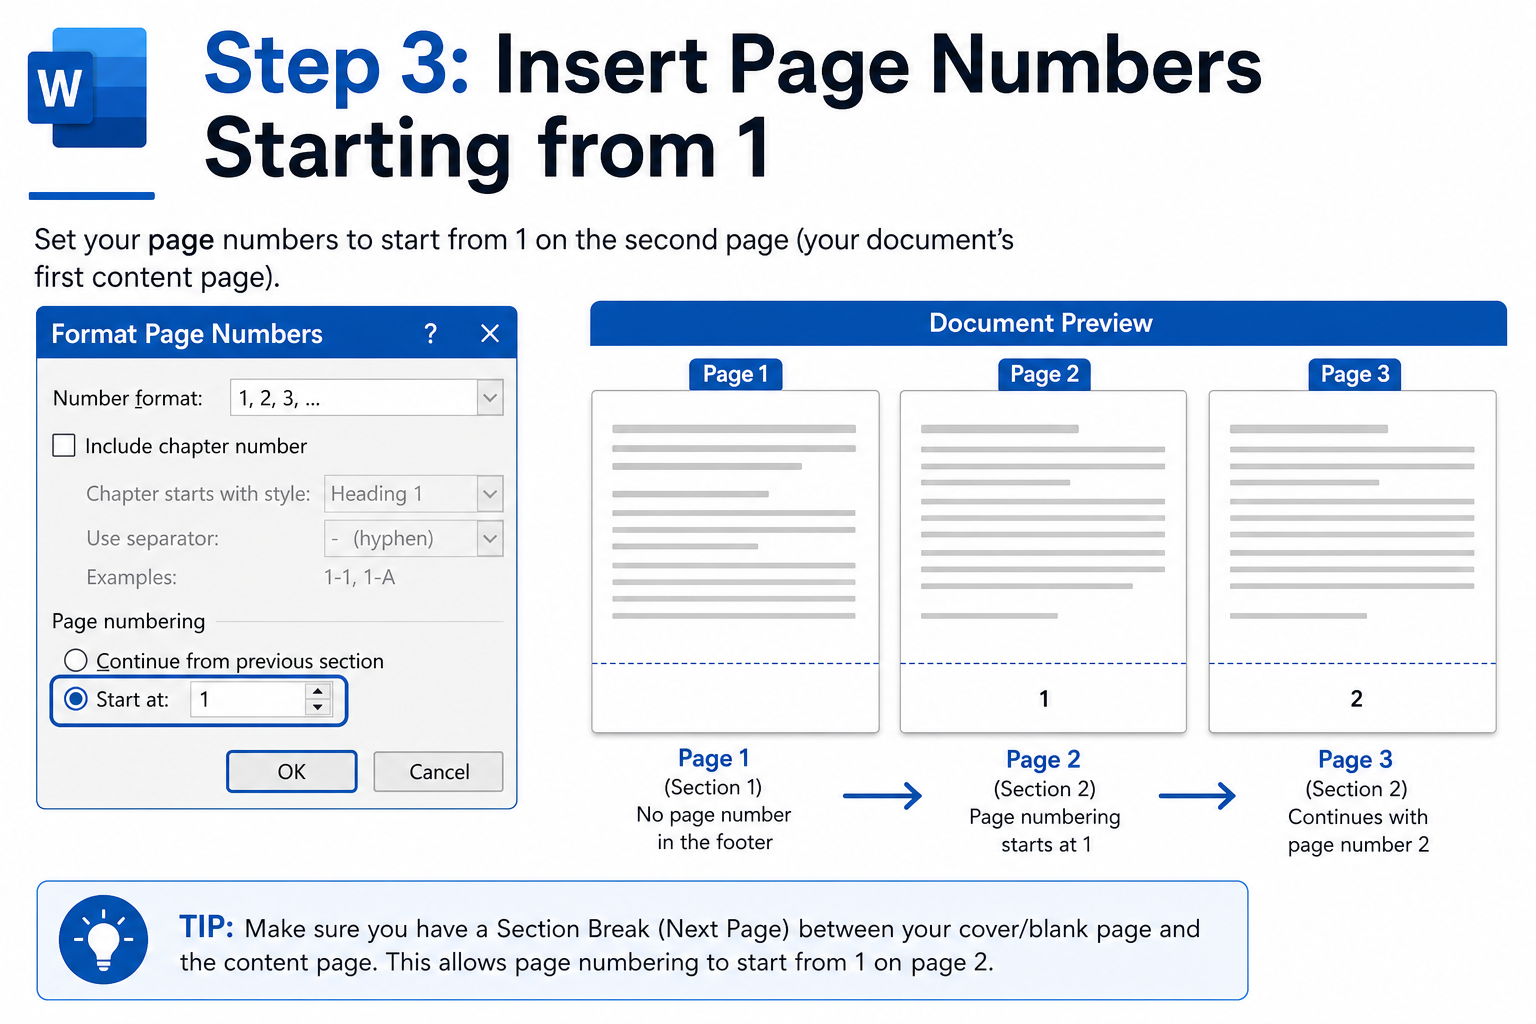
With the page 2 footer still active, go to Insert > Page Number.
Choose Bottom of Page or Top of Page, then pick a style.
Go to Insert > Page Number > Format Page Numbers.
Under Page numbering, select Start at and enter 1.
Click OK, then Close Header and Footer.
Page 1 stays blank. Page 2 shows 1, page 3 shows 2, and so on.
Method 2: Show "Page 2" as the First Number
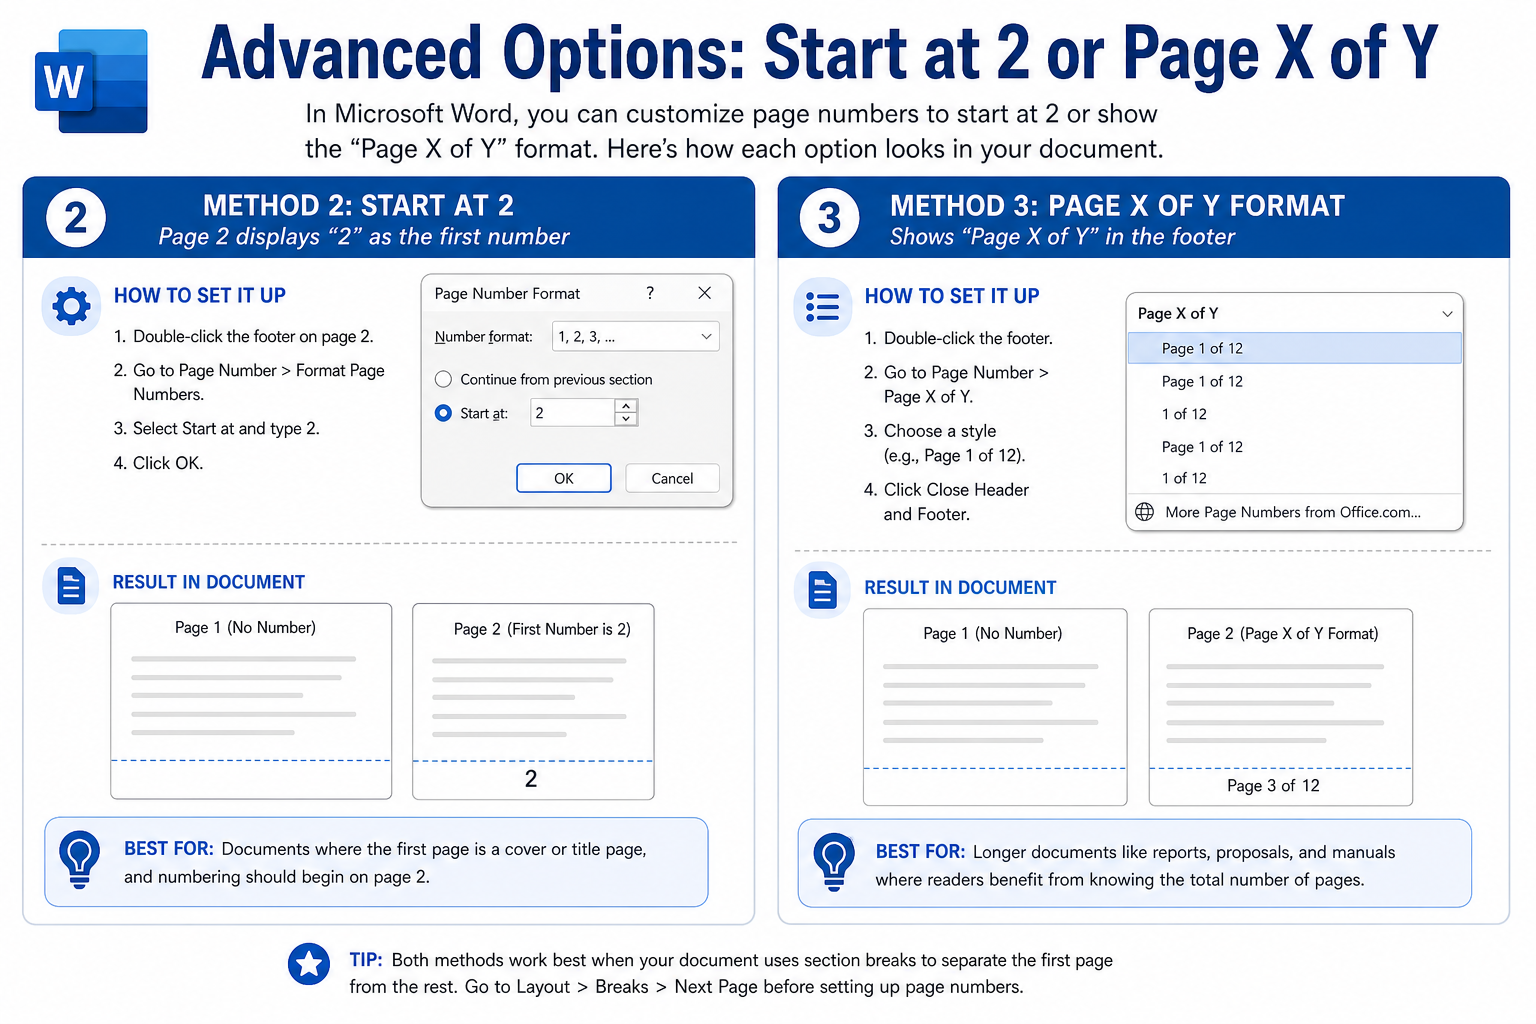
Some style guides require the first numbered page to display 2 instead of 1 (because the cover counts as page 1 but is not numbered).
Follow Method 1, Steps 1–2.
Insert page numbers on page 2.
Go to Format Page Numbers and set Start at: 2.
Click OK.
Result: Page 1 has no number. Page 2 shows 2, page 3 shows 3.
Method 3: Use "Page X of Y" Format
Complete Method 1 first.
In the footer on page 2, type Page then insert the page number field.
Or use Insert > Page Number > Format Page Numbers and choose a Page X of Y style if available.
The cover page remains unnumbered; the body shows "Page 1 of 10", "Page 2 of 10", and so on.
Useful Tips
Double-click the top or bottom margin to enter header/footer editing mode quickly.
Enable Different First Page if you only want to hide numbers on page 1 within the same section.
After inserting a section break, always check that Link to Previous is off on the new section.
You can change font, size, and alignment of page numbers like regular text.
FAQ
Can I start page numbers on page 2 without a section break?
No. A section break is required to separate the unnumbered cover from the numbered body. Without it, Word applies the same footer to every page.
Does this work in Word for Mac?
Yes. The steps are the same: Layout > Breaks > Next Page, then turn off Link to Previous and insert page numbers.
How do I start numbering on page 3 instead of page 2?
Insert the section break at the end of page 2 instead of page 1. The process is identical—only the break position changes.
Will this affect my table of contents?
Yes, in a good way. After numbering starts on page 2, update your TOC (References > Update Table) so page references match the new numbers.
Do I need to know how to add page numbers before starting on page 2?
Yes—at least the basics. Starting on page 2 builds on standard page numbering: you still use Insert → Page Number and Format Page Numbers; you just add a section break and turn off Link to Previous first. If you are new to page numbers altogether, readHow to add page numbers to a word document for the foundation, then use this guide for the page-2 setup.
Conclusion
Starting page numbers on page 2 in Word takes three core steps: insert a section break after page 1, turn off Link to Previous on page 2, and set the starting page number in Format Page Numbers. Once configured, your cover stays clean and your body pages count correctly—ready for academic papers, business reports, and formal submissions.



'%3e%3cpath%20d='M19.9911%204.11386V6.471H18.5894C18.0775%206.471%2017.7322%206.57814%2017.5536%206.79243C17.3751%207.00671%2017.2858%207.32814%2017.2858%207.75671V9.44421H19.9019L19.5536%2012.0871H17.2858V18.8639H14.5536V12.0871H12.2769V9.44421H14.5536V7.49779C14.5536%206.39064%2014.8632%205.53201%2015.4822%204.92189C16.1013%204.31177%2016.9257%204.00671%2017.9554%204.00671C18.8304%204.00671%2019.509%204.04243%2019.9911%204.11386Z'%20fill='%23333333'/%3e%3c/g%3e%3cdefs%3e%3cclipPath%20id='clip0_2938_8199'%3e%3crect%20width='16'%20height='16'%20fill='white'%20transform='translate(8%204.00671)'/%3e%3c/clipPath%3e%3c/defs%3e%3c/svg%3e)
'%3e%3cpath%20d='M17.5237%2010.7813L23.4811%204H22.0699L16.8949%209.88693L12.7648%204H8L14.2469%2012.9029L8%2020.0133H9.4112L14.8725%2013.7952L19.2352%2020.0133H24M9.92053%205.04213H12.0885L22.0688%2019.0224H19.9003'%20fill='%23333333'/%3e%3c/g%3e%3cdefs%3e%3cclipPath%20id='clip0_2938_8200'%3e%3crect%20width='16'%20height='16.0134'%20fill='white'%20transform='translate(8%204)'/%3e%3c/clipPath%3e%3c/defs%3e%3c/svg%3e)


