
'%3e%3cpath%20d='M8%200C12.4183%200%2016%203.58172%2016%208C16%2012.4183%2012.4183%2016%208%2016C3.58172%2016%200%2012.4183%200%208C0%203.58172%203.58172%200%208%200ZM11.6162%204.38379C11.2257%203.99337%2010.5927%203.99338%2010.2021%204.38379L8%206.58594L5.79785%204.38379C5.40732%203.99334%204.77429%203.99329%204.38379%204.38379C3.99331%204.77429%203.99335%205.40733%204.38379%205.79785L6.58594%208L4.38379%2010.2021C3.99348%2010.5927%203.99341%2011.2257%204.38379%2011.6162C4.77426%2012.0066%205.40734%2012.0065%205.79785%2011.6162L8%209.41406L10.2021%2011.6162C10.5927%2012.0066%2011.2257%2012.0067%2011.6162%2011.6162C12.0067%2011.2257%2012.0066%2010.5927%2011.6162%2010.2021L9.41406%208L11.6162%205.79785C12.0066%205.40735%2012.0066%204.77429%2011.6162%204.38379Z'%20fill='%23080E17'%20fill-opacity='0.46'/%3e%3c/g%3e%3cdefs%3e%3cclipPath%20id='clip0_3761_713'%3e%3crect%20width='16'%20height='16'%20fill='white'/%3e%3c/clipPath%3e%3c/defs%3e%3c/svg%3e)


'%3e%3cpath%20fill-rule='evenodd'%20clip-rule='evenodd'%20d='M21.4999%2010.9993C21.4999%205.20009%2016.7986%200.498901%2010.9993%200.498901C5.19994%200.498901%200.498657%205.20009%200.498657%2010.9993C0.498657%2016.2404%204.33858%2020.5844%209.35855%2021.3722V14.0346H6.69238V10.9993H9.35855V8.68594C9.35855%206.05427%2010.9262%204.60062%2013.3248%204.60062C14.4736%204.60062%2015.6753%204.80571%2015.6753%204.80571V7.38979H14.3512C13.0468%207.38979%2012.64%208.19921%2012.64%209.0296V10.9993H15.5523L15.0867%2014.0346H12.64V21.3722C17.66%2020.5844%2021.4999%2016.2404%2021.4999%2010.9993Z'%20fill='%231568EA'/%3e%3c/g%3e%3c/svg%3e)


In your pursuit of creating a polished presentation, you might find footers to be more of a hindrance than an aid. They can detract from the overall aesthetics of your slides. Fear not, for removing them is easier than you think. This article will guide you through the process, ensuring your presentations look nothing short of professional.
Part1 How to Remove Footer in PowerPoint [Step-by-Step]

Remove Footer from A Single Slide
Removing the footer from a single slide in PowerPoint is a straightforward process that can greatly enhance the overall appearance of your presentation. Follow these steps for a seamless experience:
Step 1: Open Your PowerPoint Presentation: Launch PowerPoint and open the specific presentation containing the slide with the footer you want to remove.
Step 2: Access the Slide: Navigate to the slide from which you wish to eliminate the footer.

Step 3: Enter Edit Mode: Click on the slide to select it, then go to the "View" tab in the ribbon and choose "Slide Master."

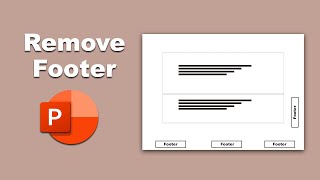
Step 4: Locate the Footer: In the Slide Master view, you'll find the footer at the bottom of the slide.

Step 5: Remove the Footer: Click on the footer element, and press the "Delete" key on your keyboard.

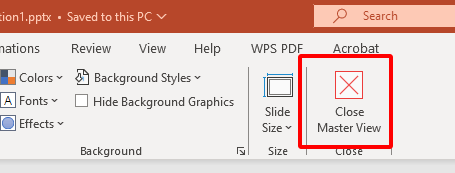
Step 6: Save Changes: Exit Slide Master view by clicking on the "Slide Master" tab again, and then click "Close Master View." Ensure to save your presentation.
Remove Footers from Multiple Slides
When you need to remove footers from multiple slides, PowerPoint provides a convenient way to do this efficiently. Here's how:
Step 1: Access Slide Master View: Follow the same steps as above to enter Slide Master view.
Step 2: Select All Affected Slides: In Slide Master view, select all the slides where you want to remove the footer. You can do this by clicking and dragging your cursor to highlight them.

Step 3: Delete the Footer: Just like in the previous step, click on the footer element and press the "Delete" key.
Step 4: Exit Slide Master View: Save your changes and close the Slide Master view.
The footer will now be removed from all slides in your presentation.
Part2 How to Remove Footer in PowerPoint for Printing
Removing footers specifically for printing purposes is a crucial step in ensuring a clean and professional-looking document. Here's a step-by-step guide along with an illustrative example:
Step 1: Open Your Presentation: Begin by launching your PowerPoint presentation.
Step 2: Access the Slide Master: Go to the "View" tab in the ribbon and select "Slide Master."
Step 3: Identify the Footer: In Slide Master view, locate the footer at the bottom of the slide.
Step 4: Edit Footer for Printing: Click on the footer element, and make sure it is either empty or contains the desired information for printing purposes.
Step 5: Save Changes: Exit Slide Master view by clicking on the "Slide Master" tab again, and then click "Close Master View." Save your presentation.

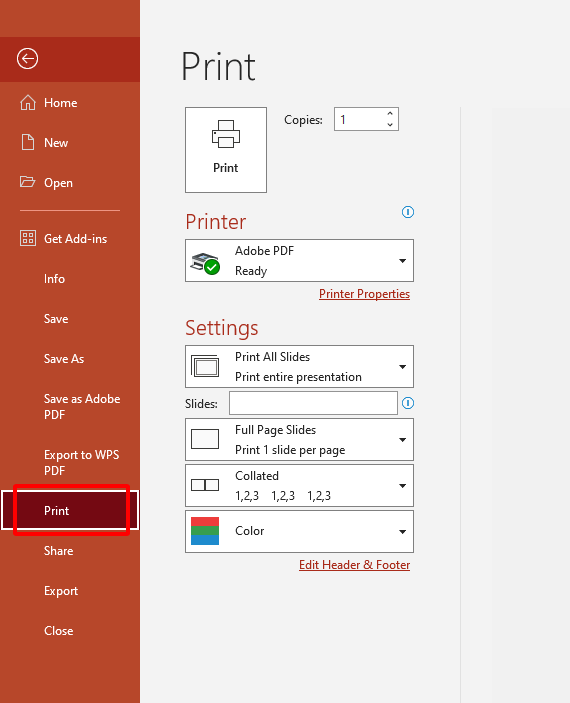
Step 6: Print Your Presentation: Navigate to the "File" menu, select "Print," and adjust print settings as needed.
Let's say you have a PowerPoint presentation for a client meeting. You want to remove the footer information like date and slide number to ensure a clean printout. By following the steps above, you can easily customize the footer for printing, leaving it empty or including only essential details.
Part3 Common Issues About Removing Footers in PowerPoint
While removing footers in PowerPoint can enhance the overall appearance of your presentation, there are some common issues that users might encounter:
Formatting Discrepancies: Removing footers may sometimes lead to formatting inconsistencies, especially if the original presentation heavily relied on footer elements for layout.
Master Slide Overrides: If a footer is defined in the Slide Master, it might override any attempts to remove it on individual slides.
Linked Elements: Footers can sometimes be linked to other elements on the slide, making it challenging to remove them without affecting the overall PowerPoint layout design.
Compatibility Issues: Different versions of PowerPoint or alternative software might handle footers differently, potentially causing unexpected results.
Hidden Footers: Footers can be hidden behind other elements, making them difficult to locate and remove.
Tips for Using Footers in PowerPoint

Utilizing footers effectively can significantly enhance your presentation. Here are some tips based on practical experience:
When to Use Footers: Use footers for consistency and professionalism, especially in business or academic presentations.
Customization is Key: Customize footers to suit the specific content and purpose of your presentation. Avoid generic or excessive information.
Consider Audience Needs: Tailor footers to meet the expectations and preferences of your audience, providing relevant context.
Regular Review: Periodically review and update footers to ensure they align with the evolving content of your presentation.
Modifying Footers: Always use the Slide Master for global changes, but be cautious as this may affect the entire presentation.
Part 4 Best Free Alternative to PowerPoint – WPS Presentation

WPS Office is a comprehensive productivity suite that offers a viable alternative to Microsoft Office. With its intuitive interface and wide range of features, WPS Office is a powerful tool for creating and managing documents, spreadsheets, and presentations.
If you're looking for a powerful alternative to PowerPoint, WPS Presentation is an excellent choice. Here's how you can download WPS Office:
Step 1: Visit the official website of WPS Office by going to www.wps.com.

Step 2: Navigate to the "Products" section and select "WPS Office" from the dropdown menu.
Step 3: Click on the "Download" button for your preferred platform (Windows, macOS, Android, or iOS).
Step 4: Follow the on-screen instructions to complete the installation process.

Using WPS Presentation to Remove Footer
WPS Presentation makes it easy to remove footers from your slides. Here's a step-by-step guide along with an example:
Step 1: Open your presentation in WPS Presentation.

Step 2: Select the slide from which you want to remove the footer.
Step 3: Go to the "Insert" tab on the ribbon and choose "Text Box."

Step 4: Draw a text box over the footer area to cover it.
Step 5: Adjust the size and position of the text box as needed to completely cover the footer.
Step 6: Add any additional content or elements to the slide as desired.
Step 7: Save your presentation.

Benefits of Using WPS Office
WPS Office offers a range of features that make it a standout alternative to PowerPoint. Here are some of the key benefits, especially in comparison to PowerPoint and similar software:
Cross-Platform Compatibility: WPS Office is available for Windows, macOS, Android, and iOS, ensuring seamless collaboration across different devices.
Intuitive Interface: Its user-friendly interface makes it easy for both beginners and experienced users to create compelling presentations.
Advanced Features: WPS Presentation offers a wide range of tools and features for creating visually appealing slides, including animations, transitions, and more.
Mac Compatibility: Unlike some other office suites, WPS Office is fully compatible with macOS, providing a smooth experience for Mac users.
Templates and Resources: WPS offers a wealth of templates and resources through wps.template.com, allowing you to create professional-looking presentations with ease.
WPS Office is a great alternative to Microsoft Office for Mac users. It is free, feature-rich, lightweight, and fast.
FAQs about how to remove footer in PowerPoint
Why can't I edit the footer in PowerPoint?
If you can't edit the footer in PowerPoint, it might be because it's locked in the Slide Master or you're in Protected View. Try enabling editing, accessing the Slide Master, or ensuring you have the right permissions.
How do I stop my footer from repeating?
To stop your footer from repeating in PowerPoint, follow these steps:
Step 1: Go to the Slide Master:
Click on the "View" tab in the ribbon.
Select "Slide Master" from the dropdown menu.
Step 2: Locate the footer area:
Look for the footer area at the bottom of the Slide Master.
Step 3: Remove or adjust the footer:
You can either delete the footer or adjust its content as needed.
Step 4: Apply changes:
Once you've made the necessary adjustments, close the Slide Master.
This should prevent the footer from repeating on your slides. If you're still experiencing issues, double-check that you've made the changes in the Slide Master correctly.
Summary
This comprehensive guide provides clear, step-by-step instructions for removing footers in PowerPoint presentations, enhancing the overall visual appeal and professionalism of your slides. From single-slide adjustments to handling footers on multiple slides and ensuring they don't appear when printing, this guide covers it all. What sets this guide apart is its emphasis on WPS Office, a powerful alternative to PowerPoint, known for its user-friendly interface and seamless compatibility with Mac systems, making it an excellent choice for creating engaging presentations.

'%3e%3cpath%20d='M19.9911%204.11386V6.471H18.5894C18.0775%206.471%2017.7322%206.57814%2017.5536%206.79243C17.3751%207.00671%2017.2858%207.32814%2017.2858%207.75671V9.44421H19.9019L19.5536%2012.0871H17.2858V18.8639H14.5536V12.0871H12.2769V9.44421H14.5536V7.49779C14.5536%206.39064%2014.8632%205.53201%2015.4822%204.92189C16.1013%204.31177%2016.9257%204.00671%2017.9554%204.00671C18.8304%204.00671%2019.509%204.04243%2019.9911%204.11386Z'%20fill='%23333333'/%3e%3c/g%3e%3cdefs%3e%3cclipPath%20id='clip0_2938_8199'%3e%3crect%20width='16'%20height='16'%20fill='white'%20transform='translate(8%204.00671)'/%3e%3c/clipPath%3e%3c/defs%3e%3c/svg%3e)
'%3e%3cpath%20d='M17.5237%2010.7813L23.4811%204H22.0699L16.8949%209.88693L12.7648%204H8L14.2469%2012.9029L8%2020.0133H9.4112L14.8725%2013.7952L19.2352%2020.0133H24M9.92053%205.04213H12.0885L22.0688%2019.0224H19.9003'%20fill='%23333333'/%3e%3c/g%3e%3cdefs%3e%3cclipPath%20id='clip0_2938_8200'%3e%3crect%20width='16'%20height='16.0134'%20fill='white'%20transform='translate(8%204)'/%3e%3c/clipPath%3e%3c/defs%3e%3c/svg%3e)


