
'%3e%3cpath%20d='M8%200C12.4183%200%2016%203.58172%2016%208C16%2012.4183%2012.4183%2016%208%2016C3.58172%2016%200%2012.4183%200%208C0%203.58172%203.58172%200%208%200ZM11.6162%204.38379C11.2257%203.99337%2010.5927%203.99338%2010.2021%204.38379L8%206.58594L5.79785%204.38379C5.40732%203.99334%204.77429%203.99329%204.38379%204.38379C3.99331%204.77429%203.99335%205.40733%204.38379%205.79785L6.58594%208L4.38379%2010.2021C3.99348%2010.5927%203.99341%2011.2257%204.38379%2011.6162C4.77426%2012.0066%205.40734%2012.0065%205.79785%2011.6162L8%209.41406L10.2021%2011.6162C10.5927%2012.0066%2011.2257%2012.0067%2011.6162%2011.6162C12.0067%2011.2257%2012.0066%2010.5927%2011.6162%2010.2021L9.41406%208L11.6162%205.79785C12.0066%205.40735%2012.0066%204.77429%2011.6162%204.38379Z'%20fill='%23080E17'%20fill-opacity='0.46'/%3e%3c/g%3e%3cdefs%3e%3cclipPath%20id='clip0_3761_713'%3e%3crect%20width='16'%20height='16'%20fill='white'/%3e%3c/clipPath%3e%3c/defs%3e%3c/svg%3e)


'%3e%3cpath%20fill-rule='evenodd'%20clip-rule='evenodd'%20d='M21.4999%2010.9993C21.4999%205.20009%2016.7986%200.498901%2010.9993%200.498901C5.19994%200.498901%200.498657%205.20009%200.498657%2010.9993C0.498657%2016.2404%204.33858%2020.5844%209.35855%2021.3722V14.0346H6.69238V10.9993H9.35855V8.68594C9.35855%206.05427%2010.9262%204.60062%2013.3248%204.60062C14.4736%204.60062%2015.6753%204.80571%2015.6753%204.80571V7.38979H14.3512C13.0468%207.38979%2012.64%208.19921%2012.64%209.0296V10.9993H15.5523L15.0867%2014.0346H12.64V21.3722C17.66%2020.5844%2021.4999%2016.2404%2021.4999%2010.9993Z'%20fill='%231568EA'/%3e%3c/g%3e%3c/svg%3e)


Are you facing issues with your WPS Office settings? The settings within WPS Office can greatly affect your user experience, from appearance preferences to functional behavior. If you've found yourself in a situation where your settings are causing troubles or you simply want to start fresh, you're in the right place. In this article, we'll walk you through the process of resetting WPS Office settings.
Part 1: What is WPS Office?

WPS Office, also known as Kingsoft Office, is a comprehensive office suite software developed by Zhuhai-based Chinese software company Kingsoft. It offers a range of applications that serve various document-related needs, including word processing, spreadsheet management, and presentation creation. WPS Office is designed to be a versatile and user-friendly alternative to other well-known office suites like Microsoft Office and LibreOffice.
The main components of WPS Office include:
Writer: This is the word processing application in WPS Office, similar to Microsoft Word. It allows users to create and edit documents, format text, insert images and tables, and more.
Spreadsheets: The spreadsheet application is comparable to Microsoft Excel. It enables users to create and manipulate data in tabular form, perform calculations, create charts and graphs, and manage data analysis.
Presentation: The presentation application, like Microsoft PowerPoint, allows users to create visually appealing slideshows with various multimedia elements, transitions, and animations.
PDF Reader: WPS Office includes a built-in PDF reader that lets users open and view PDF documents. It also supports basic editing features for PDF files.
Cloud Integration: WPS Office offers cloud storage integration, allowing users to save their documents to cloud services like Dropbox, Google Drive, and OneDrive for easy access and collaboration.
WPS Office has gained popularity due to its user-friendly interface, compatibility with Microsoft Office formats, and a wide range of features that cater to different office-related tasks. It has become a go-to choice for individuals, students, businesses, and organizations seeking a cost-effective and feature-rich office suite solution.
Part 2: How to Reset WPS Office Settings
Resetting WPS Office settings can be a helpful troubleshooting step if you're experiencing issues with the software or simply want to start with a clean slate. In this tutorial, I'll guide you through the process of resetting WPS Office settings on both Android and Windows 10 platforms. I'll also share my own experience and insights to help you make the most of each method.
Step 1: Open WPS Office
Launch WPS Office on your Windows 10 computer. You can find it in your Start menu or taskbar.
Step 2: Access Global Settings
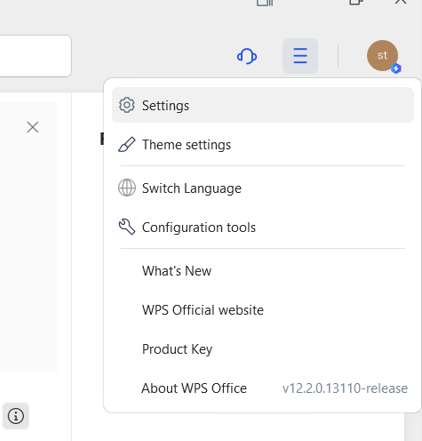
Click on the 3 lines located in the top-right corner of the window.
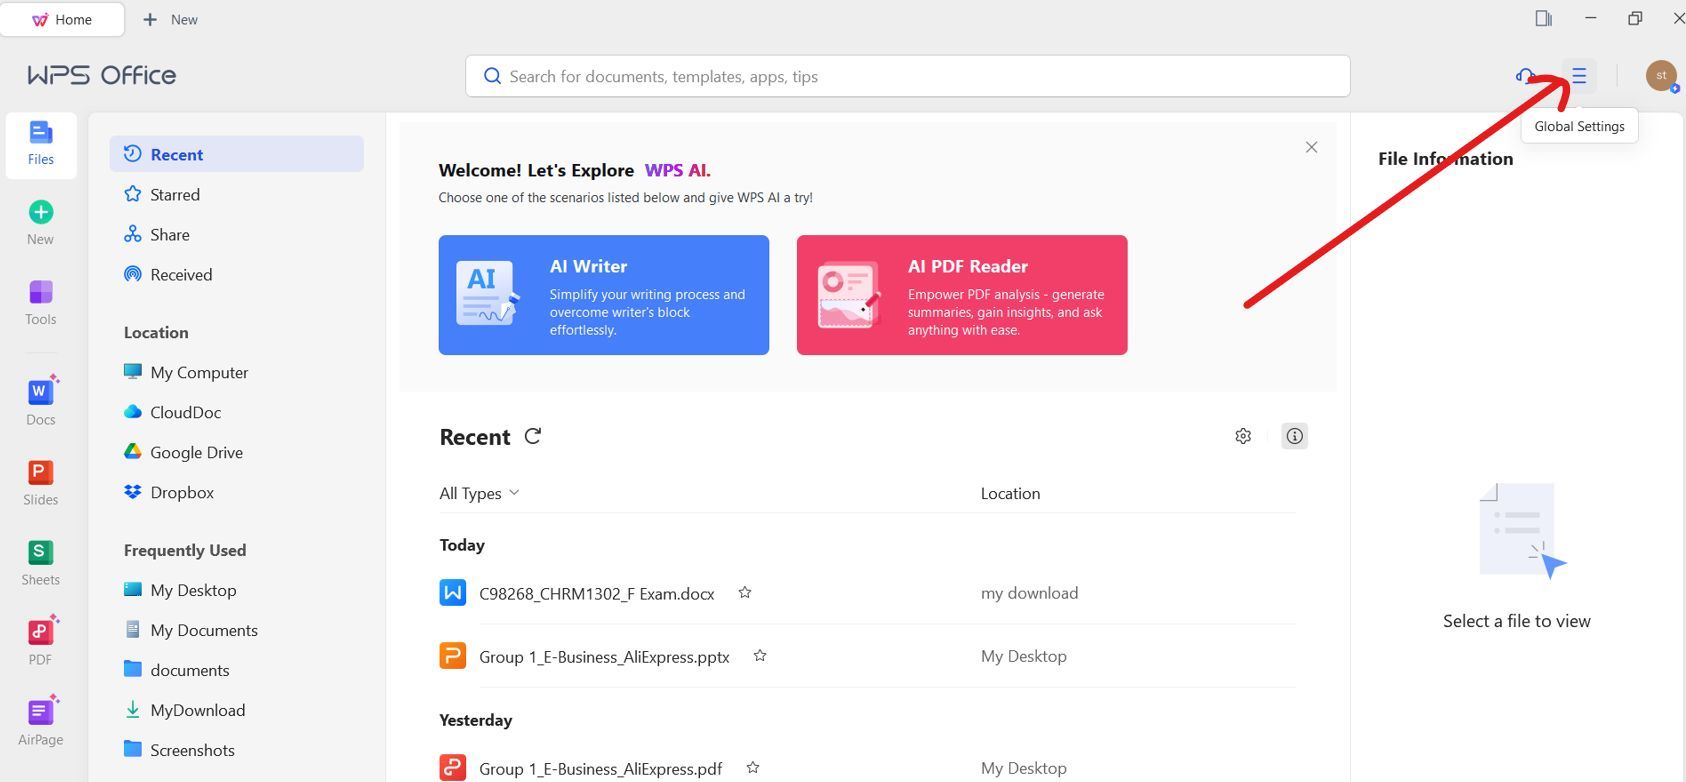
Step 3: Click on Settings
From the drop-down menu, select "Settings."
Step 4: Reset Settings
In the Settings window, navigate to the "Reset Settings”. Click on it.
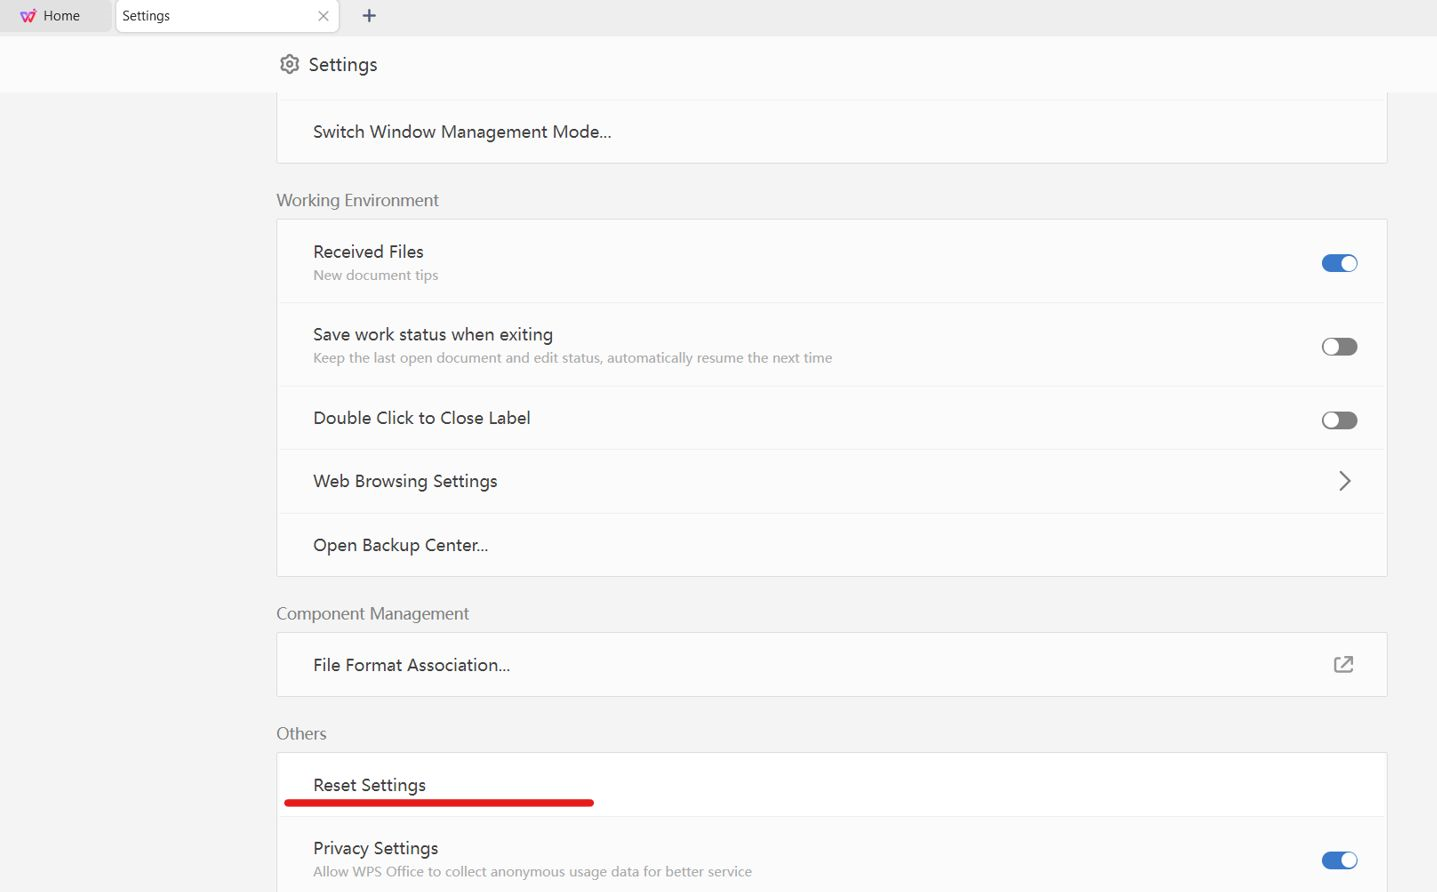
Step 5: Confirmation
A confirmation prompt will appear, asking you to verify your choice to reset the settings. Confirm to proceed.

Step 6: Restart WPS Office
Close the WPS Office application completely and then reopen it. You'll find that the settings have been reset to their original defaults.
My Experience: Resetting settings of WPS Office provided a clean slate for troubleshooting persistent issues. However, keep in mind that any personalized settings and configurations will be lost. This method is particularly useful if you're encountering stability problems or performance issues.
Resonating Reminder:
Resetting settings can be a helpful troubleshooting step, but it's important to balance the need for resolution with the potential loss of customized configurations. Be proactive in safeguarding your preferences.
Part 3: Why Use WPS Office?
WPS Office stands out as a versatile and user-friendly office suite with a host of features that cater to both personal and professional needs. Its compatibility, document formatting capabilities, collaboration tools, cloud integration, and templates make it a compelling choice for users seeking an efficient and effective office solution.
Features and Benefits:
Compatibility: WPS Office is optimized for Asus devices, ensuring smooth performance and compatibility. Whether you're using it on your laptop, desktop, tablet, or smartphone, the software is tailored to deliver a consistent and seamless experience across Asus devices.
Document Formatting: With WPS Office, users can create and edit documents using a variety of formatting tools and styles. This enables you to craft documents that are not only informative but visually appealing as well.
Collaboration: Collaboration is made effortless with WPS Office's real-time collaboration features. Multiple users can work on the same document simultaneously, viewing changes in real time.
Cloud Integration: WPS Office offers seamless integration with cloud storage services like Dropbox, Google Drive, and OneDrive. This means your documents can be saved directly to the cloud, allowing you to access and edit them from any device with an internet connection.
Templates: Time is precious, and WPS Office recognizes that. The suite comes with a range of templates for different document types, including resumes, reports, presentations, and more.
Steps to Edit Word/Excel/PowerPoint in WPS Office:
1. Download WPS Office: If you haven't already, download and install WPS Office on your device. You can find the download link for your specific platform on the WPS Office official website.
2. Open WPS Office: Launch the WPS Office application. You'll be presented with the main interface, which displays options for creating or editing documents, spreadsheets, and presentations.
3. Choose Document Type: Depending on the type of file you want to edit (Word document, Excel spreadsheet, or PowerPoint presentation), select the corresponding option from the main interface.
4. Open Document: Once you've chosen the document type, you can either create a new document or open an existing one. If you're opening an existing file, navigate to its location on your device or cloud storage service.
5. Edit and Format: Use the various formatting tools available in WPS Office to edit and format your document as needed. You can change fonts, adjust font sizes, apply styles, insert images, tables, and more.


Part 4: How to Download WPS Office for Free
WPS Office is available for free, offering a range of powerful office productivity tools. In this step-by-step tutorial, I'll guide you through the process of downloading and installing WPS Office on your device. Follow along with the images provided to ensure a smooth installation.
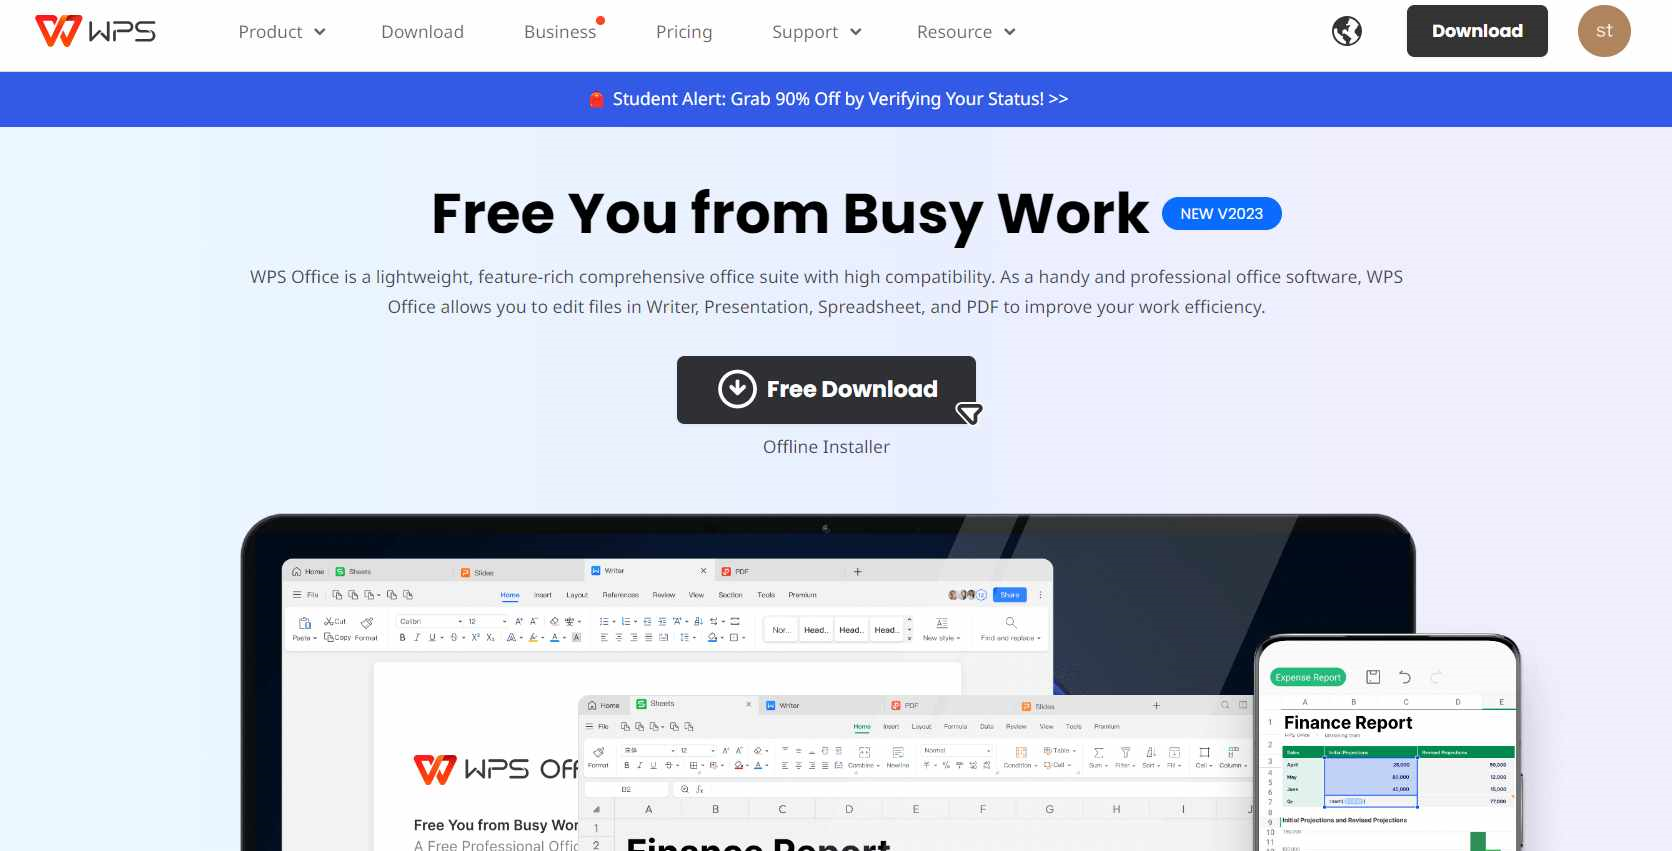
Step 1: Access the Official Website
Visit the official WPS Office website by clicking on the following link: Download WPS Office. This link will take you to the download page.
Step 2: Start Download
After clicking “Free Download”, the download will start automatically. You'll see a progress bar indicating the download status.
Step 3: Locate the Downloaded File
Once the download is complete, navigate to your device's downloads folder. You should find the WPS Office installer file.
Step 4: Run the Installer
Double-click on the downloaded installer file to run it. This will initiate the installation process.
Step 5: Customize Installation (Optional)
During the installation process, you might be presented with options to customize the installation. These options may include selecting installation location, language, and components to install. Adjust these settings according to your preferences.
Step 6: Installation Complete
Once the installation is complete, you'll see a confirmation message. You can choose to launch WPS Office immediately or close the installer and launch it later from your desktop or Start menu.
Step 9: Explore WPS Office
After launching WPS Office, you'll have access to its various applications such as Writer, Spreadsheets, and Presentation. You can start creating and editing documents right away.

FAQs:
1. How do I turn off WPS settings?
To turn off WPS (Wi-Fi Protected Setup) settings, follow these steps:
Open a web browser and type "192.168.1.1" in the address bar.
Enter the administrator username and password. (The default username is usually "admin," and the default password is also "admin.")
Navigate to the "Advanced Settings" section and then click on "Wireless."
Look for the "WPS" tab.
Disable WPS by moving the "Enable WPS" toggle switch to the off position.
2. How do I force open Windows settings?
To force open Windows Settings, you can follow these steps:
Press the Win key + R to open the Run command dialog box.
Type CMD and press Ctrl + Shift + Enter. This will open an elevated Command Prompt.
In the Command Prompt, type ms-settings: and press Enter.
The Windows Settings window should open, allowing you to access various system settings.
Final Thoughts on Resetting WPS Office Settings
In conclusion, WPS Office emerges as a robust and user-friendly office suite that caters to diverse document-related needs. Whether you're troubleshooting issues with a reset of its settings or exploring the steps to download and install it for free, WPS Office's features and benefits shine through. Its commitment to user experience, cross-platform accessibility, and a range of tools to streamline your work makes it an excellent choice for creating, editing, and managing documents, spreadsheets, and presentations.

'%3e%3cpath%20d='M19.9911%204.11386V6.471H18.5894C18.0775%206.471%2017.7322%206.57814%2017.5536%206.79243C17.3751%207.00671%2017.2858%207.32814%2017.2858%207.75671V9.44421H19.9019L19.5536%2012.0871H17.2858V18.8639H14.5536V12.0871H12.2769V9.44421H14.5536V7.49779C14.5536%206.39064%2014.8632%205.53201%2015.4822%204.92189C16.1013%204.31177%2016.9257%204.00671%2017.9554%204.00671C18.8304%204.00671%2019.509%204.04243%2019.9911%204.11386Z'%20fill='%23333333'/%3e%3c/g%3e%3cdefs%3e%3cclipPath%20id='clip0_2938_8199'%3e%3crect%20width='16'%20height='16'%20fill='white'%20transform='translate(8%204.00671)'/%3e%3c/clipPath%3e%3c/defs%3e%3c/svg%3e)
'%3e%3cpath%20d='M17.5237%2010.7813L23.4811%204H22.0699L16.8949%209.88693L12.7648%204H8L14.2469%2012.9029L8%2020.0133H9.4112L14.8725%2013.7952L19.2352%2020.0133H24M9.92053%205.04213H12.0885L22.0688%2019.0224H19.9003'%20fill='%23333333'/%3e%3c/g%3e%3cdefs%3e%3cclipPath%20id='clip0_2938_8200'%3e%3crect%20width='16'%20height='16.0134'%20fill='white'%20transform='translate(8%204)'/%3e%3c/clipPath%3e%3c/defs%3e%3c/svg%3e)


