

'%3e%3cpath%20d='M8%200C12.4183%200%2016%203.58172%2016%208C16%2012.4183%2012.4183%2016%208%2016C3.58172%2016%200%2012.4183%200%208C0%203.58172%203.58172%200%208%200ZM11.6162%204.38379C11.2257%203.99337%2010.5927%203.99338%2010.2021%204.38379L8%206.58594L5.79785%204.38379C5.40732%203.99334%204.77429%203.99329%204.38379%204.38379C3.99331%204.77429%203.99335%205.40733%204.38379%205.79785L6.58594%208L4.38379%2010.2021C3.99348%2010.5927%203.99341%2011.2257%204.38379%2011.6162C4.77426%2012.0066%205.40734%2012.0065%205.79785%2011.6162L8%209.41406L10.2021%2011.6162C10.5927%2012.0066%2011.2257%2012.0067%2011.6162%2011.6162C12.0067%2011.2257%2012.0066%2010.5927%2011.6162%2010.2021L9.41406%208L11.6162%205.79785C12.0066%205.40735%2012.0066%204.77429%2011.6162%204.38379Z'%20fill='%23080E17'%20fill-opacity='0.46'/%3e%3c/g%3e%3cdefs%3e%3cclipPath%20id='clip0_3761_713'%3e%3crect%20width='16'%20height='16'%20fill='white'/%3e%3c/clipPath%3e%3c/defs%3e%3c/svg%3e)




'%3e%3cpath%20fill-rule='evenodd'%20clip-rule='evenodd'%20d='M21.4999%2010.9993C21.4999%205.20009%2016.7986%200.498901%2010.9993%200.498901C5.19994%200.498901%200.498657%205.20009%200.498657%2010.9993C0.498657%2016.2404%204.33858%2020.5844%209.35855%2021.3722V14.0346H6.69238V10.9993H9.35855V8.68594C9.35855%206.05427%2010.9262%204.60062%2013.3248%204.60062C14.4736%204.60062%2015.6753%204.80571%2015.6753%204.80571V7.38979H14.3512C13.0468%207.38979%2012.64%208.19921%2012.64%209.0296V10.9993H15.5523L15.0867%2014.0346H12.64V21.3722C17.66%2020.5844%2021.4999%2016.2404%2021.4999%2010.9993Z'%20fill='%231568EA'/%3e%3c/g%3e%3c/svg%3e)


'%3e%3cpath%20d='M2.42045%2022.1876H6.31818V12.7217L0.75%208.54553V20.5171C0.75%2021.4414%201.49892%2022.1876%202.42045%2022.1876Z'%20fill='%234285F4'/%3e%3cpath%20d='M19.682%2022.1876H23.5797C24.5041%2022.1876%2025.2502%2021.4387%2025.2502%2020.5171V8.54553L19.682%2012.7217'%20fill='%2334A853'/%3e%3cpath%20d='M19.682%205.48293V12.7216L25.2502%208.54543V6.31816C25.2502%204.25236%2022.8921%203.07469%2021.2411%204.31361'%20fill='%23FBBC04'/%3e%3cpath%20d='M6.31824%2012.7217V5.48303L13.0001%2010.4944L19.6819%205.48303V12.7217L13.0001%2017.733'%20fill='%23EA4335'/%3e%3cpath%20d='M0.75%206.31816V8.54543L6.31818%2012.7216V5.48293L4.75909%204.31361C3.10534%203.07469%200.75%204.25236%200.75%206.31816Z'%20fill='%23C5221F'/%3e%3c/g%3e%3cdefs%3e%3cclipPath%20id='clip0_2954_7305'%3e%3crect%20width='24.5'%20height='18.375'%20fill='white'%20transform='translate(0.75%203.8125)'/%3e%3c/clipPath%3e%3c/defs%3e%3c/svg%3e)


Those same GIFs often end up embedded in internal documentation and presentations, especially when teams build training materials or how-to guides in an office suite like WPS Office. In this guide we cover when a GIF is the right call, how to convert video to GIF without losing quality or ending up with a file too large to upload, which tools fit which workflow, and how to embed GIFs cleanly in WPS Presentation and WPS Writer.


Why Convert Video to GIF Instead of Just Sharing the Clip?
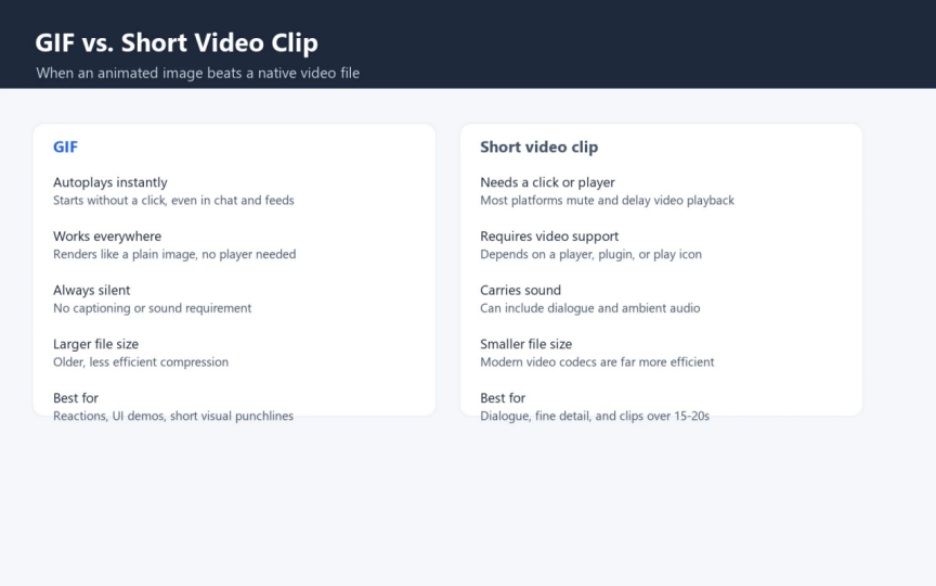
Before getting into tools, it helps to be specific about what a GIF gives you over a native video file.
It autoplays everywhere. Most platforms mute video and delay playback until someone clicks. A GIF starts immediately, which matters when you are trying to grab attention in a feed or a chat window.
It is compatible with everything. You do not need a video player, a plugin, or a click-to-play icon to view a GIF. It renders like a plain image almost anywhere: email, forums, documentation, and slide decks.
It communicates an action faster. For a tutorial, a bug report, or a quick interface walkthrough, a three-to-six-second GIF gets the point across faster than asking someone to scrub through a video to the right moment.
It does not need sound handled. GIFs are always silent, so there is no captioning requirement and no dependency on whether the viewer's speakers are on.
The trade-off is file size. GIFs take up more space than a comparably short video clip, because the format's compression is older and less efficient than modern video codecs. That is the cost you pay for the autoplay-everywhere convenience, and it is the reason the settings below matter.
Step 1: Pick the Right Clip Before You Convert
The single biggest factor in a good GIF is not the software you use, it is the source clip. A few things to check before you convert anything.
Keep it brief. The best GIFs run two to eight seconds. Anything longer tends to get compressed into a blur or balloon into an unreasonably large file.
Cut it close. Trim any dead air at the start or end. The GIF should open on the action, not on half a second of nothing happening.
Mind the movement. Fast pans, quick edits, and shaky footage all compress poorly, because each frame effectively has to be rebuilt from scratch. Steady footage compresses cleaner and looks better.
Watch the frame rate. You almost never need to preserve the source footage's full frame rate. Dropping from, say, 30 frames per second to 12 to 15 can meaningfully cut file size without a visible quality hit.
Step 2: Choose a Video-to-GIF Tool That Matches Your Workflow
There is no single best converter. The right choice depends on whether you are optimizing for speed, control, or built-in editing features. Here is how the common categories compare.
Browser-based converters are the fastest path for a one-off conversion: upload a clip, trim it if needed, adjust frame rate or size, and export. A few worth knowing. Adobe Express offers a browser-based video to GIF converter that lets you trim and resize before export without creating an account, a reasonable option if you are already in the Adobe Express ecosystem. Ezgif is a solid default if you want fine control over compression settings like color count, dithering, and frame delay. CloudConvert is built for bulk conversion or for teams that want to script the process through an API. Kapwing is the better pick when you also want to add subtitles or crop for a specific aspect ratio.
Desktop and offline tools make more sense when you are converting sensitive footage, working without a reliable connection, or batch-processing a large number of files, since nothing leaves your machine and there is no upload limit to work around. FFmpeg gives you the most control over compression but has a real learning curve; GIMP can also export animated GIFs if you prefer a graphical interface.
Mobile apps are the practical choice when a clip is recorded and shared entirely from a phone. Tools built into Instagram and dedicated GIF apps let you convert without round-tripping through a desktop import and export step.
Step 3: Get the Settings Right
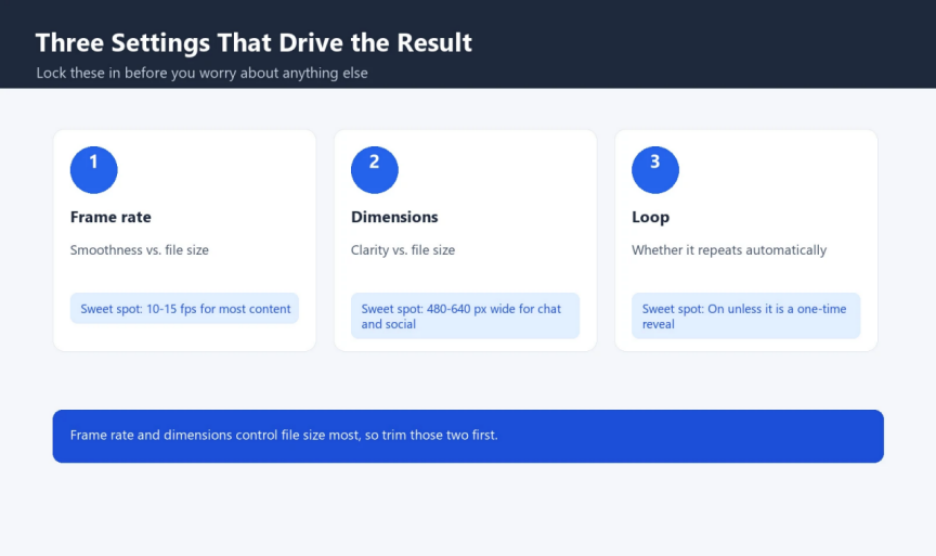
Whichever tool you use, three settings drive most of the final result. Get these locked in before you worry about anything else.
| Setting | What it controls | Typical sweet spot |
|---|---|---|
| Frame rate | Smoothness versus file size | 10-15 fps for most content |
| Dimensions | Clarity versus file size | 480-640px wide for chat and social use |
| Loop | Whether it repeats automatically | On, unless it is a one-time reveal |
If the GIF is going somewhere with a hard upload cap, Slack's free plan limits uploads to a few megabytes, for example, export a sample first and check the actual file size before you commit to a final version. File size is controlled mainly by frame rate and dimensions, so trim those two before anything else.
Step 4: Optimize Before You Publish
A few extra passes can make a meaningful difference to the final GIF.
Tidy up the loop point. If the first and last frames do not match well, the GIF visibly jumps when it repeats. Trimming a frame or two off either end usually fixes it.
Keep text minimal. Captions are useful when they clarify something, such as a before-and-after label or a step number, but too much on-screen text competes with the action itself.
Compress after exporting. Most export tools offer a post-export compression pass, which is worth running any time you are close to a size limit.
If AI tools helped you write captions, descriptions, or any accompanying post copy, some platforms now expect you to disclose AI-generated content. When you need to check how much of your writing reads as machine-made, an ai detector gives a quick signal so you can disclose it honestly or refine the copy before publishing.
Using GIFs in WPS Office Without Bloating Your Files
GIFs are common in training decks and how-to docs, but embedding them carelessly in WPS Presentation or WPS Writer causes two problems worth planning around.
Compress before you embed, not after. WPS embeds the actual GIF file inside the document or presentation package. A handful of uncompressed five-to-ten-megabyte GIFs dropped into a deck will noticeably slow down scrolling, saving, and opening the file, especially once you share it with a team over a shared drive. Run every GIF through a compression pass, reduce the dimensions to roughly 480 to 640 pixels wide, cap the frame rate around 10 to 15, and aim to keep each embedded GIF under two megabytes where you can. It is much easier to compress once at the source than to shrink a presentation after it is already bloated with a dozen oversized GIFs.
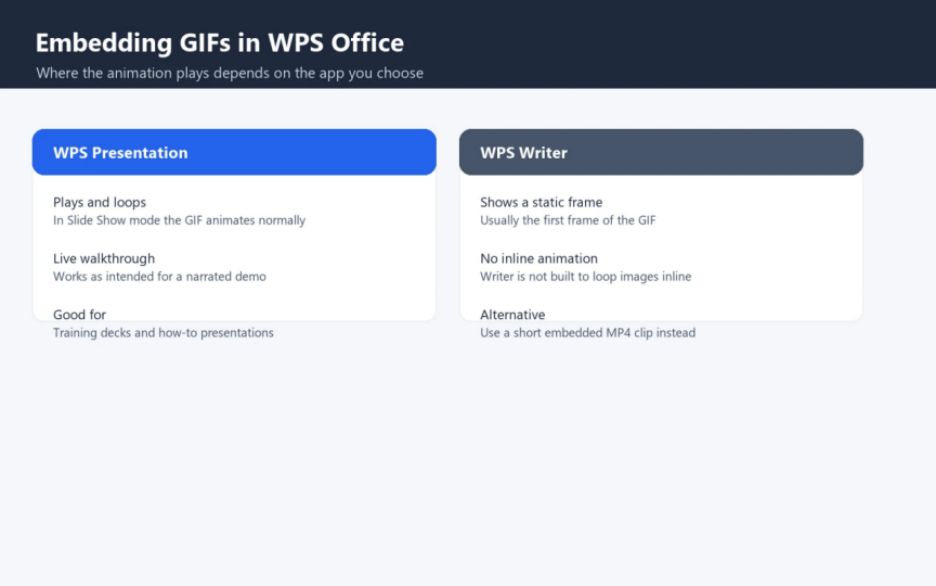
Know where the animation will actually play. Like most office suites, WPS treats a document and a presentation differently. In WPS Presentation, an embedded GIF plays and loops normally during Slide Show mode, so it works as intended for a live walkthrough; if that is your use case, WPS Presentation is the right place to build the deck. In WPS Writer, however, a GIF typically displays as a static image, usually just the first frame, because Writer is not built to render looping animations inline the way a slideshow player is. If a walkthrough needs to stay animated for the reader, build it as a presentation rather than a document, or fall back to a short embedded MP4 clip in Writer, where video playback support is generally more reliable than animated-image playback.
Limit how many you use per slide or page. Even compressed, GIFs are heavier than static screenshots. Two or three per slide is a reasonable ceiling before file size and scroll performance start to suffer, particularly in longer training decks that get emailed around rather than viewed from cloud storage. If you want to refine how you insert and edit media, the free WPS Academy tutorials walk through inserting pictures, video, and shapes in both Writer and Presentation.
When a GIF Isn't the Right Format
Not every clip needs to become a GIF. If the clip needs sound, runs longer than 15 to 20 seconds, or involves fast, detailed motion that a GIF cannot capture cleanly, a short native MP4 clip with captions is almost always the better choice, both visually and in terms of file size. GIFs are great for quick reaction clips, interface demonstrations, and visual punchlines. They are a poor fit for dialogue or anything with fine detail that needs to stay sharp.
Final Thoughts
Turning a video into a GIF does not take long, but doing it well takes more thought than dropping a file into the first converter you find. Start with a tight, well-chosen source clip, pick a tool that matches how much control you actually need, and lock in frame rate and dimensions before anything else. Get those right, and the GIF will do exactly what it is supposed to do: load instantly and make its point in a few seconds.


'%3e%3cpath%20d='M19.9911%204.11386V6.471H18.5894C18.0775%206.471%2017.7322%206.57814%2017.5536%206.79243C17.3751%207.00671%2017.2858%207.32814%2017.2858%207.75671V9.44421H19.9019L19.5536%2012.0871H17.2858V18.8639H14.5536V12.0871H12.2769V9.44421H14.5536V7.49779C14.5536%206.39064%2014.8632%205.53201%2015.4822%204.92189C16.1013%204.31177%2016.9257%204.00671%2017.9554%204.00671C18.8304%204.00671%2019.509%204.04243%2019.9911%204.11386Z'%20fill='%23333333'/%3e%3c/g%3e%3cdefs%3e%3cclipPath%20id='clip0_2938_8199'%3e%3crect%20width='16'%20height='16'%20fill='white'%20transform='translate(8%204.00671)'/%3e%3c/clipPath%3e%3c/defs%3e%3c/svg%3e)
'%3e%3cpath%20d='M17.5237%2010.7813L23.4811%204H22.0699L16.8949%209.88693L12.7648%204H8L14.2469%2012.9029L8%2020.0133H9.4112L14.8725%2013.7952L19.2352%2020.0133H24M9.92053%205.04213H12.0885L22.0688%2019.0224H19.9003'%20fill='%23333333'/%3e%3c/g%3e%3cdefs%3e%3cclipPath%20id='clip0_2938_8200'%3e%3crect%20width='16'%20height='16.0134'%20fill='white'%20transform='translate(8%204)'/%3e%3c/clipPath%3e%3c/defs%3e%3c/svg%3e)


