

'%3e%3cpath%20d='M8%200C12.4183%200%2016%203.58172%2016%208C16%2012.4183%2012.4183%2016%208%2016C3.58172%2016%200%2012.4183%200%208C0%203.58172%203.58172%200%208%200ZM11.6162%204.38379C11.2257%203.99337%2010.5927%203.99338%2010.2021%204.38379L8%206.58594L5.79785%204.38379C5.40732%203.99334%204.77429%203.99329%204.38379%204.38379C3.99331%204.77429%203.99335%205.40733%204.38379%205.79785L6.58594%208L4.38379%2010.2021C3.99348%2010.5927%203.99341%2011.2257%204.38379%2011.6162C4.77426%2012.0066%205.40734%2012.0065%205.79785%2011.6162L8%209.41406L10.2021%2011.6162C10.5927%2012.0066%2011.2257%2012.0067%2011.6162%2011.6162C12.0067%2011.2257%2012.0066%2010.5927%2011.6162%2010.2021L9.41406%208L11.6162%205.79785C12.0066%205.40735%2012.0066%204.77429%2011.6162%204.38379Z'%20fill='%23080E17'%20fill-opacity='0.46'/%3e%3c/g%3e%3cdefs%3e%3cclipPath%20id='clip0_3761_713'%3e%3crect%20width='16'%20height='16'%20fill='white'/%3e%3c/clipPath%3e%3c/defs%3e%3c/svg%3e)



'%3e%3cpath%20fill-rule='evenodd'%20clip-rule='evenodd'%20d='M21.4999%2010.9993C21.4999%205.20009%2016.7986%200.498901%2010.9993%200.498901C5.19994%200.498901%200.498657%205.20009%200.498657%2010.9993C0.498657%2016.2404%204.33858%2020.5844%209.35855%2021.3722V14.0346H6.69238V10.9993H9.35855V8.68594C9.35855%206.05427%2010.9262%204.60062%2013.3248%204.60062C14.4736%204.60062%2015.6753%204.80571%2015.6753%204.80571V7.38979H14.3512C13.0468%207.38979%2012.64%208.19921%2012.64%209.0296V10.9993H15.5523L15.0867%2014.0346H12.64V21.3722C17.66%2020.5844%2021.4999%2016.2404%2021.4999%2010.9993Z'%20fill='%231568EA'/%3e%3c/g%3e%3c/svg%3e)


'%3e%3cpath%20d='M2.42045%2022.1876H6.31818V12.7217L0.75%208.54553V20.5171C0.75%2021.4414%201.49892%2022.1876%202.42045%2022.1876Z'%20fill='%234285F4'/%3e%3cpath%20d='M19.682%2022.1876H23.5797C24.5041%2022.1876%2025.2502%2021.4387%2025.2502%2020.5171V8.54553L19.682%2012.7217'%20fill='%2334A853'/%3e%3cpath%20d='M19.682%205.48293V12.7216L25.2502%208.54543V6.31816C25.2502%204.25236%2022.8921%203.07469%2021.2411%204.31361'%20fill='%23FBBC04'/%3e%3cpath%20d='M6.31824%2012.7217V5.48303L13.0001%2010.4944L19.6819%205.48303V12.7217L13.0001%2017.733'%20fill='%23EA4335'/%3e%3cpath%20d='M0.75%206.31816V8.54543L6.31818%2012.7216V5.48293L4.75909%204.31361C3.10534%203.07469%200.75%204.25236%200.75%206.31816Z'%20fill='%23C5221F'/%3e%3c/g%3e%3cdefs%3e%3cclipPath%20id='clip0_2954_7305'%3e%3crect%20width='24.5'%20height='18.375'%20fill='white'%20transform='translate(0.75%203.8125)'/%3e%3c/clipPath%3e%3c/defs%3e%3c/svg%3e)


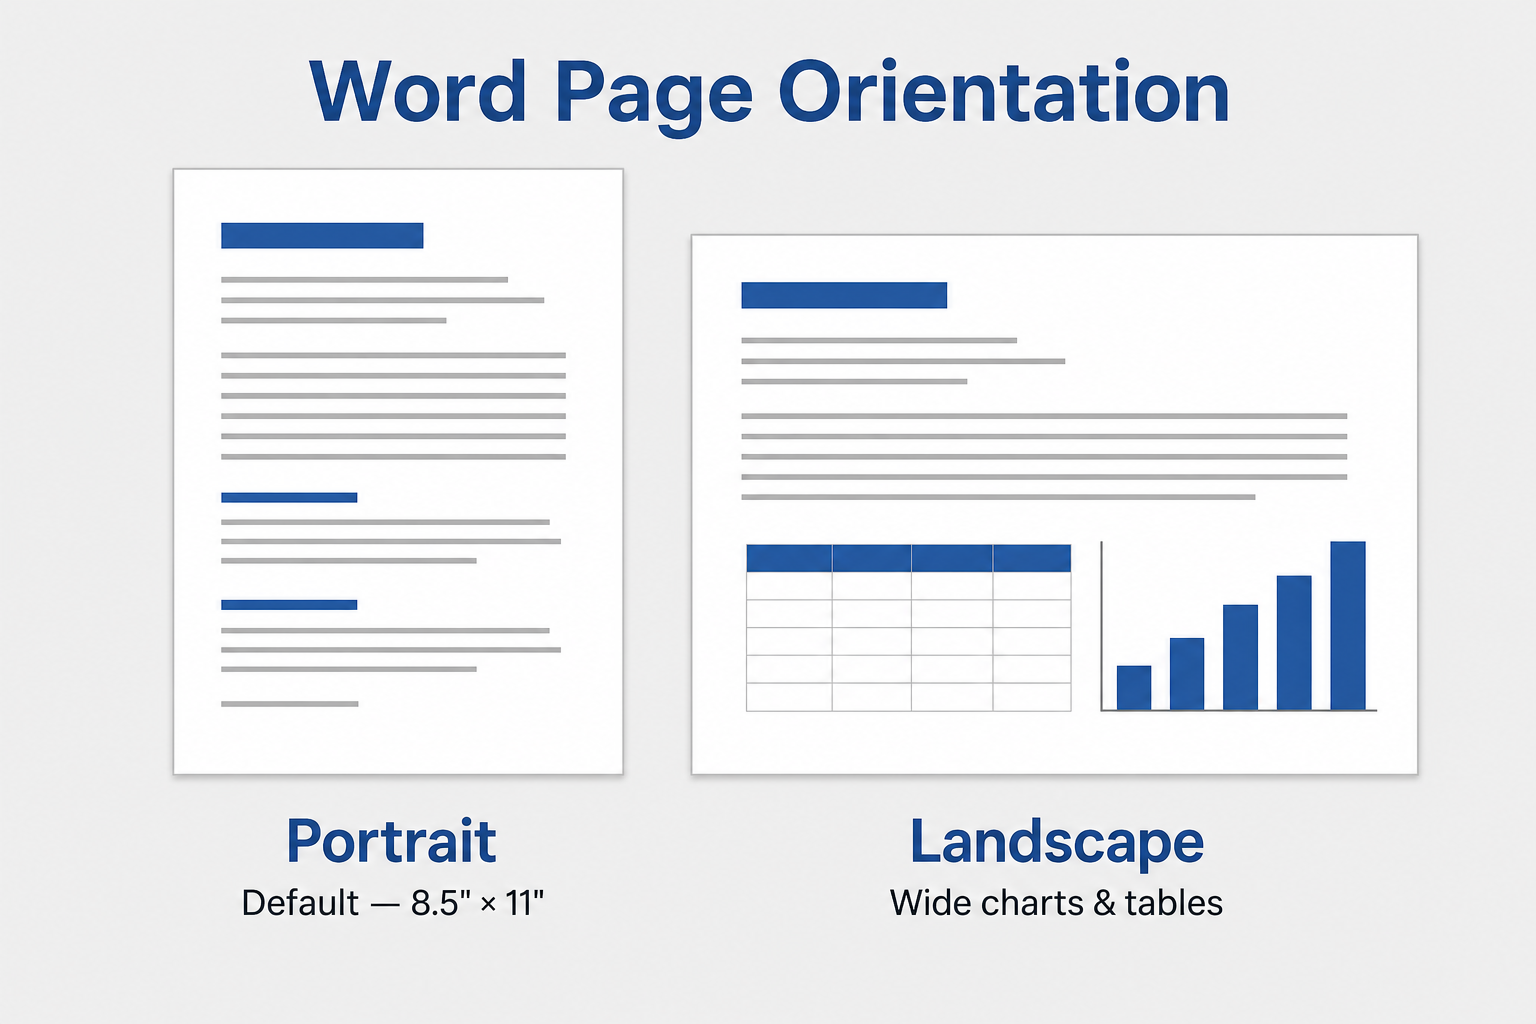
Page orientation controls whether your document is taller than it is wide—or the other way around. In U.S. Microsoft Word, the default is Portrait (vertical). Switch to Landscape (horizontal) when you need more room for charts, tables, or wide images.
Quick answer: Go to Layout → Orientation, then choose Portrait or Landscape.
Portrait vs. Landscape: What's the Difference?
| Orientation | Layout | Typical Use |
|---|---|---|
| Portrait (default) | Taller than wide — like a printed letter | Essays, reports, resumes, most office docs |
| Landscape | Wider than tall — like a calendar spread | Wide tables, charts, timelines, posters |
On standard U.S. letter paper (8.5" × 11"), portrait keeps the 11" side vertical. Landscape flips it so the 11" side runs horizontally.
Before You Start
Save your file before changing layout settings
Use View → Print Layout to preview how pages will look
Changing orientation can shift images, tables, and page breaks — review the full document after you apply the change
Method 1: Change Orientation for the Whole Document
Best when every page in your file should use the same orientation.
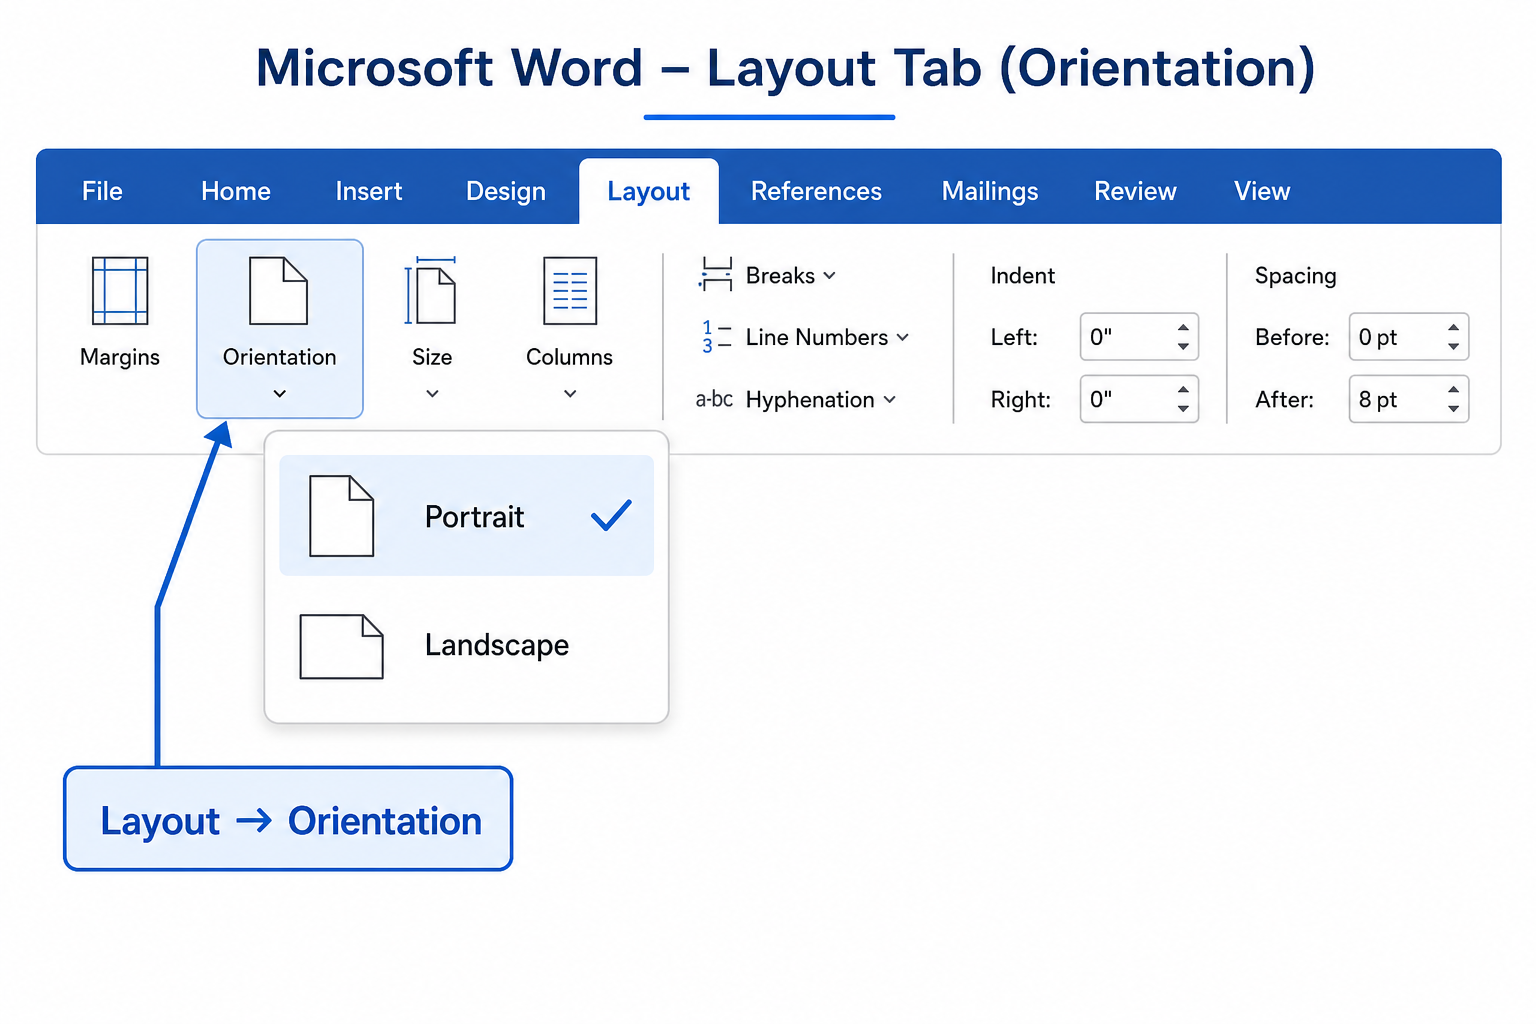
Open your Word document.
Click the Layout tab (called Page Layout in older Word versions).
Click Orientation.
Select Portrait or Landscape.
The change applies to your entire document immediately. All pages switch to the orientation you picked.
Tip: Press Ctrl + A to select all content first if you want to be sure the change covers everything — though for a full-document switch, this is usually not required.
Method 2: Change Orientation for One Page or Section
Need one landscape page in the middle of a portrait report — for a wide chart or table? Use a section break.
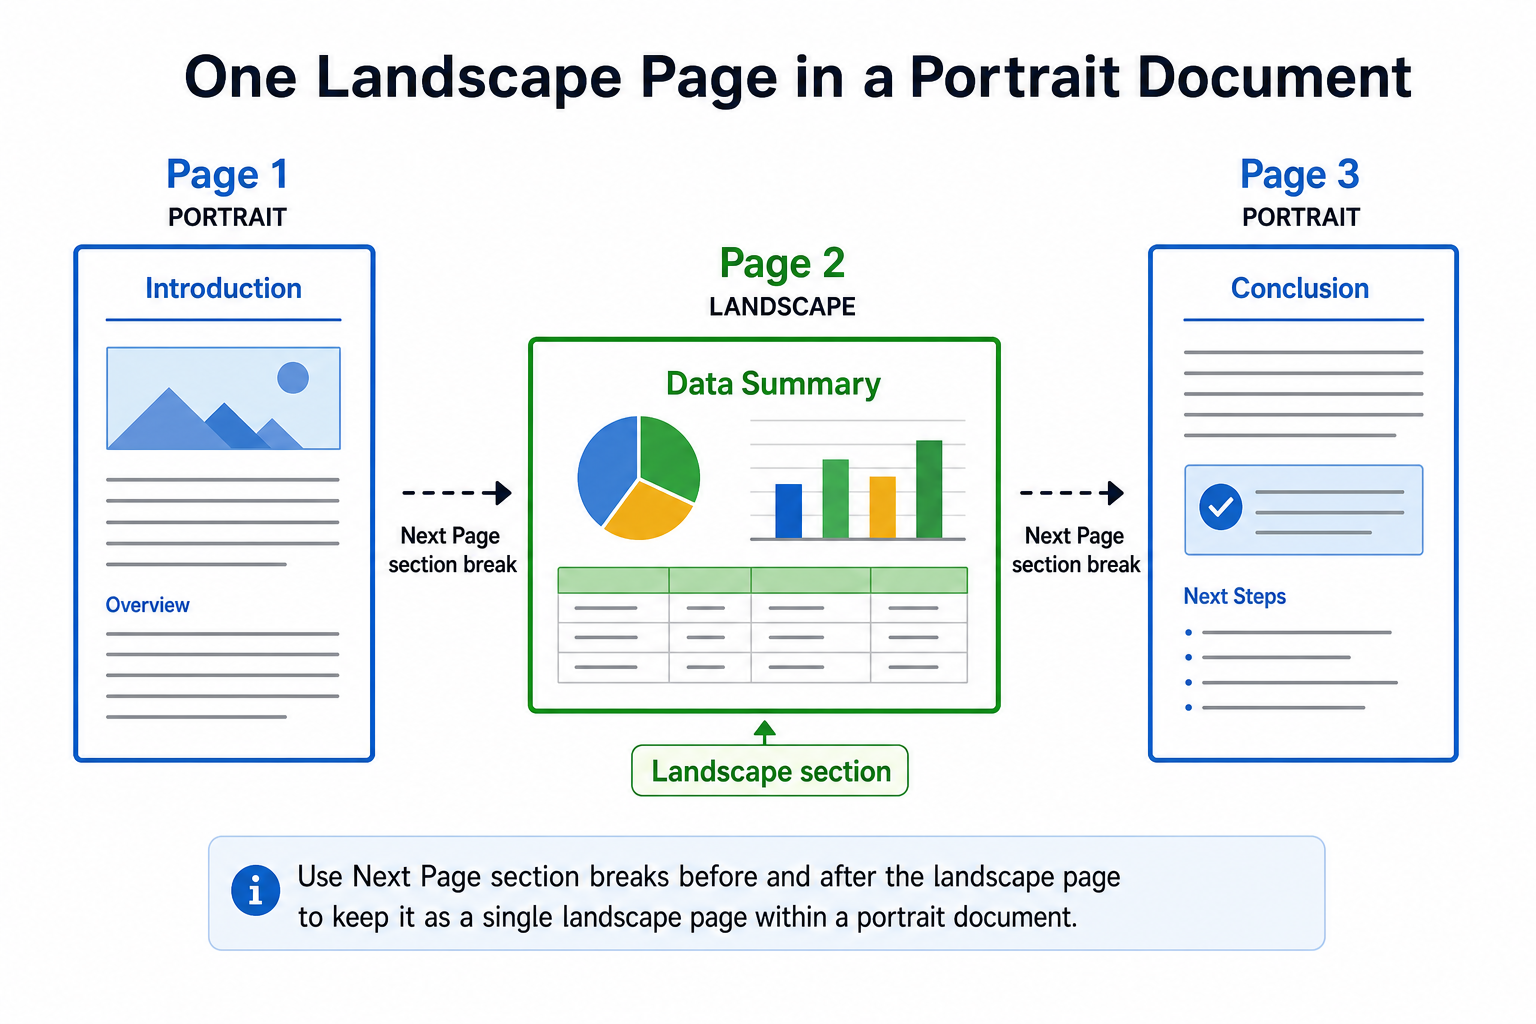
Step 1: Insert a section break before the landscape page
Click where the landscape section should start (place your cursor at the beginning of that content).
Go to Layout → Breaks → Next Page (under Section Breaks).
Step 2: Set that section to landscape
Click inside the new section (the page after the break).
Go to Layout → Orientation → Landscape.
Step 3: Return to portrait for the rest of the document (if needed)
Click where portrait pages should resume.
Go to Layout → Breaks → Next Page again.
With your cursor in the new section, choose Layout → Orientation → Portrait.
Only the section between the two breaks uses landscape. Pages before and after stay in portrait.
Method 3: Change Orientation for Selected Text Only
Best for a quick one-off change without manually placing section breaks.
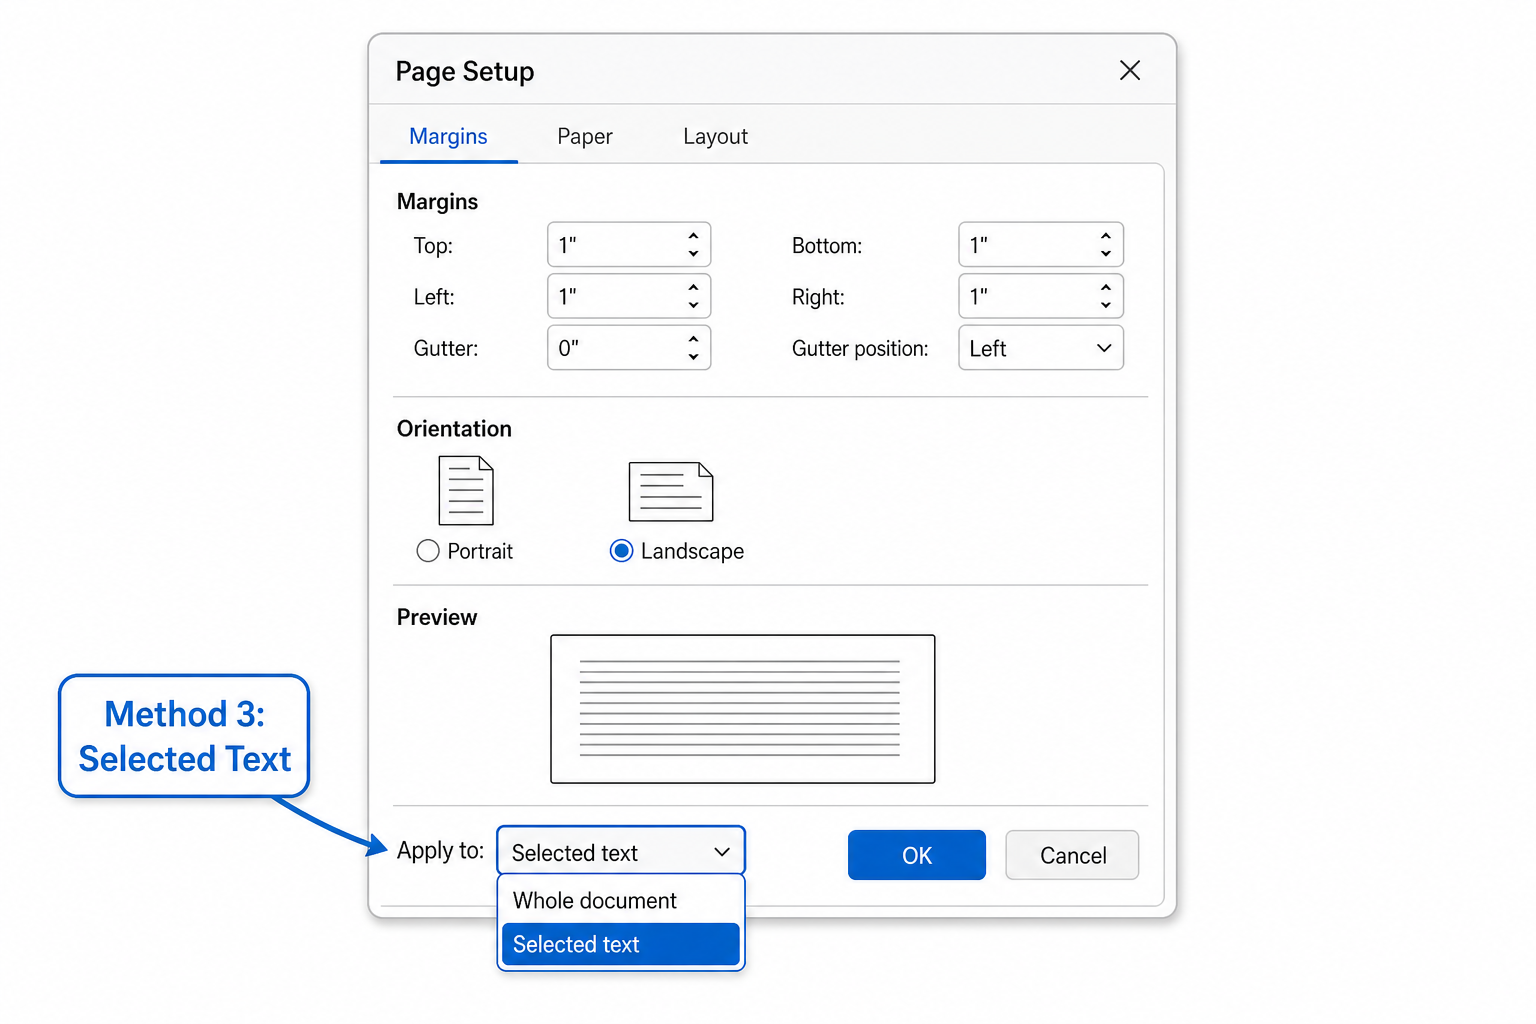
Select the text (or objects) you want on a landscape page.
Go to Layout and click the small arrow in the bottom-right corner of the Page Setup group.
Under Orientation, choose Landscape.
In the Apply to box, select Selected text.
Click OK.
Word automatically inserts the section breaks for you and applies landscape only to the selected content.
Quick Reference
| Goal | Steps |
|---|---|
| Entire document → landscape | Layout → Orientation → Landscape |
| Entire document → portrait | Layout → Orientation → Portrait |
| One page/section → landscape | Breaks → Next Page, then Orientation → Landscape |
| Selected text → landscape | Page Setup dialog → Landscape → Apply to: Selected text |
When to Use Each Orientation
Portrait — Letters, school papers, contracts, and anything meant to be read top to bottom on standard letter paper
Landscape — Excel-style tables pasted into Word, Gantt charts, org charts, wide photos, and comparison tables
Mixed — Annual reports with a landscape financial summary page, or a resume with a landscape project timeline
Already working on margins? See our guide on how to change margins in Word — orientation and margins are both under the Layout tab.
Tips
Set orientation before you finalize layout when possible — font sizes and image placement often depend on page width
Preview in File → Print before printing landscape pages on a portrait-default printer
If headers or footers look wrong after a section break, double-click the header and turn off Link to Previous for that section
To see section breaks on screen, go to Home → Show/Hide ¶ (the paragraph mark button)
In Word on the web, orientation options are more limited — use desktop Word for mixed portrait/landscape documents
Troubleshooting
| Problem | Fix |
|---|---|
| Whole document flips when I only want one page | Insert a Next Page section break first, then change orientation inside that section only |
| Landscape page affects pages before it | Your cursor was in the wrong section — click inside the target section, then apply orientation |
| Table or image still looks cut off | Try landscape and reduce column width, font size, or image scale |
| Can't find Orientation | Look under Layout (or Page Layout in Word 2010 and earlier) |
| Word Online won't mix orientations | Use Word desktop or WPS Writer for section-based layout changes |
FAQ
How do I change page orientation in Word?
Go to Layout → Orientation and choose Portrait or Landscape. For one page only, insert a Next Page section break first.
What is the default page orientation in Word?
Portrait — the same vertical layout used for most U.S. letter-size documents.
How do I make just one page landscape?
Place your cursor at the start of that content, insert Layout → Breaks → Next Page, then choose Layout → Orientation → Landscape. Add another section break to switch back to portrait.
Can I change orientation for selected text only?
Yes. Select the text, open the Page Setup dialog from the Layout tab, pick Landscape, and set Apply to: Selected text.
Does changing orientation affect margins?
Margin values stay the same, but the top/bottom and left/right sides swap visually when you rotate the page. Check your layout in Print Preview after switching.
Does Word Online support landscape?
Yes for the whole document. Mixed portrait and landscape in one file works best in desktop Word.
Conclusion
Changing page orientation in Word takes just a few clicks: Layout → Orientation for the full document, or section breaks + Orientation when only part of your file needs landscape. Pick portrait for everyday reading and printing, landscape when width matters — and use Print Layout view to confirm every page looks right before you share or print.



'%3e%3cpath%20d='M19.9911%204.11386V6.471H18.5894C18.0775%206.471%2017.7322%206.57814%2017.5536%206.79243C17.3751%207.00671%2017.2858%207.32814%2017.2858%207.75671V9.44421H19.9019L19.5536%2012.0871H17.2858V18.8639H14.5536V12.0871H12.2769V9.44421H14.5536V7.49779C14.5536%206.39064%2014.8632%205.53201%2015.4822%204.92189C16.1013%204.31177%2016.9257%204.00671%2017.9554%204.00671C18.8304%204.00671%2019.509%204.04243%2019.9911%204.11386Z'%20fill='%23333333'/%3e%3c/g%3e%3cdefs%3e%3cclipPath%20id='clip0_2938_8199'%3e%3crect%20width='16'%20height='16'%20fill='white'%20transform='translate(8%204.00671)'/%3e%3c/clipPath%3e%3c/defs%3e%3c/svg%3e)
'%3e%3cpath%20d='M17.5237%2010.7813L23.4811%204H22.0699L16.8949%209.88693L12.7648%204H8L14.2469%2012.9029L8%2020.0133H9.4112L14.8725%2013.7952L19.2352%2020.0133H24M9.92053%205.04213H12.0885L22.0688%2019.0224H19.9003'%20fill='%23333333'/%3e%3c/g%3e%3cdefs%3e%3cclipPath%20id='clip0_2938_8200'%3e%3crect%20width='16'%20height='16.0134'%20fill='white'%20transform='translate(8%204)'/%3e%3c/clipPath%3e%3c/defs%3e%3c/svg%3e)


