

'%3e%3cpath%20d='M8%200C12.4183%200%2016%203.58172%2016%208C16%2012.4183%2012.4183%2016%208%2016C3.58172%2016%200%2012.4183%200%208C0%203.58172%203.58172%200%208%200ZM11.6162%204.38379C11.2257%203.99337%2010.5927%203.99338%2010.2021%204.38379L8%206.58594L5.79785%204.38379C5.40732%203.99334%204.77429%203.99329%204.38379%204.38379C3.99331%204.77429%203.99335%205.40733%204.38379%205.79785L6.58594%208L4.38379%2010.2021C3.99348%2010.5927%203.99341%2011.2257%204.38379%2011.6162C4.77426%2012.0066%205.40734%2012.0065%205.79785%2011.6162L8%209.41406L10.2021%2011.6162C10.5927%2012.0066%2011.2257%2012.0067%2011.6162%2011.6162C12.0067%2011.2257%2012.0066%2010.5927%2011.6162%2010.2021L9.41406%208L11.6162%205.79785C12.0066%205.40735%2012.0066%204.77429%2011.6162%204.38379Z'%20fill='%23080E17'%20fill-opacity='0.46'/%3e%3c/g%3e%3cdefs%3e%3cclipPath%20id='clip0_3761_713'%3e%3crect%20width='16'%20height='16'%20fill='white'/%3e%3c/clipPath%3e%3c/defs%3e%3c/svg%3e)



'%3e%3cpath%20fill-rule='evenodd'%20clip-rule='evenodd'%20d='M21.4999%2010.9993C21.4999%205.20009%2016.7986%200.498901%2010.9993%200.498901C5.19994%200.498901%200.498657%205.20009%200.498657%2010.9993C0.498657%2016.2404%204.33858%2020.5844%209.35855%2021.3722V14.0346H6.69238V10.9993H9.35855V8.68594C9.35855%206.05427%2010.9262%204.60062%2013.3248%204.60062C14.4736%204.60062%2015.6753%204.80571%2015.6753%204.80571V7.38979H14.3512C13.0468%207.38979%2012.64%208.19921%2012.64%209.0296V10.9993H15.5523L15.0867%2014.0346H12.64V21.3722C17.66%2020.5844%2021.4999%2016.2404%2021.4999%2010.9993Z'%20fill='%231568EA'/%3e%3c/g%3e%3c/svg%3e)


'%3e%3cpath%20d='M2.42045%2022.1876H6.31818V12.7217L0.75%208.54553V20.5171C0.75%2021.4414%201.49892%2022.1876%202.42045%2022.1876Z'%20fill='%234285F4'/%3e%3cpath%20d='M19.682%2022.1876H23.5797C24.5041%2022.1876%2025.2502%2021.4387%2025.2502%2020.5171V8.54553L19.682%2012.7217'%20fill='%2334A853'/%3e%3cpath%20d='M19.682%205.48293V12.7216L25.2502%208.54543V6.31816C25.2502%204.25236%2022.8921%203.07469%2021.2411%204.31361'%20fill='%23FBBC04'/%3e%3cpath%20d='M6.31824%2012.7217V5.48303L13.0001%2010.4944L19.6819%205.48303V12.7217L13.0001%2017.733'%20fill='%23EA4335'/%3e%3cpath%20d='M0.75%206.31816V8.54543L6.31818%2012.7216V5.48293L4.75909%204.31361C3.10534%203.07469%200.75%204.25236%200.75%206.31816Z'%20fill='%23C5221F'/%3e%3c/g%3e%3cdefs%3e%3cclipPath%20id='clip0_2954_7305'%3e%3crect%20width='24.5'%20height='18.375'%20fill='white'%20transform='translate(0.75%203.8125)'/%3e%3c/clipPath%3e%3c/defs%3e%3c/svg%3e)


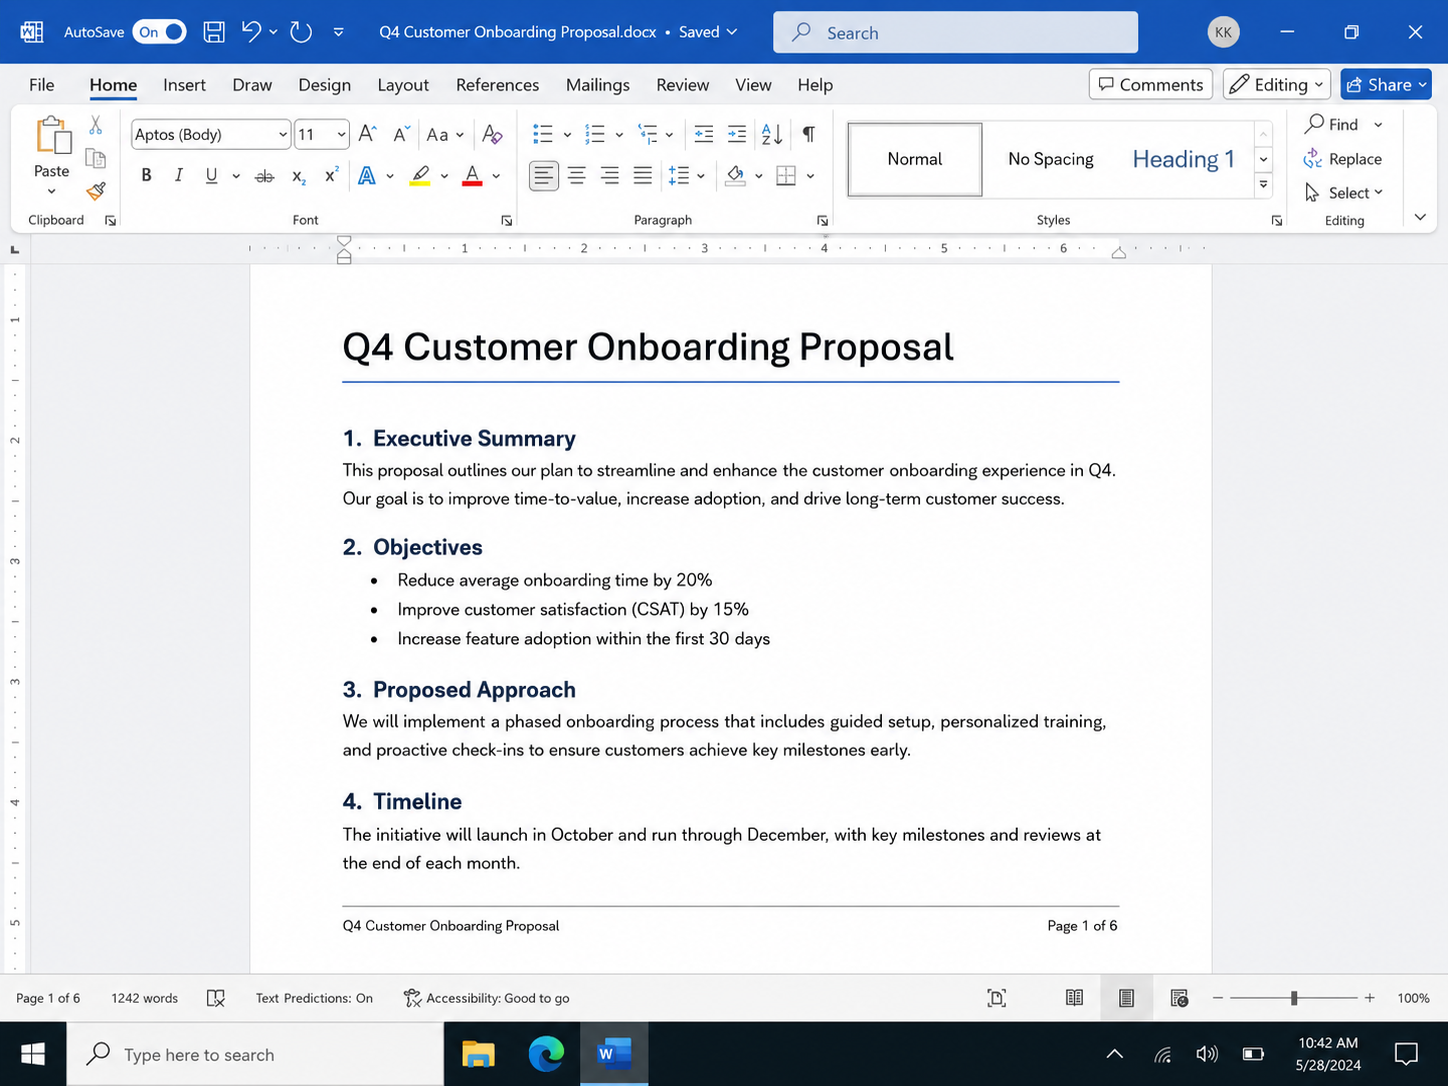
To insert the Title document property in Word, first set the file’s Title under File > Info. Then click where the title should appear and choose Insert > Quick Parts > Document Property > Title. Word inserts a linked document-property control that can reuse the same title in the body, cover page, header, or footer.
Key Takeaways
The Title document property is metadata stored with the file; it is separate from the .docx file name and the visible Title style.
Set the Title value before inserting it, otherwise the inserted result may be blank.
Use Quick Parts > Document Property > Title for the simplest editable property control.
Use Quick Parts > Field > DocProperty > Title when you need a traditional field, especially in headers, footers, or reusable templates.
After changing the metadata, update traditional fields with F9; Ctrl + A, then F9 updates fields in the main document story on Windows.
Applies to
This guide uses the desktop Word interface. Word for the web can display many existing document properties and fields, but the complete Quick Parts and Field workflow is best handled in the desktop app.
What Is the Title Document Property in Word?
The Title document property is metadata stored inside the Word file. Metadata describes or identifies a file independently of the text visible on the page. Word can store properties such as Title, Author, Subject, Keywords, and Company, and it can insert those values into the document as reusable controls or fields.
This is useful in reports, proposals, policies, contracts, and templates where the same document name must appear in several places. Instead of typing the title separately on a cover page and in every header, you can maintain one property value and reuse it.
| Element | What it controls | Relationship to the inserted Title |
|---|---|---|
| Title document property | Metadata under File > Info or Advanced Properties | This is the source value used by the linked control or field. |
| File name | The saved .docx file name | Renaming the file does not normally change the Title property. |
| Title style | The visual formatting of text on the page | Applying the Title style does not create or edit file metadata. |
| Inserted Title control or field | Displays the stored Title value inside the document | It reflects the property value; traditional fields may need to be refreshed. |
If a copied template still displays an old project name after you rename the file, edit the Title metadata itself. Changing only the file name or the visible heading will not reliably update a linked Title field.
How to Insert the Title Document Property in Word on Windows
The Windows workflow has three parts: define the Title metadata, insert it into the document, and confirm that the inserted value remains linked. Use desktop Word because the full Quick Parts and Field commands may not appear in the browser version.
Step 1: Set the Title property
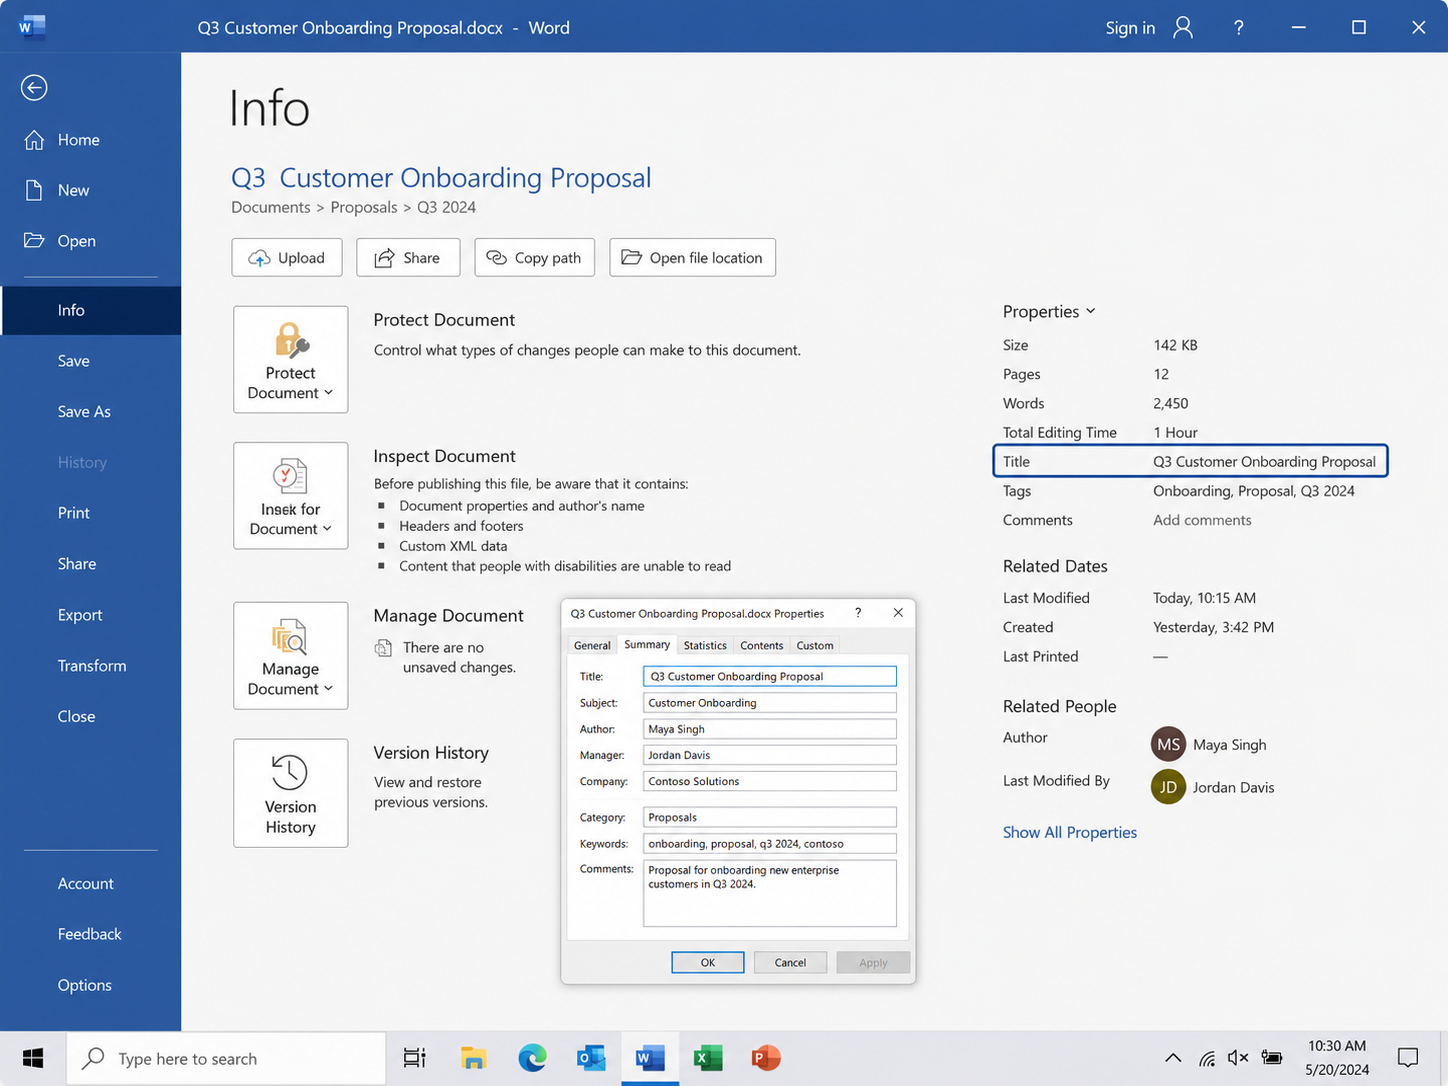
Open the document and select File.
Choose Info.
In the Properties area, select Add a title if the field is visible. If it is not, choose Properties > Advanced Properties.
Open the Summary tab and enter a clear document title, such as Q3 Customer Onboarding Proposal.
Select OK, return to the document, and save the file.
Good practice: Use a title that identifies the document without depending on its folder or file name. This makes the metadata more useful in templates, document libraries, and search tools.
Step 2: Insert the Title property with Quick Parts
Click where the title should appear.
Open the Insert tab.
In the Text group, select Quick Parts.
Choose Document Property > Title.
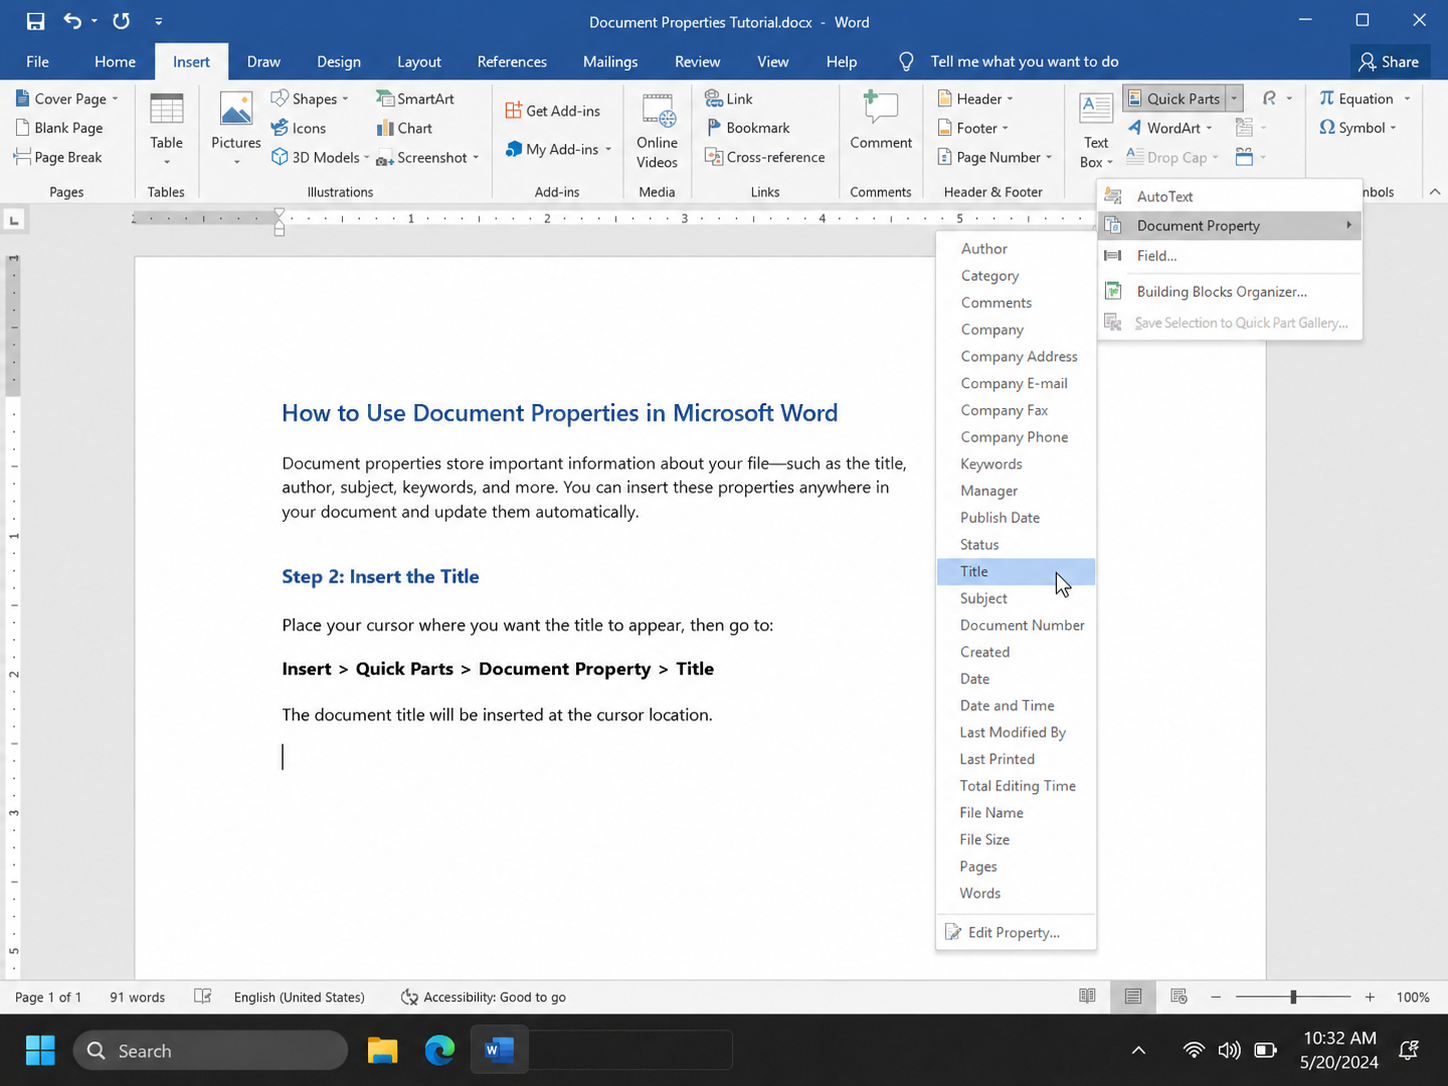
Word inserts an editable document-property control at the cursor position. You can format its visible text like normal content, including the font, size, alignment, color, and paragraph spacing. Formatting the control changes its appearance; it does not change the stored metadata value.
Step 3: Confirm that the value is linked
Save the document after inserting the Title control.
Return to File > Info and change the Title value temporarily.
Return to the document and click outside the control. Confirm that the displayed title changes to the new value.
Restore the intended Title and save the document again.
If you inserted a traditional DOCPROPERTY field instead of a document-property control, select the field and press F9, or right-click it and choose Update Field.
Quick Parts Title Control vs. DOCPROPERTY Field
Both methods display the same Title metadata, but they behave differently. Choose the method based on where the title will appear and how much control you need.
| Method | Best for | What to expect |
|---|---|---|
| Quick Parts > Document Property > Title | Cover pages, forms, and editable document templates | Inserts a document-property content control that is easy to edit and reuse. |
| Quick Parts > Field > DocProperty > Title | Headers, footers, print layouts, and users who work with field codes | Inserts a traditional field that can be updated with F9 and formatted with field switches. |
| Typed title text | One-off documents with no need for metadata synchronization | Looks like a title but is not connected to the file’s Title property. |
Alternative Method: Insert the Title with the Field Dialog
Use the Field dialog when Document Property is missing from the Quick Parts menu, when you want a traditional field code, or when the title must appear in a header or footer.
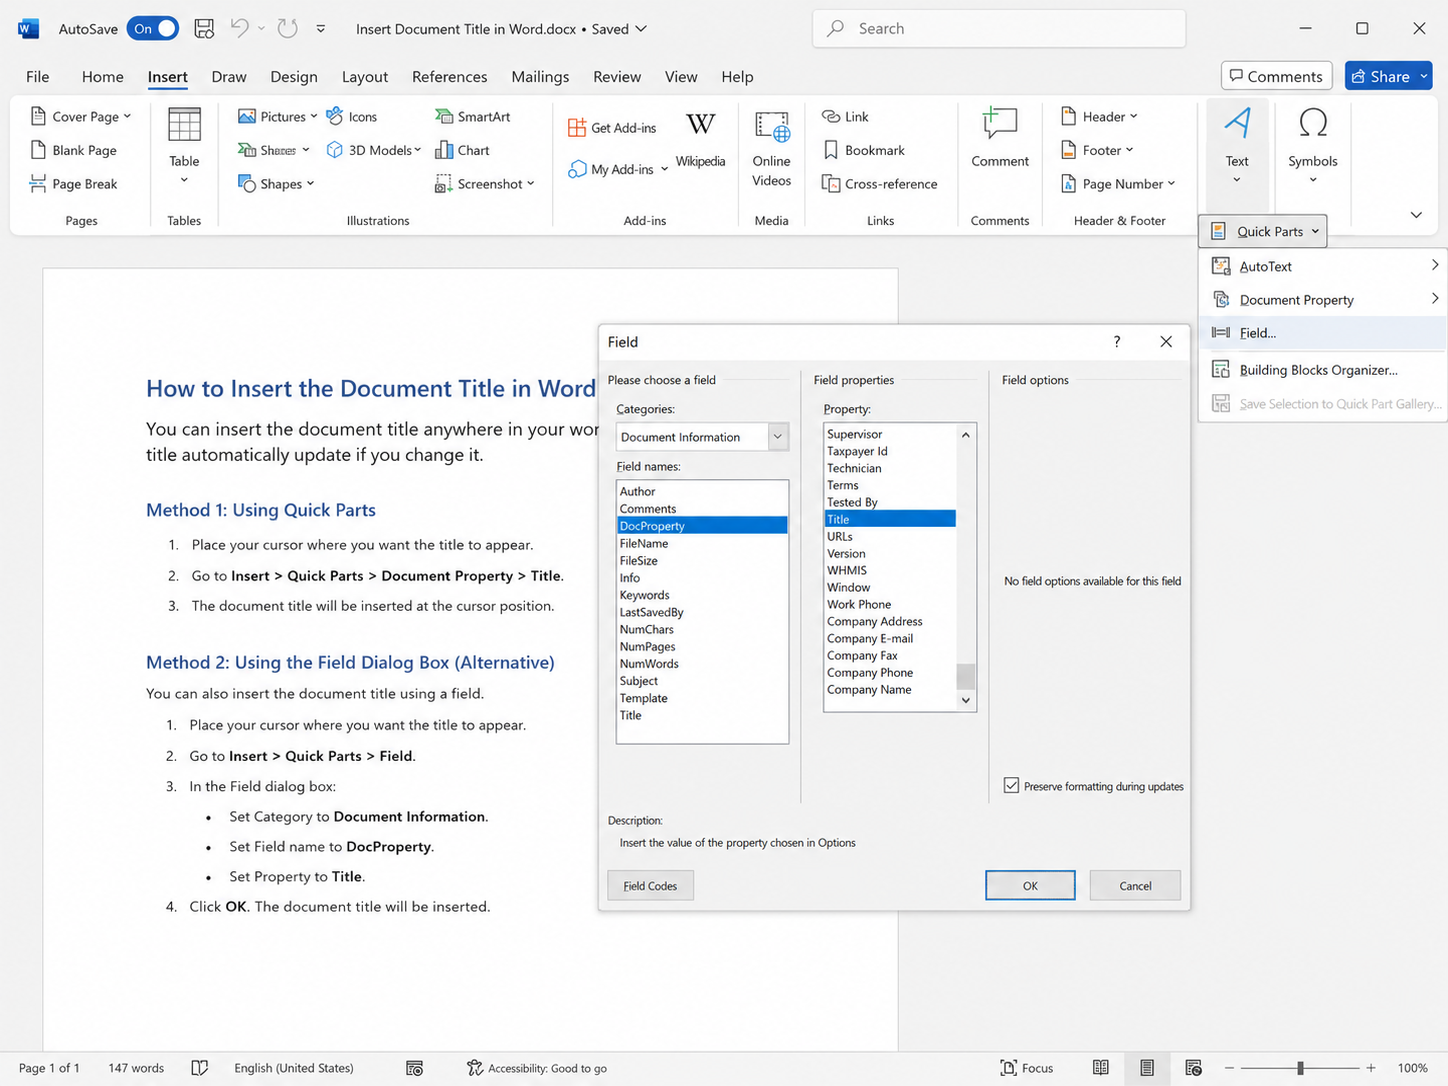
Place the cursor where the title should appear.
Select Insert > Quick Parts > Field. Older interfaces may show Insert > Field.
Choose Document Information from the Categories list.
Select DocProperty, then choose Title as the property. Some versions may list Title directly.
Leave Preserve formatting during updates selected when you want the field to retain its formatting.
Select OK.
A traditional field may display a code such as { DOCPROPERTY Title \* MERGEFORMAT } when field-code view is enabled. Press Alt + F9 to switch all field codes and results, or Shift + F9 to switch only the selected field.


How to Insert the Title Property in a Header or Footer
A linked Title in the header or footer is useful when a report, policy, proposal, or controlled template needs its document name repeated on multiple pages.
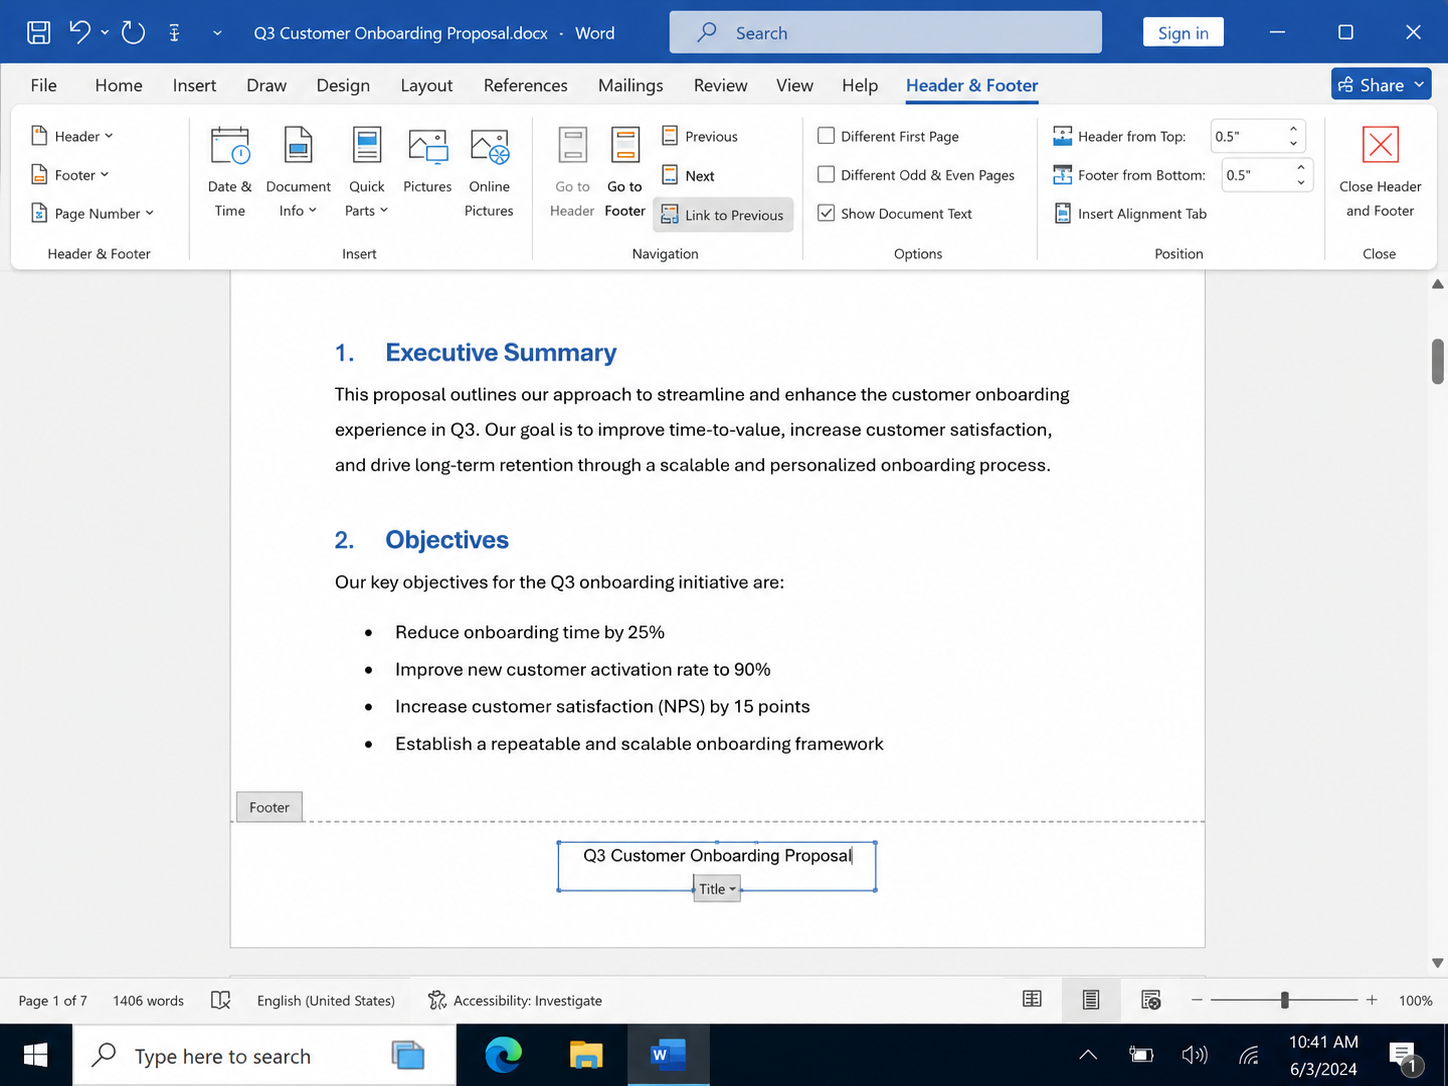
Double-click the header or footer area, or choose Insert > Header or Footer > Edit Header/Footer.
Place the cursor where the title should appear.
Select Quick Parts > Field.
Choose Title, or select DocProperty and set the property to Title.
Select OK, format the result, and close the header or footer.
Check whether the document uses Different First Page, Different Odd & Even Pages, or multiple sections. Each header or footer can be a separate area, so a Title field may need to be inserted or updated in more than one location.
For section-specific placement options, see how to insert the document title in a Word footer.
How to Change or Update the Title Property
Changing ordinary text on the page does not necessarily change the stored Title property. Edit the metadata first, then refresh any traditional fields that display it.
Go to File > Info.
Edit the value next to Title, or open Properties > Advanced Properties > Summary.
Return to the document and save it.
To refresh one field, select it and press F9, or right-click and choose Update Field.
To update fields in the main document on Windows, press Ctrl + A, then F9.
Fields in headers, footers, tables, text boxes, footnotes, or separate sections may need to be updated individually. You can also enable File > Options > Display > Update fields before printing to reduce the risk of printing outdated field results.
Can You Insert the Title Property in Word for the Web?
Word for the web can open documents that already contain many fields and document-property controls, but the full desktop workflow described here may not be available in the browser. If you cannot find Quick Parts, Document Property, or Field, use Open in Desktop App and insert or update the Title there.
After saving the desktop document, reopen it in the browser and confirm that the displayed title is still correct. Avoid replacing the field with ordinary typed text if the document must stay synchronized with its metadata.
Fix Common Title Document Property Problems
The inserted Title is blank
The Title metadata is probably empty. Open File > Info and add a title, or use Advanced Properties > Summary. Save the file, then update the inserted field. For a document-property control, click outside it or reopen the file to confirm that the value was saved.
The Title shows an old project or template name
Renaming the .docx file does not automatically replace its Title metadata. Copied documents and templates often retain the previous property value. Edit the Title under File > Info, save the file, and update any traditional fields with F9.
Word shows a field code instead of the title
If you see { DOCPROPERTY Title }, Word is displaying a field code. Press Alt + F9 to switch all fields to their results, or right-click the field and choose Toggle Field Codes.
Quick Parts or Document Property is missing
Expand the Word window and look in the Text group on the Insert tab; Word can collapse commands when the ribbon is narrow. You can also use Insert > Quick Parts > Field and insert a DocProperty field. In Word for the web, open the file in desktop Word for the complete workflow.
The Title will not update
Confirm that the visible title is a linked property control or field rather than ordinary text. Select a field and press F9. If a field is locked in Word for Windows, press Ctrl + Shift + F11 to unlock it, then update it again. Also check whether editing restrictions are enabled.
The Title appears with a gray box or shading
Gray field shading or a content-control boundary helps you identify linked content while editing. It normally does not print. Click outside the control or use Word’s field-shading settings if you want a less prominent editing view; do not remove the control unless you intentionally want to break the link.
The Title updates in the body but not in the header
The main document and its headers or footers are separate Word areas. Updating the body with Ctrl + A, then F9 may not refresh every header, footer, text box, or section. Open the affected area, select the field, and press F9 there.
How to Insert the Title Document Property in Word on Mac
Word for Mac uses different menu arrangements and may not show the same Quick Parts gallery as Word for Windows. The exact labels can vary by release, but the field-based workflow is generally the most reliable.
Open the document and choose File > Properties.
Open the Summary tab, enter the Title, and save the document.
Place the cursor where the title should appear.
Choose Insert > Field.
Select DocProperty or Title, depending on the available field list, and choose the Title property.
Insert the field and confirm that the correct title appears.
To refresh a selected field, use F9; some Mac keyboards require Fn + F9.
If your edition does not expose the required document-property field, create the field in a compatible desktop version of Word, save the .docx file, and then reopen it on the Mac to verify the result.
Using Title Property Fields in WPS Writer
WPS Writer can open and edit DOCX files that already contain many Word fields and document-property controls. Field menus and supported property types can vary by platform and WPS Office version, so test the document before distributing a reusable template.
Open the .docx file in WPS Writer.
Check whether an existing Title field or property control displays the correct value.
Look for Insert > Field and review the available document-property fields in your installed version.
If DOCPROPERTY Title is available, insert it and refresh the field using the update command offered by that version.
If the property is unavailable or does not resolve, create the Title field in Microsoft Word, save the .docx file, and reopen it in WPS Writer for editing and layout checks.
For a broader field workflow, read how to insert fields in Word using WPS Office.
Related Word Document Property Guides
FAQs About the Title Document Property in Word
What is the Title document property in Word?
It is metadata stored inside the Word file. You can edit it under File > Info and insert it into the document as a property control or field.
Is the Title property the same as the file name?
No. The file name identifies the saved .docx file, while the Title property is separate metadata. Renaming the file does not normally change the Title property.
Does applying the Title style create a Title document property?
No. The Title style formats visible text only. Set the metadata under File > Info > Properties or Advanced Properties > Summary.
Can I insert the Title property in a header or footer?
Yes. Open the header or footer, select Quick Parts > Field, and choose Title or DocProperty: Title.
Can I insert the Title document property in Word Online?
The browser version may display an existing Title control or field, but the complete Quick Parts and Field workflow may be unavailable. Use Open in Desktop App when those commands are missing.
How do I update every Title field in the document?
Edit the Title metadata, then press Ctrl + A followed by F9 in Word for Windows. Update fields in headers, footers, text boxes, and other separate areas individually when necessary.
Final Checklist
Set the Title metadata before inserting it.
Use the Quick Parts document-property control for the simplest editable method.
Use the Field dialog when you need a traditional DOCPROPERTY field.
Update fields after changing metadata and before printing or exporting.
Check headers, footers, sections, and copied templates for old Title values.
Open the final DOCX in the software your recipients will use and confirm that the title displays correctly.


'%3e%3cpath%20d='M19.9911%204.11386V6.471H18.5894C18.0775%206.471%2017.7322%206.57814%2017.5536%206.79243C17.3751%207.00671%2017.2858%207.32814%2017.2858%207.75671V9.44421H19.9019L19.5536%2012.0871H17.2858V18.8639H14.5536V12.0871H12.2769V9.44421H14.5536V7.49779C14.5536%206.39064%2014.8632%205.53201%2015.4822%204.92189C16.1013%204.31177%2016.9257%204.00671%2017.9554%204.00671C18.8304%204.00671%2019.509%204.04243%2019.9911%204.11386Z'%20fill='%23333333'/%3e%3c/g%3e%3cdefs%3e%3cclipPath%20id='clip0_2938_8199'%3e%3crect%20width='16'%20height='16'%20fill='white'%20transform='translate(8%204.00671)'/%3e%3c/clipPath%3e%3c/defs%3e%3c/svg%3e)
'%3e%3cpath%20d='M17.5237%2010.7813L23.4811%204H22.0699L16.8949%209.88693L12.7648%204H8L14.2469%2012.9029L8%2020.0133H9.4112L14.8725%2013.7952L19.2352%2020.0133H24M9.92053%205.04213H12.0885L22.0688%2019.0224H19.9003'%20fill='%23333333'/%3e%3c/g%3e%3cdefs%3e%3cclipPath%20id='clip0_2938_8200'%3e%3crect%20width='16'%20height='16.0134'%20fill='white'%20transform='translate(8%204)'/%3e%3c/clipPath%3e%3c/defs%3e%3c/svg%3e)


