

'%3e%3cpath%20d='M8%200C12.4183%200%2016%203.58172%2016%208C16%2012.4183%2012.4183%2016%208%2016C3.58172%2016%200%2012.4183%200%208C0%203.58172%203.58172%200%208%200ZM11.6162%204.38379C11.2257%203.99337%2010.5927%203.99338%2010.2021%204.38379L8%206.58594L5.79785%204.38379C5.40732%203.99334%204.77429%203.99329%204.38379%204.38379C3.99331%204.77429%203.99335%205.40733%204.38379%205.79785L6.58594%208L4.38379%2010.2021C3.99348%2010.5927%203.99341%2011.2257%204.38379%2011.6162C4.77426%2012.0066%205.40734%2012.0065%205.79785%2011.6162L8%209.41406L10.2021%2011.6162C10.5927%2012.0066%2011.2257%2012.0067%2011.6162%2011.6162C12.0067%2011.2257%2012.0066%2010.5927%2011.6162%2010.2021L9.41406%208L11.6162%205.79785C12.0066%205.40735%2012.0066%204.77429%2011.6162%204.38379Z'%20fill='%23080E17'%20fill-opacity='0.46'/%3e%3c/g%3e%3cdefs%3e%3cclipPath%20id='clip0_3761_713'%3e%3crect%20width='16'%20height='16'%20fill='white'/%3e%3c/clipPath%3e%3c/defs%3e%3c/svg%3e)



'%3e%3cpath%20fill-rule='evenodd'%20clip-rule='evenodd'%20d='M21.4999%2010.9993C21.4999%205.20009%2016.7986%200.498901%2010.9993%200.498901C5.19994%200.498901%200.498657%205.20009%200.498657%2010.9993C0.498657%2016.2404%204.33858%2020.5844%209.35855%2021.3722V14.0346H6.69238V10.9993H9.35855V8.68594C9.35855%206.05427%2010.9262%204.60062%2013.3248%204.60062C14.4736%204.60062%2015.6753%204.80571%2015.6753%204.80571V7.38979H14.3512C13.0468%207.38979%2012.64%208.19921%2012.64%209.0296V10.9993H15.5523L15.0867%2014.0346H12.64V21.3722C17.66%2020.5844%2021.4999%2016.2404%2021.4999%2010.9993Z'%20fill='%231568EA'/%3e%3c/g%3e%3c/svg%3e)


'%3e%3cpath%20d='M2.42045%2022.1876H6.31818V12.7217L0.75%208.54553V20.5171C0.75%2021.4414%201.49892%2022.1876%202.42045%2022.1876Z'%20fill='%234285F4'/%3e%3cpath%20d='M19.682%2022.1876H23.5797C24.5041%2022.1876%2025.2502%2021.4387%2025.2502%2020.5171V8.54553L19.682%2012.7217'%20fill='%2334A853'/%3e%3cpath%20d='M19.682%205.48293V12.7216L25.2502%208.54543V6.31816C25.2502%204.25236%2022.8921%203.07469%2021.2411%204.31361'%20fill='%23FBBC04'/%3e%3cpath%20d='M6.31824%2012.7217V5.48303L13.0001%2010.4944L19.6819%205.48303V12.7217L13.0001%2017.733'%20fill='%23EA4335'/%3e%3cpath%20d='M0.75%206.31816V8.54543L6.31818%2012.7216V5.48293L4.75909%204.31361C3.10534%203.07469%200.75%204.25236%200.75%206.31816Z'%20fill='%23C5221F'/%3e%3c/g%3e%3cdefs%3e%3cclipPath%20id='clip0_2954_7305'%3e%3crect%20width='24.5'%20height='18.375'%20fill='white'%20transform='translate(0.75%203.8125)'/%3e%3c/clipPath%3e%3c/defs%3e%3c/svg%3e)


For a simple paper bookmark, 2 × 6 inches is a practical starting size: that is 50.8 × 152.4 mm, or 5.08 × 15.24 cm. It is a common commercial format, not a universal requirement. Choose a longer bookmark when the book or design needs more room, and confirm the printer's dimensions before creating the artwork.
This guide covers physical bookmarks you print and cut, rather than navigation bookmarks inside a document. Use the size chart to choose a format, plan the trim and bleed, then build a reusable layout in WPS Writer and check it at actual size.
Bookmark Size Guide: Dimensions and a Printable Layout
Choose a bookmark size that fits your book
The right bookmark should be easy to find without being awkward to store. Measure the book's page height first. Decide whether the bookmark should sit fully inside the pages or extend beyond the top, and account for any tassel separately from the paper dimensions.
| Finished size | Millimeters | Centimeters | Pixels at 300 ppi | Possible use |
|---|---|---|---|---|
| 2 × 6 in | 50.8 × 152.4 mm | 5.08 × 15.24 cm | 600 × 1800 px | Compact reading bookmark or handout |
| 2 × 7 in | 50.8 × 177.8 mm | 5.08 × 17.78 cm | 600 × 2100 px | Extra room for a quotation or illustration |
| 2 × 8 in | 50.8 × 203.2 mm | 5.08 × 20.32 cm | 600 × 2400 px | Taller books or longer designs |
The chart gives design options and exact unit conversions; it does not mean every print supplier offers each size. Pixel values describe artwork at the finished size and exclude bleed. They are calculated as inches multiplied by 300.
Match the design to the available space
A narrow bookmark works best with a short quotation, a single illustration, or a small amount of useful information. If the content only fits after you make the text difficult to read, simplify it before increasing the bookmark size. Print a paper mock-up and place it inside the intended book.
For an event handout, check that the essential text remains readable at actual size. If you add a QR code, test it on the printed proof with the devices your audience is likely to use. A code that scans on a large screen may be too small or poorly printed on paper.
Understand pixels without changing the print dimensions
A 600 × 1800-pixel image produces a 2 × 6-inch design at 300 pixels per inch. Merely changing a resolution label cannot create missing image detail. Use sufficiently large source artwork and judge the printed proof, especially around fine lettering and line art.
For a concrete production example, the University of West Georgia print template specifies a 2 × 6-inch trim and a larger bleed boundary. Your own supplier's template takes precedence.
The following illustration compares design options; use the measurements in the table, not the illustration, as your cutting guide.
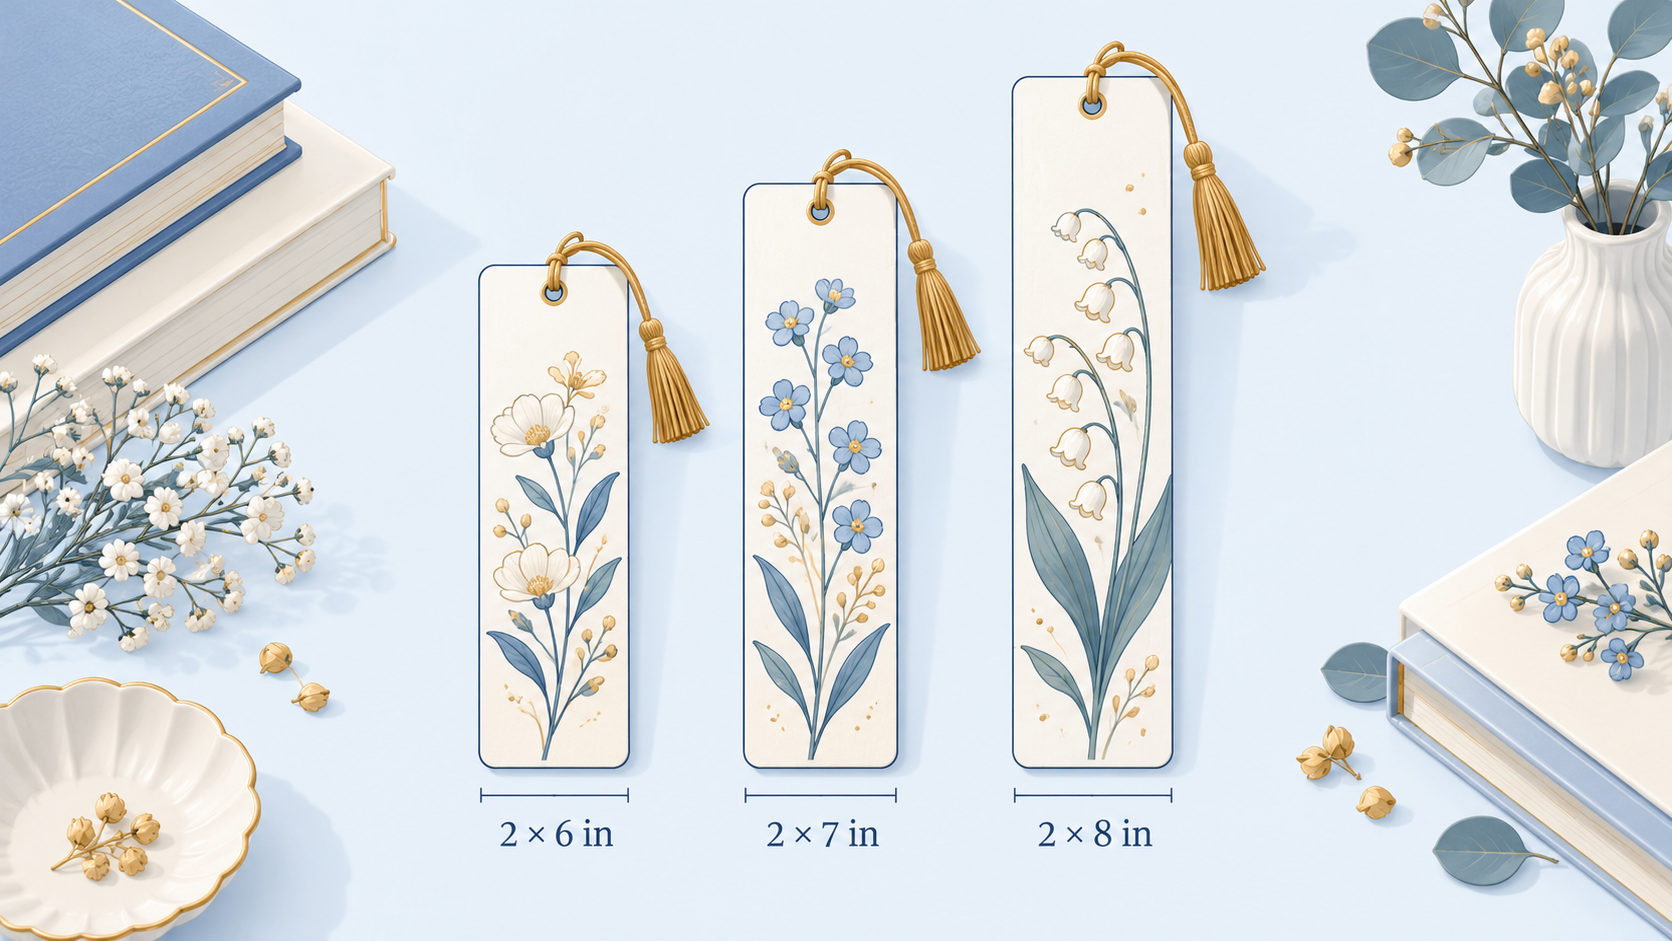
Three illustrated bookmark sizes for comparison


Set bookmark size, bleed, and print scale correctly
Three boundaries matter when artwork extends to the edge. The trim is the finished bookmark. The bleed extends background artwork beyond that edge so minor cutting variation does not expose an unwanted white strip. The safe area keeps important text and artwork away from the cut.
Calculate bleed separately from the finished size
If a printer requests 0.125 inch of bleed on every side, add 0.25 inch to each overall dimension. A finished 2 × 6-inch bookmark therefore needs a 2.25 × 6.25-inch artwork area. At 300 ppi, that is 675 × 1875 pixels. The final bookmark is still trimmed to 2 × 6 inches.
Do not automatically add these numbers to every job. Some suppliers request a different bleed or a particular file setup. If their template already includes bleed, do not add it again. Follow their safe-area, crop-mark, color, and file-format requirements as well.
Home printing: start with a white border
For a first home-printing project, a white-border design is easier to handle than full-bleed artwork. Place several bookmarks on a larger sheet, leave gaps for cutting, and keep the layout within the printer's printable area. A full-bleed commercial file and a sheet arranged for home printing serve different purposes.
Make one plain-paper proof. Use the same page size as the paper in the printer.
Print at 100% or Actual Size. Disable Fit or Shrink options when exact dimensions matter.
Measure the output. An intended 2-inch-wide bookmark should measure 2 inches on paper. Check both width and height.
Test double-sided alignment. Mark the top of the proof, print the reverse, and inspect orientation and registration before using final stock.
Cut a sample. Check whether the text is comfortable to read and whether the paper bends the book's pages.
Use paper that the printer supports; a heavier stock is not automatically compatible. For laminated bookmarks, allow room for the sealed edge and test the total thickness inside the book.
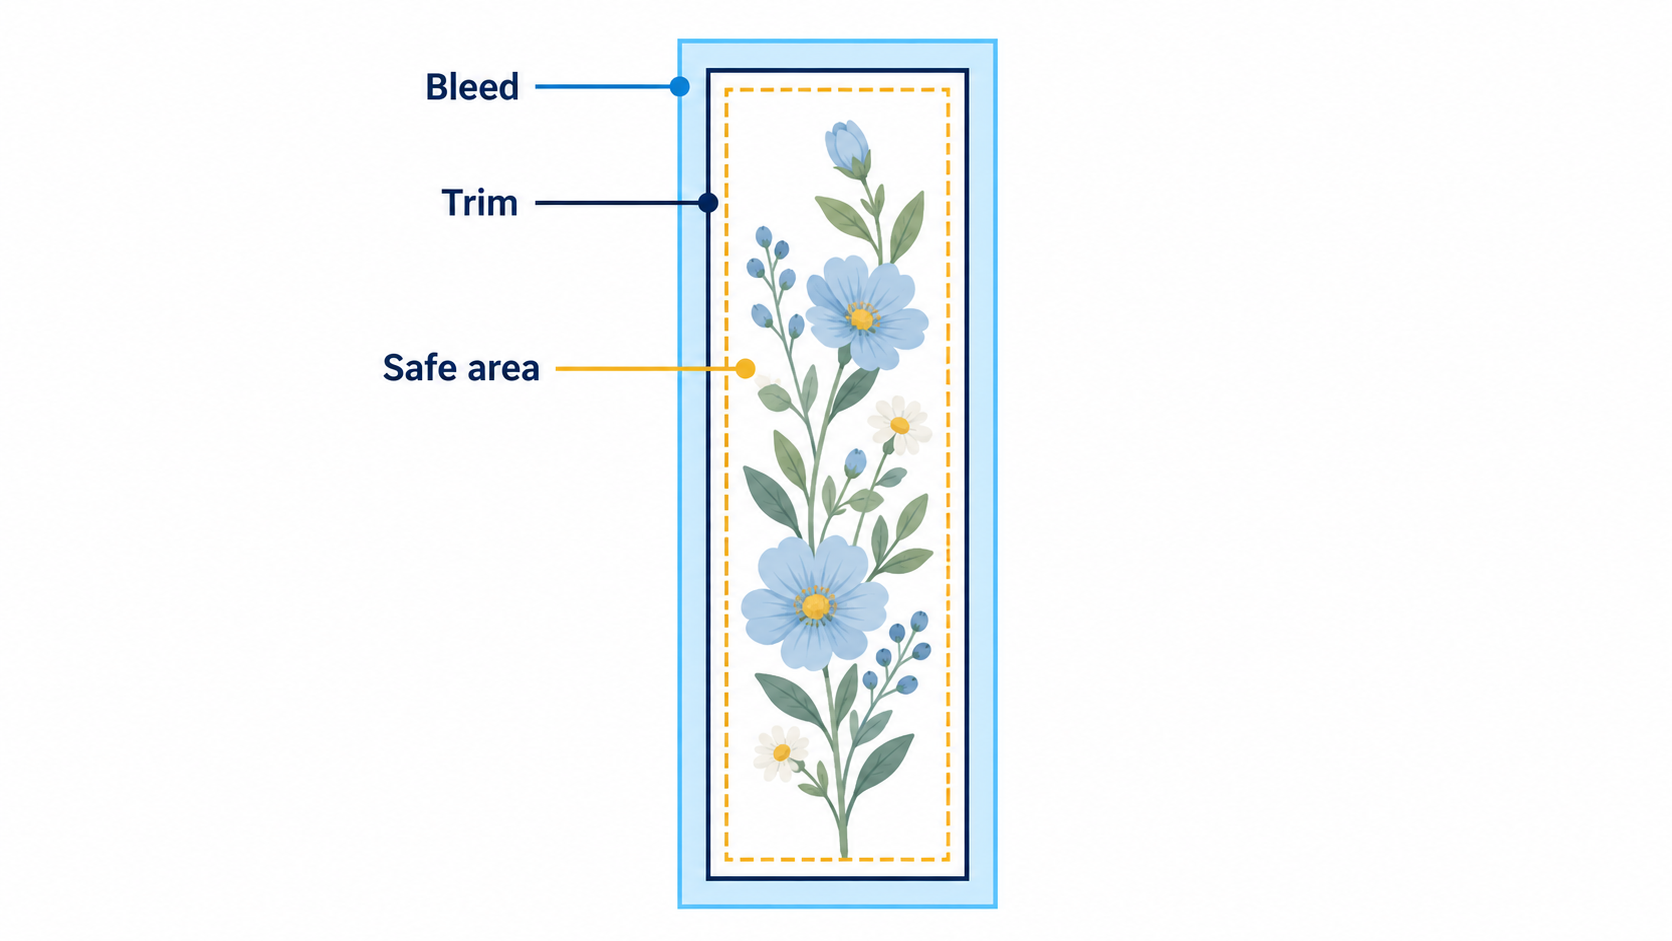
Bookmark bleed trim and safe area
Create your bookmark layout with WPS Writer
WPS Writer can help you build an editable page containing several bookmark designs and export a PDF for printing. Keep the DOCX as your reusable source. For a professional print order, confirm that the exported file meets the supplier's requirements before ordering a full run.
Build a reusable layout
Open a blank document. Set the page to the sheet you plan to print, such as A4 or Letter, and choose margins your printer can handle.
Insert a horizontal text box. In the desktop Writer interface, choose Insert > Text Box > Horizontal Text Box. Draw a box for the first bookmark. The existing WPS tutorial image below shows that insertion command; interface details can vary by version.
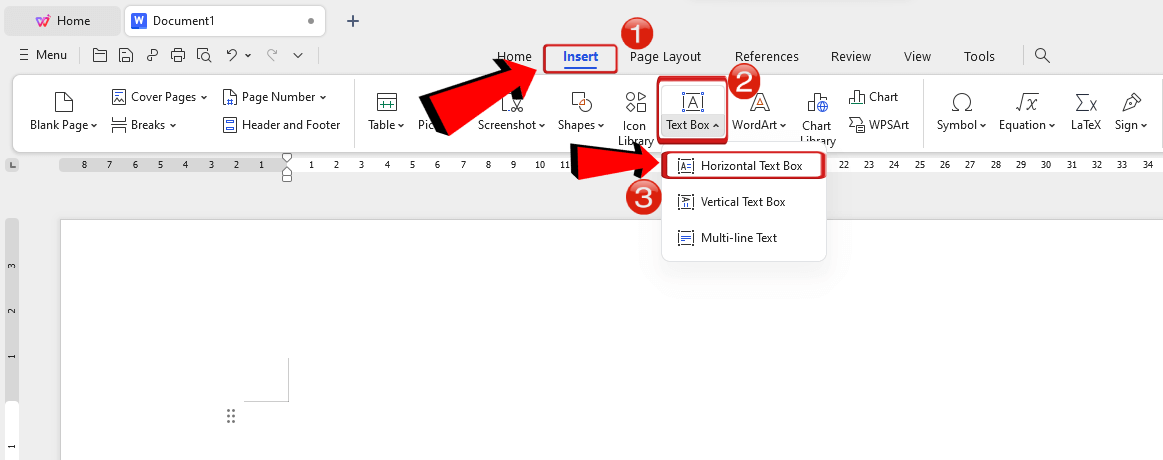
Insert horizontal text box in Writer
Set the intended dimensions. Select the text-box border and use the available size or object-format controls to enter the width and height numerically. For the compact layout, use 2 inches wide and 6 inches high. Check that resizing to fit text has not changed those dimensions.
Add the design. Keep important text comfortably inside the border, insert your artwork, and leave room for a tassel hole if needed. Avoid putting a name or logo where it will be punched.
Duplicate the finished box. Arrange copies with space between them for cutting. Three 2-inch-wide designs occupy 6 inches before you add gaps; check the usable sheet width before placing a fourth.
Save and export. Save the editable document, then use Menu > Export to PDF. Inspect the PDF and print one proof at actual size.
The WPS PDF export tutorial covers the basic export command. Export preserves a shareable layout, but the print dialog can still scale it, so keep the physical measurement check.
Fix common layout problems
Bookmark prints too small: check page scaling and whether the document page size matches the loaded paper.
Text moves after editing: recheck the text-box dimensions, internal spacing, and overflow.
Front and back do not align: test the duplex orientation and allow for the printer's registration variation.
Edges have white slivers: check bleed and trimming for commercial work; for home printing, use an intentional white border.
WPS Writer document editing product overview
FAQs
What is a common bookmark size?
A common paper bookmark is 2 × 6 inches, or 50.8 × 152.4 mm. It is a useful starting point, but the book, artwork, and print supplier determine the final choice.
What is a 2 × 6-inch bookmark in pixels?
At 300 ppi, the finished-size artwork is 600 × 1800 pixels. If the supplier requests 0.125-inch bleed on every side, the artwork becomes 675 × 1875 pixels at the same resolution.
Can I make a bookmark on A4 or Letter paper?
Yes. Arrange smaller bookmark designs on the larger sheet, leaving room for margins and cutting. Print a proof at actual size and measure it before making multiple copies.
Is bleed the same as a margin?
No. Bleed extends background artwork outside the finished cut. A safe margin keeps important content inside the cut. Follow the supplier's template for both.
Should I send a Word file or PDF to a printer?
Ask the printer. A PDF is commonly used to preserve layout, but suppliers may require specific bleed, fonts, color settings, or a particular PDF standard. Confirm those details before submitting.


'%3e%3cpath%20d='M19.9911%204.11386V6.471H18.5894C18.0775%206.471%2017.7322%206.57814%2017.5536%206.79243C17.3751%207.00671%2017.2858%207.32814%2017.2858%207.75671V9.44421H19.9019L19.5536%2012.0871H17.2858V18.8639H14.5536V12.0871H12.2769V9.44421H14.5536V7.49779C14.5536%206.39064%2014.8632%205.53201%2015.4822%204.92189C16.1013%204.31177%2016.9257%204.00671%2017.9554%204.00671C18.8304%204.00671%2019.509%204.04243%2019.9911%204.11386Z'%20fill='%23333333'/%3e%3c/g%3e%3cdefs%3e%3cclipPath%20id='clip0_2938_8199'%3e%3crect%20width='16'%20height='16'%20fill='white'%20transform='translate(8%204.00671)'/%3e%3c/clipPath%3e%3c/defs%3e%3c/svg%3e)
'%3e%3cpath%20d='M17.5237%2010.7813L23.4811%204H22.0699L16.8949%209.88693L12.7648%204H8L14.2469%2012.9029L8%2020.0133H9.4112L14.8725%2013.7952L19.2352%2020.0133H24M9.92053%205.04213H12.0885L22.0688%2019.0224H19.9003'%20fill='%23333333'/%3e%3c/g%3e%3cdefs%3e%3cclipPath%20id='clip0_2938_8200'%3e%3crect%20width='16'%20height='16.0134'%20fill='white'%20transform='translate(8%204)'/%3e%3c/clipPath%3e%3c/defs%3e%3c/svg%3e)


