

'%3e%3cpath%20d='M8%200C12.4183%200%2016%203.58172%2016%208C16%2012.4183%2012.4183%2016%208%2016C3.58172%2016%200%2012.4183%200%208C0%203.58172%203.58172%200%208%200ZM11.6162%204.38379C11.2257%203.99337%2010.5927%203.99338%2010.2021%204.38379L8%206.58594L5.79785%204.38379C5.40732%203.99334%204.77429%203.99329%204.38379%204.38379C3.99331%204.77429%203.99335%205.40733%204.38379%205.79785L6.58594%208L4.38379%2010.2021C3.99348%2010.5927%203.99341%2011.2257%204.38379%2011.6162C4.77426%2012.0066%205.40734%2012.0065%205.79785%2011.6162L8%209.41406L10.2021%2011.6162C10.5927%2012.0066%2011.2257%2012.0067%2011.6162%2011.6162C12.0067%2011.2257%2012.0066%2010.5927%2011.6162%2010.2021L9.41406%208L11.6162%205.79785C12.0066%205.40735%2012.0066%204.77429%2011.6162%204.38379Z'%20fill='%23080E17'%20fill-opacity='0.46'/%3e%3c/g%3e%3cdefs%3e%3cclipPath%20id='clip0_3761_713'%3e%3crect%20width='16'%20height='16'%20fill='white'/%3e%3c/clipPath%3e%3c/defs%3e%3c/svg%3e)



'%3e%3cpath%20fill-rule='evenodd'%20clip-rule='evenodd'%20d='M21.4999%2010.9993C21.4999%205.20009%2016.7986%200.498901%2010.9993%200.498901C5.19994%200.498901%200.498657%205.20009%200.498657%2010.9993C0.498657%2016.2404%204.33858%2020.5844%209.35855%2021.3722V14.0346H6.69238V10.9993H9.35855V8.68594C9.35855%206.05427%2010.9262%204.60062%2013.3248%204.60062C14.4736%204.60062%2015.6753%204.80571%2015.6753%204.80571V7.38979H14.3512C13.0468%207.38979%2012.64%208.19921%2012.64%209.0296V10.9993H15.5523L15.0867%2014.0346H12.64V21.3722C17.66%2020.5844%2021.4999%2016.2404%2021.4999%2010.9993Z'%20fill='%231568EA'/%3e%3c/g%3e%3c/svg%3e)


'%3e%3cpath%20d='M2.42045%2022.1876H6.31818V12.7217L0.75%208.54553V20.5171C0.75%2021.4414%201.49892%2022.1876%202.42045%2022.1876Z'%20fill='%234285F4'/%3e%3cpath%20d='M19.682%2022.1876H23.5797C24.5041%2022.1876%2025.2502%2021.4387%2025.2502%2020.5171V8.54553L19.682%2012.7217'%20fill='%2334A853'/%3e%3cpath%20d='M19.682%205.48293V12.7216L25.2502%208.54543V6.31816C25.2502%204.25236%2022.8921%203.07469%2021.2411%204.31361'%20fill='%23FBBC04'/%3e%3cpath%20d='M6.31824%2012.7217V5.48303L13.0001%2010.4944L19.6819%205.48303V12.7217L13.0001%2017.733'%20fill='%23EA4335'/%3e%3cpath%20d='M0.75%206.31816V8.54543L6.31818%2012.7216V5.48293L4.75909%204.31361C3.10534%203.07469%200.75%204.25236%200.75%206.31816Z'%20fill='%23C5221F'/%3e%3c/g%3e%3cdefs%3e%3cclipPath%20id='clip0_2954_7305'%3e%3crect%20width='24.5'%20height='18.375'%20fill='white'%20transform='translate(0.75%203.8125)'/%3e%3c/clipPath%3e%3c/defs%3e%3c/svg%3e)


If you need to share a talk without presenting live, learning how to record a PowerPoint presentation with audio is usually the fastest path. PowerPoint's desktop recorder can capture your narration (and optionally your camera), save timings per slide, and export an MP4 that viewers can open without PowerPoint.
This guide walks through the built-in Record Slide Show workflow, how to re-record a single slide, how to export with narrations intact, and how to fix the mic and silent-export issues people hit most often. You'll also see a realistic path inside WPS Presentation using the built-in Screen Recorder.
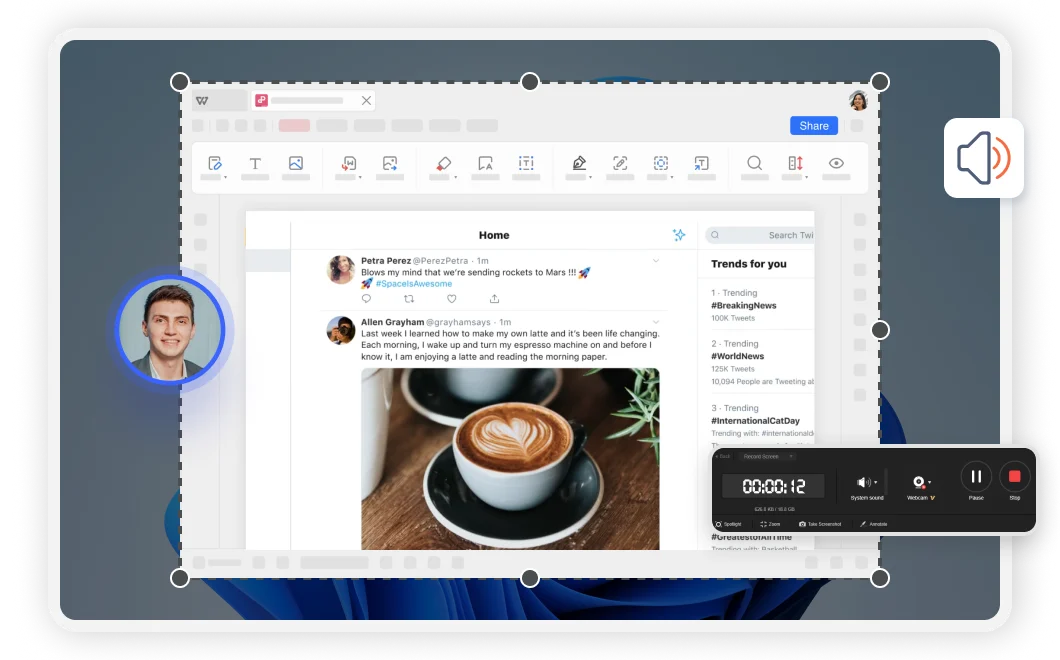
WPS screen recorder with webcam
What you need before you record a PowerPoint presentation with audio
PowerPoint desktop on Windows or Mac (Microsoft 365 or a recent desktop build). PowerPoint for the web does not support the full Recording Studio / Record Slide Show experience or video export the same way.
A working microphone (built-in or USB). Grant OS permission for PowerPoint to use the mic.
Optional: a webcam if you want yourself on the recording.
A quiet room and a short test take before you record the full deck.
Goal for most searchers: narrate the deck → fix bad slides without starting over → export a shareable video (or keep narrations inside the .pptx).
How to record a PowerPoint presentation with audio on desktop
Open your deck in the desktop app. If the file is only in the browser, open it in desktop PowerPoint first.
Go to Record. Open the Slide Show tab and choose Record Slide Show (or use the Record tab if your build shows it). Pick From Beginning or From Current Slide.
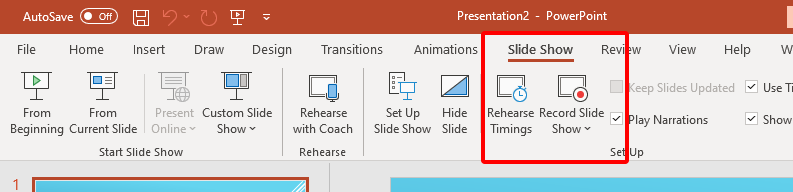
PowerPoint Record Slide Show button
Check mic (and camera). In the recording window, confirm the correct microphone is selected. Turn the camera on only if you need video of yourself; otherwise keep audio-only.
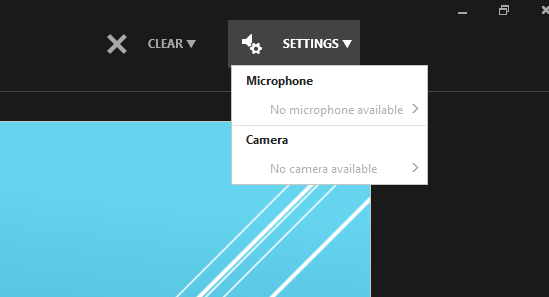
Microphone and camera record controls
Start recording. Click the red Record button, wait for the countdown, then speak naturally as you advance slides. Use pen or highlighter only if you want those ink actions in the playback.

Start PowerPoint narration recording button
Pause or stop as needed. Pause for breaks. Stop when the slide (or deck) is done. Preview the take before you move on.
Re-record only the slides that need it. Start recording from the current slide to replace narration on that slide without wiping the whole presentation. Clearing a recording on a slide removes that slide's previous narration (and ink) before the new take.
When you finish, speaker icons (or a webcam still) appear on recorded slides. Timings are stored with the presentation so Slide Show playback and video export can use them.


How to export after you record a PowerPoint presentation with audio
Recording embeds audio and timings in the presentation; it does not automatically create a separate video file. To share with people who do not have PowerPoint:
Go to File → Export → Create a Video (or use Export to Video from the Recording experience, depending on your build).

Export Create a Video menu
Choose quality (Full HD is a practical default for most LMS and email shares).
Set the second option to Use Recorded Timings and Narrations. If this is off, the video may advance on a default timer and sound may be missing.

Use recorded timings and narrations
Create the video (MP4 on modern builds; Mac may also offer MOV). Export can take several minutes for long decks—leave the app open until it finishes.
Upload the MP4 to your LMS, drive, or course platform. Students and teammates can watch without installing PowerPoint.
How to record a PowerPoint presentation with audio on Mac vs Windows
Windows: Record often appears on the Record tab; you can also start from Slide Show. If the Record tab is missing, enable it under File → Options → Customize Ribbon.
Mac: Use Slide Show → Record Slide Show (or the Record control in newer builds). Confirm microphone (and camera) permissions under System Settings → Privacy & Security.
UI labels shift slightly by Microsoft 365 version—if you do not see "Record Slide Show," look for Record on the ribbon or in Presenter-style recording view.
Fix common problems when you record a PowerPoint presentation with audio
Microphone not recording / "recording device is unavailable"
Confirm the mic works in OS sound settings and is not muted.
Allow PowerPoint access to the microphone (Windows: Settings → Privacy & security → Microphone; Mac: System Settings → Privacy & Security → Microphone).
Select the correct input device inside the recording window if more than one mic is connected.
Temporarily check whether security software is blocking mic access; restart PowerPoint after changing permissions.
Exported video has no sound
Confirm each slide shows a speaker icon (narration actually exists).
Re-export with Use Recorded Timings and Narrations selected.
Play the recording inside PowerPoint first; if Slide Show is silent, fix the mic take before exporting again.
You only need to fix one slide
Do not re-record the entire deck. Start from the current slide, replace that slide's narration, then export again if you already created a video.
How to record a PowerPoint presentation with audio in WPS Presentation
If you want narration and export without a separate third-party recorder, WPS Presentation includes a built-in Screen Recorder. The screenshots below are from the actual WPS interface.
Open your
.pptxin WPS Presentation.Go to the Tools tab and click Screen Recorder (orange camera icon on the ribbon).

WPS Tools Screen Recorder button
Choose a recording mode: Record Screen, Record window (best for locking onto the slide window), or Record Webcam.
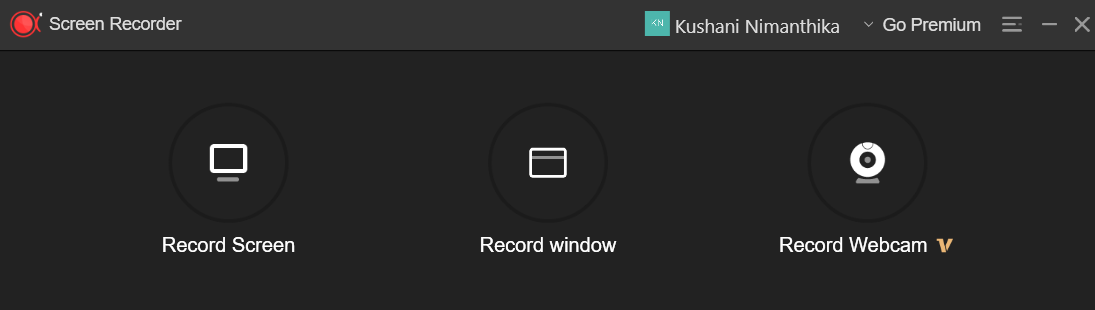
WPS screen recorder mode options
In the recorder panel, enable System sound / microphone as needed, optionally turn on webcam, then click the red REC button and narrate while advancing slides.
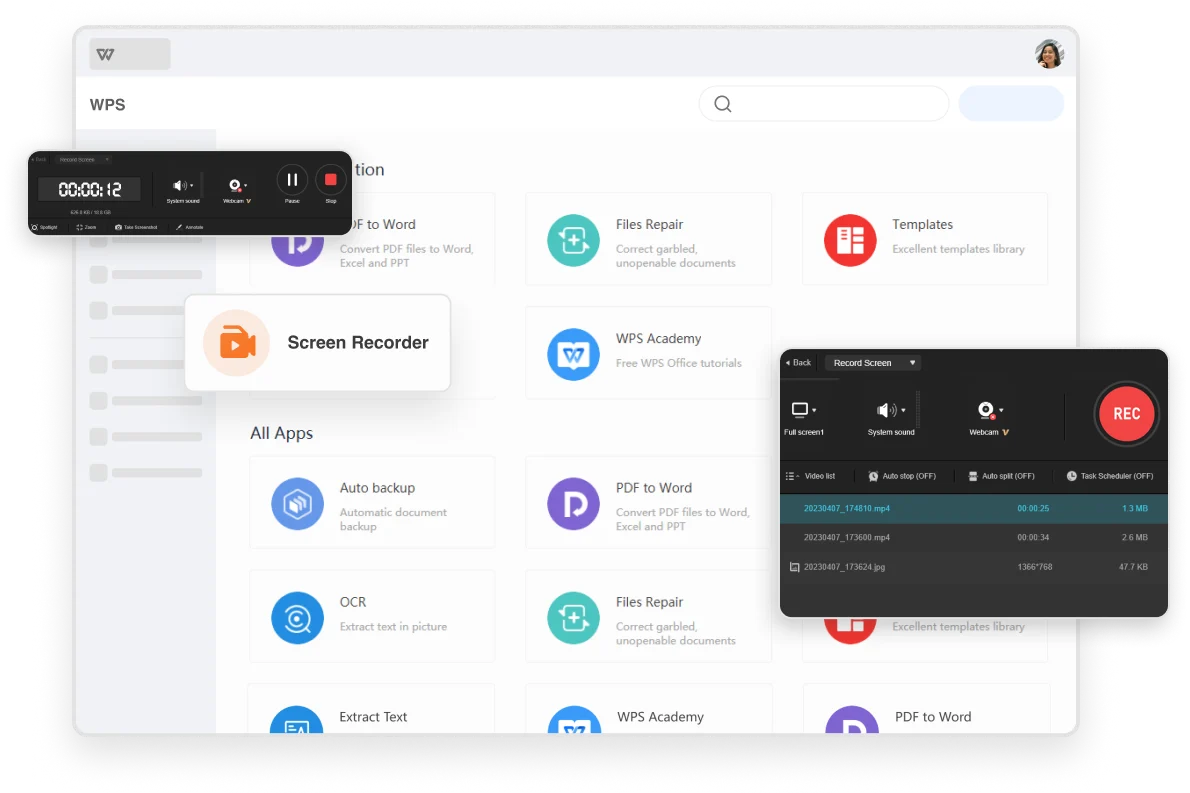
WPS recorder panel REC button
Click Stop when finished. Save the MP4 and share it to your LMS, drive, or course platform.
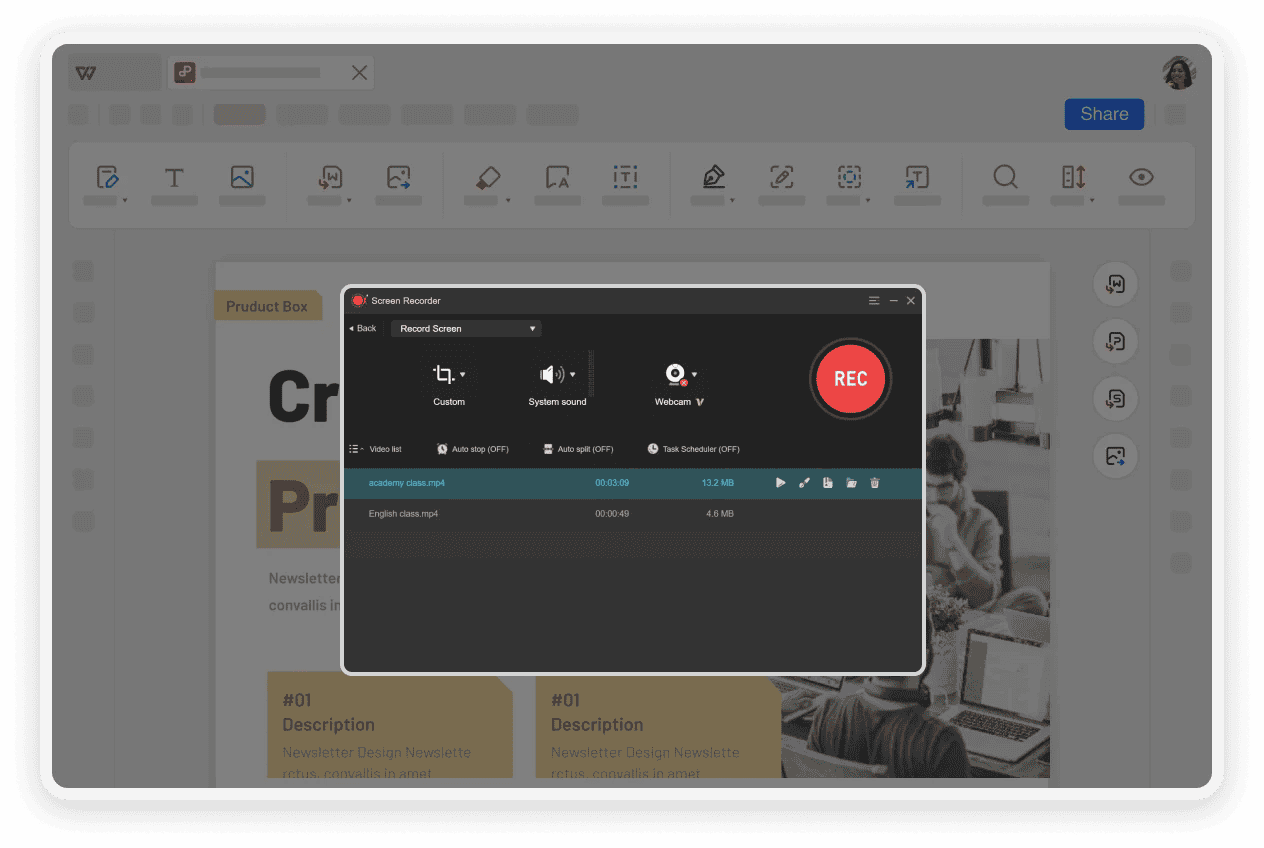
WPS recorder saved video list
This path is useful when you already use WPS Office, want a free-to-start suite workflow, or prefer staying inside one app instead of Loom/OBS for a simple narrated deck.
Tips that help when you record a PowerPoint presentation with audio
Do a 15–30 second test and listen back before the real take.
Pause briefly after slide transitions so audio is not clipped.
Script key points or use notes; avoid reading the slide text word for word.
Prefer a USB mic in echoey rooms when quality matters for a course or client deliverable.
FAQ about how to record a PowerPoint presentation with audio
Can I record a PowerPoint presentation with audio online?
Not with the full desktop recording and export workflow. Open the file in desktop PowerPoint (or WPS Presentation) to record narration and create a video.
Does recording include my webcam?
Yes, if you enable the camera in the recording window (PowerPoint) or turn on Webcam in WPS Screen Recorder. You can also record audio only by turning the camera off.
How do I share the recording without PowerPoint?
Export to MP4 with recorded timings and narrations (PowerPoint), or save the MP4 from WPS Screen Recorder, then share the video file or upload it to your LMS or drive.
Will re-recording one slide erase the whole presentation?
No. In PowerPoint, recording from the current slide replaces narration on that slide. Clear or re-record only the slides you need to fix.
Conclusion: how to record a PowerPoint presentation with audio
To record a PowerPoint presentation with audio: use the desktop Record / Record Slide Show tools, verify your mic, narrate slide by slide, re-take only what you need, then export with Use Recorded Timings and Narrations. Prefer staying in one office suite? Open the same deck in WPS Presentation, use Tools → Screen Recorder, hit REC, and export MP4 when you are ready to share.


'%3e%3cpath%20d='M19.9911%204.11386V6.471H18.5894C18.0775%206.471%2017.7322%206.57814%2017.5536%206.79243C17.3751%207.00671%2017.2858%207.32814%2017.2858%207.75671V9.44421H19.9019L19.5536%2012.0871H17.2858V18.8639H14.5536V12.0871H12.2769V9.44421H14.5536V7.49779C14.5536%206.39064%2014.8632%205.53201%2015.4822%204.92189C16.1013%204.31177%2016.9257%204.00671%2017.9554%204.00671C18.8304%204.00671%2019.509%204.04243%2019.9911%204.11386Z'%20fill='%23333333'/%3e%3c/g%3e%3cdefs%3e%3cclipPath%20id='clip0_2938_8199'%3e%3crect%20width='16'%20height='16'%20fill='white'%20transform='translate(8%204.00671)'/%3e%3c/clipPath%3e%3c/defs%3e%3c/svg%3e)
'%3e%3cpath%20d='M17.5237%2010.7813L23.4811%204H22.0699L16.8949%209.88693L12.7648%204H8L14.2469%2012.9029L8%2020.0133H9.4112L14.8725%2013.7952L19.2352%2020.0133H24M9.92053%205.04213H12.0885L22.0688%2019.0224H19.9003'%20fill='%23333333'/%3e%3c/g%3e%3cdefs%3e%3cclipPath%20id='clip0_2938_8200'%3e%3crect%20width='16'%20height='16.0134'%20fill='white'%20transform='translate(8%204)'/%3e%3c/clipPath%3e%3c/defs%3e%3c/svg%3e)


