

'%3e%3cpath%20d='M8%200C12.4183%200%2016%203.58172%2016%208C16%2012.4183%2012.4183%2016%208%2016C3.58172%2016%200%2012.4183%200%208C0%203.58172%203.58172%200%208%200ZM11.6162%204.38379C11.2257%203.99337%2010.5927%203.99338%2010.2021%204.38379L8%206.58594L5.79785%204.38379C5.40732%203.99334%204.77429%203.99329%204.38379%204.38379C3.99331%204.77429%203.99335%205.40733%204.38379%205.79785L6.58594%208L4.38379%2010.2021C3.99348%2010.5927%203.99341%2011.2257%204.38379%2011.6162C4.77426%2012.0066%205.40734%2012.0065%205.79785%2011.6162L8%209.41406L10.2021%2011.6162C10.5927%2012.0066%2011.2257%2012.0067%2011.6162%2011.6162C12.0067%2011.2257%2012.0066%2010.5927%2011.6162%2010.2021L9.41406%208L11.6162%205.79785C12.0066%205.40735%2012.0066%204.77429%2011.6162%204.38379Z'%20fill='%23080E17'%20fill-opacity='0.46'/%3e%3c/g%3e%3cdefs%3e%3cclipPath%20id='clip0_3761_713'%3e%3crect%20width='16'%20height='16'%20fill='white'/%3e%3c/clipPath%3e%3c/defs%3e%3c/svg%3e)



'%3e%3cpath%20fill-rule='evenodd'%20clip-rule='evenodd'%20d='M21.4999%2010.9993C21.4999%205.20009%2016.7986%200.498901%2010.9993%200.498901C5.19994%200.498901%200.498657%205.20009%200.498657%2010.9993C0.498657%2016.2404%204.33858%2020.5844%209.35855%2021.3722V14.0346H6.69238V10.9993H9.35855V8.68594C9.35855%206.05427%2010.9262%204.60062%2013.3248%204.60062C14.4736%204.60062%2015.6753%204.80571%2015.6753%204.80571V7.38979H14.3512C13.0468%207.38979%2012.64%208.19921%2012.64%209.0296V10.9993H15.5523L15.0867%2014.0346H12.64V21.3722C17.66%2020.5844%2021.4999%2016.2404%2021.4999%2010.9993Z'%20fill='%231568EA'/%3e%3c/g%3e%3c/svg%3e)


'%3e%3cpath%20d='M2.42045%2022.1876H6.31818V12.7217L0.75%208.54553V20.5171C0.75%2021.4414%201.49892%2022.1876%202.42045%2022.1876Z'%20fill='%234285F4'/%3e%3cpath%20d='M19.682%2022.1876H23.5797C24.5041%2022.1876%2025.2502%2021.4387%2025.2502%2020.5171V8.54553L19.682%2012.7217'%20fill='%2334A853'/%3e%3cpath%20d='M19.682%205.48293V12.7216L25.2502%208.54543V6.31816C25.2502%204.25236%2022.8921%203.07469%2021.2411%204.31361'%20fill='%23FBBC04'/%3e%3cpath%20d='M6.31824%2012.7217V5.48303L13.0001%2010.4944L19.6819%205.48303V12.7217L13.0001%2017.733'%20fill='%23EA4335'/%3e%3cpath%20d='M0.75%206.31816V8.54543L6.31818%2012.7216V5.48293L4.75909%204.31361C3.10534%203.07469%200.75%204.25236%200.75%206.31816Z'%20fill='%23C5221F'/%3e%3c/g%3e%3cdefs%3e%3cclipPath%20id='clip0_2954_7305'%3e%3crect%20width='24.5'%20height='18.375'%20fill='white'%20transform='translate(0.75%203.8125)'/%3e%3c/clipPath%3e%3c/defs%3e%3c/svg%3e)


To add a bottom border in Word, place the cursor in the paragraph (or select the table cell), open Home → Borders → Borders and Shading, choose the bottom line under Preview, and click OK. You can also use the quick Bottom Border icon on the Borders menu for a single-line rule under text.
Key Takeaways
Use Home → Borders → Bottom Border for a fast single line under a paragraph.
Open Borders and Shading to set weight, color, and style on the bottom edge only.
In tables, select cells and apply a bottom border to separate rows.
WPS Writer uses the same Borders controls on the Home tab.
When to Use a Bottom Border in Word
A bottom border separates content below a line—useful for signatures, section breaks, invoice totals, and table row dividers. It is different from a full box border or a top border on the next paragraph.
| Scenario | Best method |
|---|---|
| Underline a heading block | Paragraph bottom border |
| Separate table rows | Cell bottom border |
| Signature line above a name | Bottom border on empty paragraph |
| Horizontal rule between sections | Bottom border or Insert → Horizontal Line |
Add a Bottom Border to a Paragraph (Microsoft Word)
Quick method
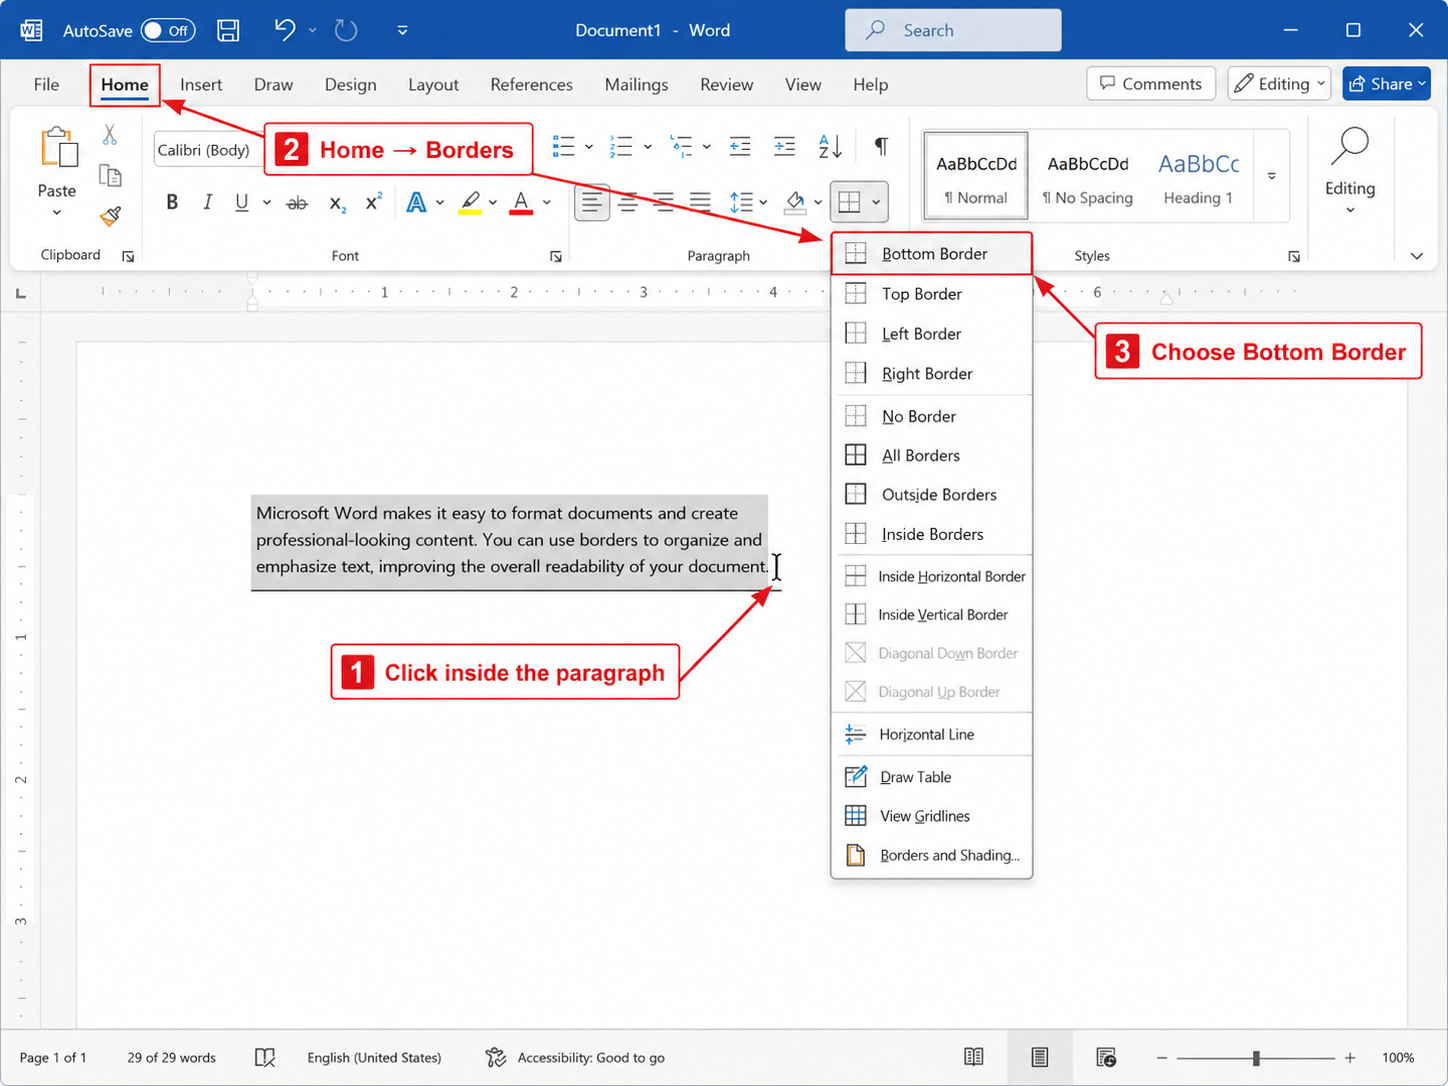
Click inside the paragraph (or select multiple paragraphs).
Go to Home → Paragraph group → Borders dropdown.
Choose Bottom Border.
Custom weight, color, and style
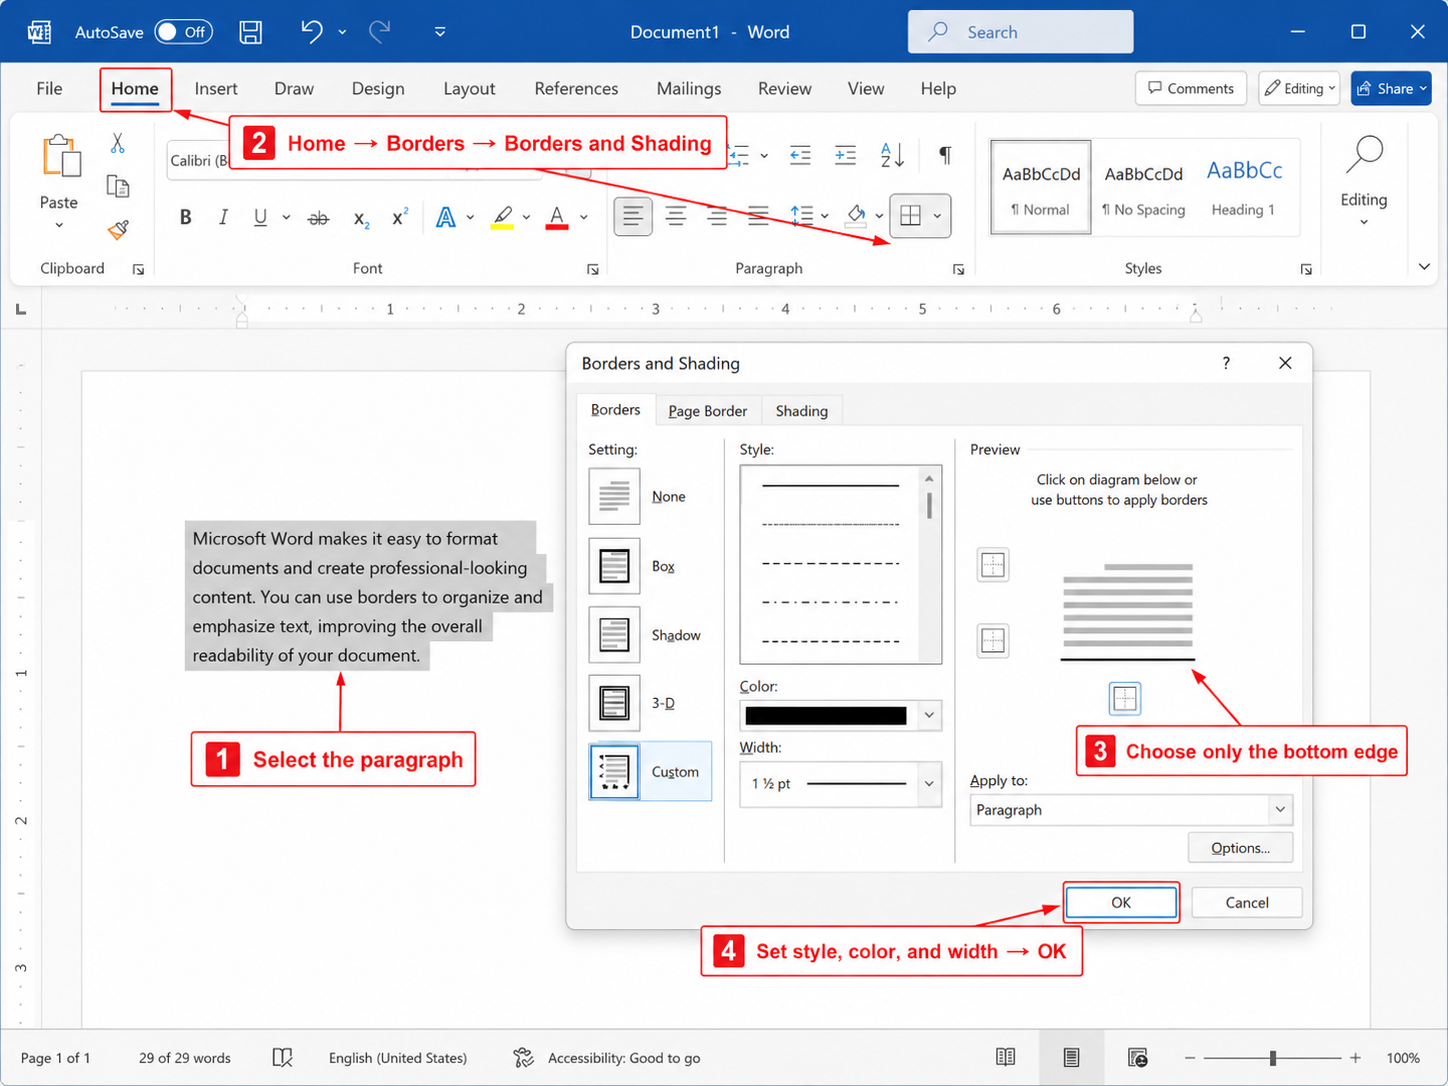
Select the paragraph.
Home → Borders → Borders and Shading.
Under Setting, click the diagram’s bottom edge (or choose a preset, then clear other sides).
Set Style, Color, and Width.
Confirm Apply to: Paragraph → OK.
Add a Bottom Border in WPS Writer
Select the paragraph in WPS Writer.
Open Home → Borders (same ribbon layout as Word).
Click Bottom Border for a default line, or Borders and Shading for custom options.
Pick line style and color, apply to the bottom edge only → OK.
WPS Writer saves as .docx, so bottom borders remain editable in Microsoft Word.
Bottom Border on Table Cells
Select the row or cells.
Table Design (or Table Tools) → Borders.
Choose Bottom Border, or open Borders and Shading and style only the bottom edge.
For a full grid, use All Borders first, then remove top/left/right on specific cells if you need only bottom lines.
Remove or Change a Bottom Border
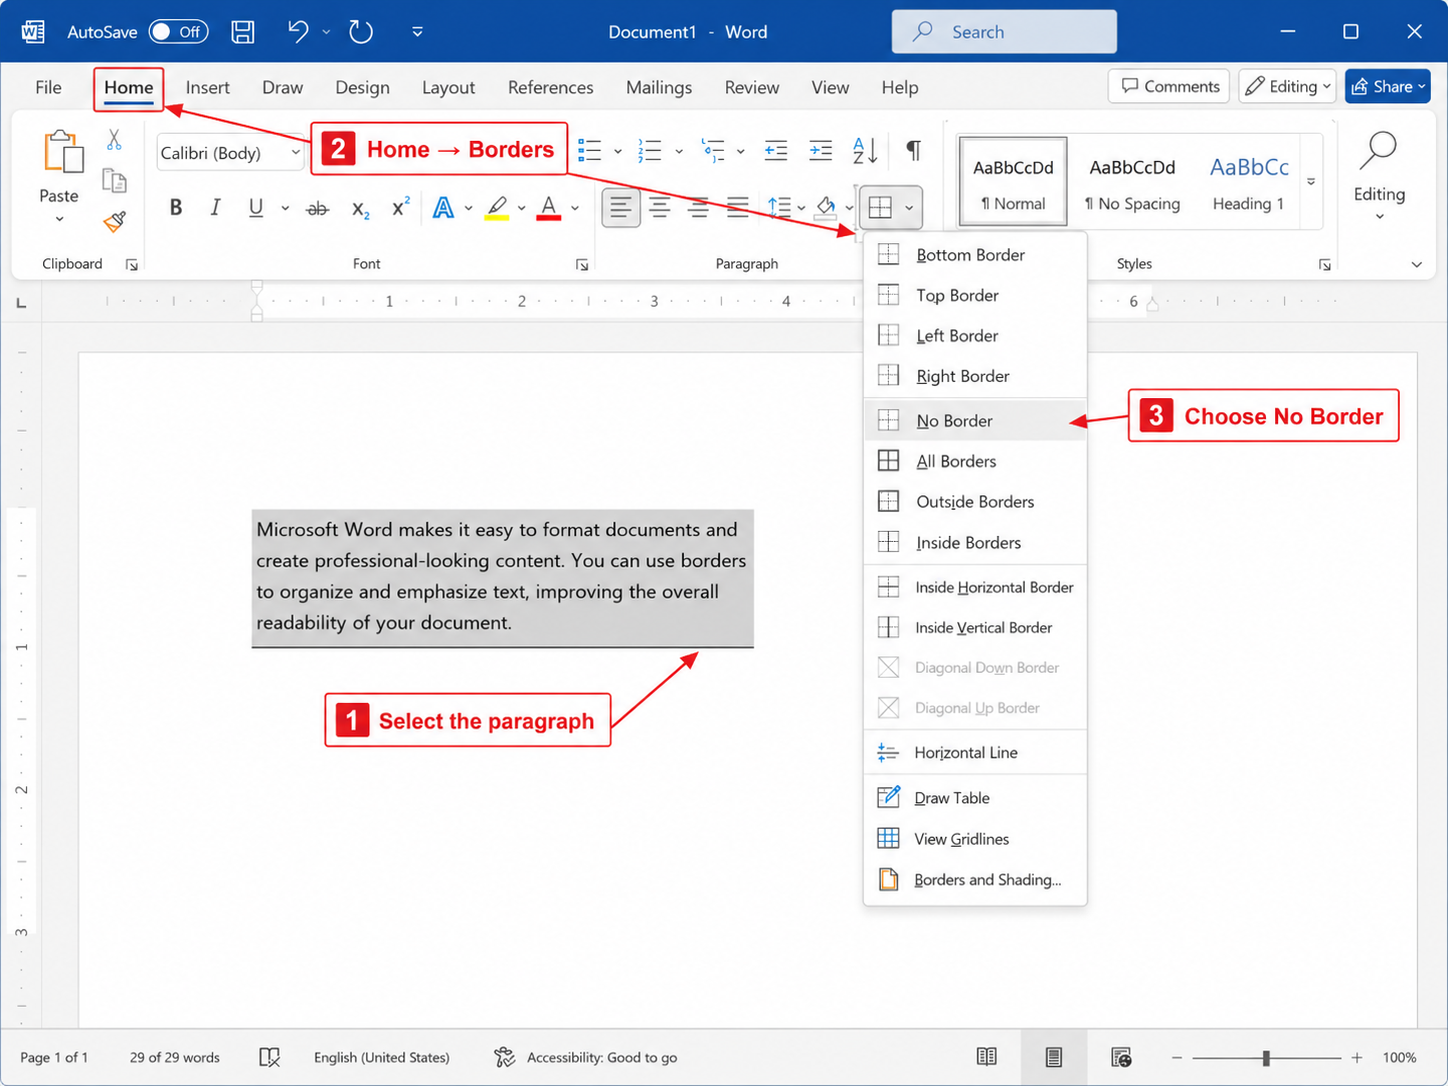
Select the paragraph → Home → Borders → No Border to clear all borders, or reopen Borders and Shading and click the bottom edge again to toggle it off. If a line persists, check for border-bottom on a style (Home → Styles → Modify).


Format Borders with WPS Office
WPS Office includes Writer with Word-compatible border and picture formatting—ideal when you need a free .docx editor on Windows, Mac, or mobile. Borders you apply in WPS open correctly in Microsoft Word.
Need a line above text instead? See how to add a top border in Word. For images, use our picture border guide.
FAQs
How do I add only a bottom border in Word?
Select the paragraph → Home → Borders → Borders and Shading → click only the bottom edge in Preview → OK.
Why is my bottom border missing after paste?
Pasted text may use plain formatting. Reapply Borders and Shading, or use Paste Special → Keep Source Formatting.
Can I add a bottom border to one line in a table?
Yes—select that cell or row and apply Bottom Border from Table Design or Borders and Shading.
Bottom border vs. underline?
Underline follows text; a bottom border spans the full paragraph width (or cell width in tables).
Summary
How to add a bottom border in Word: use Home → Borders → Bottom Border for a quick rule, or Borders and Shading to control style, color, and width on the bottom edge only. The same steps work in WPS Writer for .docx files.

'%3e%3cpath%20d='M19.9911%204.11386V6.471H18.5894C18.0775%206.471%2017.7322%206.57814%2017.5536%206.79243C17.3751%207.00671%2017.2858%207.32814%2017.2858%207.75671V9.44421H19.9019L19.5536%2012.0871H17.2858V18.8639H14.5536V12.0871H12.2769V9.44421H14.5536V7.49779C14.5536%206.39064%2014.8632%205.53201%2015.4822%204.92189C16.1013%204.31177%2016.9257%204.00671%2017.9554%204.00671C18.8304%204.00671%2019.509%204.04243%2019.9911%204.11386Z'%20fill='%23333333'/%3e%3c/g%3e%3cdefs%3e%3cclipPath%20id='clip0_2938_8199'%3e%3crect%20width='16'%20height='16'%20fill='white'%20transform='translate(8%204.00671)'/%3e%3c/clipPath%3e%3c/defs%3e%3c/svg%3e)
'%3e%3cpath%20d='M17.5237%2010.7813L23.4811%204H22.0699L16.8949%209.88693L12.7648%204H8L14.2469%2012.9029L8%2020.0133H9.4112L14.8725%2013.7952L19.2352%2020.0133H24M9.92053%205.04213H12.0885L22.0688%2019.0224H19.9003'%20fill='%23333333'/%3e%3c/g%3e%3cdefs%3e%3cclipPath%20id='clip0_2938_8200'%3e%3crect%20width='16'%20height='16.0134'%20fill='white'%20transform='translate(8%204)'/%3e%3c/clipPath%3e%3c/defs%3e%3c/svg%3e)


