
'%3e%3cpath%20d='M8%200C12.4183%200%2016%203.58172%2016%208C16%2012.4183%2012.4183%2016%208%2016C3.58172%2016%200%2012.4183%200%208C0%203.58172%203.58172%200%208%200ZM11.6162%204.38379C11.2257%203.99337%2010.5927%203.99338%2010.2021%204.38379L8%206.58594L5.79785%204.38379C5.40732%203.99334%204.77429%203.99329%204.38379%204.38379C3.99331%204.77429%203.99335%205.40733%204.38379%205.79785L6.58594%208L4.38379%2010.2021C3.99348%2010.5927%203.99341%2011.2257%204.38379%2011.6162C4.77426%2012.0066%205.40734%2012.0065%205.79785%2011.6162L8%209.41406L10.2021%2011.6162C10.5927%2012.0066%2011.2257%2012.0067%2011.6162%2011.6162C12.0067%2011.2257%2012.0066%2010.5927%2011.6162%2010.2021L9.41406%208L11.6162%205.79785C12.0066%205.40735%2012.0066%204.77429%2011.6162%204.38379Z'%20fill='%23080E17'%20fill-opacity='0.46'/%3e%3c/g%3e%3cdefs%3e%3cclipPath%20id='clip0_3761_713'%3e%3crect%20width='16'%20height='16'%20fill='white'/%3e%3c/clipPath%3e%3c/defs%3e%3c/svg%3e)


'%3e%3cpath%20fill-rule='evenodd'%20clip-rule='evenodd'%20d='M21.4999%2010.9993C21.4999%205.20009%2016.7986%200.498901%2010.9993%200.498901C5.19994%200.498901%200.498657%205.20009%200.498657%2010.9993C0.498657%2016.2404%204.33858%2020.5844%209.35855%2021.3722V14.0346H6.69238V10.9993H9.35855V8.68594C9.35855%206.05427%2010.9262%204.60062%2013.3248%204.60062C14.4736%204.60062%2015.6753%204.80571%2015.6753%204.80571V7.38979H14.3512C13.0468%207.38979%2012.64%208.19921%2012.64%209.0296V10.9993H15.5523L15.0867%2014.0346H12.64V21.3722C17.66%2020.5844%2021.4999%2016.2404%2021.4999%2010.9993Z'%20fill='%231568EA'/%3e%3c/g%3e%3c/svg%3e)


Video content dominates the internet today, outperforming static images in engagement and reach. It can be for social media, portfolios, or marketing, motion adds life and story to your visuals. With the rise of artificial intelligence, turning photos into videos is no longer a task for professional editors. You can now animate still photos, add realistic motion, and create cinematic effects using free AI tools that handle everything automatically. In this guide, I’ll take you through the best photo to video AI free tools that require no editing experience but still deliver quality results.

Introduction to Image to Video
Artificial intelligence has completely redefined how we create visual content. A few years ago, making a short video from a single photo required hours of editing, multiple layers, and expensive software. Now, AI-based tools do all of that in minutes. They automatically detect subjects, create motion paths, adjust lighting, and even add transitions or background effects. For anyone creating content for TikTok, YouTube Shorts, or brand campaigns, photo-to-video AI tools offer an effortless way to stand out.

Here’s what makes image-to-video AI tools so valuable:
Save Time: You can go from image to finished video in minutes.
No Technical Barriers: There’s no need to understand editing software.
Budget-Friendly: Most AI tools offer free plans with powerful features.
AI-Driven Creativity: Smart algorithms add realistic movement, depth, and cinematic flair to your images.
These tools are about creativity without limits. With them, you can create dynamic slideshows, animated memories, or engaging marketing clips even if you’ve never used a video editor before. The best part is that many of these options are free to use and available online.
Top 5 Best Photo to Video AI Tools
Before getting into the tools, let’s set the stage. Each of the following AI tools was selected based on usability, quality, and accessibility. You can use them to create short social media clips, digital ads, or personal montages. These platforms can help you create beautiful videos from still images, all without paying for complex editing software. Here are some of the best photo to video AI free tools.
Clideo
Clideo is a browser‑based tool designed to help you quickly turn photos into videos with minimal effort. You can upload a variety of image and audio formats, arrange the order, set the duration for each slide, add background music or choose from your own files, apply simple transitions like crossfades, and export the finished video all from within your browser. The interface is simple and intuitive, making it suitable for beginners or anyone who wants fast results without learning complex editing software.

Now that you know Clideo’s key features and benefits, here’s a simple step-by-step guide to creating your first photo video.
Step 1: Open the Clideo Photo to Video AI tool in your browser and click on “Get started”.

Step 2: Upload one or more photos by dragging them into the upload area.

Step 3: Edit the video, like adding background music, using the Toolbar on the left hand side.

Step 4: In order to save the final edited version to your device, click the blue “Export” button.

2. Kapwing
Kapwing is a browser‑based video creation platform that brings together editing, collaboration and AI‑powered features for content creators. You can upload videos, images or GIFs, trim and arrange them on a simple timeline, add titles, captions or animated text overlays, and take advantage of smart tools like automatic subtitling and one‑click translation to reach a wider audience. The platform is tailored to teams too, with real‑time collaboration, shared workspaces and version control helping multiple users edit the same project seamlessly.

Understanding these features provides a clear foundation for following the step-by-step process to create a video with Kapwing.
Step 1: Open the Kapwing image-to-video tool and click on “Add an Image”.

Step 2:Upload your photo or multiple images to the media panel.

Step 3: Add text, animate elements, and place audio on the track, using the toolbar on the left-hand side.

Step 4: To save your finished work, simply click on the blue “Export Project” button.

3. Canva
Canva is a versatile online platform that combines graphic design and video editing in a single, browser-based workspace. Its drag-and-drop interface makes it easy for beginners and professionals alike to create polished videos by uploading clips, images, and audio, or selecting from Canva’s extensive library of stock media. Users can add text, animated graphics, transitions, and effects, while advanced tools like background removal and multi-track audio enable more detailed edits.

With these capabilities in mind, the following steps outline how to create a video using Canva efficiently.
Step 1: Open Canva’s Photo to Video tool and click on “Convert photo to video”.

Step 2: Once the page loads up, upload your photo by going to “Uploads” on the tool-bar and then clicking on “Upload Files”.

Step 3: You can make changes preset to the photo such as elements, or editing design.

Step 4: Export the video by clicking on the “Share” button on the top right of your screen.

4. Veed
Veed is an online, browser‑based video editor designed for both beginners and teams, enabling uploads of clips, images or screens, and offering a drag‑and‑drop interface for trimming, cropping, adding subtitles, animations, and exporting in social‑friendly formats. Its standout features include AI‑powered tools like auto‑subtitling, voice cloning, background removal, and text‑to‑video generation, allowing creators to go from concept to polished product quickly.

Knowing what VEED.io offers makes it easier to navigate the step-by-step workflow for creating and editing videos efficiently.
Step 1: Launch Veed’s photo-to-video editor and click on “Upload Image”.

Step 2: Once the tab refreshes, upload your picture to convert to video by clicking on “Upload”.

Step 3: Add text overlays and audio using the toolbar on the left-hand side if needed.

Step 4: Once you are finished editing, export the video by clicking on “Done”.

5. Adobe
Adobe offers a browser‑based creative platform designed to bring high‑impact videos, images and social content within reach of both beginners and experienced creators. It enables users to select from thousands of professionally designed templates or start from scratch, then upload video clips, images and audio to edit via a simple drag‑and‑drop interface. The tool also supports one‑click resizing for different social platforms, animated effects for images and text, access to a vast library of royalty‑free assets, and seamless integration with Adobe Firefly generative AI to create custom backgrounds, text effects and more,

With Adobe Express’s tools and resources in mind, the following steps show the process of crafting videos efficiently and creatively.
Step 1: Open Adobe’s image to video tool and click on “Upload your video”.

Step 2: Upload your image by clicking on “Upload from device”.

Step 3: Make changes to the video using the toolbar on the left-hand side, if needed .

Step 4: Export the high quality video and save it by clicking on “Download”.

Quick Comparison Table
When it comes to turning photos into videos, the right tool can make all the difference, whether you’re creating quick social media clips, polished promotional content, or standout visuals. To help you navigate the options, I’ve compared the photo to video AI free online tools based on their free features, best use cases, and overall value, giving you a clear summary of which platform fits your creative needs.
| Tool | Free Tier | Best For | My Verdict |
|---|---|---|---|
| Clideo | Basic tools, watermark | Simple photo-to-video | Great for fast clips, but watermark in the free version. |
| Kapwing | Full editor, watermark, limited exports | Custom motion & layout | More control, steeper learning curve, worth it for posts. |
| Canva | Many templates, very beginner-friendly | Social Media content | Super easy, great for quick visuals, limited motion. |
| Veed | Basic export, watermark | Product or short promo | Quick and polished, but free tier has branding. |
| Adobe Express | High-end templates, limited free features | Premium clips | Top quality, best when you need standout visuals. |
Looking at the comparison, it’s clear that all five tools can turn a photo into a short, engaging video, but each one serves a slightly different purpose. Choosing the right photo to video AI free tool really depends on how much time you want to spend versus how refined you want the result to look.
The Pro Step, Perfect Your Photos Before Creating Your Video
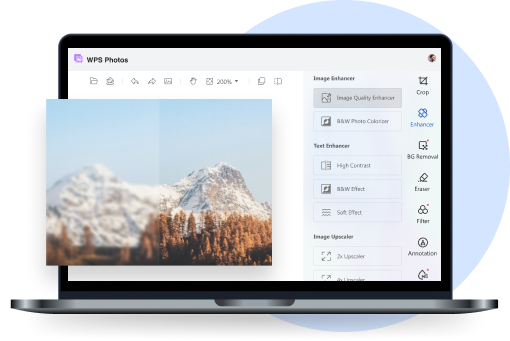
Once your photos are ready to be turned into a video, the next step is ensuring they look ready and consistent especially if the lighting or colors vary across images. Tools like WPS Photo make this process quick and easy, offering in-app options such as exposure correction, edge sharpening, and tone adjustment without needing extra software. Batch enhancement ensures multiple images maintain a uniform look, while the AI Enhancer automatically balances light and detail which is perfect for preparing visuals that will flow seamlessly in your final video.

Step 1: Right-click on the merged photo you want to edit, then click on “Edit Photo” to open it in WPS Photo Editor.

Step 2: Make whatever changes you like, such as using the Image Enhancer and adjusting colors for a refined look.

Step 3: Click on “Export”, then select “Print” to save your changes and print your edited photo.

FAQs
Q1: What's the difference between a GIF and an AI-generated video?
A GIF loops short frames, while AI-generated videos create realistic motion and cinematic effects for a lifelike result.
Q2: How long are AI-generated videos from photos?
Most are between 3 to 10 seconds, making them ideal for TikTok, Instagram Reels, and YouTube Shorts.
Q3: Do I need editing skills to use these AI tools?
No, all tools mentioned here are designed for users with no video editing background.
Q4: Are these tools really free?
Yes, they all offer free versions, though some include watermarks or limit premium features.
Q5: Which tool works best for social media content?
Kapwing and Canva are excellent for social media because they support aspect ratios for all major platforms.

'%3e%3cpath%20d='M19.9911%204.11386V6.471H18.5894C18.0775%206.471%2017.7322%206.57814%2017.5536%206.79243C17.3751%207.00671%2017.2858%207.32814%2017.2858%207.75671V9.44421H19.9019L19.5536%2012.0871H17.2858V18.8639H14.5536V12.0871H12.2769V9.44421H14.5536V7.49779C14.5536%206.39064%2014.8632%205.53201%2015.4822%204.92189C16.1013%204.31177%2016.9257%204.00671%2017.9554%204.00671C18.8304%204.00671%2019.509%204.04243%2019.9911%204.11386Z'%20fill='%23333333'/%3e%3c/g%3e%3cdefs%3e%3cclipPath%20id='clip0_2938_8199'%3e%3crect%20width='16'%20height='16'%20fill='white'%20transform='translate(8%204.00671)'/%3e%3c/clipPath%3e%3c/defs%3e%3c/svg%3e)
'%3e%3cpath%20d='M17.5237%2010.7813L23.4811%204H22.0699L16.8949%209.88693L12.7648%204H8L14.2469%2012.9029L8%2020.0133H9.4112L14.8725%2013.7952L19.2352%2020.0133H24M9.92053%205.04213H12.0885L22.0688%2019.0224H19.9003'%20fill='%23333333'/%3e%3c/g%3e%3cdefs%3e%3cclipPath%20id='clip0_2938_8200'%3e%3crect%20width='16'%20height='16.0134'%20fill='white'%20transform='translate(8%204)'/%3e%3c/clipPath%3e%3c/defs%3e%3c/svg%3e)


