

'%3e%3cpath%20d='M8%200C12.4183%200%2016%203.58172%2016%208C16%2012.4183%2012.4183%2016%208%2016C3.58172%2016%200%2012.4183%200%208C0%203.58172%203.58172%200%208%200ZM11.6162%204.38379C11.2257%203.99337%2010.5927%203.99338%2010.2021%204.38379L8%206.58594L5.79785%204.38379C5.40732%203.99334%204.77429%203.99329%204.38379%204.38379C3.99331%204.77429%203.99335%205.40733%204.38379%205.79785L6.58594%208L4.38379%2010.2021C3.99348%2010.5927%203.99341%2011.2257%204.38379%2011.6162C4.77426%2012.0066%205.40734%2012.0065%205.79785%2011.6162L8%209.41406L10.2021%2011.6162C10.5927%2012.0066%2011.2257%2012.0067%2011.6162%2011.6162C12.0067%2011.2257%2012.0066%2010.5927%2011.6162%2010.2021L9.41406%208L11.6162%205.79785C12.0066%205.40735%2012.0066%204.77429%2011.6162%204.38379Z'%20fill='%23080E17'%20fill-opacity='0.46'/%3e%3c/g%3e%3cdefs%3e%3cclipPath%20id='clip0_3761_713'%3e%3crect%20width='16'%20height='16'%20fill='white'/%3e%3c/clipPath%3e%3c/defs%3e%3c/svg%3e)



'%3e%3cpath%20fill-rule='evenodd'%20clip-rule='evenodd'%20d='M21.4999%2010.9993C21.4999%205.20009%2016.7986%200.498901%2010.9993%200.498901C5.19994%200.498901%200.498657%205.20009%200.498657%2010.9993C0.498657%2016.2404%204.33858%2020.5844%209.35855%2021.3722V14.0346H6.69238V10.9993H9.35855V8.68594C9.35855%206.05427%2010.9262%204.60062%2013.3248%204.60062C14.4736%204.60062%2015.6753%204.80571%2015.6753%204.80571V7.38979H14.3512C13.0468%207.38979%2012.64%208.19921%2012.64%209.0296V10.9993H15.5523L15.0867%2014.0346H12.64V21.3722C17.66%2020.5844%2021.4999%2016.2404%2021.4999%2010.9993Z'%20fill='%231568EA'/%3e%3c/g%3e%3c/svg%3e)


'%3e%3cpath%20d='M2.42045%2022.1876H6.31818V12.7217L0.75%208.54553V20.5171C0.75%2021.4414%201.49892%2022.1876%202.42045%2022.1876Z'%20fill='%234285F4'/%3e%3cpath%20d='M19.682%2022.1876H23.5797C24.5041%2022.1876%2025.2502%2021.4387%2025.2502%2020.5171V8.54553L19.682%2012.7217'%20fill='%2334A853'/%3e%3cpath%20d='M19.682%205.48293V12.7216L25.2502%208.54543V6.31816C25.2502%204.25236%2022.8921%203.07469%2021.2411%204.31361'%20fill='%23FBBC04'/%3e%3cpath%20d='M6.31824%2012.7217V5.48303L13.0001%2010.4944L19.6819%205.48303V12.7217L13.0001%2017.733'%20fill='%23EA4335'/%3e%3cpath%20d='M0.75%206.31816V8.54543L6.31818%2012.7216V5.48293L4.75909%204.31361C3.10534%203.07469%200.75%204.25236%200.75%206.31816Z'%20fill='%23C5221F'/%3e%3c/g%3e%3cdefs%3e%3cclipPath%20id='clip0_2954_7305'%3e%3crect%20width='24.5'%20height='18.375'%20fill='white'%20transform='translate(0.75%203.8125)'/%3e%3c/clipPath%3e%3c/defs%3e%3c/svg%3e)


Quick answer: Here is how to create automatic table of contents in word: format the section titles you want to include with Word’s built-in Heading 1, Heading 2, and Heading 3 styles. Then place the cursor where the table should appear and select References > Table of Contents > Automatic Table.
Select a main section title.
Go to Home > Styles.
Apply Heading 1, Heading 2, or Heading 3.
Repeat this for all titles you want in the table.
Place the cursor where the table of contents should appear.
Select References > Table of Contents and choose an automatic style.
Place the cursor → References → Table of Contents → Choose an automatic style
Important: After adding, deleting, renaming, or moving headings, click inside the table and choose References > Update Table > Update entire table. An automatic TOC can be rebuilt from your headings, but it does not continuously refresh every time you edit the document.

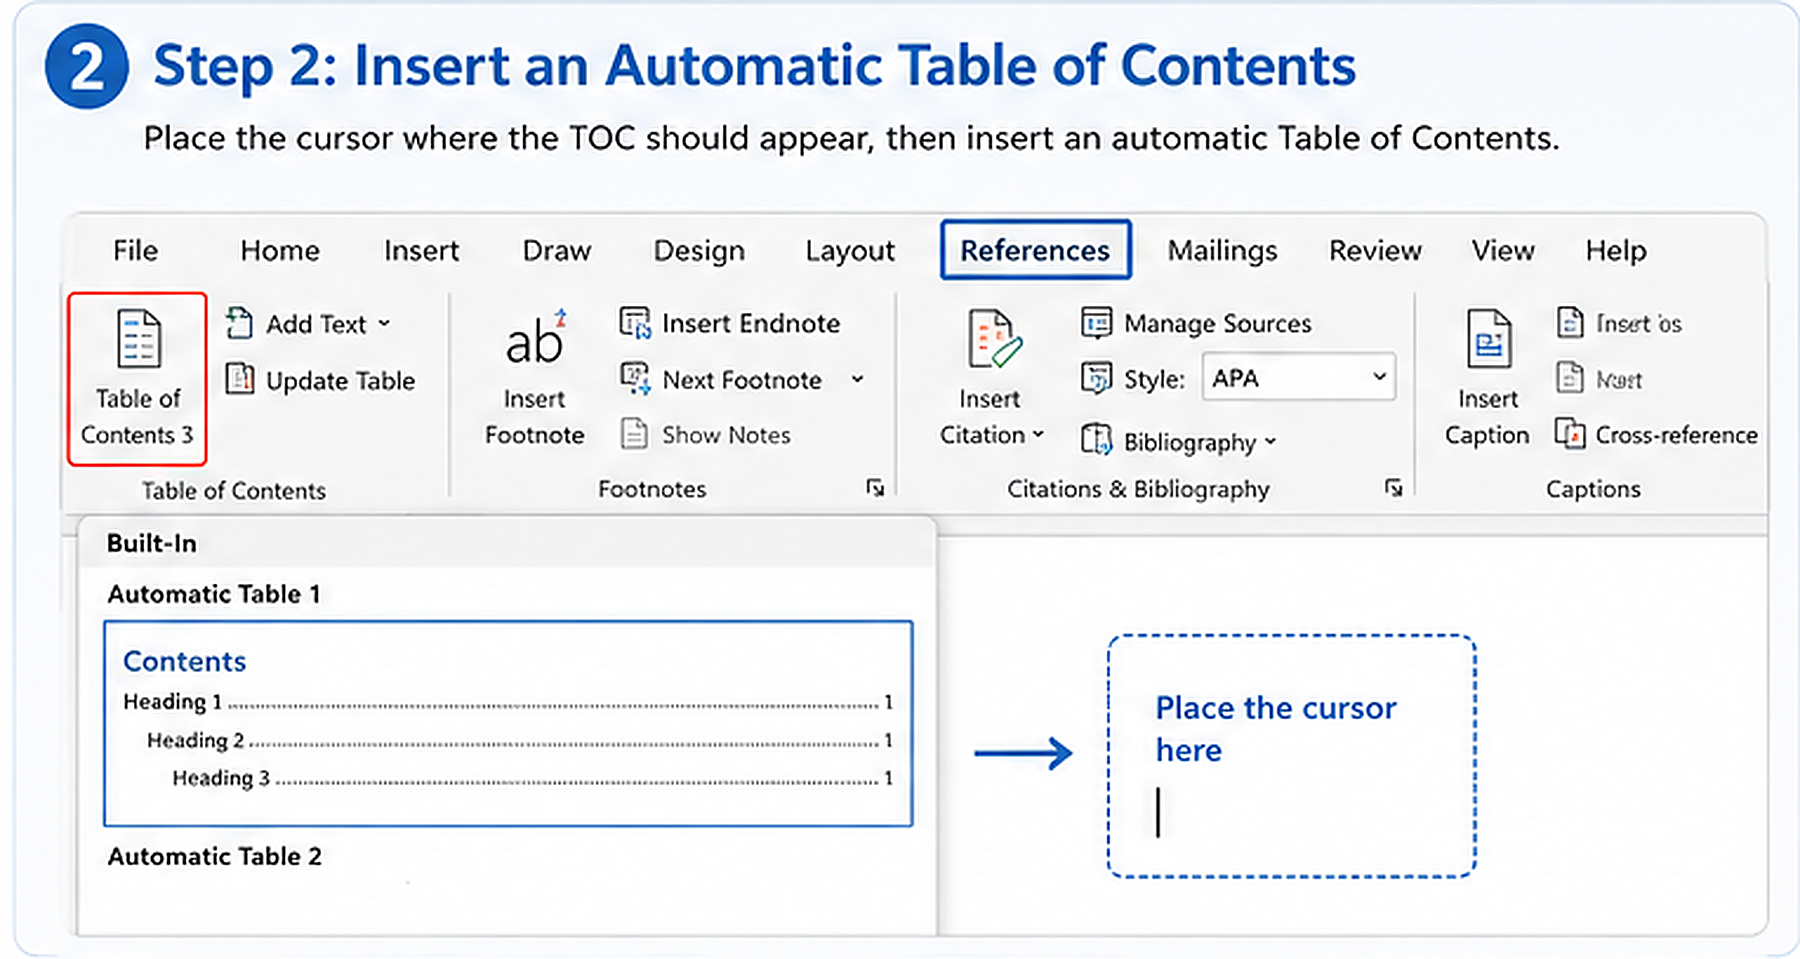
Step 2 — Insert an Automatic Table of Contents
Once the heading structure is ready, Word can generate the table.
Place the Cursor Where the TOC Should Appear
Click where you want to insert the table of contents. It is usually placed after the title or cover page, before the introduction, near the beginning of the document, or on a separate page.
For a long document, inserting a page break before the TOC helps keep it separate from the main text.
Open the Table of Contents Menu
Choose an Automatic Table
Select an automatic table style from the gallery. The exact design and name may vary between Word versions, but the option should be identified as an automatic table rather than a manual one.
Check the Generated TOC
All main sections appear.
Heading 2 and Heading 3 entries have the correct indentation.
The section order matches the document.
Page numbers appear correctly.
Normal paragraphs are not included.
The table is placed on the intended page.
If a section is missing, do not type it directly into the generated table. Correct the heading style in the document and update the entire table.
Step 3 — Update the Table of Contents After Editing
After inserting the table, you may continue writing, rename sections, add new headings, delete content, or move chapters. These changes can make the headings or page numbers in the TOC outdated.
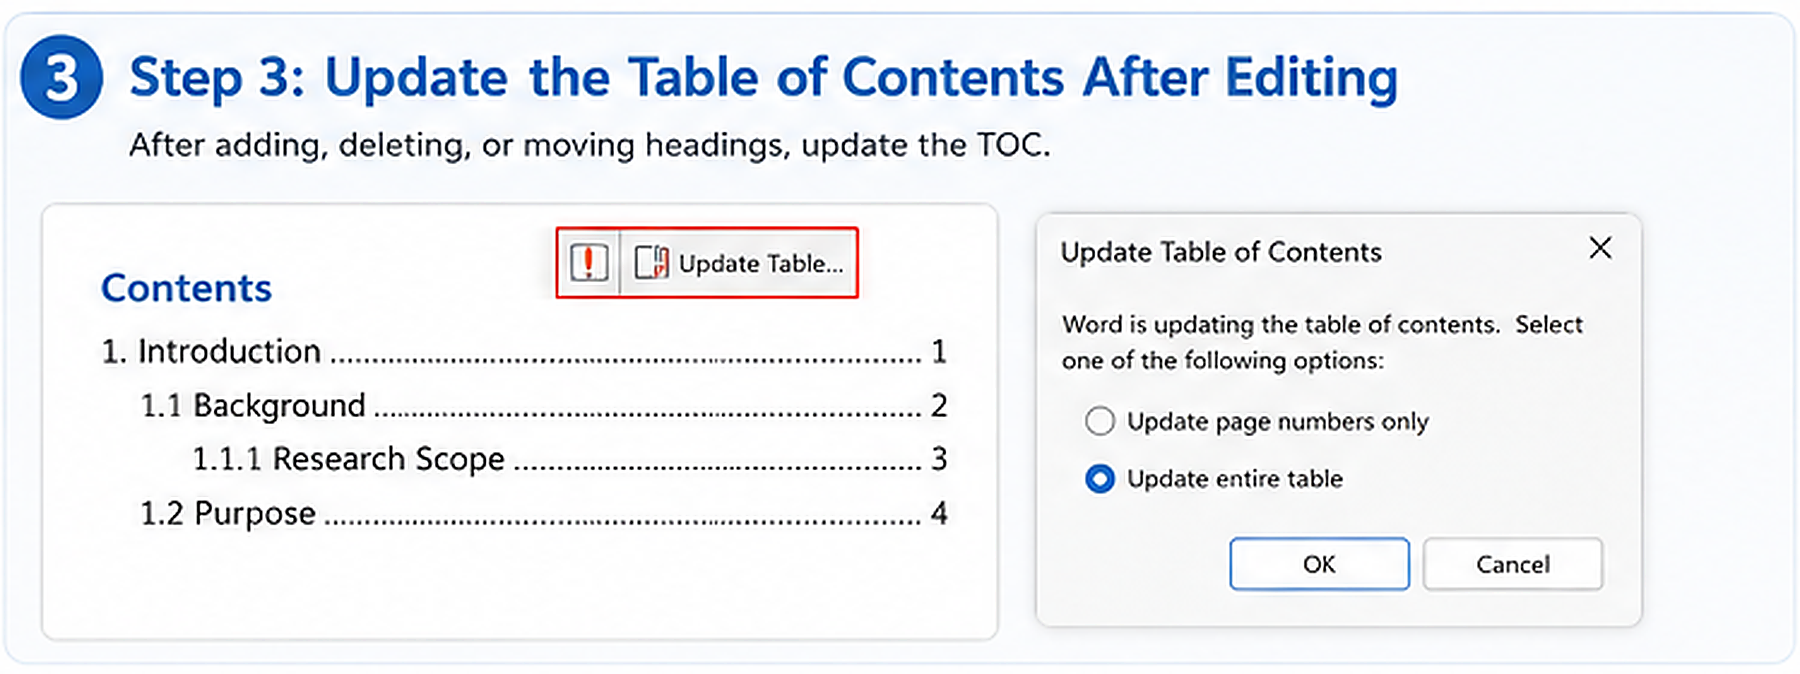
Update Page Numbers Only
Choose Update page numbers only when no heading text has changed, no heading has been added or removed, and your edits only moved existing sections to different pages.
Update the Entire Table
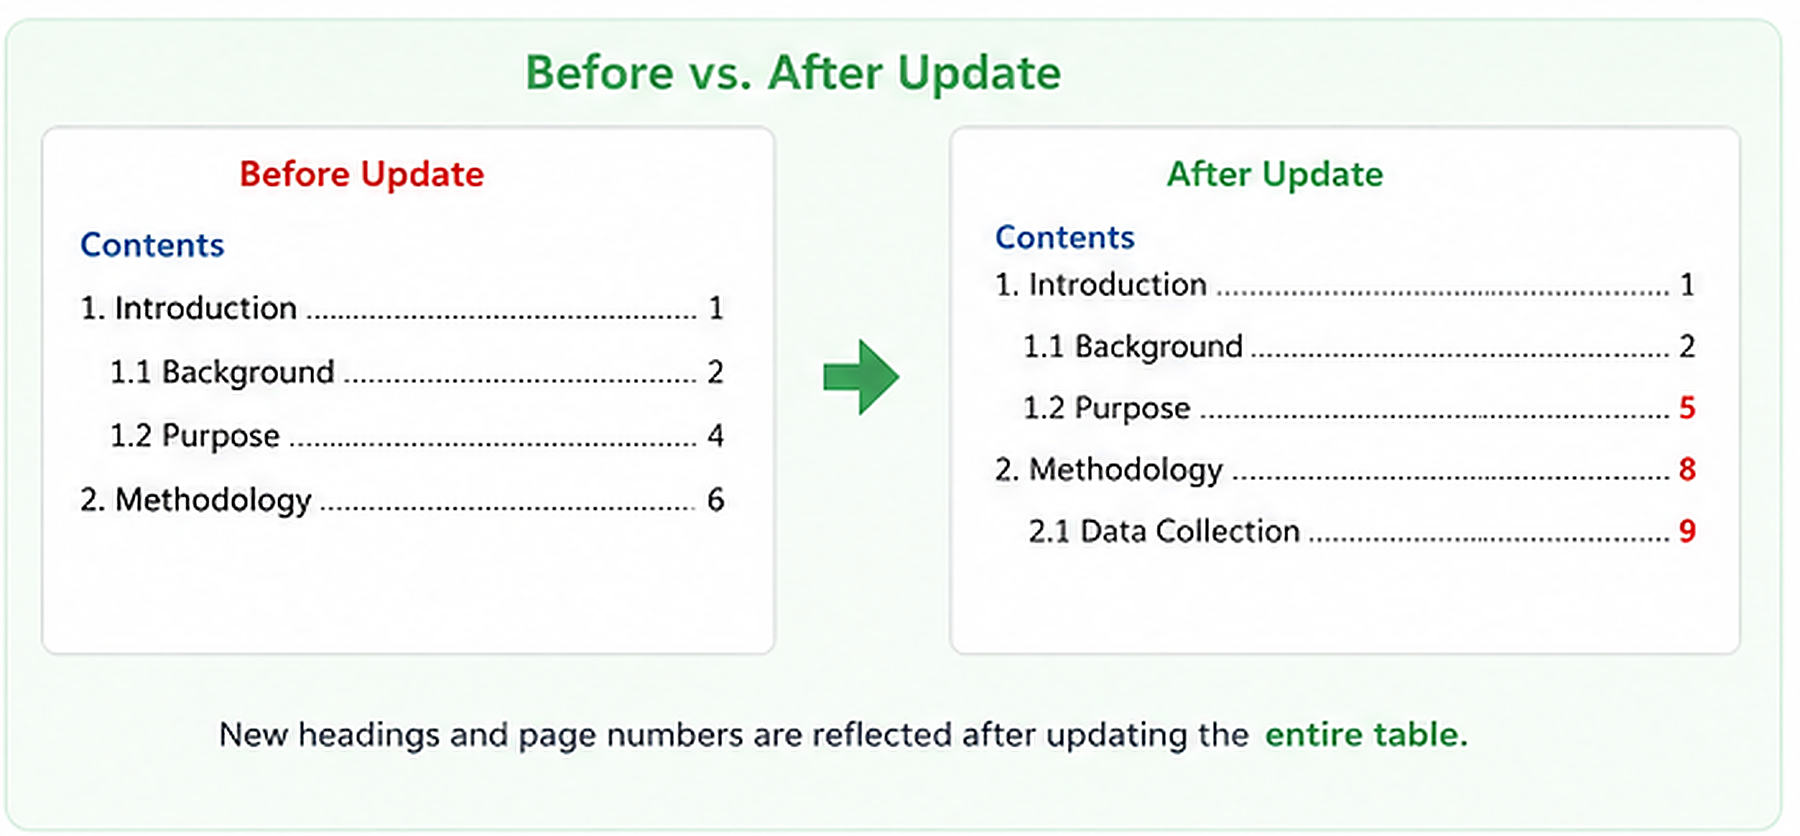
Choose Update entire table when you have added a heading, removed a section, renamed a heading, changed a heading level, moved a section, or changed the document hierarchy.
When you are unsure which option to choose, use Update entire table.
Update the TOC with F9
Click inside the table.
Press F9.
Choose whether to update page numbers or the entire table.
Select OK.
You can also right-click inside the TOC and select Update Field.
Update Before Printing or Exporting
Update the entire table before printing the document, exporting the final PDF, submitting a thesis or assignment, sending a report to a client, or uploading a final version for review.
Why Is My Automatic Table of Contents Not Working?
| Problem | Most likely cause | Quick fix |
|---|---|---|
| A heading is missing | The title does not use a Heading style | Apply Heading 1–3 and update the entire table |
| Normal text appears in the TOC | The paragraph accidentally uses a Heading style | Change it to Normal and update the table |
| New sections do not appear | Only page numbers were updated | Choose Update entire table |
| The TOC cannot update | A Manual Table was inserted | Replace it with an Automatic Table |
| Page numbers are incorrect | The layout changed after the last update | Finish the layout and update again |
| Formatting disappears | TOC entries were formatted individually | Modify the TOC styles instead |
A Heading Is Missing from the TOC
Select the missing title, apply Heading 1, Heading 2, or Heading 3 from Home > Styles, and then choose Update entire table.
Normal Text Appears in the TOC
Select the unwanted paragraph in the document, apply Normal or the correct body-text style, and update the entire table.
New Headings Do Not Appear
Update page numbers only cannot add a newly created section or reflect renamed heading text. Choose Update entire table.
The TOC Cannot Be Updated
You may have inserted a Manual Table. Remove it, confirm that the document uses Heading styles, and insert an automatic table from References > Table of Contents.
Page Numbers Are Incorrect
Check page breaks, section breaks, blank pages, image positions, paragraph spacing, headers and footers, and page-number settings. After correcting the layout, update the page numbers or the entire table.
Formatting Disappears After Updating
Avoid formatting every TOC entry individually. Modify the styles associated with each level instead: TOC 1, TOC 2, and TOC 3.
Customize the Automatic Table of Contents
The built-in automatic table is suitable for many documents. A thesis, manual, book, or formal report may require additional control.
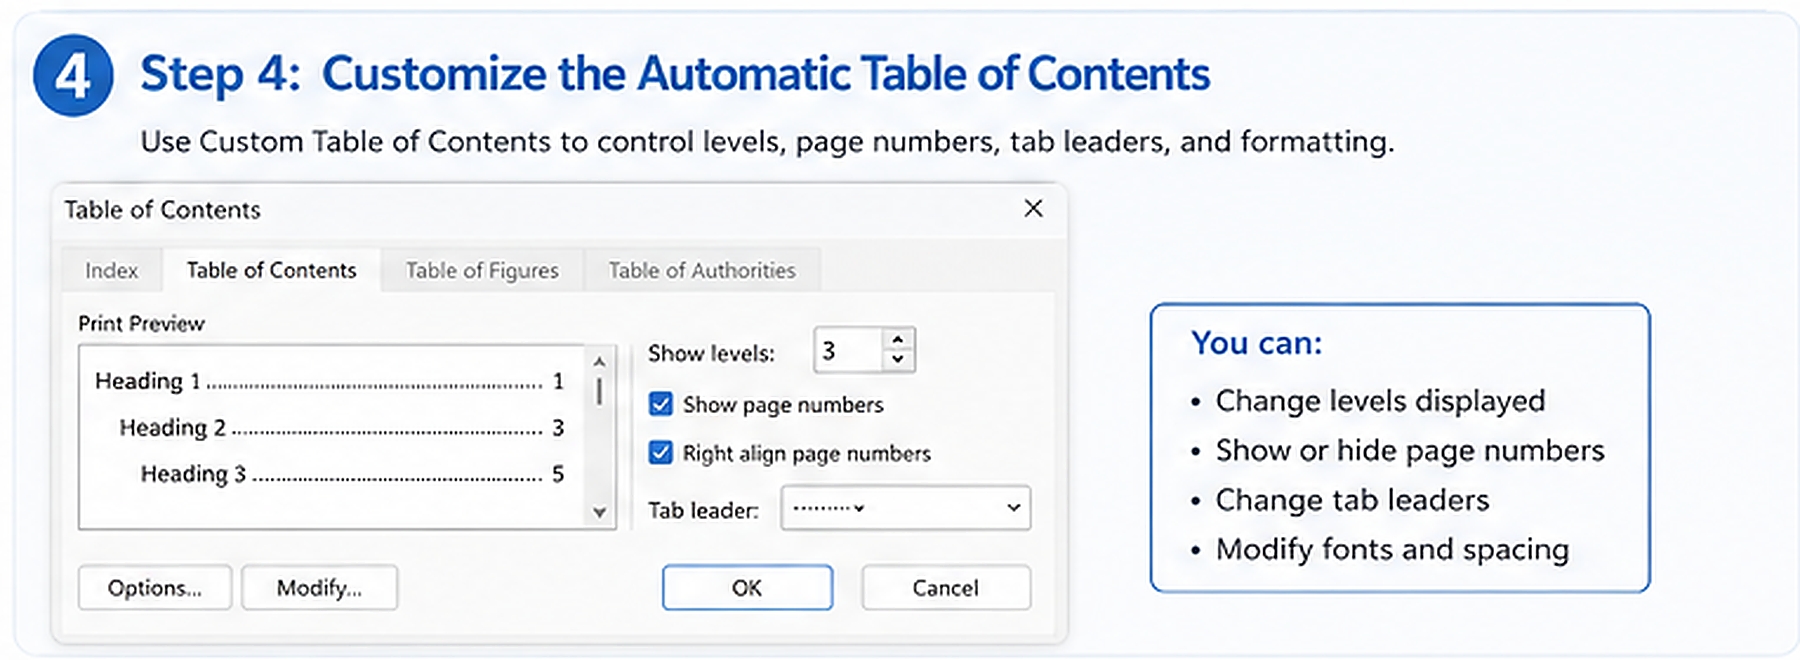
Change How Many Heading Levels Appear
| Show levels | Result |
|---|---|
| 1 | Heading 1 only |
| 2 | Heading 1 and Heading 2 |
| 3 | Heading 1, Heading 2, and Heading 3 |
Show, Hide, or Align Page Numbers
In the Custom Table of Contents dialog, you can adjust whether page numbers appear, whether they are right-aligned, which tab leader is used, and how many heading levels appear.
Change Dot Leaders
The characters between a heading and its page number are called tab leaders. Common choices include dots, dashes, a solid line, or none.
Change the TOC Font and Spacing
Select TOC 1, TOC 2, or TOC 3, then adjust the font, font size, bold or italic formatting, indentation, paragraph spacing, and line spacing.
Remove and Reinsert the TOC
Removing the TOC does not delete the headings or body content from the document. You can later insert a different automatic or custom table using the same heading structure.
Create an Automatic TOC on Mac or Word for the Web
The core workflow is similar across current desktop and web versions:
Word for Mac
Select each section title.
Apply Heading 1, Heading 2, or Heading 3.
Place the cursor where the TOC should appear.
Open the References tab.
Select Table of Contents.
Choose an automatic style.
Update the table after changing the document.
Word for the Web
Apply heading styles to the required titles.
Click where you want the TOC.
Open References.
Insert the table of contents.
Update it after changing the document.
Saving the cloud document and updating the TOC are separate actions. Saving preserves the edits, while updating rebuilds the table from the latest document structure.
Managing a Long Document? WPS Writer Can Make the TOC Workflow Easier
Microsoft Word already provides the necessary tools for creating and updating an automatic table of contents. If the document is already open in Word and you only need to insert one basic TOC, continuing in Word is usually the most direct option.
WPS Writer becomes more relevant when the TOC is one part of a larger long-document workflow. For example, you may need to reorganize a thesis, report, manual, or book repeatedly; assign and adjust many TOC levels; compare the main document with formatting requirements; keep earlier drafts and reference files open; or update the TOC and export the final document as PDF.
| Your workflow | How WPS Writer helps |
|---|---|
| You frequently restructure a long document | Apply heading styles or assign TOC levels from the References tab |
| You need to control exactly which sections enter the TOC | Assign Level 1, Level 2, or Level 3 before generating it |
| You compare the manuscript with guidelines and older drafts | Keep multiple documents open as tabs in one window |
| You need an editable file and a final delivery version | Continue editing the DOCX and export the completed document as PDF |
| You only need a basic TOC in a document already open in Word | Continuing in Microsoft Word is normally sufficient |
Assign TOC Levels While Structuring a Long Document
Select a paragraph → References → TOC Level → Level 1, Level 2, or Level 3
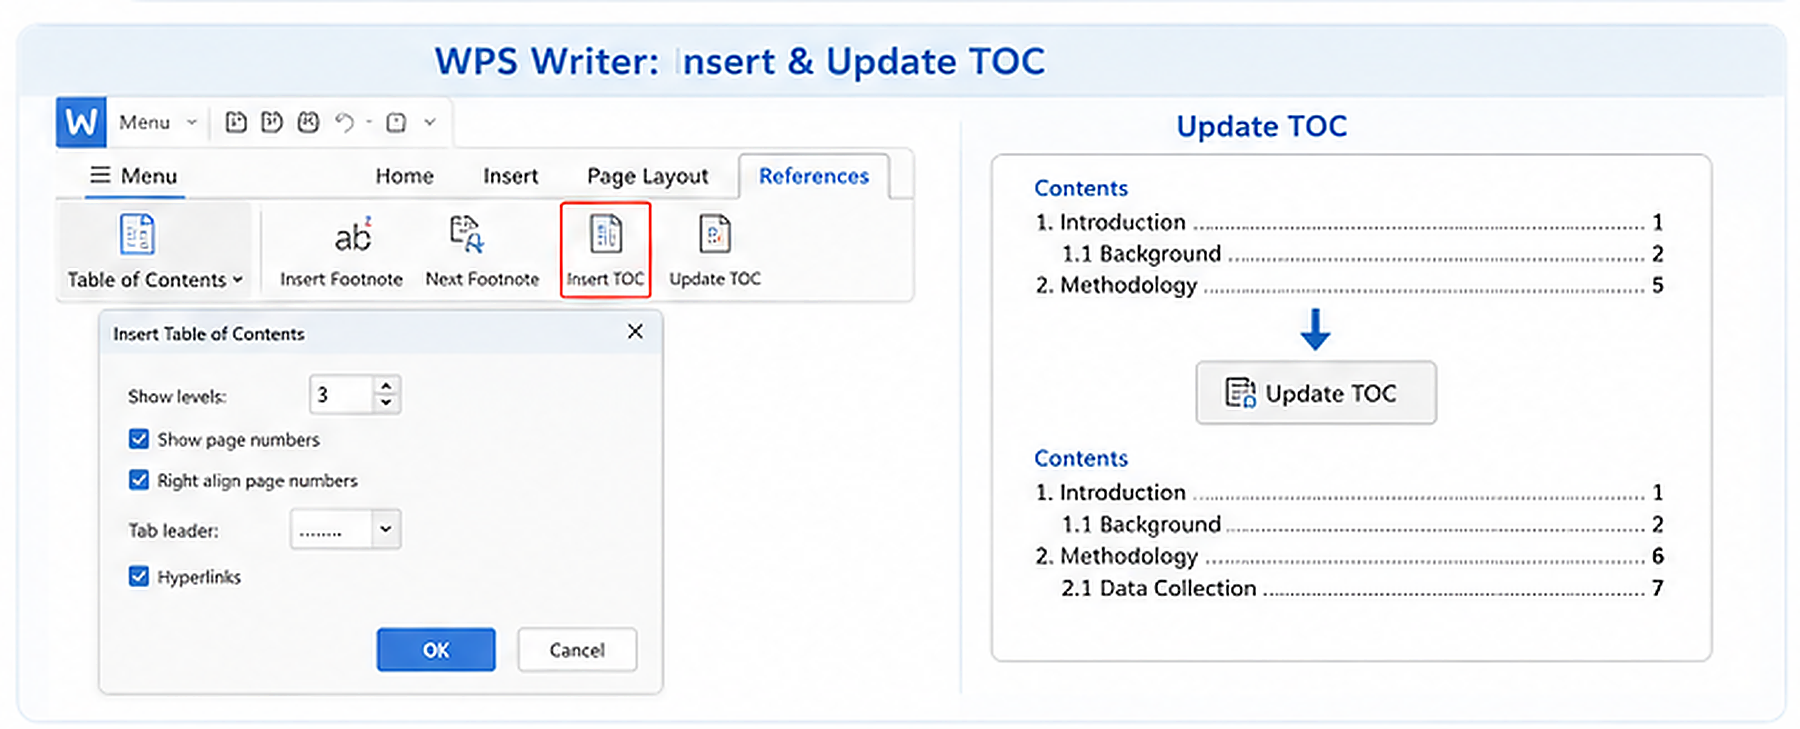
Insert the TOC in WPS Writer
Place the cursor where the TOC should appear.
Open References.
Select Insert TOC.
Choose the number of levels to display.
Configure the page-number and tab-leader settings.
Enable hyperlinks when required.
Select OK.
Keep the Main Document and Reference Files Open as Tabs
This can be useful when checking whether the TOC follows submission requirements, whether the heading levels match a formatting guide, whether an earlier chapter structure should be restored, or whether feedback has been applied correctly.
Update the TOC in WPS Writer
Save the Editable DOCX and Export the Final PDF
When Microsoft Word Is Still the Better Choice
The document is part of a Microsoft 365 collaboration workflow.
Several users are co-authoring through OneDrive or SharePoint.
Your organization relies on Word-specific templates or permissions.
The file uses Word-specific macros.
You only need to insert a basic TOC in a document already open in Word.
Organize and Finish Your Long Document with WPS Writer
Apply heading or TOC levels, insert and update an automatic table of contents, keep reference documents open as tabs, and export the completed report, thesis, manual, or book as PDF.


Frequently Asked Questions
How to create automatic table of contents in Word?
Apply Heading 1, Heading 2, and Heading 3 styles to the titles you want to include. Place the cursor where the TOC should appear, then select References > Table of Contents and choose an automatic style.
Why are some headings missing from my table of contents?
The missing title may not use a built-in Heading style. Select it, apply Heading 1, Heading 2, or Heading 3 from Home > Styles, and then update the entire table.
Does a Word table of contents update automatically?
Word generates the TOC from the heading structure, but it normally needs to be refreshed after document changes. Click inside the table and choose References > Update Table.
What is the difference between Update page numbers only and Update entire table?
Update page numbers only changes the locations of existing entries. Update entire table also reflects new, removed, renamed, or reorganized headings.
Why is normal text appearing in my TOC?
The paragraph probably uses a Heading style. Change it to Normal or the correct body style, and then update the entire table.
Why do new headings not appear?
You may have selected Update page numbers only. Choose Update entire table to include newly added or renamed headings.
Can I change how many heading levels appear?
Yes. Open References > Table of Contents > Custom Table of Contents, and change the number of levels shown.
Can I create and update a TOC in WPS Writer?
Yes. Apply heading styles or TOC levels, use References > Insert TOC to create the table, and select References > Update TOC after modifying the document.

'%3e%3cpath%20d='M19.9911%204.11386V6.471H18.5894C18.0775%206.471%2017.7322%206.57814%2017.5536%206.79243C17.3751%207.00671%2017.2858%207.32814%2017.2858%207.75671V9.44421H19.9019L19.5536%2012.0871H17.2858V18.8639H14.5536V12.0871H12.2769V9.44421H14.5536V7.49779C14.5536%206.39064%2014.8632%205.53201%2015.4822%204.92189C16.1013%204.31177%2016.9257%204.00671%2017.9554%204.00671C18.8304%204.00671%2019.509%204.04243%2019.9911%204.11386Z'%20fill='%23333333'/%3e%3c/g%3e%3cdefs%3e%3cclipPath%20id='clip0_2938_8199'%3e%3crect%20width='16'%20height='16'%20fill='white'%20transform='translate(8%204.00671)'/%3e%3c/clipPath%3e%3c/defs%3e%3c/svg%3e)
'%3e%3cpath%20d='M17.5237%2010.7813L23.4811%204H22.0699L16.8949%209.88693L12.7648%204H8L14.2469%2012.9029L8%2020.0133H9.4112L14.8725%2013.7952L19.2352%2020.0133H24M9.92053%205.04213H12.0885L22.0688%2019.0224H19.9003'%20fill='%23333333'/%3e%3c/g%3e%3cdefs%3e%3cclipPath%20id='clip0_2938_8200'%3e%3crect%20width='16'%20height='16.0134'%20fill='white'%20transform='translate(8%204)'/%3e%3c/clipPath%3e%3c/defs%3e%3c/svg%3e)


