

'%3e%3cpath%20d='M8%200C12.4183%200%2016%203.58172%2016%208C16%2012.4183%2012.4183%2016%208%2016C3.58172%2016%200%2012.4183%200%208C0%203.58172%203.58172%200%208%200ZM11.6162%204.38379C11.2257%203.99337%2010.5927%203.99338%2010.2021%204.38379L8%206.58594L5.79785%204.38379C5.40732%203.99334%204.77429%203.99329%204.38379%204.38379C3.99331%204.77429%203.99335%205.40733%204.38379%205.79785L6.58594%208L4.38379%2010.2021C3.99348%2010.5927%203.99341%2011.2257%204.38379%2011.6162C4.77426%2012.0066%205.40734%2012.0065%205.79785%2011.6162L8%209.41406L10.2021%2011.6162C10.5927%2012.0066%2011.2257%2012.0067%2011.6162%2011.6162C12.0067%2011.2257%2012.0066%2010.5927%2011.6162%2010.2021L9.41406%208L11.6162%205.79785C12.0066%205.40735%2012.0066%204.77429%2011.6162%204.38379Z'%20fill='%23080E17'%20fill-opacity='0.46'/%3e%3c/g%3e%3cdefs%3e%3cclipPath%20id='clip0_3761_713'%3e%3crect%20width='16'%20height='16'%20fill='white'/%3e%3c/clipPath%3e%3c/defs%3e%3c/svg%3e)



'%3e%3cpath%20fill-rule='evenodd'%20clip-rule='evenodd'%20d='M21.4999%2010.9993C21.4999%205.20009%2016.7986%200.498901%2010.9993%200.498901C5.19994%200.498901%200.498657%205.20009%200.498657%2010.9993C0.498657%2016.2404%204.33858%2020.5844%209.35855%2021.3722V14.0346H6.69238V10.9993H9.35855V8.68594C9.35855%206.05427%2010.9262%204.60062%2013.3248%204.60062C14.4736%204.60062%2015.6753%204.80571%2015.6753%204.80571V7.38979H14.3512C13.0468%207.38979%2012.64%208.19921%2012.64%209.0296V10.9993H15.5523L15.0867%2014.0346H12.64V21.3722C17.66%2020.5844%2021.4999%2016.2404%2021.4999%2010.9993Z'%20fill='%231568EA'/%3e%3c/g%3e%3c/svg%3e)


'%3e%3cpath%20d='M2.42045%2022.1876H6.31818V12.7217L0.75%208.54553V20.5171C0.75%2021.4414%201.49892%2022.1876%202.42045%2022.1876Z'%20fill='%234285F4'/%3e%3cpath%20d='M19.682%2022.1876H23.5797C24.5041%2022.1876%2025.2502%2021.4387%2025.2502%2020.5171V8.54553L19.682%2012.7217'%20fill='%2334A853'/%3e%3cpath%20d='M19.682%205.48293V12.7216L25.2502%208.54543V6.31816C25.2502%204.25236%2022.8921%203.07469%2021.2411%204.31361'%20fill='%23FBBC04'/%3e%3cpath%20d='M6.31824%2012.7217V5.48303L13.0001%2010.4944L19.6819%205.48303V12.7217L13.0001%2017.733'%20fill='%23EA4335'/%3e%3cpath%20d='M0.75%206.31816V8.54543L6.31818%2012.7216V5.48293L4.75909%204.31361C3.10534%203.07469%200.75%204.25236%200.75%206.31816Z'%20fill='%23C5221F'/%3e%3c/g%3e%3cdefs%3e%3cclipPath%20id='clip0_2954_7305'%3e%3crect%20width='24.5'%20height='18.375'%20fill='white'%20transform='translate(0.75%203.8125)'/%3e%3c/clipPath%3e%3c/defs%3e%3c/svg%3e)


Inserting pictures one by one in Word is slow when you build photo pages, product catalogs, or illustrated reports. Most people want to insert multiple images at once and keep them neat—but Word’s default In Line with Text wrap can leave photos stacked, uneven, or hard to move. This guide covers the fastest ways to batch-insert images in Microsoft Word, how to align them cleanly, and a free Word-compatible option in WPS Writer.


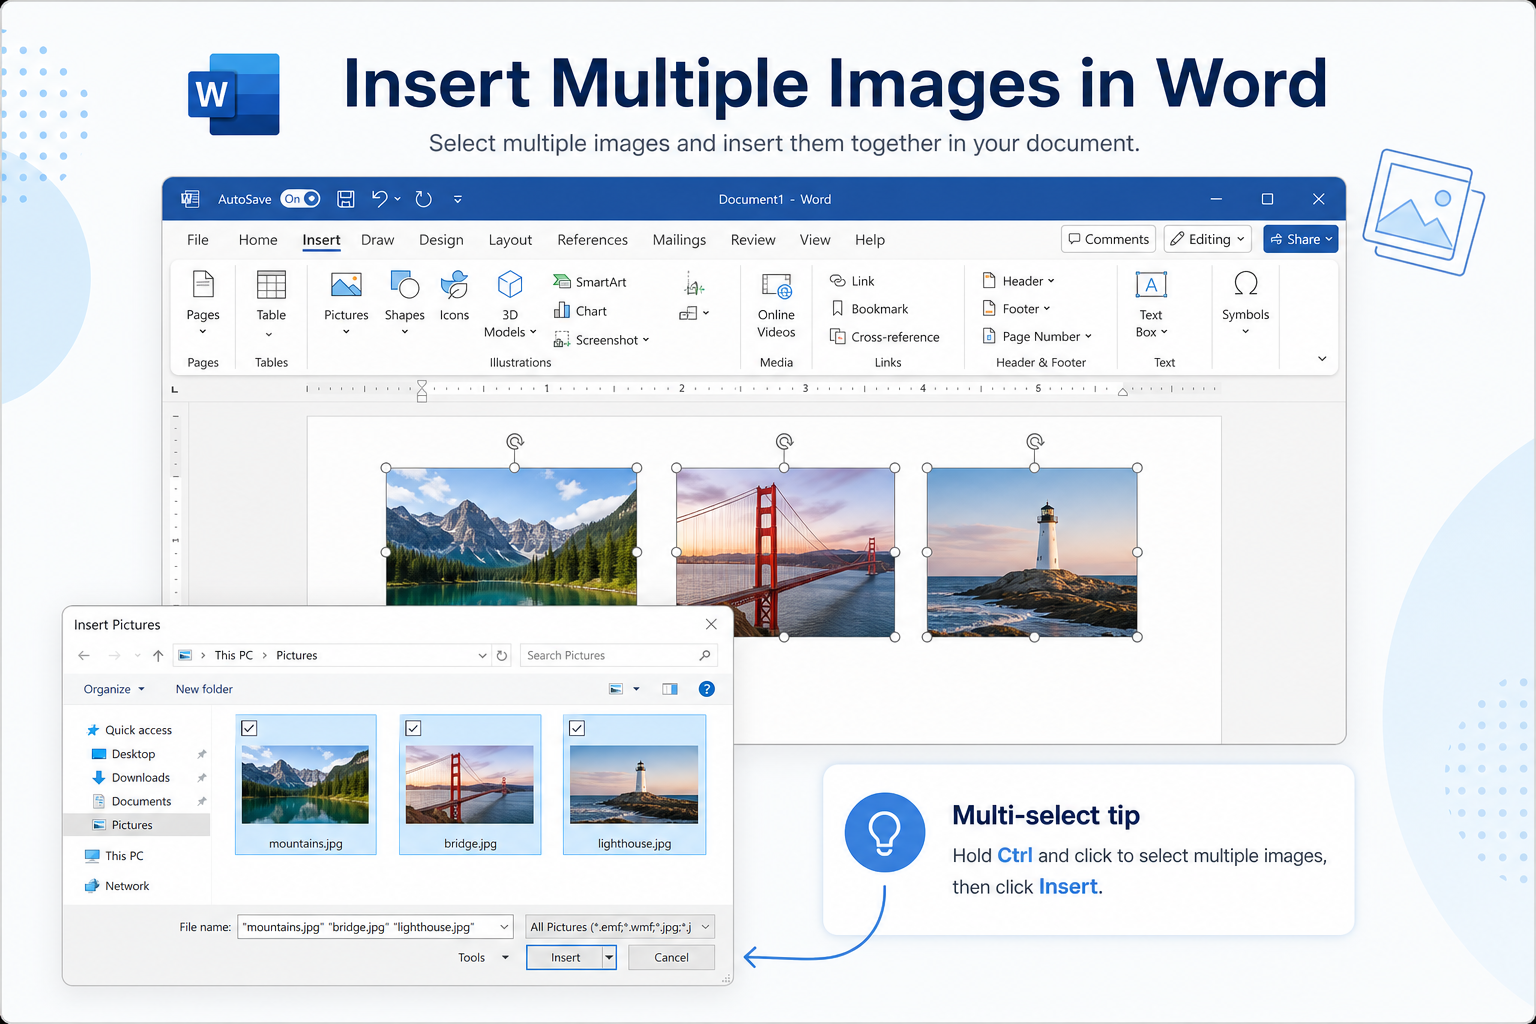
Quick answer: Go to Insert → Pictures → This Device → hold Ctrl (Windows) or Command (Mac) → select multiple files → Insert. Or drag several images from File Explorer onto the page. Then set wrap to Square or Tight and use Picture Format → Align to even them out.
Batch import still starts from that same ribbon—Pictures lives with Tables, Shapes, and Charts, and the Insert Tab in Word shows how those groups are laid out.
Ways to Insert Multiple Images in Word
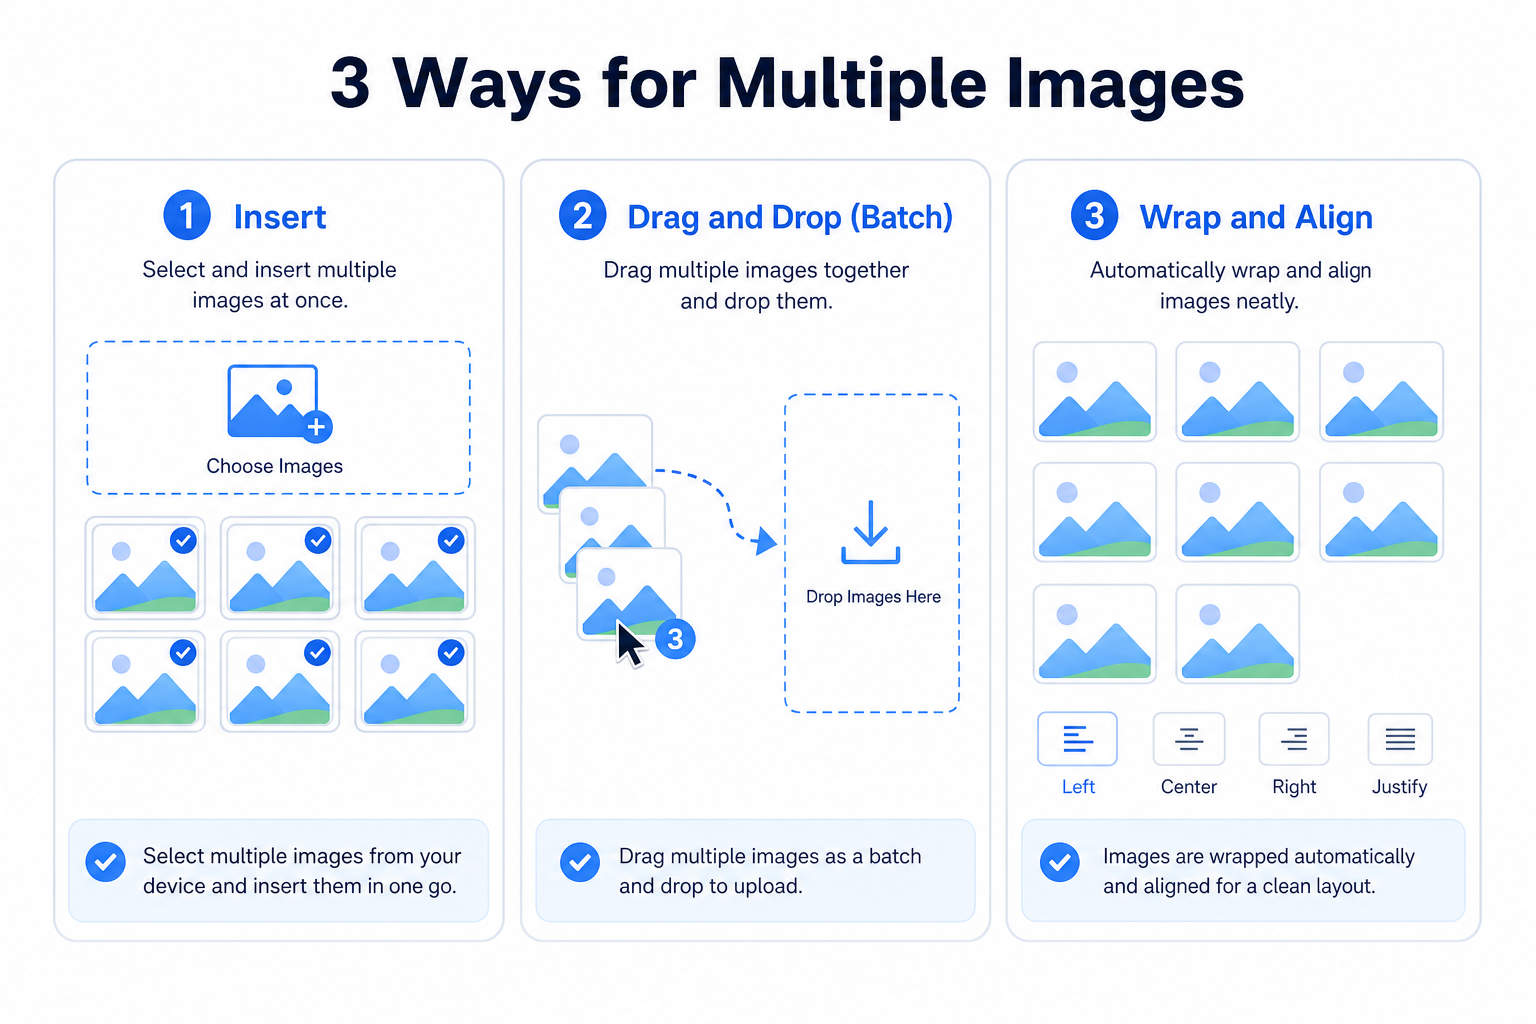
| Method | Best for | Where to start |
|---|---|---|
| Multi-select Insert | Precise placement at the cursor | Insert → Pictures → This Device + Ctrl / Command |
| Drag and drop | Fast bulk drops from a folder | Select files in Explorer/Finder → drag onto the page |
| Wrap + Align cleanup | Neat rows after batch insert | Picture Format → Wrap Text + Align |
Batch Insert Multiple Images in Microsoft Word
These steps work in Word 2016, 2019, 2021, and Microsoft 365.
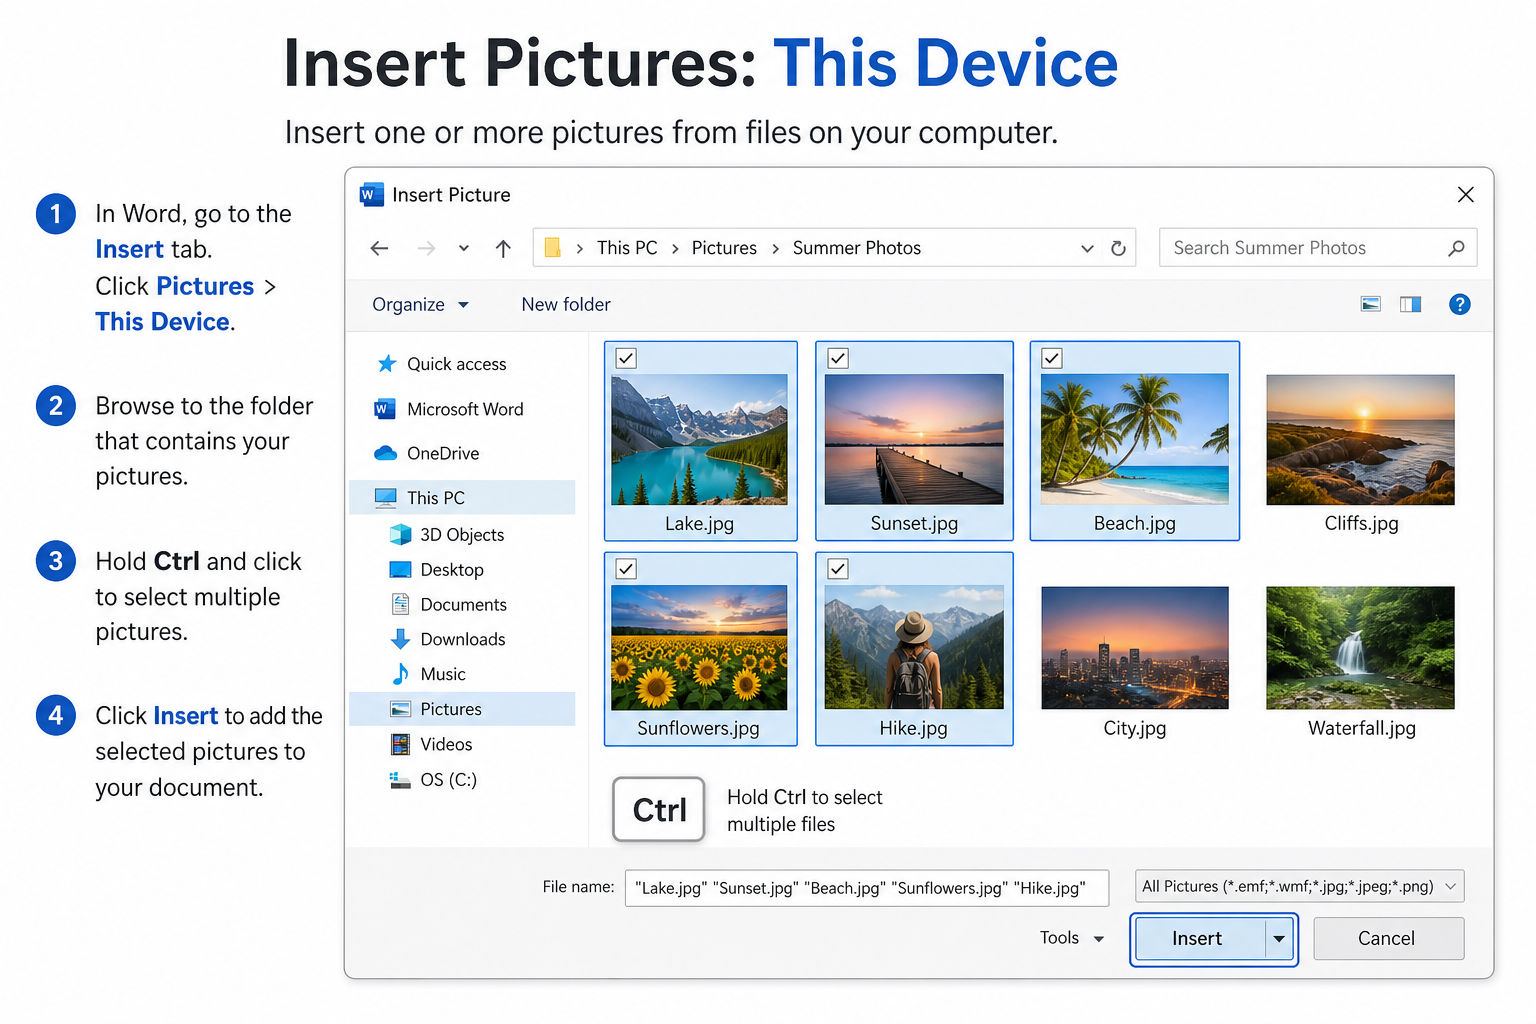
Open your Word document and place the cursor where the pictures should start.
Go to Insert → Pictures → This Device (older Word may say Picture → From File).
Hold Ctrl (Windows) or Command (Mac) and click each image you want—or use Shift to select a range.
Click Insert. Word adds all selected pictures at once.
Tip: Sort files by name in the picker first if you need a specific order (for example, 01.jpg, 02.jpg).
Fast Drag-and-Drop Batch Insert
For speed, drop a whole group of images onto the page.
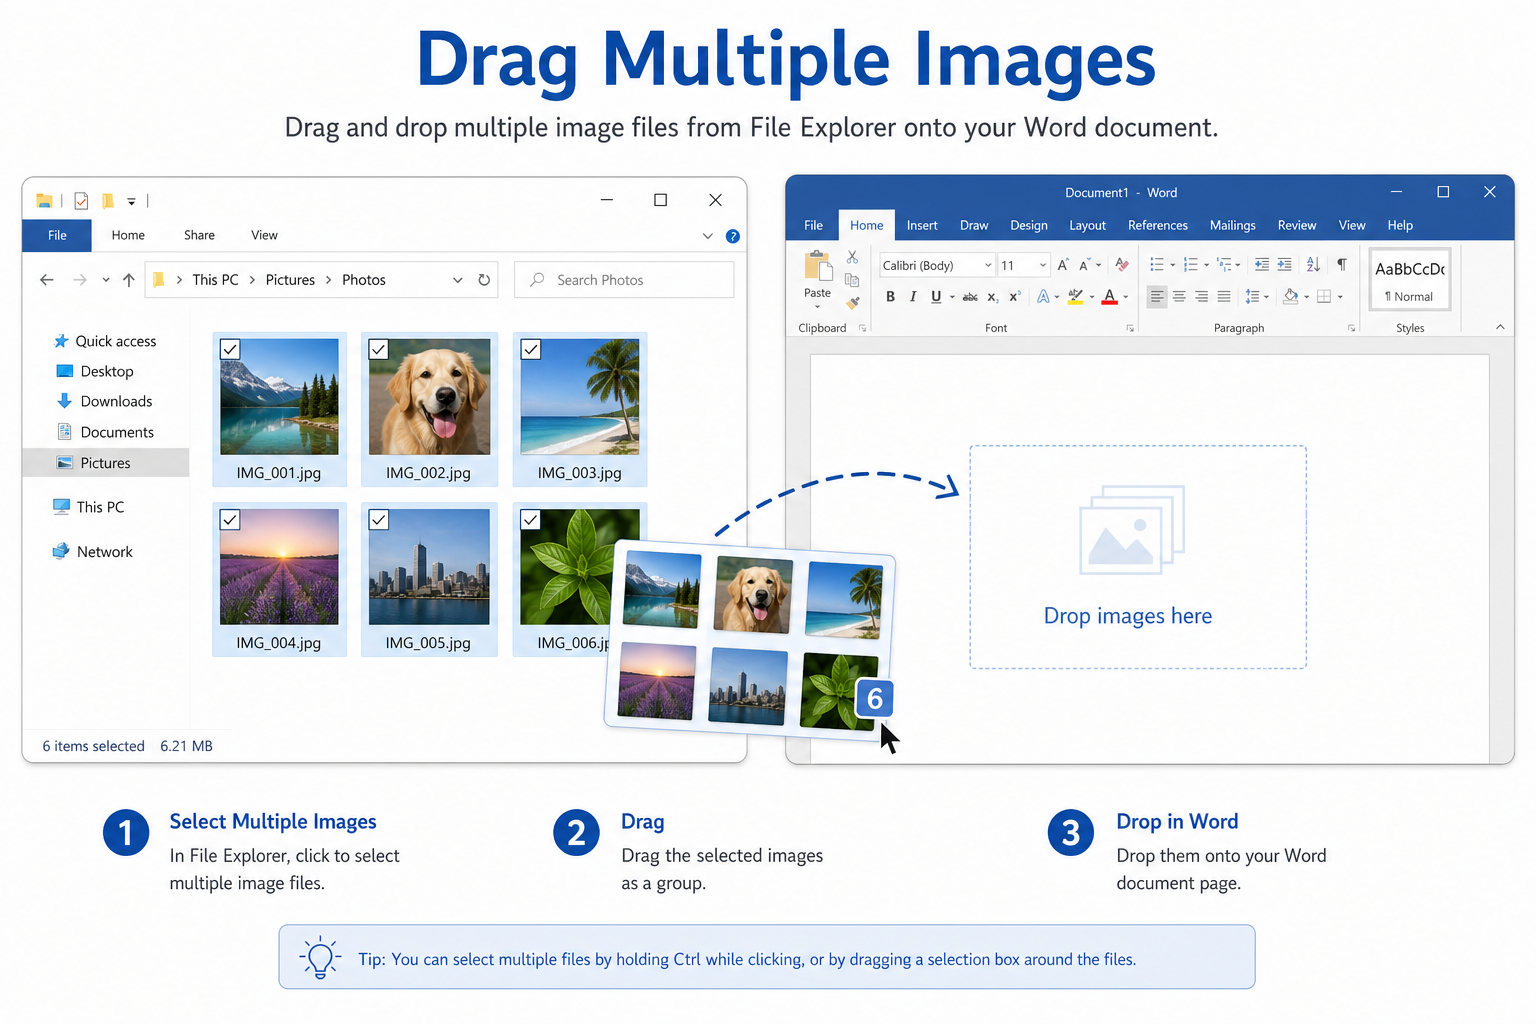
Open the folder that contains your pictures in File Explorer (Windows) or Finder (Mac).
Select all target images (Ctrl + A or multi-select).
Drag the group onto the Word page and release.
This skips repeated menu clicks and works well for photo dumps and draft layouts.
Common Problems After Batch Insertion
| Problem | Why it happens | What to try |
|---|---|---|
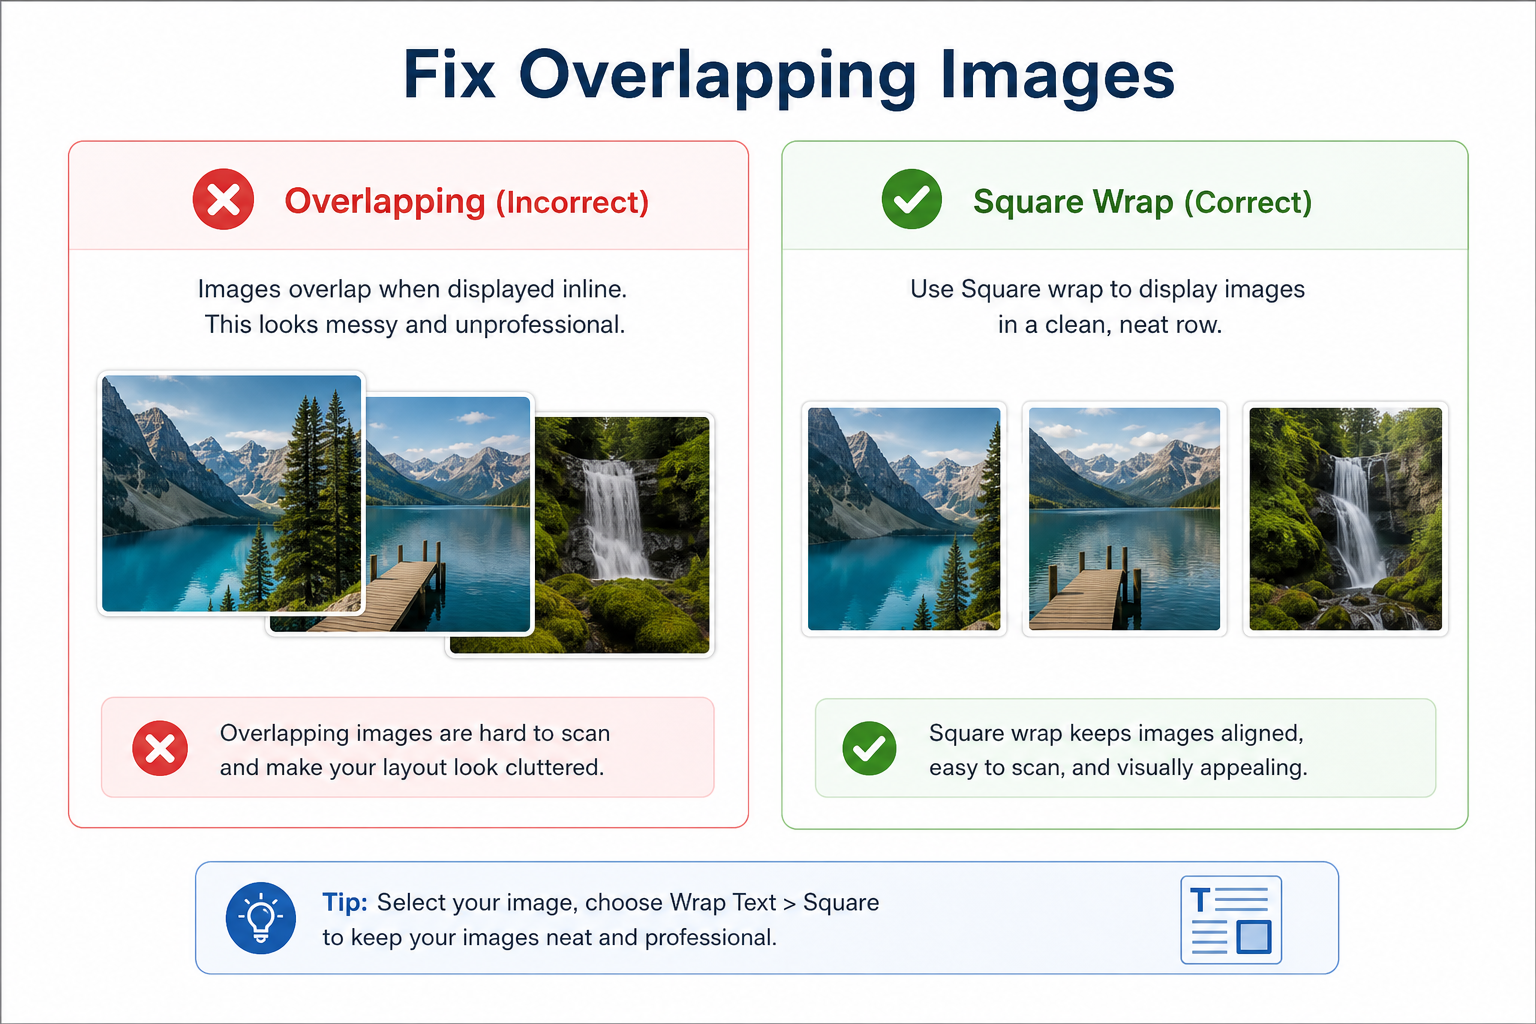
| Pictures stack or overlap | Default wrap is In Line with Text | Change wrap to Square or Tight, then drag into place |
| Uneven sizes | Different resolutions and aspect ratios | Select each image and set a matching width (or use Compress Pictures) |
| Hard to move freely | Inline pictures behave like giant characters | Switch wrap, then use Align / distribute tools |
| File becomes slow | Large photo files | Picture Format → Compress Pictures before sharing |
How to Arrange Multiple Images Neatly in Word
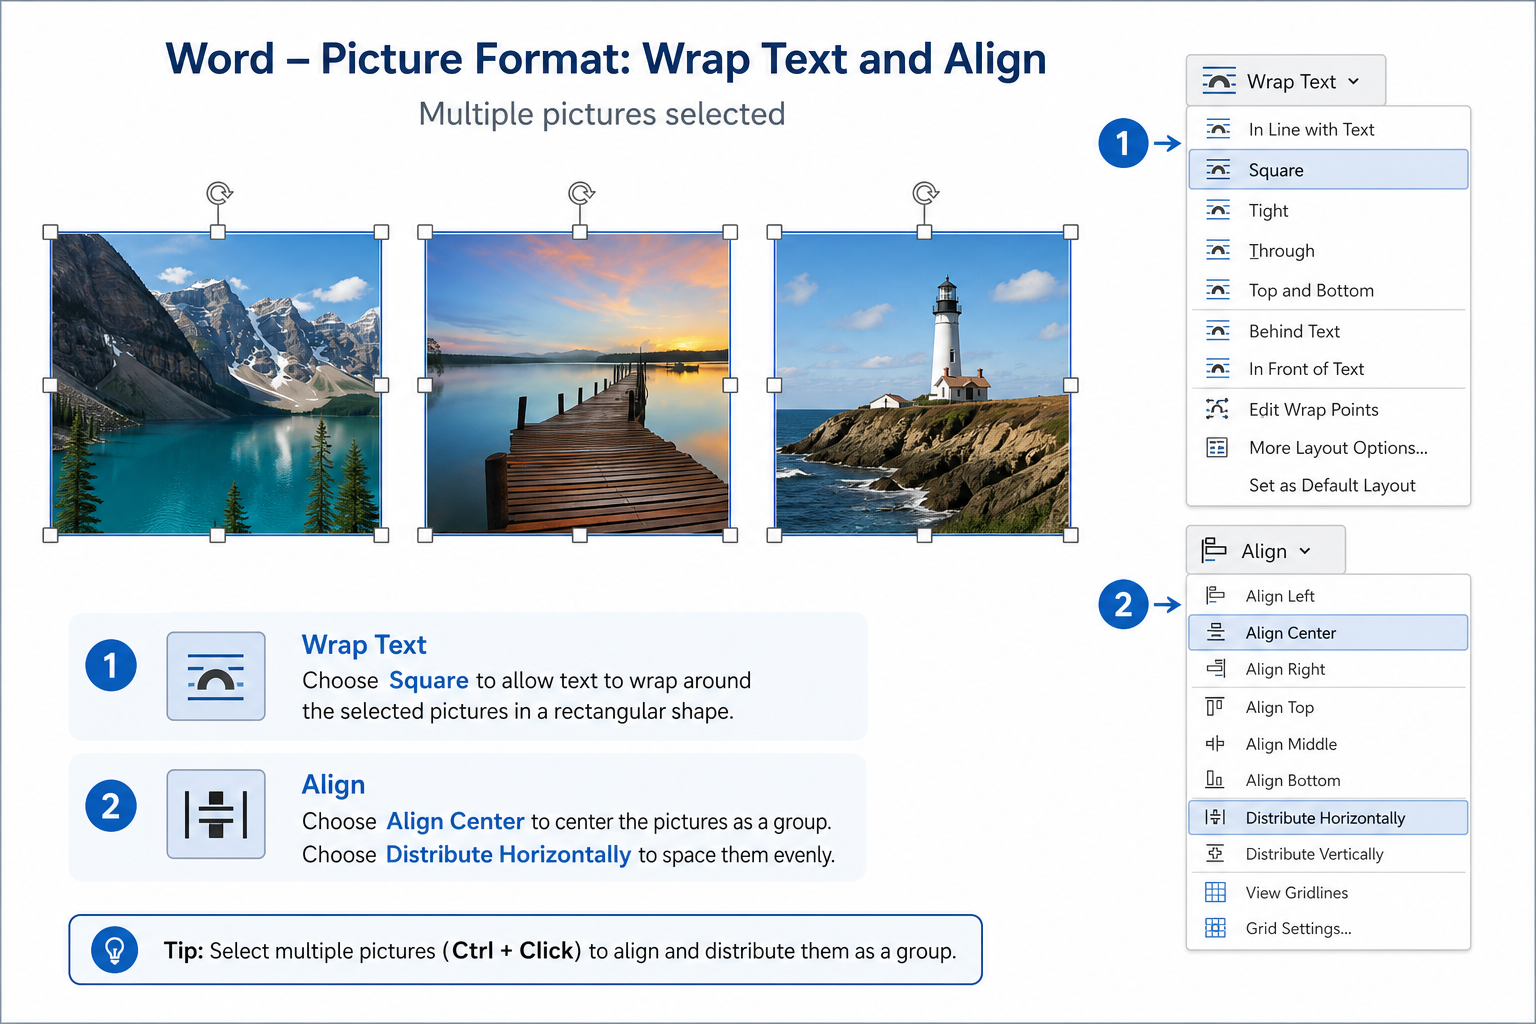
Click the first picture, then hold Ctrl / Command and select the rest (or select them one by one).
Open Picture Format (or the Layout Options icon next to a picture).
Set Wrap Text to Square or Tight for freer placement. Use In Line with Text only when you want photos to stay in the paragraph flow.
With multiple pictures selected, use Align to align left/center or distribute horizontally/vertically.
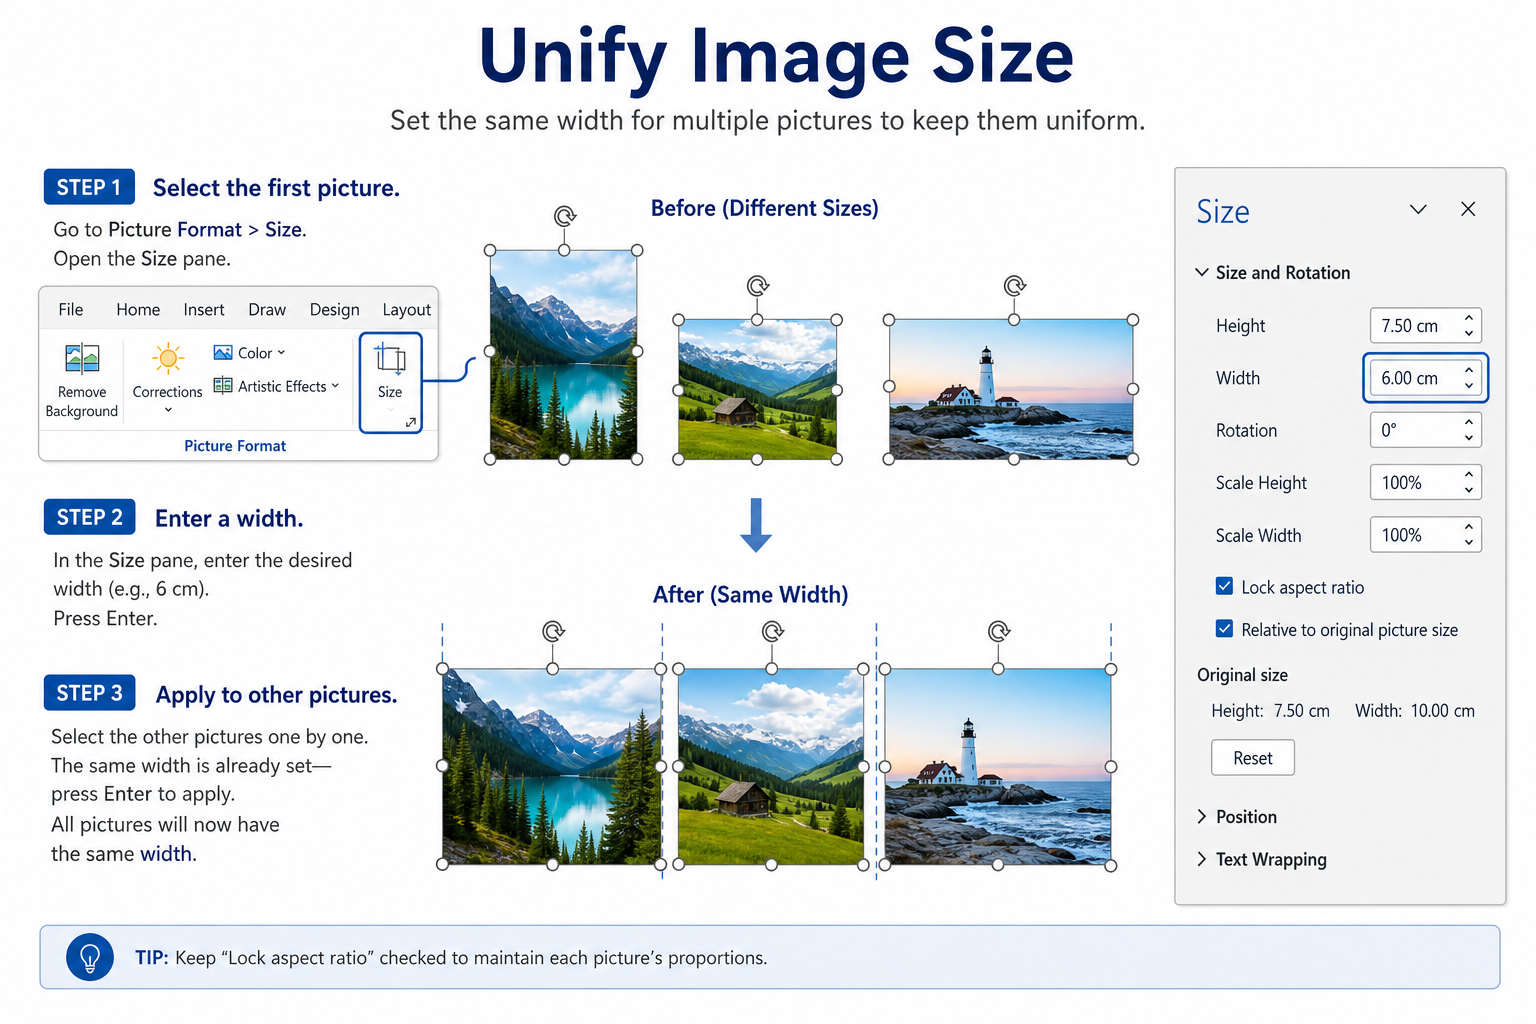
Drag a corner handle to resize. For a uniform look, set the same width on each image (check size in Picture Format → Size).
Optional: Group images after alignment if you want them to move together—select them → right-click → Group (availability can vary by wrap settings).
Free Method: Batch Insert Images in WPS Writer
Word can import many pictures at once, but cleanup often means wrap changes, sizing, and alignment by hand. WPS Writer is a free, Word-compatible option with a straightforward multi-picture insert workflow for everyday catalogs and reports.
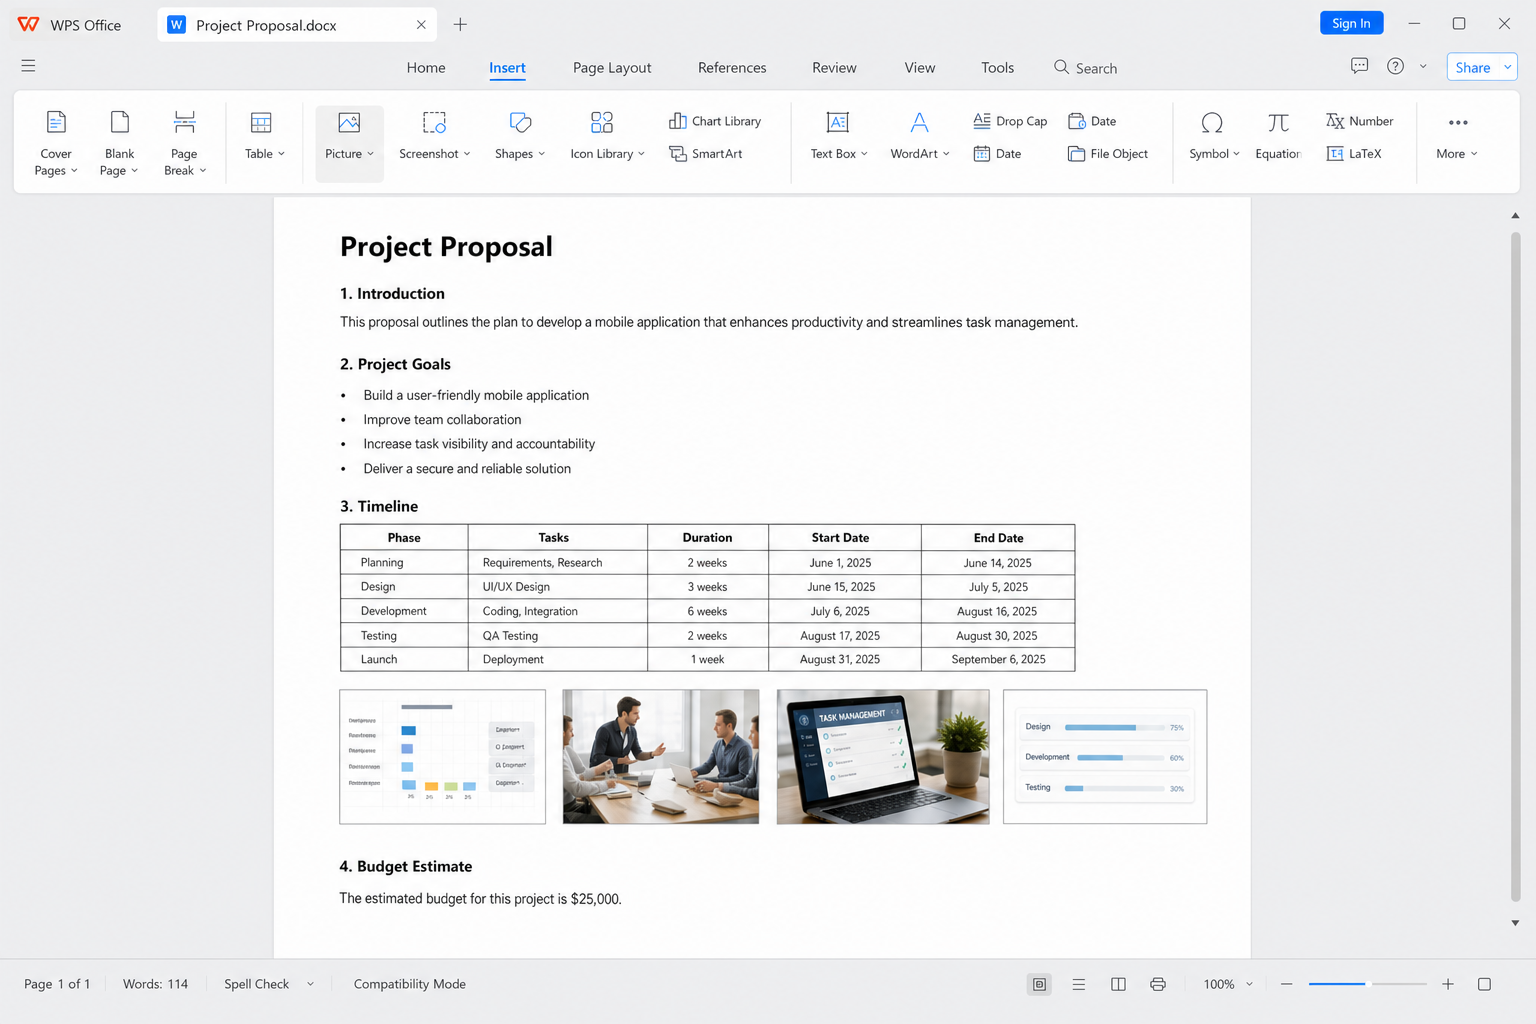
Open your document in WPS Writer.
Go to Insert → Pictures and multi-select the image files.
Insert them, then adjust size and wrap so they sit in a clean row or grid.
Use align / distribute tools to even the layout.
Save as .docx when you need to share the file in Microsoft Word.
Fast multi-select insert — Add many pictures without one-by-one browsing
Easy wrap and align — Clean up rows and spacing after batch import
Strong Word compatibility — Share common .docx layouts with Word users
No paid subscription required — Core picture tools for daily documents
Practical Tips for Multi-Image Documents
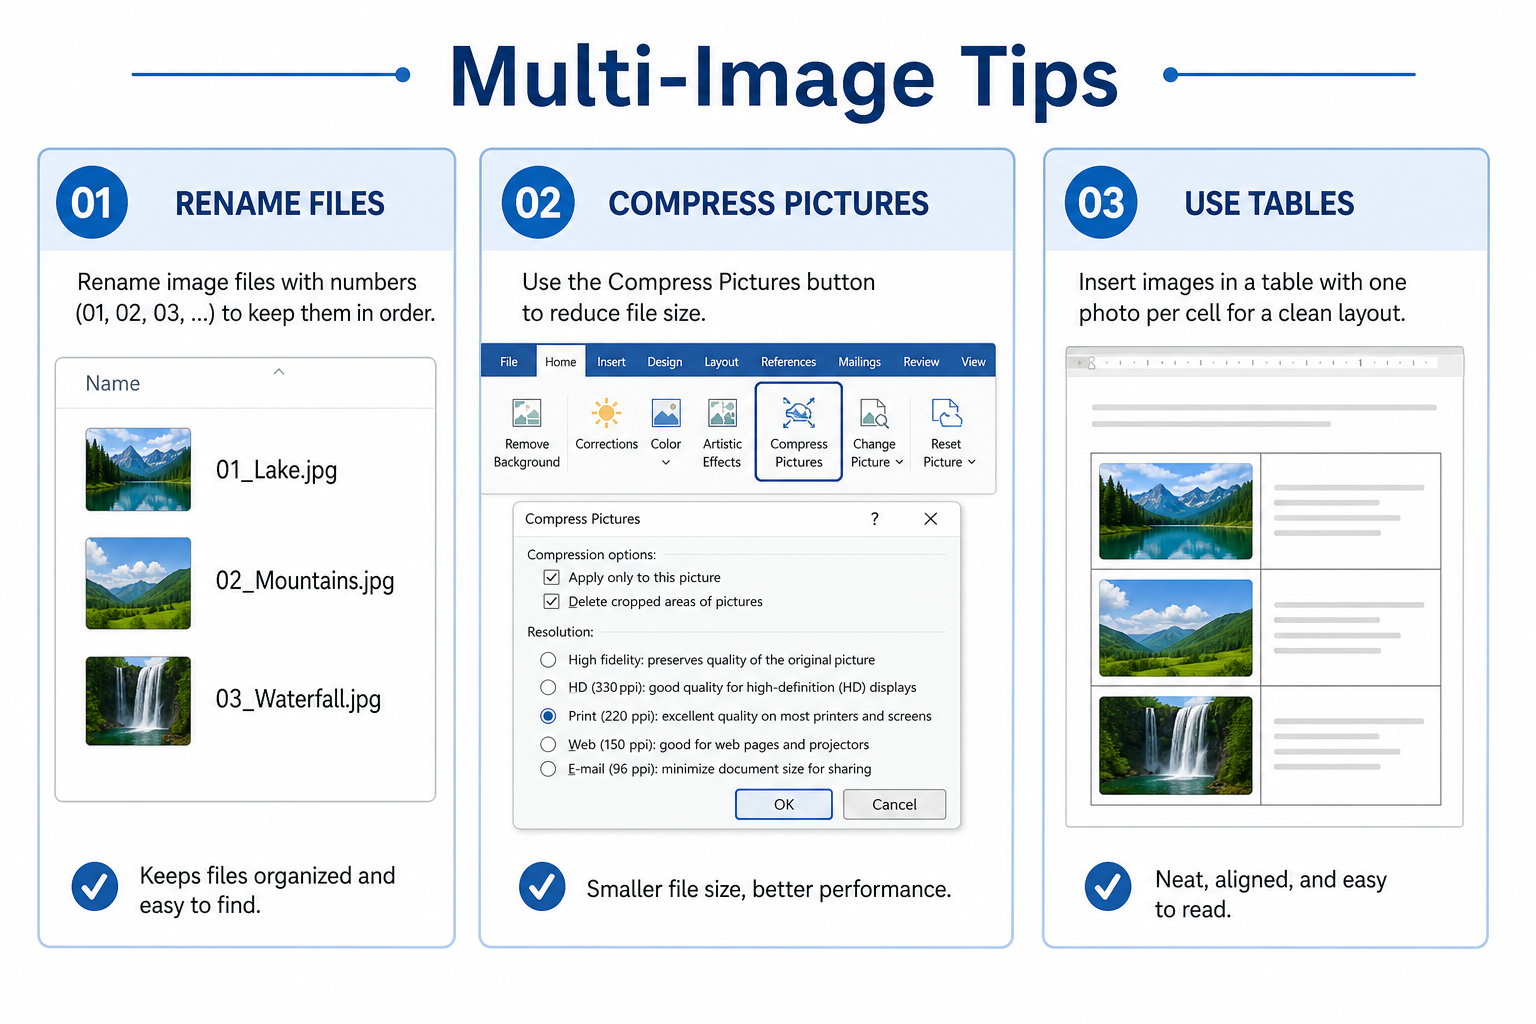
Rename files in order before inserting if sequence matters.
Prefer .jpg for photos and .png for screenshots with sharp text.
Compress pictures before emailing a large album-style file.
Keep margins consistent so a row of images does not clip at the page edge.
For a contact-sheet look, insert a table first and place one image per cell.
FAQ
How do I insert multiple images at once in Word?
Go to Insert → Pictures → This Device, hold Ctrl or Command, select several files, then click Insert. You can also drag multiple files onto the page.
Why do my batch-inserted pictures overlap?
They are probably still In Line with Text. Change wrap to Square or Tight, then align or distribute them.
How do I make all images the same size?
Select each picture and set the same width under Picture Format → Size. Lock aspect ratio if you want to avoid stretching.
Do multi-image layouts from WPS work in Microsoft Word?
Yes—when you save as a standard .docx, pictures and wrap settings usually open normally in Microsoft Word. Preview once before sharing.
Conclusion
To insert multiple images in a Word document, multi-select under Insert → Pictures or drag a group from your folder. Fix stacking and uneven spacing with Wrap Text plus Align tools, then unify widths and compress large files when needed. If you want a simpler free workflow for everyday multi-picture pages, WPS Writer is a practical Word-compatible option.

'%3e%3cpath%20d='M19.9911%204.11386V6.471H18.5894C18.0775%206.471%2017.7322%206.57814%2017.5536%206.79243C17.3751%207.00671%2017.2858%207.32814%2017.2858%207.75671V9.44421H19.9019L19.5536%2012.0871H17.2858V18.8639H14.5536V12.0871H12.2769V9.44421H14.5536V7.49779C14.5536%206.39064%2014.8632%205.53201%2015.4822%204.92189C16.1013%204.31177%2016.9257%204.00671%2017.9554%204.00671C18.8304%204.00671%2019.509%204.04243%2019.9911%204.11386Z'%20fill='%23333333'/%3e%3c/g%3e%3cdefs%3e%3cclipPath%20id='clip0_2938_8199'%3e%3crect%20width='16'%20height='16'%20fill='white'%20transform='translate(8%204.00671)'/%3e%3c/clipPath%3e%3c/defs%3e%3c/svg%3e)
'%3e%3cpath%20d='M17.5237%2010.7813L23.4811%204H22.0699L16.8949%209.88693L12.7648%204H8L14.2469%2012.9029L8%2020.0133H9.4112L14.8725%2013.7952L19.2352%2020.0133H24M9.92053%205.04213H12.0885L22.0688%2019.0224H19.9003'%20fill='%23333333'/%3e%3c/g%3e%3cdefs%3e%3cclipPath%20id='clip0_2938_8200'%3e%3crect%20width='16'%20height='16.0134'%20fill='white'%20transform='translate(8%204)'/%3e%3c/clipPath%3e%3c/defs%3e%3c/svg%3e)


