

'%3e%3cpath%20d='M8%200C12.4183%200%2016%203.58172%2016%208C16%2012.4183%2012.4183%2016%208%2016C3.58172%2016%200%2012.4183%200%208C0%203.58172%203.58172%200%208%200ZM11.6162%204.38379C11.2257%203.99337%2010.5927%203.99338%2010.2021%204.38379L8%206.58594L5.79785%204.38379C5.40732%203.99334%204.77429%203.99329%204.38379%204.38379C3.99331%204.77429%203.99335%205.40733%204.38379%205.79785L6.58594%208L4.38379%2010.2021C3.99348%2010.5927%203.99341%2011.2257%204.38379%2011.6162C4.77426%2012.0066%205.40734%2012.0065%205.79785%2011.6162L8%209.41406L10.2021%2011.6162C10.5927%2012.0066%2011.2257%2012.0067%2011.6162%2011.6162C12.0067%2011.2257%2012.0066%2010.5927%2011.6162%2010.2021L9.41406%208L11.6162%205.79785C12.0066%205.40735%2012.0066%204.77429%2011.6162%204.38379Z'%20fill='%23080E17'%20fill-opacity='0.46'/%3e%3c/g%3e%3cdefs%3e%3cclipPath%20id='clip0_3761_713'%3e%3crect%20width='16'%20height='16'%20fill='white'/%3e%3c/clipPath%3e%3c/defs%3e%3c/svg%3e)



'%3e%3cpath%20fill-rule='evenodd'%20clip-rule='evenodd'%20d='M21.4999%2010.9993C21.4999%205.20009%2016.7986%200.498901%2010.9993%200.498901C5.19994%200.498901%200.498657%205.20009%200.498657%2010.9993C0.498657%2016.2404%204.33858%2020.5844%209.35855%2021.3722V14.0346H6.69238V10.9993H9.35855V8.68594C9.35855%206.05427%2010.9262%204.60062%2013.3248%204.60062C14.4736%204.60062%2015.6753%204.80571%2015.6753%204.80571V7.38979H14.3512C13.0468%207.38979%2012.64%208.19921%2012.64%209.0296V10.9993H15.5523L15.0867%2014.0346H12.64V21.3722C17.66%2020.5844%2021.4999%2016.2404%2021.4999%2010.9993Z'%20fill='%231568EA'/%3e%3c/g%3e%3c/svg%3e)


'%3e%3cpath%20d='M2.42045%2022.1876H6.31818V12.7217L0.75%208.54553V20.5171C0.75%2021.4414%201.49892%2022.1876%202.42045%2022.1876Z'%20fill='%234285F4'/%3e%3cpath%20d='M19.682%2022.1876H23.5797C24.5041%2022.1876%2025.2502%2021.4387%2025.2502%2020.5171V8.54553L19.682%2012.7217'%20fill='%2334A853'/%3e%3cpath%20d='M19.682%205.48293V12.7216L25.2502%208.54543V6.31816C25.2502%204.25236%2022.8921%203.07469%2021.2411%204.31361'%20fill='%23FBBC04'/%3e%3cpath%20d='M6.31824%2012.7217V5.48303L13.0001%2010.4944L19.6819%205.48303V12.7217L13.0001%2017.733'%20fill='%23EA4335'/%3e%3cpath%20d='M0.75%206.31816V8.54543L6.31818%2012.7216V5.48293L4.75909%204.31361C3.10534%203.07469%200.75%204.25236%200.75%206.31816Z'%20fill='%23C5221F'/%3e%3c/g%3e%3cdefs%3e%3cclipPath%20id='clip0_2954_7305'%3e%3crect%20width='24.5'%20height='18.375'%20fill='white'%20transform='translate(0.75%203.8125)'/%3e%3c/clipPath%3e%3c/defs%3e%3c/svg%3e)


Inserting images is a basic Word skill that makes reports, essays, resumes, and presentations easier to read. Many beginners struggle with local inserts, online pictures, batch import, and messy layout after wrapping. This guide covers practical ways to insert pictures in Microsoft Word, how to fix common issues, and a free Word-compatible option in WPS Writer.


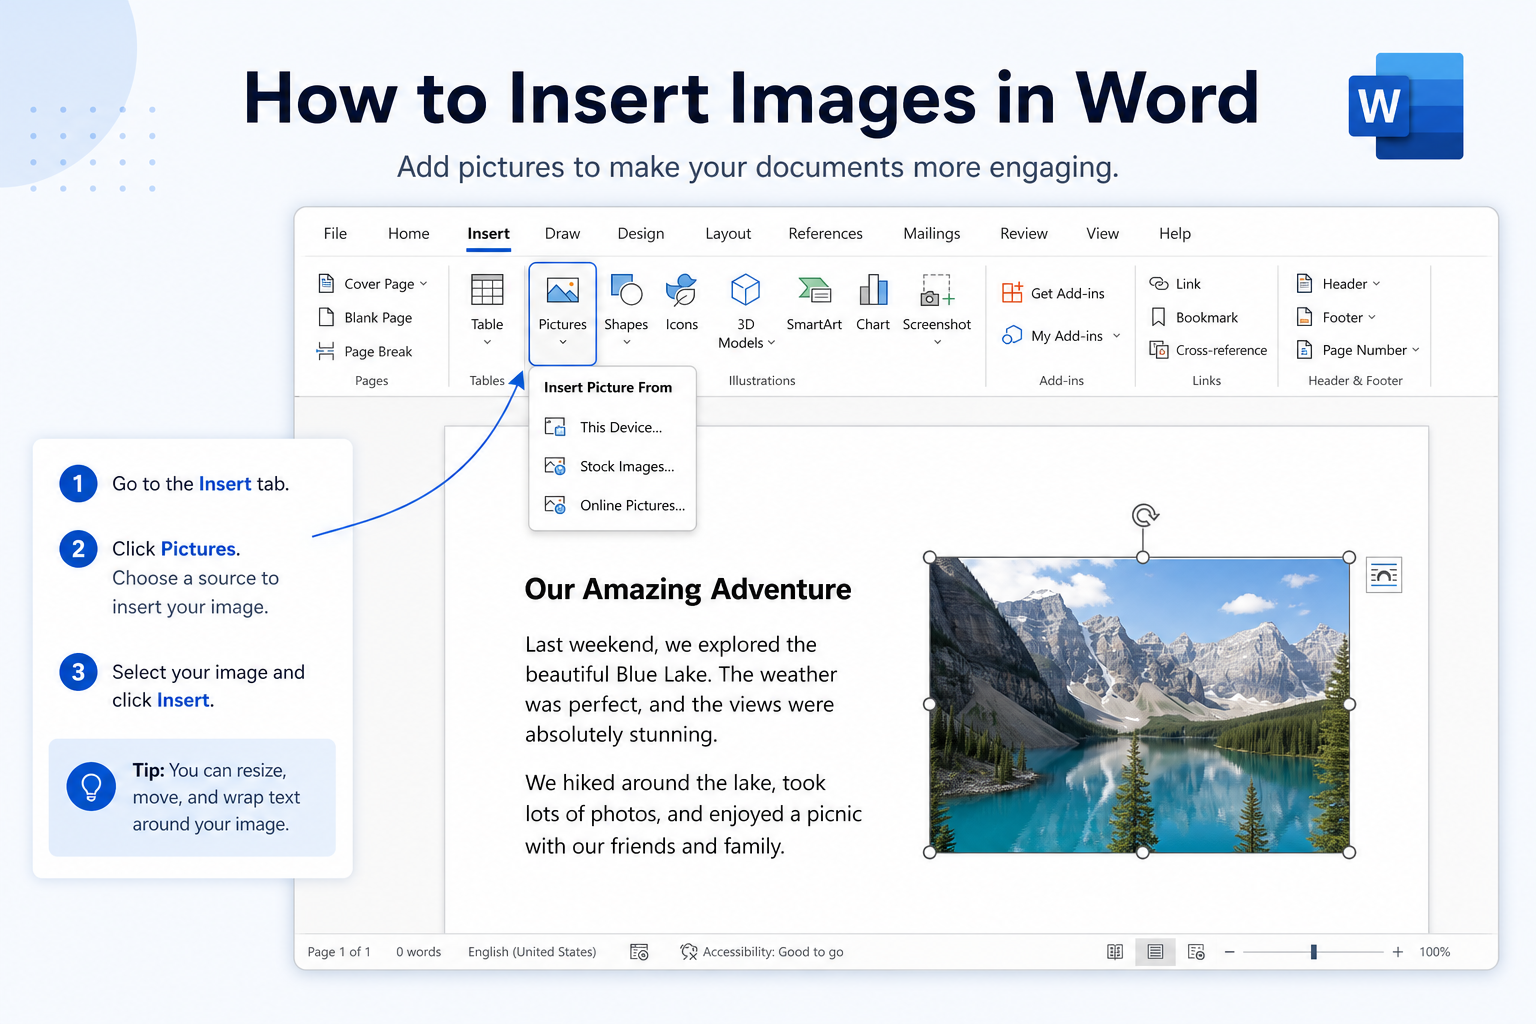
Quick answer: Place your cursor → Insert → Pictures → This Device (or Online Pictures). For multiple files, hold Ctrl and select several images. If pictures overlap or will not move, change wrap to Square or Tight.
3 Common Ways to Insert Images in Word
These methods work in Word 2016, 2019, 2021, and Microsoft 365.
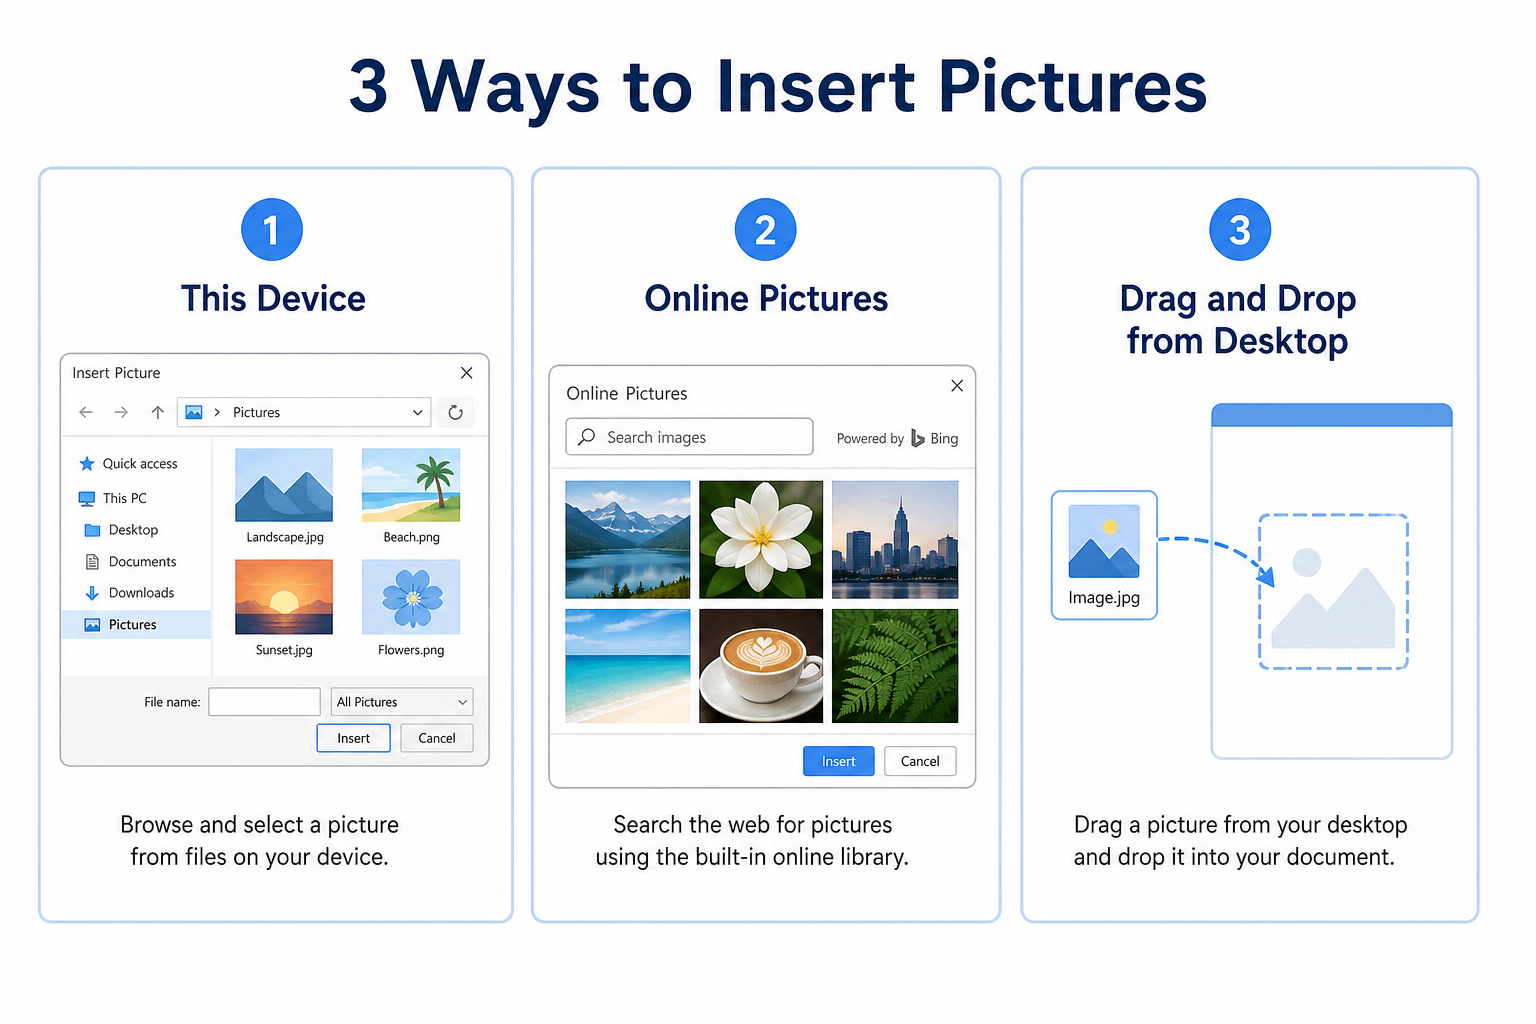
| Method | Best for | Where to start |
|---|---|---|
| This Device | Photos and files already on your computer | Insert → Pictures → This Device |
| Online Pictures | Stock images from Word’s online gallery | Insert → Pictures → Online Pictures |
| Drag and drop | Quick one-off inserts from Desktop or File Explorer | Drag the image onto the page |
Method 1: Insert images from your computer
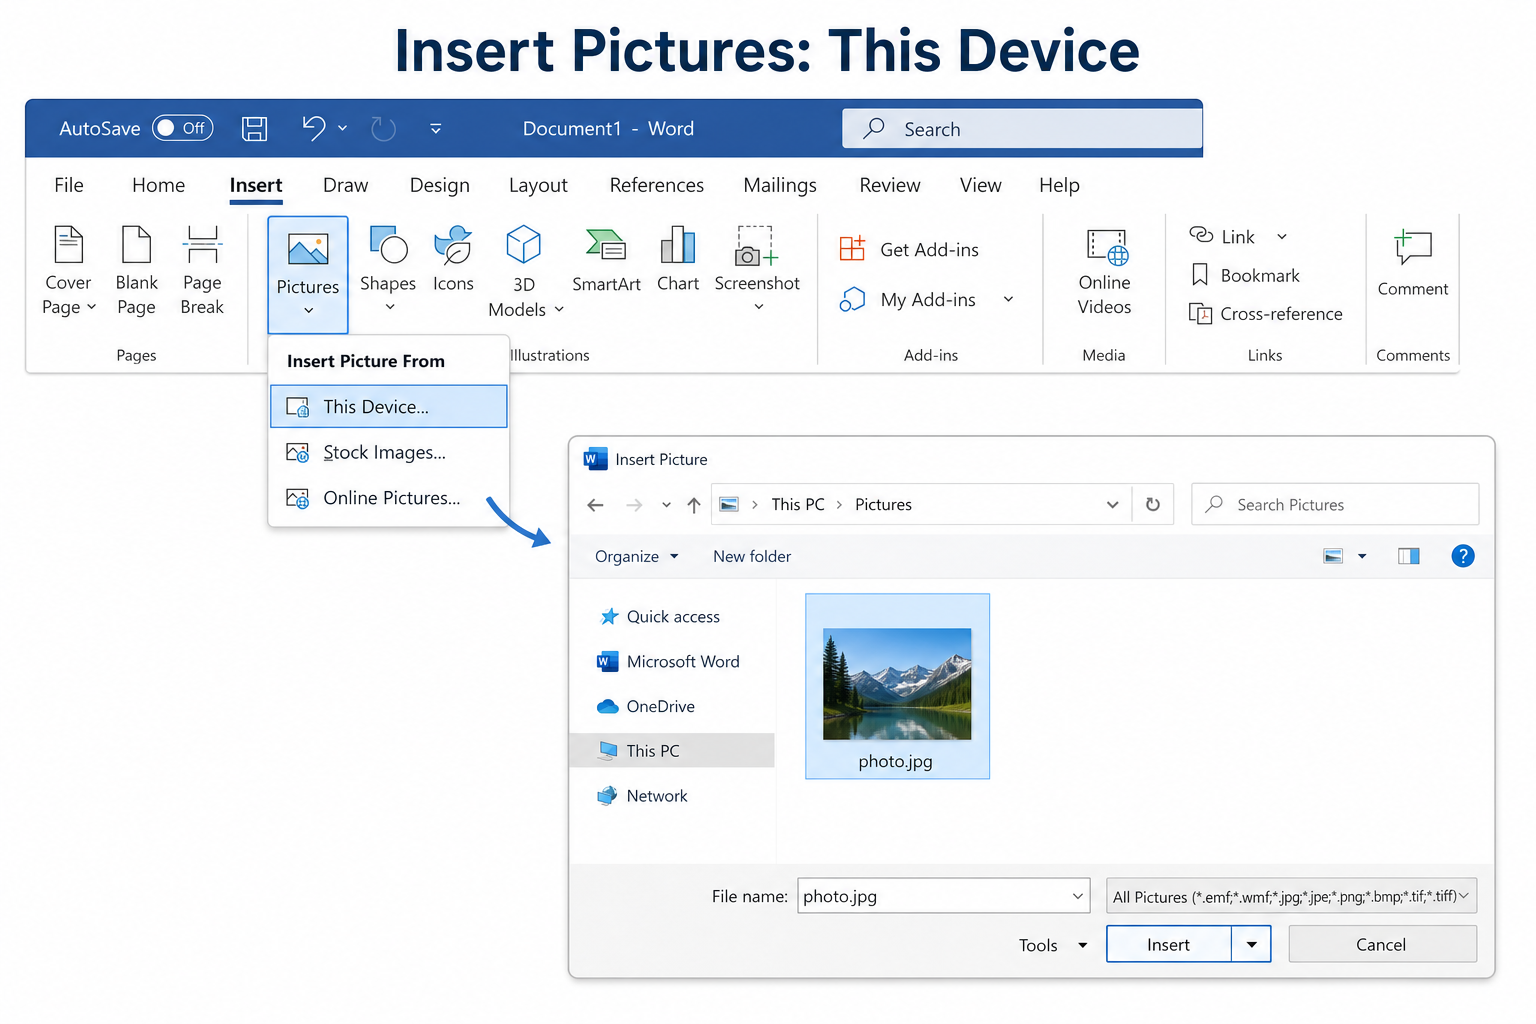
Place your cursor where the image should appear.
Go to the Insert tab.
Pictures sits alongside Tables, Shapes, and Charts on the same ribbon; a full walkthrough of the Insert Tab in Word covers how those groups are arranged.
Click Pictures → This Device (older Word may say Picture → From File).
Select your image file and click Insert.
Method 2: Insert online pictures
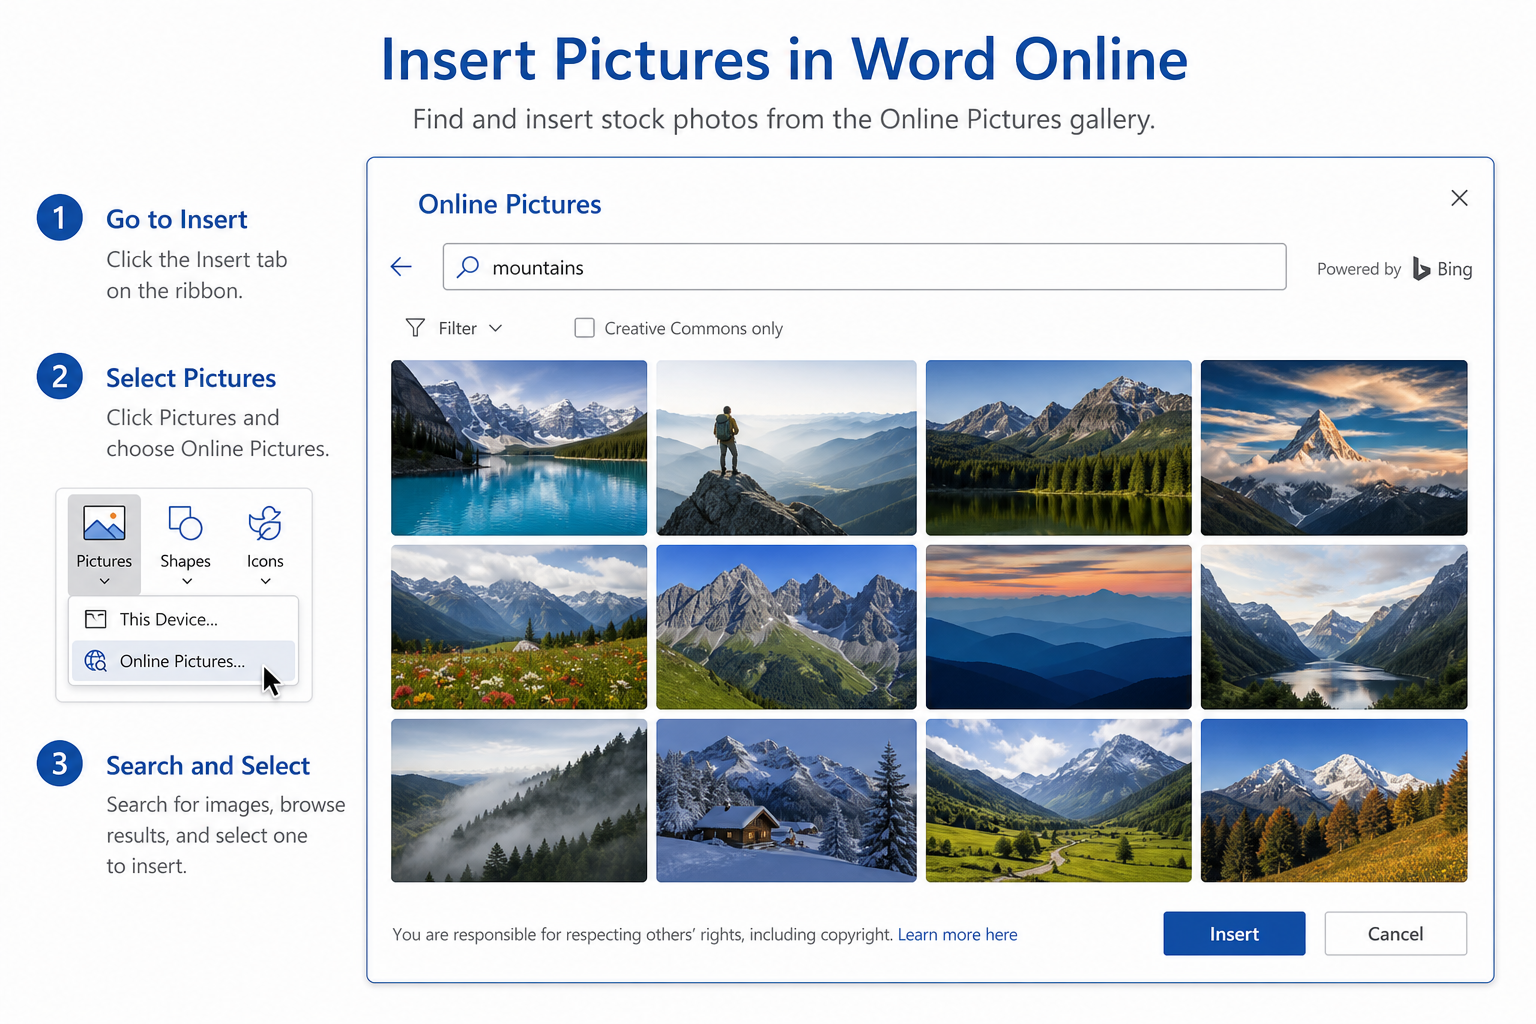
Go to Insert → Pictures → Online Pictures.
Search for an image in the built-in gallery.
Select the picture and insert it.
Note: Availability and licensing labels can vary by Word version and Microsoft account. Check usage rights before publishing.
Method 3: Drag and drop
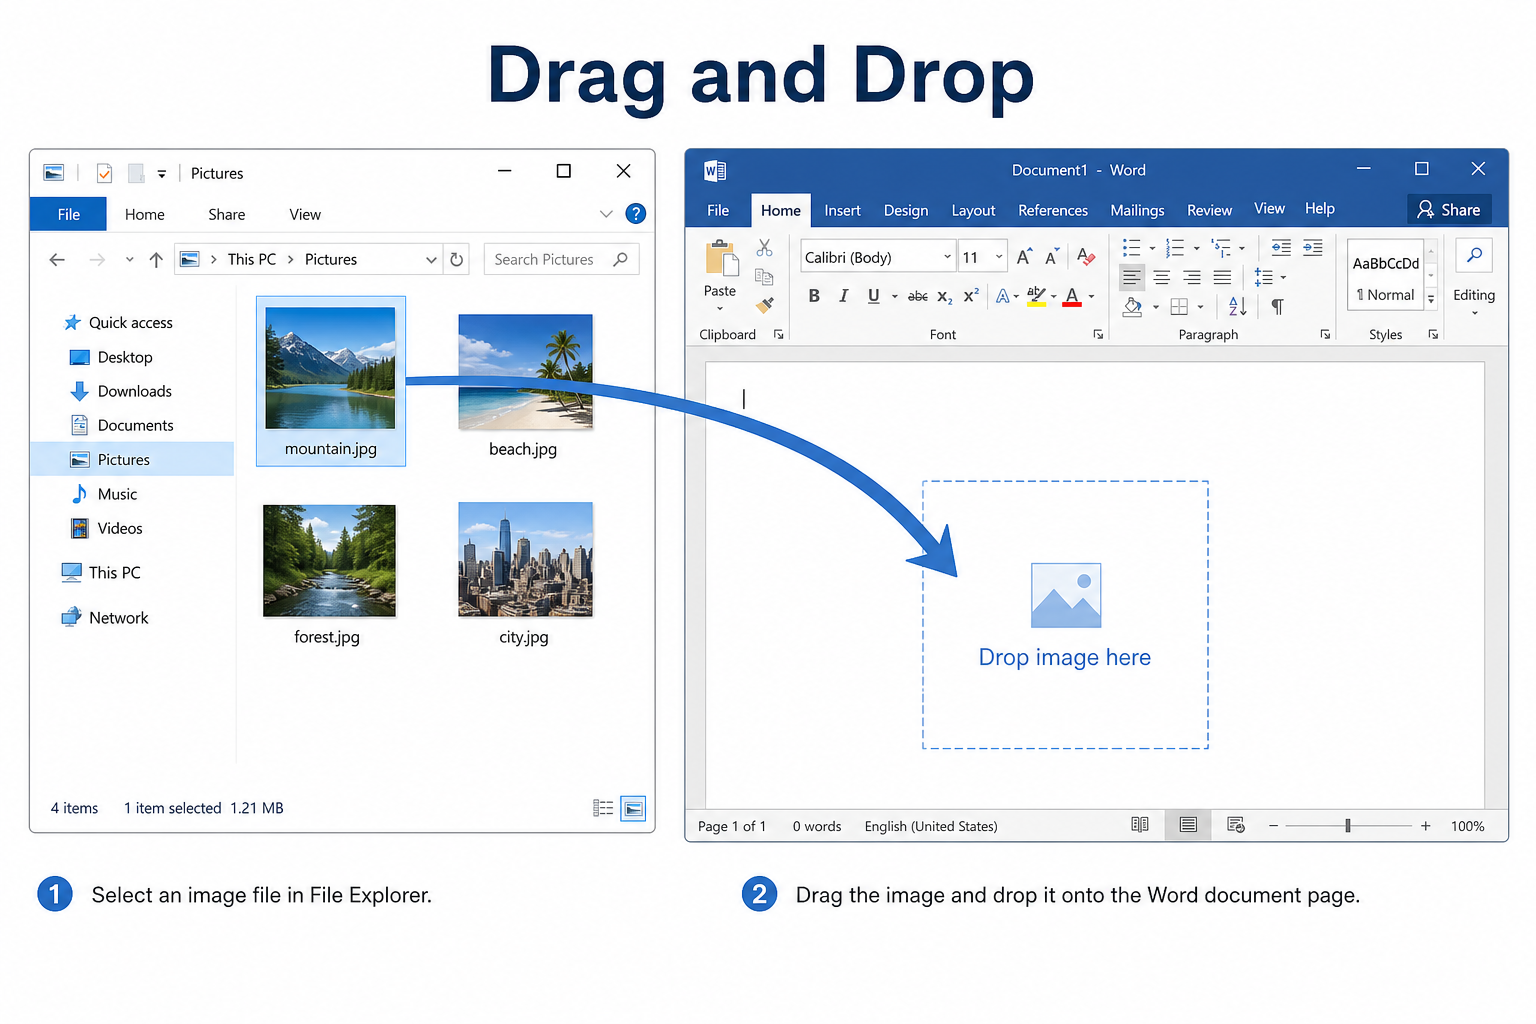
Open File Explorer (Windows) or Finder (Mac).
Drag the image file onto the Word page.
Release to drop it at the insertion point.
This is the fastest option for a single quick insert.
How to Insert Multiple Images at Once
Batch insert is useful for reports, photo pages, and visual handouts.
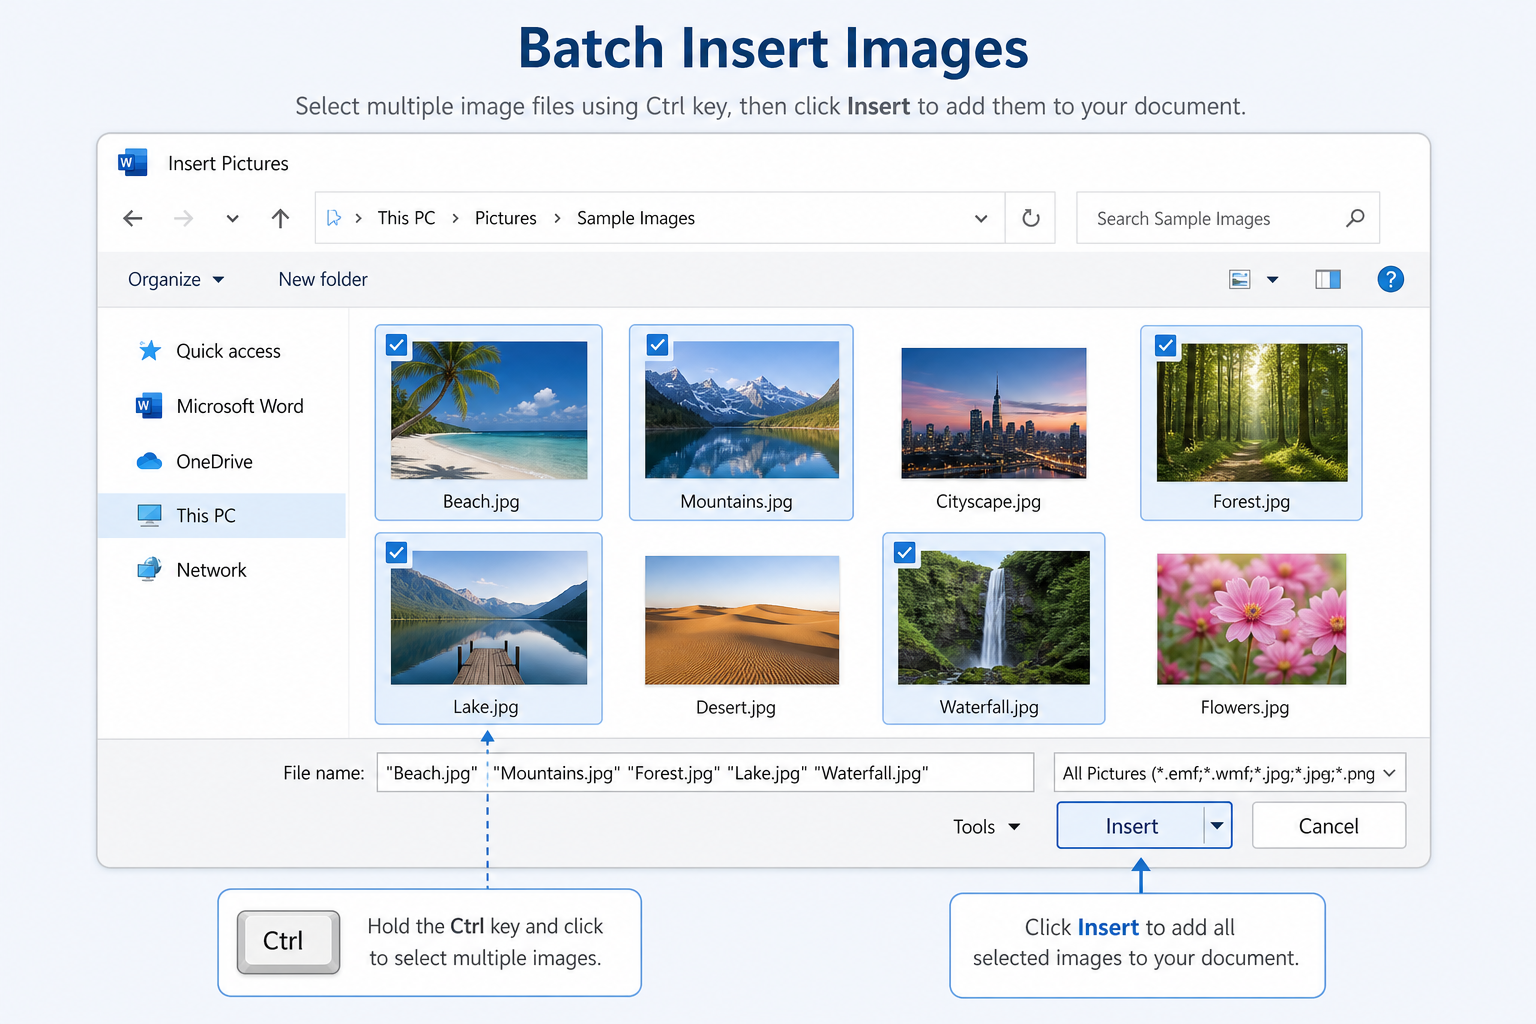
Go to Insert → Pictures → This Device.
Hold Ctrl (Windows) or Command (Mac) and click multiple image files.
Click Insert to add them together.
Tip: After a batch insert, select each picture and set the same wrap style and approximate size so the layout stays even. Word inserts images as In Line with Text by default, which can look stacked or uneven until you adjust wrapping.
Common Image Issues and Fixes
| Problem | What to try |
|---|---|
| Image is blank or will not display | Re-insert a smaller file; check the image opens outside Word; try a different format (.jpg / .png) |
| Pictures overlap or look messy | Select each image → Picture Format → Wrap Text → Square or Tight, then drag into place |
| Cannot move or resize freely | Change wrap from In Line with Text to Square, Tight, or In Front of Text |
| File becomes slow or huge | Compress pictures (Picture Format → Compress Pictures) before sharing |
Change text wrapping so images move freely
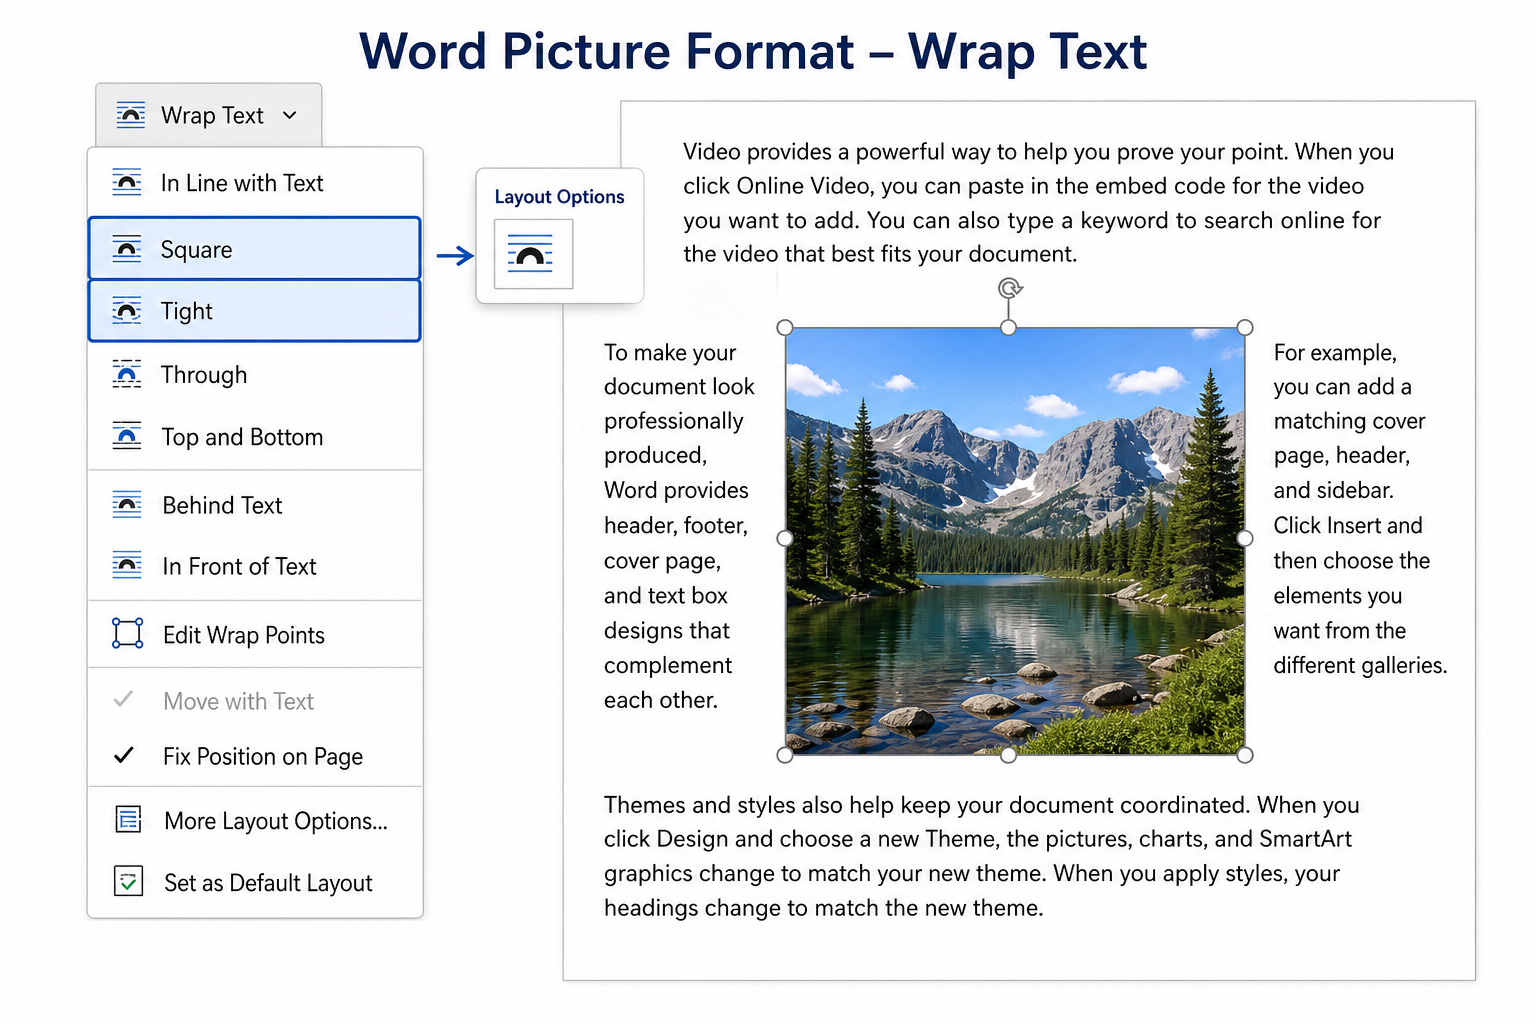
Click the image.
Open Picture Format (or the Layout Options icon next to the picture).
Choose Wrap Text → Square or Tight.
Drag the corner handles to resize; drag the image to reposition.
Free Method: Insert Images in WPS Writer
Word covers every insert path, but wrapping and alignment can take extra clicks—especially after batch import. WPS Writer is a free, Word-compatible option with a straightforward Insert → Pictures workflow for everyday documents.
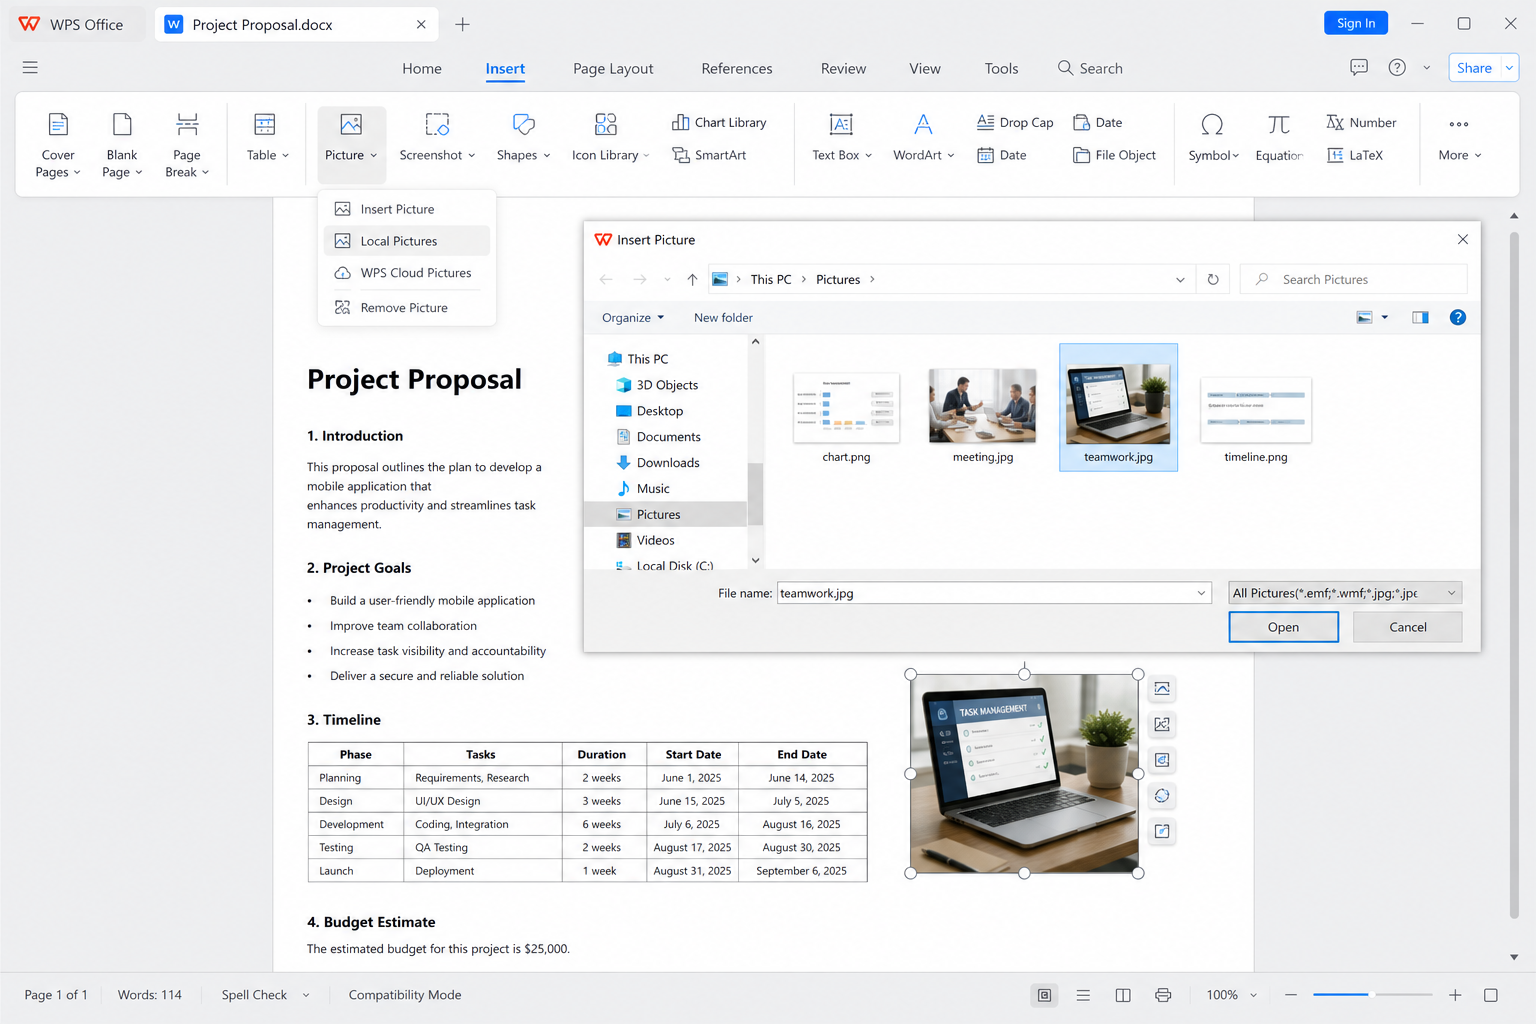
Open your document in WPS Writer.
Go to Insert → Pictures and choose a local file (or online insert if available in your build).
Adjust size and position on the page.
Use wrap and align tools to keep multiple images neat.
Save as .docx when you need to share the file in Microsoft Word.
Clear insert path — Add pictures without hunting through dense menus for basic use
Easy resize and wrap — Move images into place for reports and resumes
Strong Word compatibility — Share common .docx layouts with Word users
No paid subscription required — Core picture tools for daily documents
Practical Image Formatting Tips
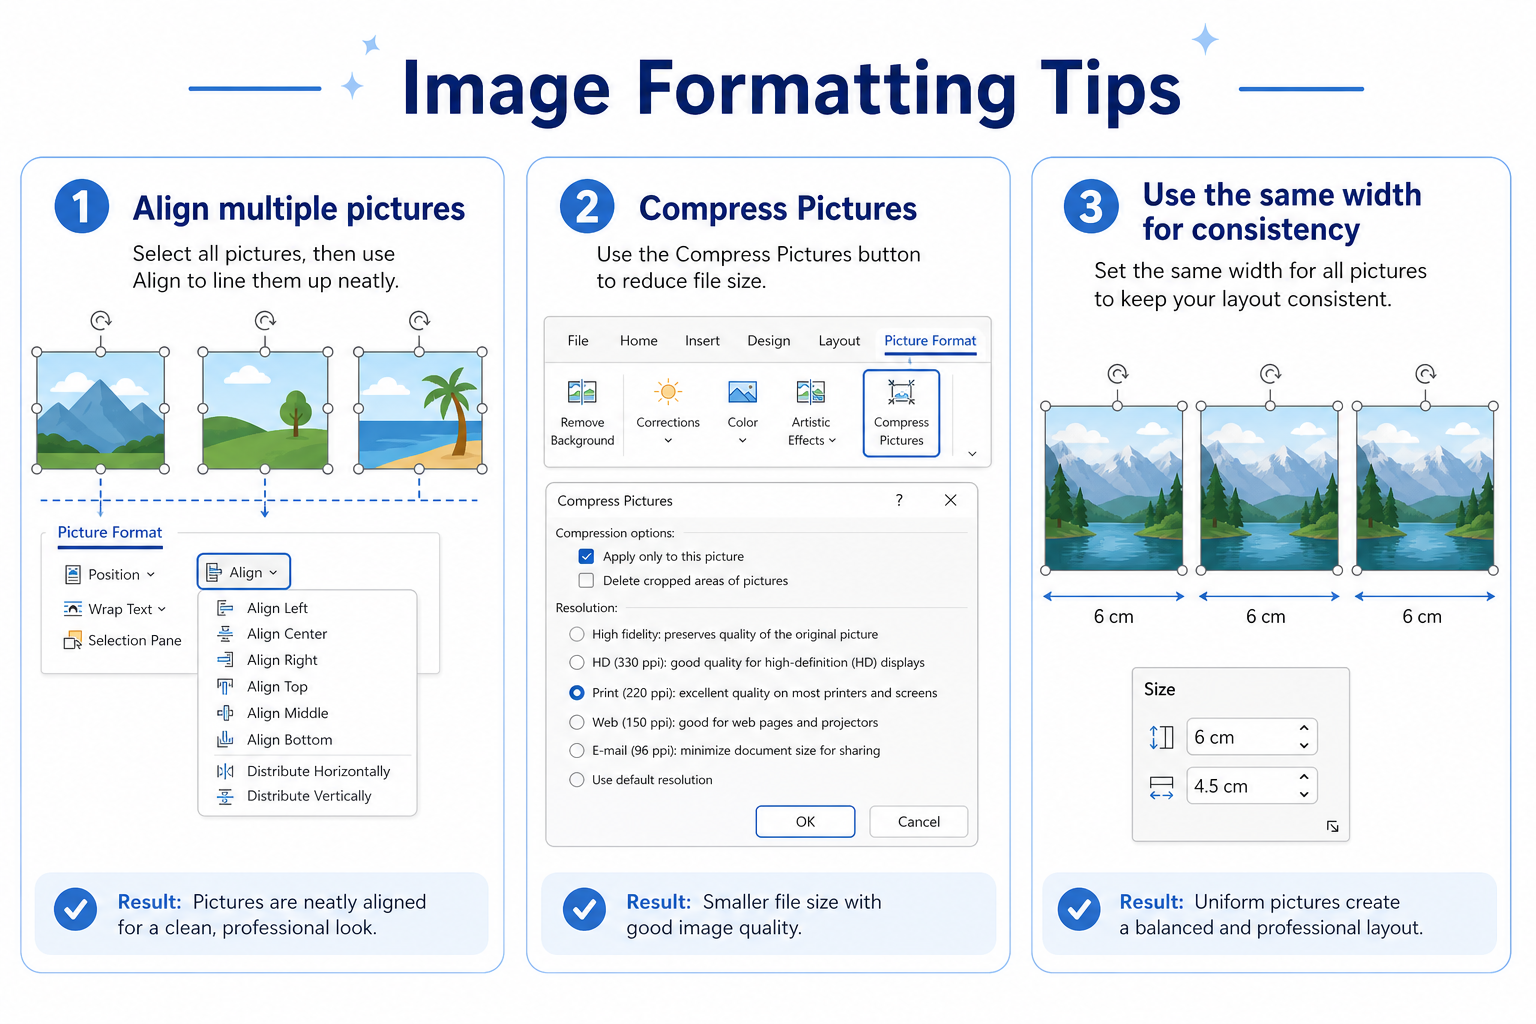
Set text wrapping early so you can drag images freely.
Select multiple pictures and use align tools to keep a clean row or column.
Compress large photos before emailing or uploading the file.
Match image widths for a more formal, consistent look.
Prefer .jpg for photos and .png for screenshots with sharp text.
FAQ
How do I insert a picture in Word?
Go to Insert → Pictures → This Device, choose your file, and click Insert. Or drag the image onto the page.
How do I insert multiple images at once?
Open Insert → Pictures → This Device, hold Ctrl (or Command on Mac), select several files, then click Insert.
Why can’t I move my image in Word?
It is probably set to In Line with Text. Change wrap to Square or Tight, then drag it.
Do images inserted in WPS work in Microsoft Word?
Yes—when you save as a standard .docx, pictures and layout usually open normally in Microsoft Word.
Conclusion
To insert images in Word, use Insert → Pictures, drag and drop for quick adds, or multi-select for batch import. Fix overlap and locked movement with wrap settings like Square or Tight, then compress oversized files when needed. If you want a simpler free workflow for everyday picture layout, WPS Writer is a practical Word-compatible option.

'%3e%3cpath%20d='M19.9911%204.11386V6.471H18.5894C18.0775%206.471%2017.7322%206.57814%2017.5536%206.79243C17.3751%207.00671%2017.2858%207.32814%2017.2858%207.75671V9.44421H19.9019L19.5536%2012.0871H17.2858V18.8639H14.5536V12.0871H12.2769V9.44421H14.5536V7.49779C14.5536%206.39064%2014.8632%205.53201%2015.4822%204.92189C16.1013%204.31177%2016.9257%204.00671%2017.9554%204.00671C18.8304%204.00671%2019.509%204.04243%2019.9911%204.11386Z'%20fill='%23333333'/%3e%3c/g%3e%3cdefs%3e%3cclipPath%20id='clip0_2938_8199'%3e%3crect%20width='16'%20height='16'%20fill='white'%20transform='translate(8%204.00671)'/%3e%3c/clipPath%3e%3c/defs%3e%3c/svg%3e)
'%3e%3cpath%20d='M17.5237%2010.7813L23.4811%204H22.0699L16.8949%209.88693L12.7648%204H8L14.2469%2012.9029L8%2020.0133H9.4112L14.8725%2013.7952L19.2352%2020.0133H24M9.92053%205.04213H12.0885L22.0688%2019.0224H19.9003'%20fill='%23333333'/%3e%3c/g%3e%3cdefs%3e%3cclipPath%20id='clip0_2938_8200'%3e%3crect%20width='16'%20height='16.0134'%20fill='white'%20transform='translate(8%204)'/%3e%3c/clipPath%3e%3c/defs%3e%3c/svg%3e)


