

'%3e%3cpath%20d='M8%200C12.4183%200%2016%203.58172%2016%208C16%2012.4183%2012.4183%2016%208%2016C3.58172%2016%200%2012.4183%200%208C0%203.58172%203.58172%200%208%200ZM11.6162%204.38379C11.2257%203.99337%2010.5927%203.99338%2010.2021%204.38379L8%206.58594L5.79785%204.38379C5.40732%203.99334%204.77429%203.99329%204.38379%204.38379C3.99331%204.77429%203.99335%205.40733%204.38379%205.79785L6.58594%208L4.38379%2010.2021C3.99348%2010.5927%203.99341%2011.2257%204.38379%2011.6162C4.77426%2012.0066%205.40734%2012.0065%205.79785%2011.6162L8%209.41406L10.2021%2011.6162C10.5927%2012.0066%2011.2257%2012.0067%2011.6162%2011.6162C12.0067%2011.2257%2012.0066%2010.5927%2011.6162%2010.2021L9.41406%208L11.6162%205.79785C12.0066%205.40735%2012.0066%204.77429%2011.6162%204.38379Z'%20fill='%23080E17'%20fill-opacity='0.46'/%3e%3c/g%3e%3cdefs%3e%3cclipPath%20id='clip0_3761_713'%3e%3crect%20width='16'%20height='16'%20fill='white'/%3e%3c/clipPath%3e%3c/defs%3e%3c/svg%3e)



'%3e%3cpath%20fill-rule='evenodd'%20clip-rule='evenodd'%20d='M21.4999%2010.9993C21.4999%205.20009%2016.7986%200.498901%2010.9993%200.498901C5.19994%200.498901%200.498657%205.20009%200.498657%2010.9993C0.498657%2016.2404%204.33858%2020.5844%209.35855%2021.3722V14.0346H6.69238V10.9993H9.35855V8.68594C9.35855%206.05427%2010.9262%204.60062%2013.3248%204.60062C14.4736%204.60062%2015.6753%204.80571%2015.6753%204.80571V7.38979H14.3512C13.0468%207.38979%2012.64%208.19921%2012.64%209.0296V10.9993H15.5523L15.0867%2014.0346H12.64V21.3722C17.66%2020.5844%2021.4999%2016.2404%2021.4999%2010.9993Z'%20fill='%231568EA'/%3e%3c/g%3e%3c/svg%3e)


'%3e%3cpath%20d='M2.42045%2022.1876H6.31818V12.7217L0.75%208.54553V20.5171C0.75%2021.4414%201.49892%2022.1876%202.42045%2022.1876Z'%20fill='%234285F4'/%3e%3cpath%20d='M19.682%2022.1876H23.5797C24.5041%2022.1876%2025.2502%2021.4387%2025.2502%2020.5171V8.54553L19.682%2012.7217'%20fill='%2334A853'/%3e%3cpath%20d='M19.682%205.48293V12.7216L25.2502%208.54543V6.31816C25.2502%204.25236%2022.8921%203.07469%2021.2411%204.31361'%20fill='%23FBBC04'/%3e%3cpath%20d='M6.31824%2012.7217V5.48303L13.0001%2010.4944L19.6819%205.48303V12.7217L13.0001%2017.733'%20fill='%23EA4335'/%3e%3cpath%20d='M0.75%206.31816V8.54543L6.31818%2012.7216V5.48293L4.75909%204.31361C3.10534%203.07469%200.75%204.25236%200.75%206.31816Z'%20fill='%23C5221F'/%3e%3c/g%3e%3cdefs%3e%3cclipPath%20id='clip0_2954_7305'%3e%3crect%20width='24.5'%20height='18.375'%20fill='white'%20transform='translate(0.75%203.8125)'/%3e%3c/clipPath%3e%3c/defs%3e%3c/svg%3e)


Adding pictures to a Word document can leave big blank gaps, push text out of place, or lock an image so it will not move. Text wrapping fixes that by letting text flow around the picture. This beginner’s guide shows how to wrap text around an image in Word, what each wrap style is for, how to build a side-by-side layout, how to fix common issues, and a free Word-compatible option in WPS Writer.


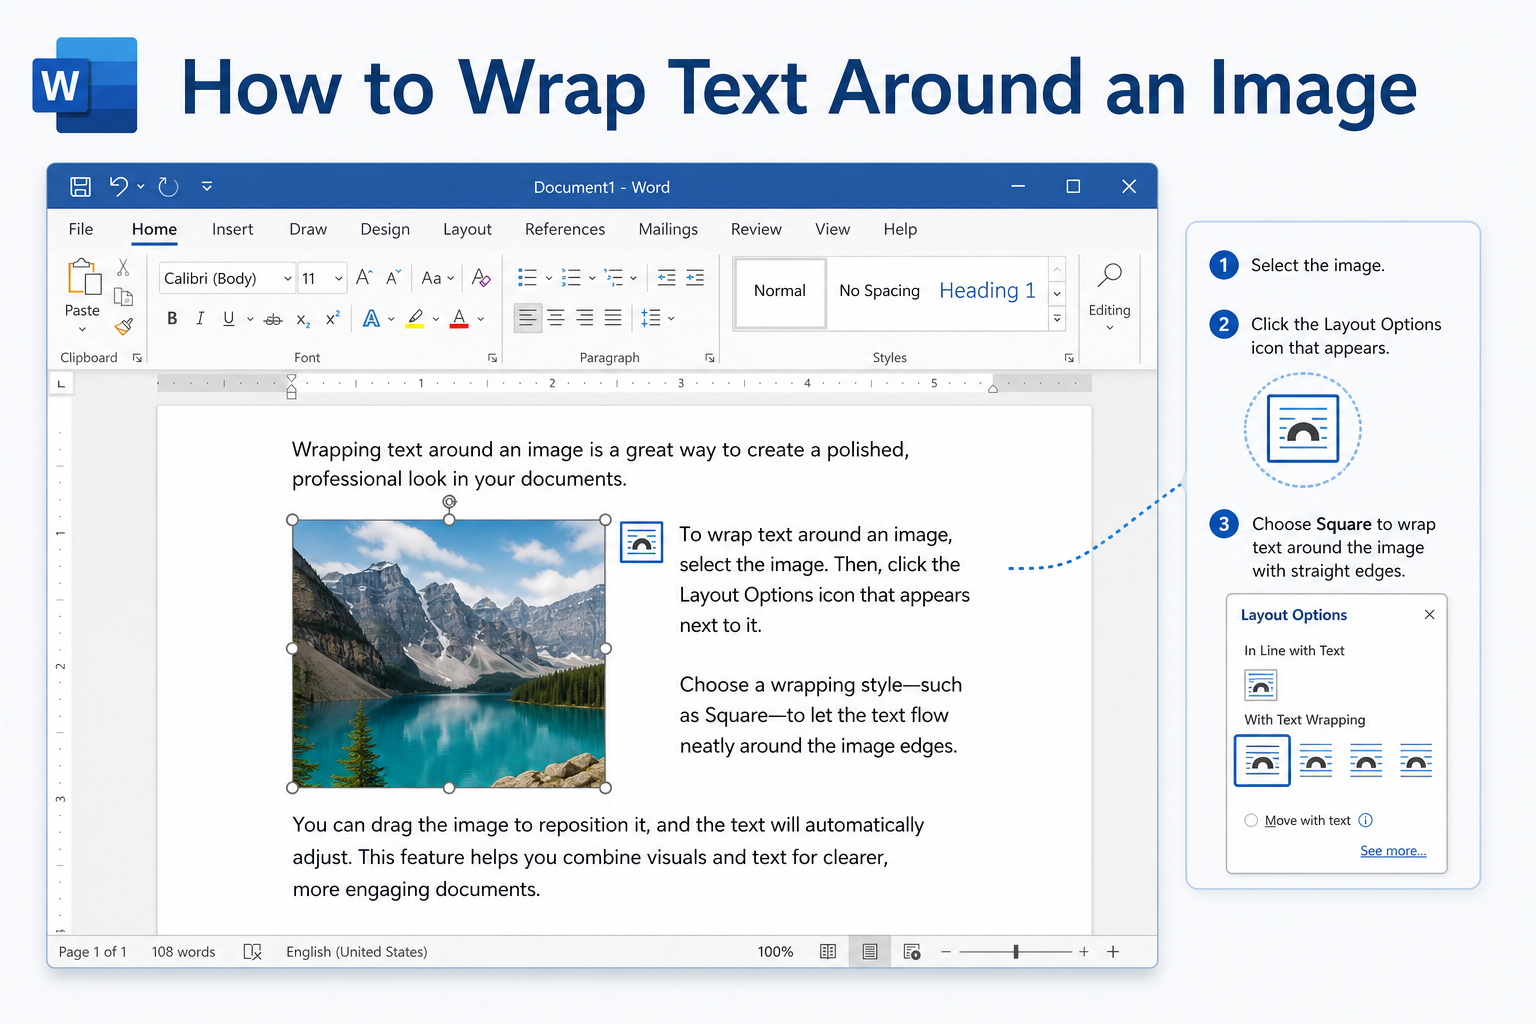
Quick answer: Select the image → click the Layout Options icon (or go to Picture Format → Wrap Text) → choose Square or Tight to move the picture freely and let text flow around it. Use Top and Bottom for banners, Behind Text for backgrounds, and In Front of Text for overlays.
How to Wrap Text Around an Image in Word
These steps work in Word 2016, 2019, 2021, and Microsoft 365.
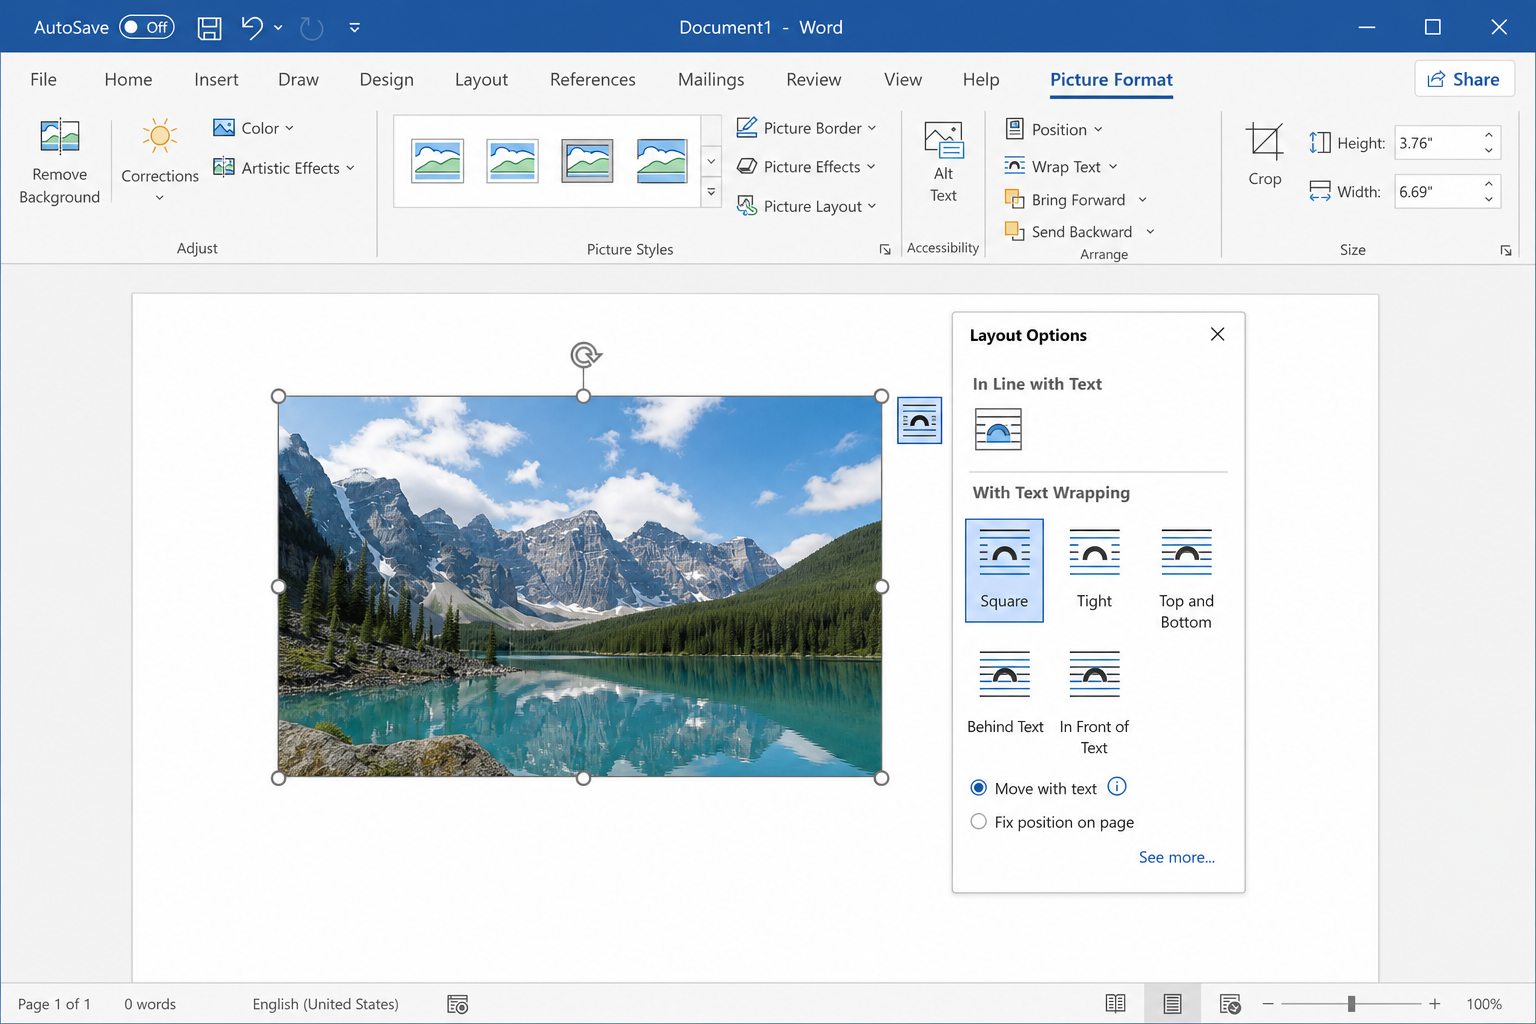
Click the image to select it.
Click the Layout Options icon that appears next to the picture.
Choose a wrapping style (start with Square if you are unsure).
Drag the image into place and resize it with the corner handles.
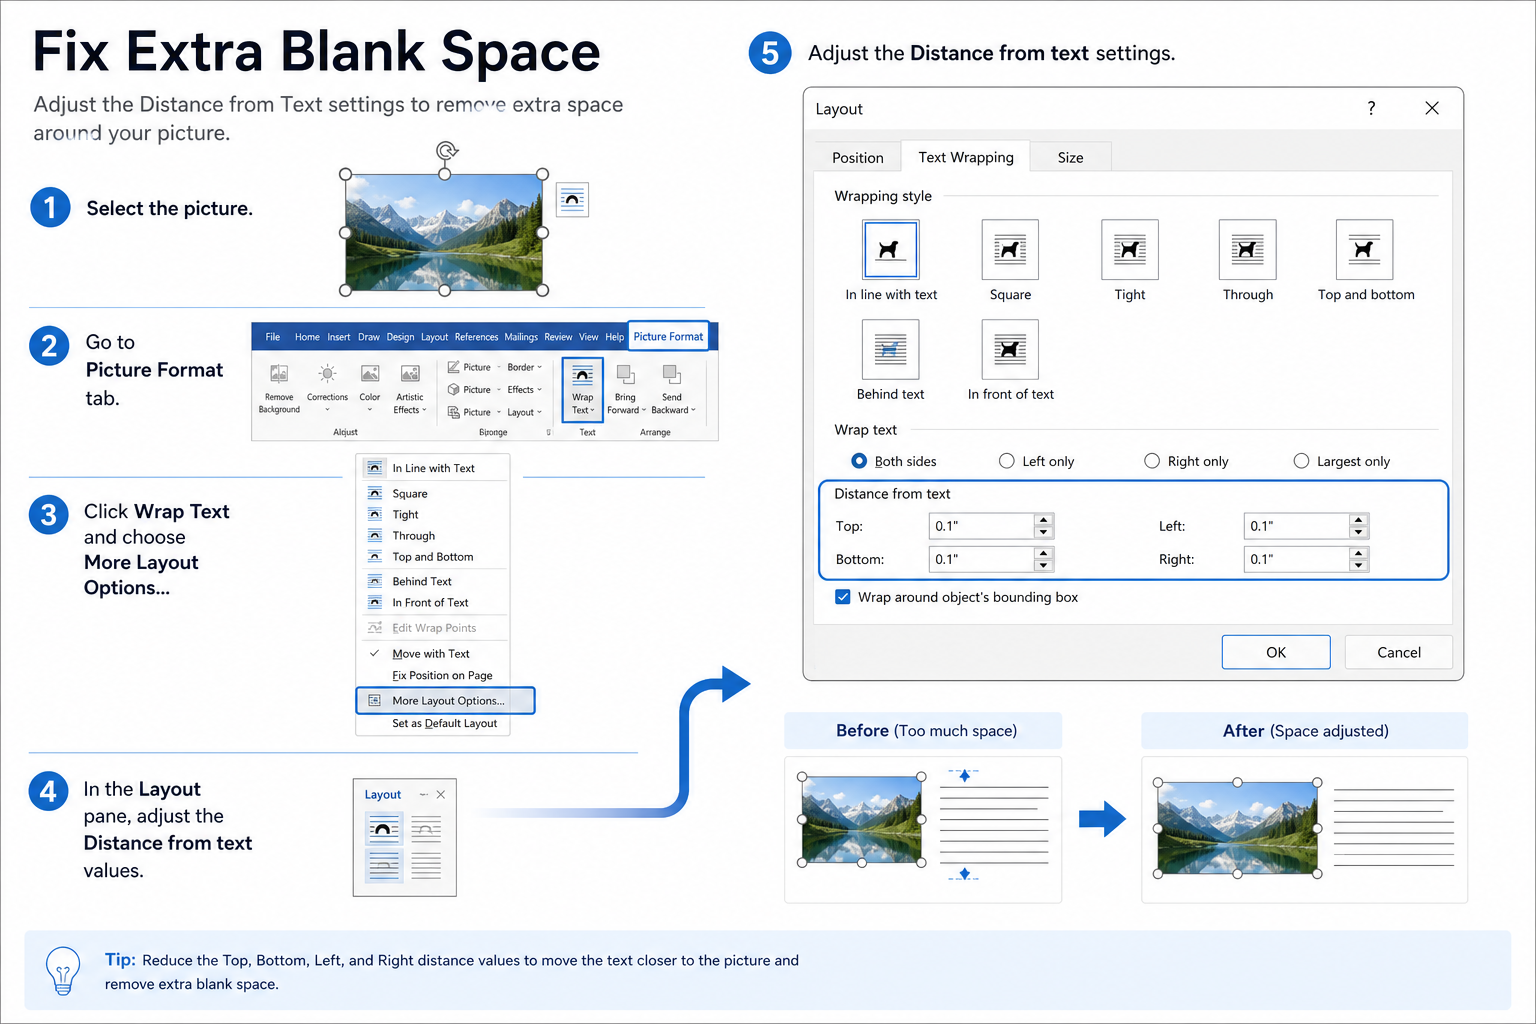
You can also open the full menu from Picture Format → Wrap Text, then pick the same styles or open More Layout Options… for spacing and position controls.
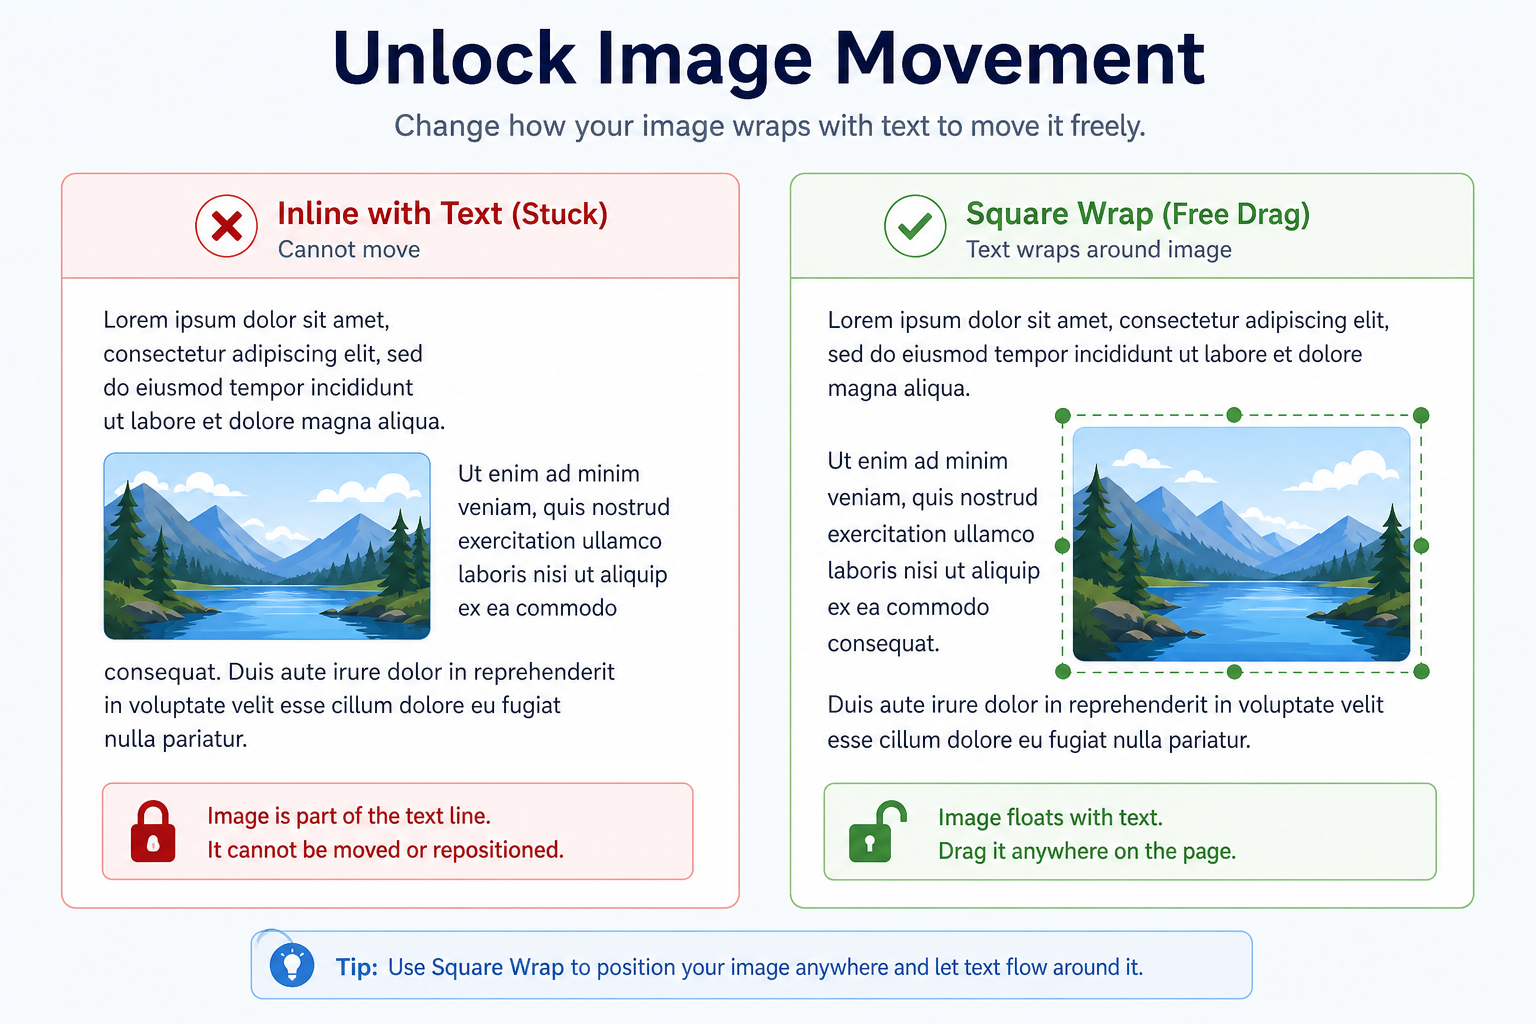
Tip: New pictures often insert as In Line with Text, which treats the image like a giant character. That is why it feels stuck until you change the wrap style.
Common Text Wrapping Styles and When to Use Them
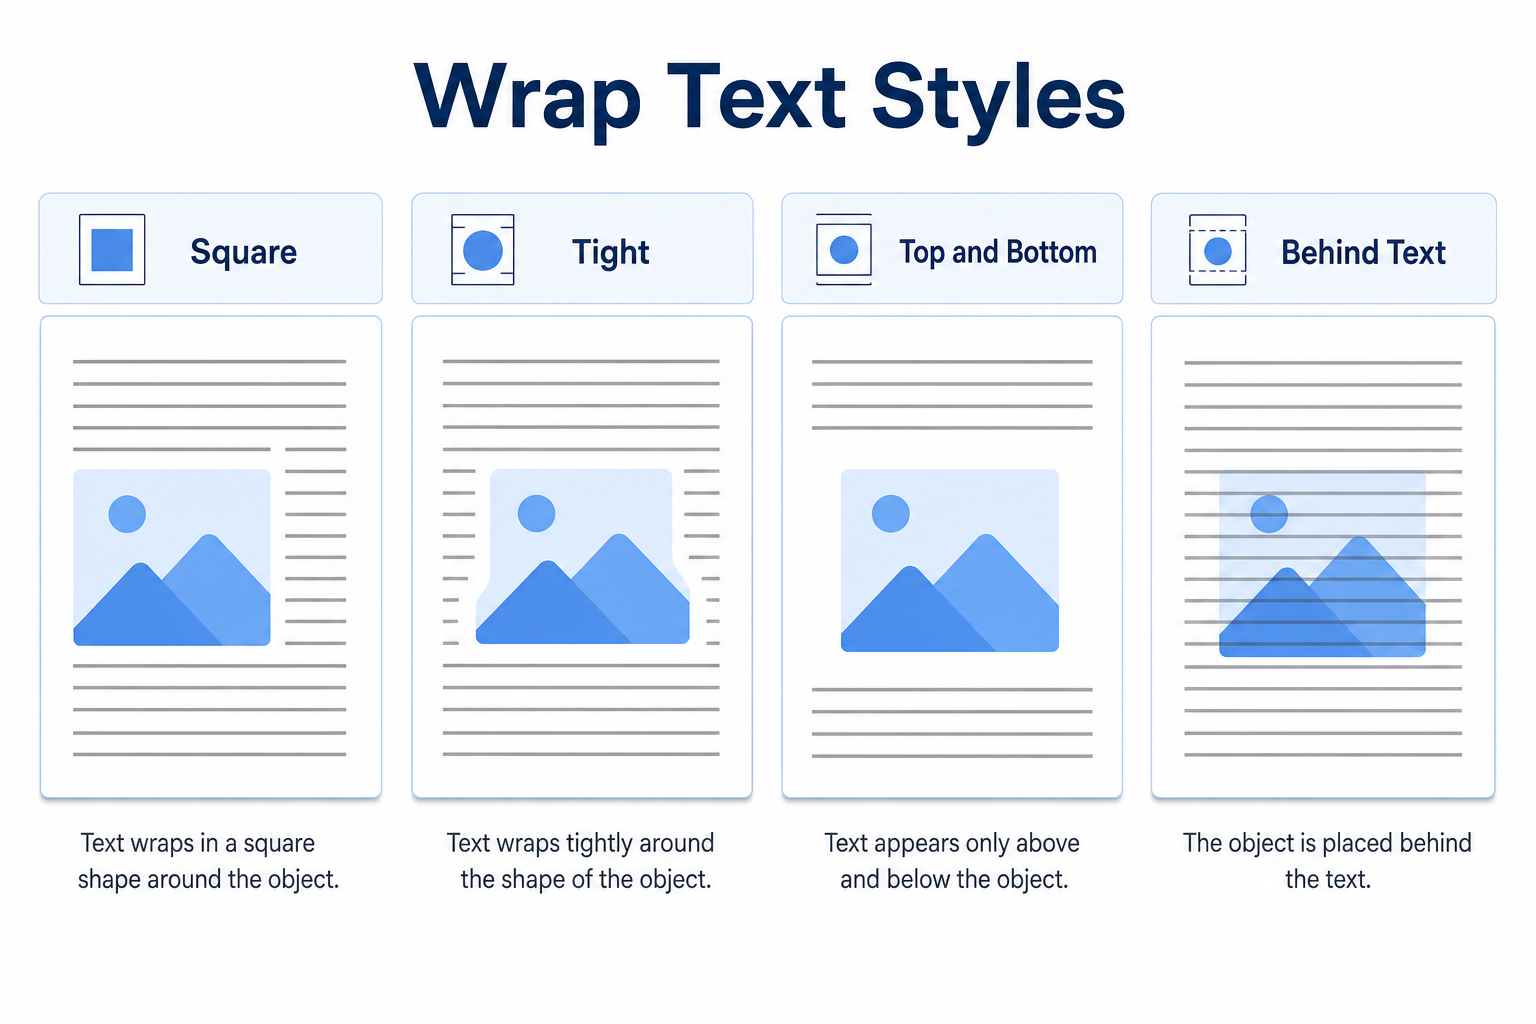
| Wrap style | What it does | Best for |
|---|---|---|
| In Line with Text | Image sits in the paragraph flow like text | Simple essays where pictures should stay between paragraphs |
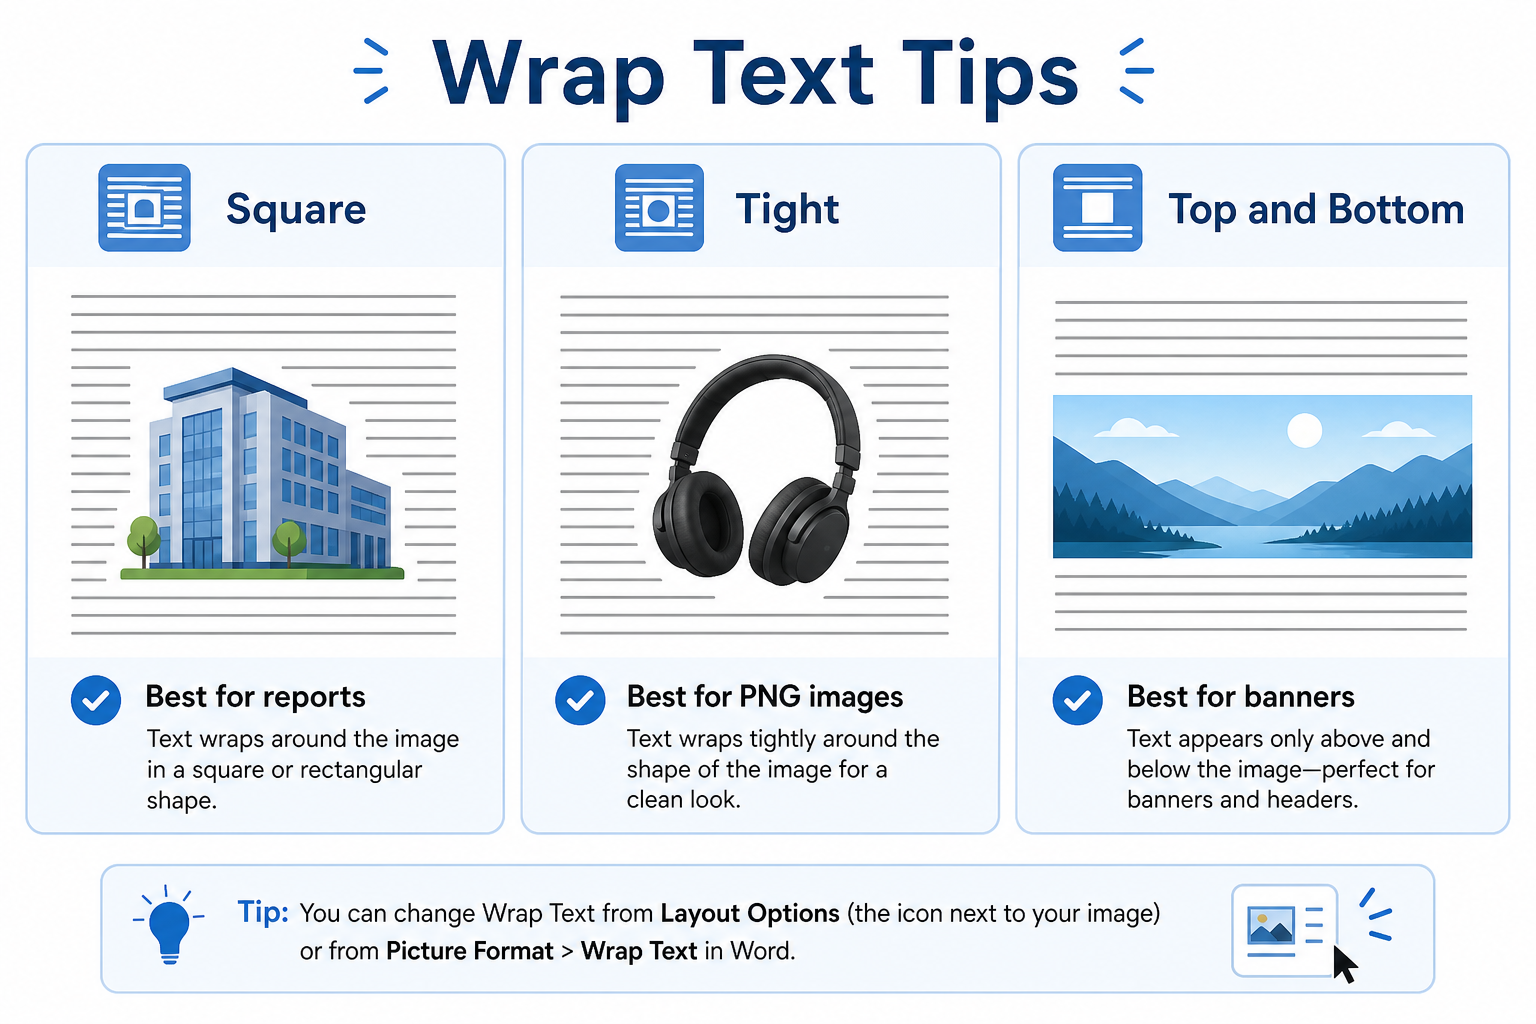
| Square | Text flows evenly around a rectangular box | Reports, articles, most everyday layouts |
| Tight | Text hugs the image outline more closely | Irregular shapes and transparent .png graphics |
| Through | Text can fill open areas inside a complex outline | Special shapes (results vary by image) |
| Top and Bottom | Text only above and below; sides stay clear | Centered banners and section header images |
| Behind Text | Image sits under the text | Light backgrounds and watermark-style designs |
| In Front of Text | Image sits on top of the text | Stickers, badges, and decorative overlays |
How to Create a Side-by-Side Text and Image Layout
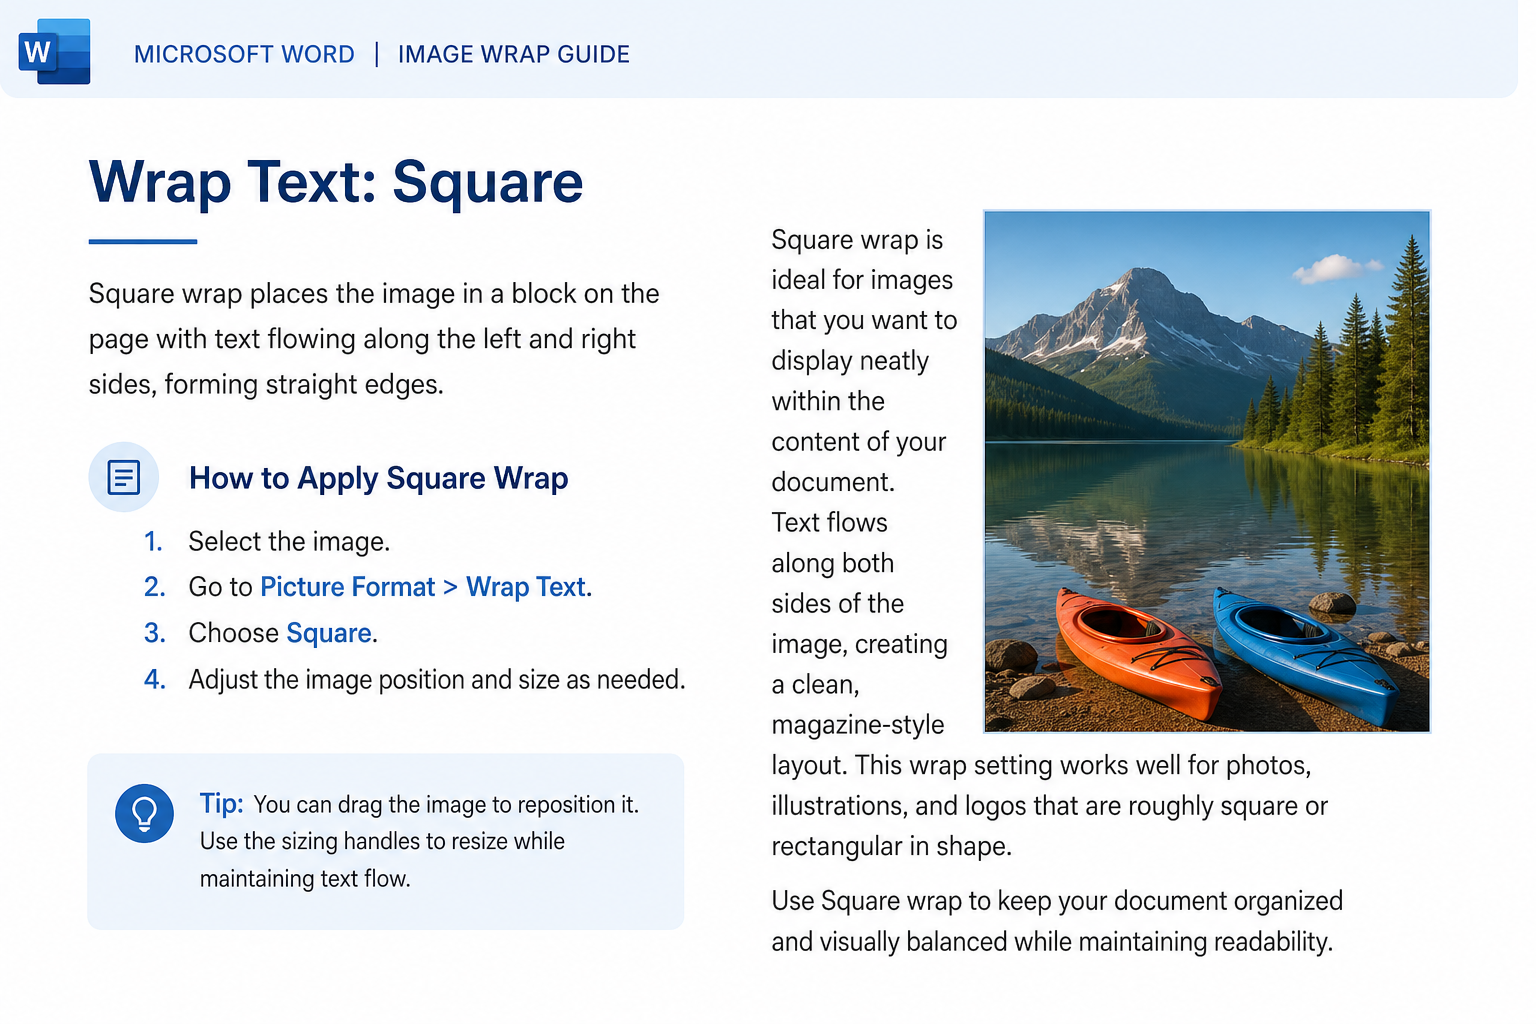
Set the image wrap to Square or Tight.
Drag the picture to the left or right side of the paragraph.
Resize the image so text has enough room beside it.
Optional: open Wrap Text → More Layout Options… and add a little distance from text so the layout does not feel cramped.
For a more structured two-column look, insert a 2-column table and put text in one cell and the image in the other—then remove borders if you want a clean page.
Common Text Wrapping Issues and Fixes
| Problem | What to try |
|---|---|
| Image will not move freely | Change wrap from In Line with Text to Square or Tight |
| Too much blank space around the picture | Try Tight, or reduce “Distance from text” in More Layout Options |
| Picture jumps when you edit text | Check anchor position; lock anchor in More Layout Options if available |
| Text overlaps the image | Avoid Behind Text / In Front of Text unless you want an overlay; use Square instead |
| Wrap looks wrong after pasting | Reapply Wrap Text after paste, then drag the image again |
Unlock movement when the image feels stuck
Select the image.
Open Layout Options or Picture Format → Wrap Text.
Choose Square or Tight.
Drag the picture to the side of your text.
Free Method: Wrap Text Around Images in WPS Writer
Word’s wrap tools cover every common layout for everyday documents. If you want a simpler picture toolbar for quick side-by-side pages, WPS Writer is a free, Word-compatible option for changing wrap styles and dragging images into place.
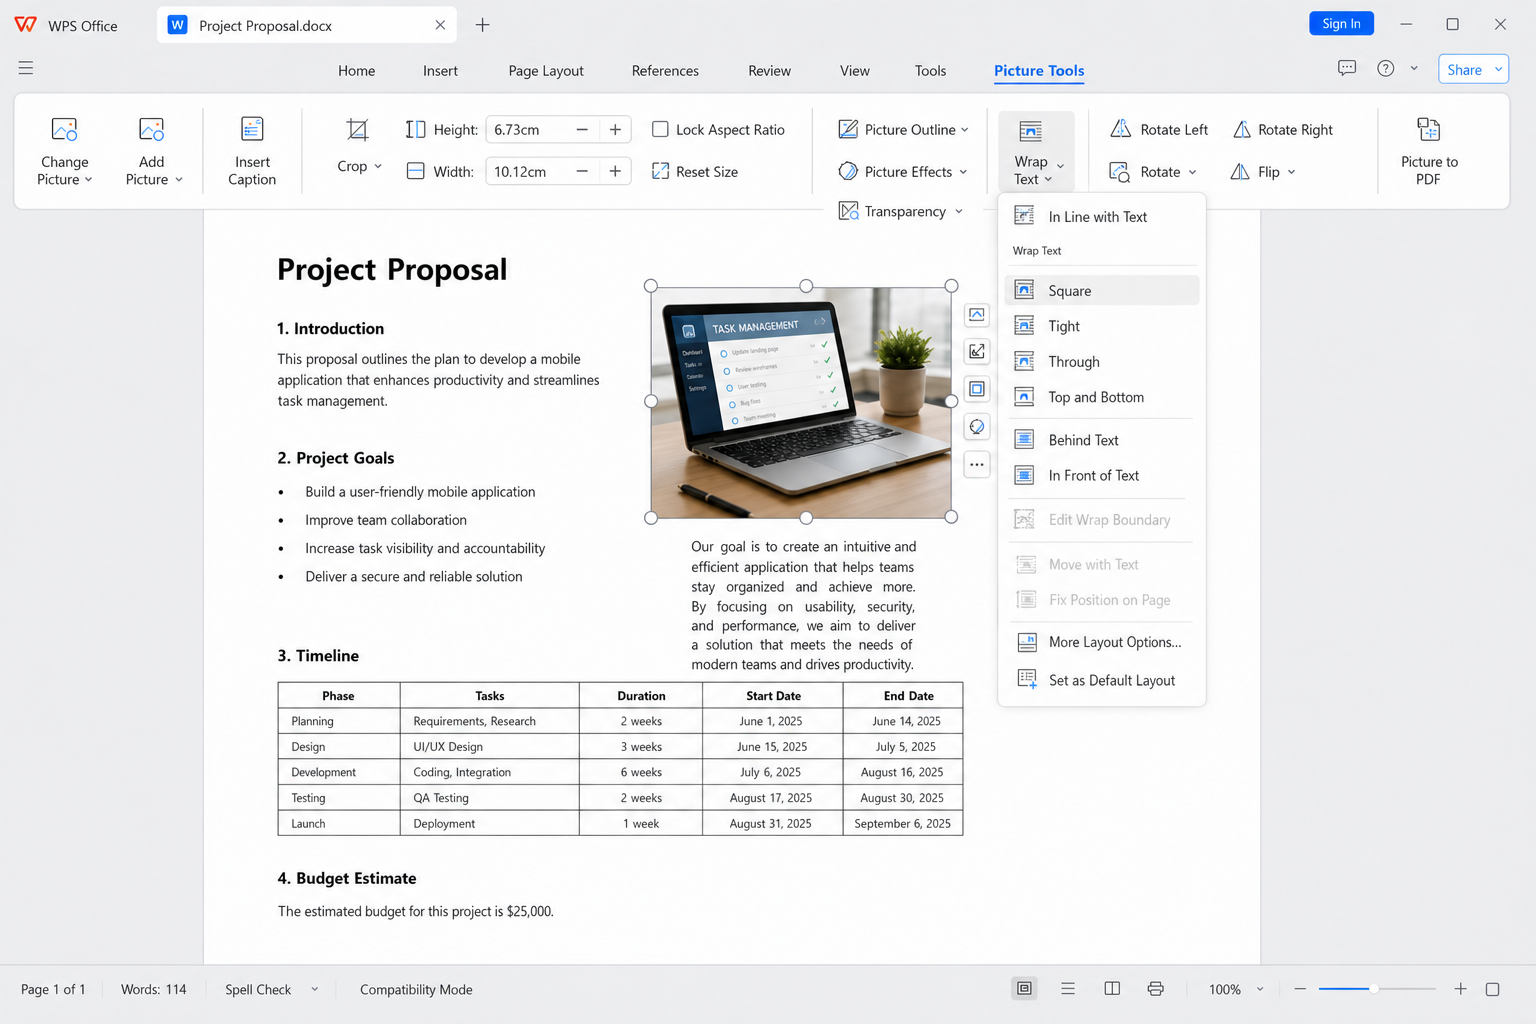
Open your document in WPS Writer.
Select the target image.
Open the text wrapping / wrap text menu.
Choose Square, Tight, or another style that fits your layout.
Drag and resize the image, then save as .docx for Microsoft Word.
Clear wrap controls — Switch styles without hunting through dense menus
Easy side-by-side layouts — Drag pictures beside paragraphs for reports and flyers
Strong Word compatibility — Share common .docx files with Word users
No paid subscription required — Core layout tools for daily documents
FAQ
How do I wrap text around a picture in Word?
Select the image → open Layout Options or Picture Format → Wrap Text → choose Square or Tight.
Why can’t I move my image in Word?
It is probably set to In Line with Text. Change the wrap style to Square or Tight, then drag it.
What is the difference between Square and Tight wrapping?
Square wraps text around a rectangular box. Tight follows the image outline more closely, which often looks better on irregular or transparent graphics.
Do WPS wrap settings work in Microsoft Word?
Yes—when you save as a standard .docx, wrap styles usually open normally in Microsoft Word. Preview the layout once before sharing.
Conclusion
To wrap text around an image in Word, change the picture from In Line with Text to a wrap style like Square or Tight, then drag it into place. Pick Top and Bottom for banners and Behind Text / In Front of Text only when you want background or overlay effects. If you want a simpler free workflow for everyday text-and-image layouts, WPS Writer is a practical Word-compatible option.

'%3e%3cpath%20d='M19.9911%204.11386V6.471H18.5894C18.0775%206.471%2017.7322%206.57814%2017.5536%206.79243C17.3751%207.00671%2017.2858%207.32814%2017.2858%207.75671V9.44421H19.9019L19.5536%2012.0871H17.2858V18.8639H14.5536V12.0871H12.2769V9.44421H14.5536V7.49779C14.5536%206.39064%2014.8632%205.53201%2015.4822%204.92189C16.1013%204.31177%2016.9257%204.00671%2017.9554%204.00671C18.8304%204.00671%2019.509%204.04243%2019.9911%204.11386Z'%20fill='%23333333'/%3e%3c/g%3e%3cdefs%3e%3cclipPath%20id='clip0_2938_8199'%3e%3crect%20width='16'%20height='16'%20fill='white'%20transform='translate(8%204.00671)'/%3e%3c/clipPath%3e%3c/defs%3e%3c/svg%3e)
'%3e%3cpath%20d='M17.5237%2010.7813L23.4811%204H22.0699L16.8949%209.88693L12.7648%204H8L14.2469%2012.9029L8%2020.0133H9.4112L14.8725%2013.7952L19.2352%2020.0133H24M9.92053%205.04213H12.0885L22.0688%2019.0224H19.9003'%20fill='%23333333'/%3e%3c/g%3e%3cdefs%3e%3cclipPath%20id='clip0_2938_8200'%3e%3crect%20width='16'%20height='16.0134'%20fill='white'%20transform='translate(8%204)'/%3e%3c/clipPath%3e%3c/defs%3e%3c/svg%3e)


