


Quick answer
Open the presentation in Canva, then go to Share → Download → Microsoft PowerPoint, choose the pages and click Download. The export is free and takes about a minute. Text and layout stay editable in the .pptx, but animations, videos, audio and fonts that are not installed on your computer do not — for motion, export the page as a GIF.
Exporting Canva to PowerPoint takes about a minute and keeps the slide text editable; the trade-off is motion. This guide walks through the built-in .pptx export step by step, then shows the GIF workaround for animated slides and how to open the file in free software.
Part 1: What is Canva?
Canva is an online graphic design platform that allows anyone to create professional-looking designs, even if they don't have any design experience. It offers a wide variety of templates, tools, and features that make it easy to create everything from social media graphics to presentations to marketing materials.
Functions:
Offers thousands of customizable templates for various purposes.
Provides a vast library of free media like photos, icons, and videos.
Utilizes an easy drag-and-drop editor with advanced features.
Operates as a cloud-based platform for cross-device access.
Enables collaboration and sharing with others.
Includes a print feature for physical copies and download options.
Advantages:
Quick creation of professional designs with customizable templates.
Access to a wide array of free and premium media assets.
Intuitive editor simplifies design process, including advanced elements.
Seamlessly syncs designs across devices via cloud-based system.
Facilitates teamwork and sharing, enhancing collaboration.
Offers convenient options for both digital and physical design outputs.


Part 2: How to export Canva to Powerpoint?
The .pptx export is built into Canva, so you do not have to screenshot slides and rebuild them by hand. Here is the five-step path, plus the one check that catches what changed.
Step 1: Open Your Presentation in Canva
Sign in at canva.com, open Projects and click the presentation. It opens in the editor, where the thumbnails on the left show how many slides will be exported. Make sure you have edit or download access — a design shared with view-only rights cannot be downloaded. If the design started as a Canva Doc or Whiteboard, copy the pages into a new Presentation first, because the PowerPoint option only appears for presentation designs.
Step 2: Access the Share Section
The Share button sits in the top-right corner of the editor, next to Present. On a narrow window the toolbar collapses and Share moves into the overflow menu. Clicking it opens a panel with collaboration settings, social sharing and Download. Use Download rather than Present: Present opens a live Canva link, not a file you can send.

Step 3: Select Microsoft PowerPoint
In the Share panel click Download, then choose Microsoft PowerPoint from the file-type list, which also holds PNG, JPG, PDF, MP4 and GIF. Older versions of the editor keep the same option under a More menu. The .pptx export is included in the free plan; if the design contains premium photos, fonts or elements, Canva asks you to upgrade or replace them before the download starts.


Step 4: Choose Pages for Export
Canva exports every page by default. Switch to Select pages and untick what you do not need — useful when you are sending one section of a long deck or leaving out the backup slides at the end. Unticked pages are omitted from the .pptx rather than hidden, so export the full deck if you may want them later and delete slides in PowerPoint instead.

Click the purple "Done" button to confirm your settings.
Step 5: Initiate Download
Click the purple Download button. Canva renders the file in the cloud, so a progress indicator appears and the .pptx is saved to your browser's downloads folder under the design's name. A 20-slide deck usually finishes in under a minute; a long, photo-heavy deck takes several minutes and the tab must stay open. If the design carries animation, Canva shows a note that animations will not play in this file type — that is the cue to use the GIF route in Part 3. No copy is emailed to you, so if the download fails, start again from the Share panel.

Your presentation will start to download onto your device.

Before you send the file: open the .pptx in PowerPoint, WPS Office or Google Slides. A few things change on the way out, and they are easier to fix now than after the file has been forwarded:
| What you check | In the exported .pptx | How to fix it |
|---|---|---|
| Text and slide layout | Kept, still editable | Re-check line breaks after a font swap |
| Images, shapes and charts | Kept; complex effects and charts may flatten into images | Re-create the chart if you need to edit its data |
| Fonts | Substituted when the font is not installed on your computer | Install the font, or apply Arial, Calibri or Segoe UI |
| Animations and transitions | Removed — every slide is static | Rebuild in the Animations tab, or use a GIF (Part 3) |
| Video and audio | Replaced by a placeholder frame | Re-insert the media file and set it to play automatically |
| Collaboration | Not carried over — the file is a snapshot | Keep editing in PowerPoint or WPS Office, or share the Canva link |
Part 3 covers the animation workaround in detail.
Part 3: Can I export the Canva to PPT with Animations?
Canva doesn't natively support exporting animations directly to PowerPoint. However, you can follow alternative methods below to incorporate animations effectively into your PowerPoint presentation.
Change File Format
To convert Canva slides with animations into PowerPoint presentation slides, follow these steps:
Step 1: Return to your Canva presentation and download the pages containing animations as GIFs.
Go to 'Share' and then click on 'Download.' Select the specific page or pages you want to download:


Step 2 Choose GIF as the file format and click the download button:

Step 3: Add the GIFs to PowerPoint:
Insert a blank slide in your PowerPoint presentation. Upload the downloaded GIF image to the blank slide.

Adjust the GIF to cover the PowerPoint slide.

Add the Animations in PPT
Step 1 Open Presentation: Launch PowerPoint and open your presentation.
Step 2 Select Element: Click on the element to animate.

Step 3 Go to "Animations" tab. Pick an animation from the menu.
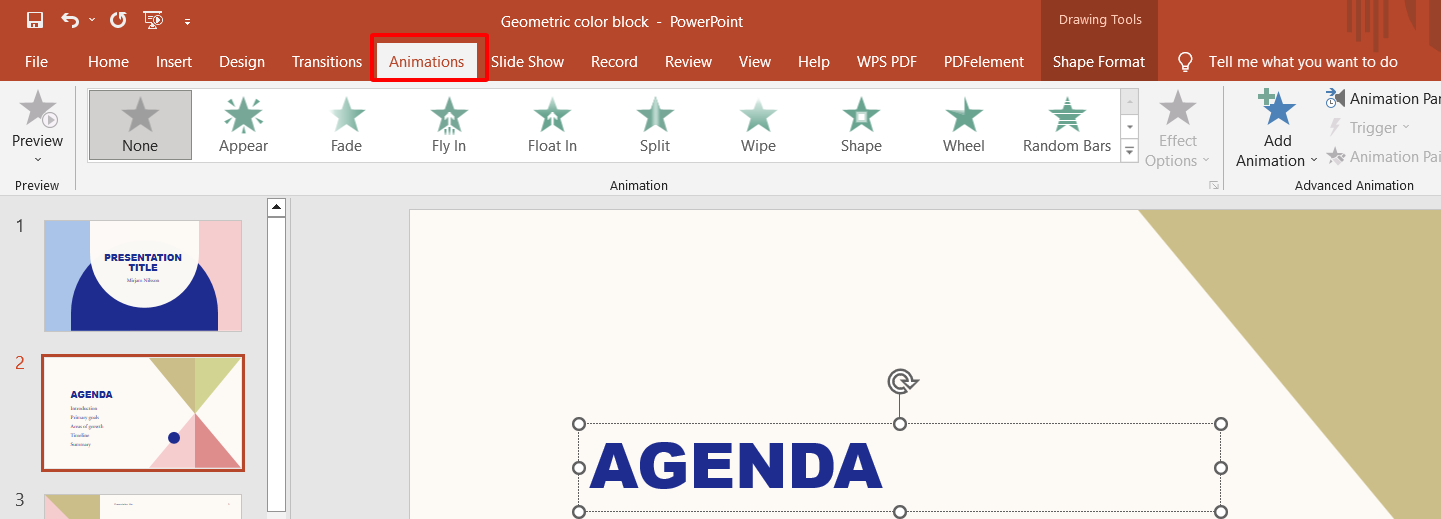
Step 4 Click to apply the animation to the element. Adjust animation settings in the Animation Pane.

Step 5 Use "Preview" to see the animation.

Part 4: Free Alternative Office Software - WPS Office

WPS Office is a free and all-in-one office suite that allows you to create and edit documents, spreadsheets, presentations, and PDF files on any device. It is compatible with Microsoft Office, Google Docs, and Adobe PDF, and supports 47 file types. With WPS Office, you can have an efficient and comfortable working experience on any device and any scenario.
Here are some other outstanding functions of WPS Office
It is free and open-source: WPS Office is free to use and download. It is also open-source, which means that anyone can contribute to its development.
It is powerful and versatile: WPS Office includes a word processor, spreadsheet, presentation software, and PDF reader. It also has a number of other features, such as a text editor, image editor, and database manager.
It is compatible with Microsoft Office: WPS Office can open, edit, and save Microsoft Office documents. This makes it a great choice for users who want to switch from Microsoft Office to a free alternative.
It is regularly updated: WPS Office is regularly updated with new features and bug fixes. This ensures that you are always using the latest version of the software.
WPS Office provides a reliable alternative for users seeking an efficient and comfortable office suite experience without the cost. Its extensive features, compatibility with industry-standard formats, and user-friendly interface make it a compelling choice for both personal and professional use. Download WPS Office today and see for yourself how it can improve your work efficiency and inspire your creativity
FAQs
Can I import PPT to Canva?
Easily upload files in Canva by either dragging and dropping your presentation onto the homepage or clicking the "Upload" button on the top corner of the homepage banner. Alternatively, access the "Projects" section from the side menu and go to the "Uploads" folder. Here, you can drag your file onto the page or use the "Upload" button. In the editor, drag and drop your presentation into the workspace or select "File" > "Upload a file" on the top corner. Within the editor's side panel, navigate to the "Uploads" tab, either dragging files or using the "Upload files" option.
Can I record the presentation in Canva?
In the editor menu bar, find "Present" and click it. If not visible, click "Share" first. Opt for "Present and record" and proceed with "Next." Access the recording studio by clicking "Go to recording studio," permitting mic and camera access. Select desired camera and mic if multiple devices are available. Initiate recording by clicking "Start recording" and present your content. Finish by clicking "End recording" on the top corner, allowing time for upload.
How to make sure the same fonts export to PPT?
Mismatched fonts can distort your presentation's appearance. Ensure uniform font usage in both tools. If PowerPoint lacks Canva fonts, download from Google and upload to Windows. Canva's extensive font library boasts 3000 options, which could require purchasing for PowerPoint, potentially at a premium cost. If budget constraints apply, continuing with Canva's presentation might be necessary, while another workaround is exploring Google Slides as an alternative.




