

'%3e%3cpath%20d='M8%200C12.4183%200%2016%203.58172%2016%208C16%2012.4183%2012.4183%2016%208%2016C3.58172%2016%200%2012.4183%200%208C0%203.58172%203.58172%200%208%200ZM11.6162%204.38379C11.2257%203.99337%2010.5927%203.99338%2010.2021%204.38379L8%206.58594L5.79785%204.38379C5.40732%203.99334%204.77429%203.99329%204.38379%204.38379C3.99331%204.77429%203.99335%205.40733%204.38379%205.79785L6.58594%208L4.38379%2010.2021C3.99348%2010.5927%203.99341%2011.2257%204.38379%2011.6162C4.77426%2012.0066%205.40734%2012.0065%205.79785%2011.6162L8%209.41406L10.2021%2011.6162C10.5927%2012.0066%2011.2257%2012.0067%2011.6162%2011.6162C12.0067%2011.2257%2012.0066%2010.5927%2011.6162%2010.2021L9.41406%208L11.6162%205.79785C12.0066%205.40735%2012.0066%204.77429%2011.6162%204.38379Z'%20fill='%23080E17'%20fill-opacity='0.46'/%3e%3c/g%3e%3cdefs%3e%3cclipPath%20id='clip0_3761_713'%3e%3crect%20width='16'%20height='16'%20fill='white'/%3e%3c/clipPath%3e%3c/defs%3e%3c/svg%3e)



'%3e%3cpath%20fill-rule='evenodd'%20clip-rule='evenodd'%20d='M21.4999%2010.9993C21.4999%205.20009%2016.7986%200.498901%2010.9993%200.498901C5.19994%200.498901%200.498657%205.20009%200.498657%2010.9993C0.498657%2016.2404%204.33858%2020.5844%209.35855%2021.3722V14.0346H6.69238V10.9993H9.35855V8.68594C9.35855%206.05427%2010.9262%204.60062%2013.3248%204.60062C14.4736%204.60062%2015.6753%204.80571%2015.6753%204.80571V7.38979H14.3512C13.0468%207.38979%2012.64%208.19921%2012.64%209.0296V10.9993H15.5523L15.0867%2014.0346H12.64V21.3722C17.66%2020.5844%2021.4999%2016.2404%2021.4999%2010.9993Z'%20fill='%231568EA'/%3e%3c/g%3e%3c/svg%3e)


'%3e%3cpath%20d='M2.42045%2022.1876H6.31818V12.7217L0.75%208.54553V20.5171C0.75%2021.4414%201.49892%2022.1876%202.42045%2022.1876Z'%20fill='%234285F4'/%3e%3cpath%20d='M19.682%2022.1876H23.5797C24.5041%2022.1876%2025.2502%2021.4387%2025.2502%2020.5171V8.54553L19.682%2012.7217'%20fill='%2334A853'/%3e%3cpath%20d='M19.682%205.48293V12.7216L25.2502%208.54543V6.31816C25.2502%204.25236%2022.8921%203.07469%2021.2411%204.31361'%20fill='%23FBBC04'/%3e%3cpath%20d='M6.31824%2012.7217V5.48303L13.0001%2010.4944L19.6819%205.48303V12.7217L13.0001%2017.733'%20fill='%23EA4335'/%3e%3cpath%20d='M0.75%206.31816V8.54543L6.31818%2012.7216V5.48293L4.75909%204.31361C3.10534%203.07469%200.75%204.25236%200.75%206.31816Z'%20fill='%23C5221F'/%3e%3c/g%3e%3cdefs%3e%3cclipPath%20id='clip0_2954_7305'%3e%3crect%20width='24.5'%20height='18.375'%20fill='white'%20transform='translate(0.75%203.8125)'/%3e%3c/clipPath%3e%3c/defs%3e%3c/svg%3e)


The liquify tool has become one of the most relied-on features for professional photo manipulation. With Photopea, more users are turning to it for advanced editing, but many still struggle to find or control the liquify interface. So, where exactly is the liquify tool in Photopea, and how do you use it without over-editing the image? In this guide, I’ll walk you through the complete process, along with techniques I personally use to achieve natural, professional results.


Part 1. Understanding Photopea’s Liquify Tool
Photopea has emerged as a powerful free alternative to Photoshop, offering a familiar workspace and advanced tools that run entirely in the browser. For anyone learning how to liquify on Photopea, understanding how the liquify workspace fits into Photopea’s broader editing environment is essential. Unlike standard adjustment tools, Liquify allows controlled pixel reshaping, making it especially valuable for subtle portrait and product corrections.
Overview of Photopea as a Free Online Editor
Photopea stands out because it combines accessibility with professional-grade capabilities:
Runs completely online with no installation required
Supports PSD, JPEG, PNG, and other common formats
Mirrors Photoshop’s interface closely, making it easy for migrating users
Offers advanced features such as layers, masks, filters, and smart adjustments
This makes it a practical choice for users who need complex manipulations without paid software.
Liquify Tool Position in Photopea’s Ecosystem
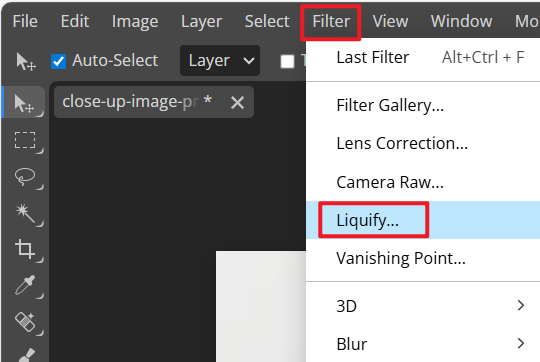
The Photopea liquify tool sits among Photopea’s specialized distortion tools. Instead of working directly on the main canvas, Liquify opens its own workspace designed for structural reshaping. You can access it through:
Filter → Liquify
Ctrl+Shift+X (Windows) / Cmd+Shift+X (Mac)
Requires a raster layer (does not work on vector or smart object layers)
This structure mirrors Photoshop’s workflow, making it intuitive for those familiar with Adobe tools.
Core Capabilities and Limitations
While Photopea’s liquify offers the essential functions most editors need, it’s important to know what it can and cannot do.
Despite these constraints, Photopea’s liquify remains highly capable for most practical editing tasks.
Best Use Cases for Liquify
Liquify is especially effective in scenarios requiring subtle shape adjustments:
In my experience, Liquify works best when applied lightly. Strong adjustments often introduce visible distortions, especially around edges or shadows. A controlled, minimal approach consistently produces the most natural results.
Part 2. Step-by-Step Liquify Tutorial in Photopea
Learning how to liquify on Photopea becomes much easier once you understand the workspace and develop a smooth, controlled editing routine. The following step-by-step guide walks beginners through the process while also introducing professional techniques that help produce natural, balanced results. This section also supports readers searching for a Photopea Liquify tool tutorial or guidance on how to use the Liquify filter in Photopea, especially for portrait retouching.
Step 1: Prepare Your Image
Before applying any distortion, preparing your layer ensures a non-destructive workflow.
Steps:
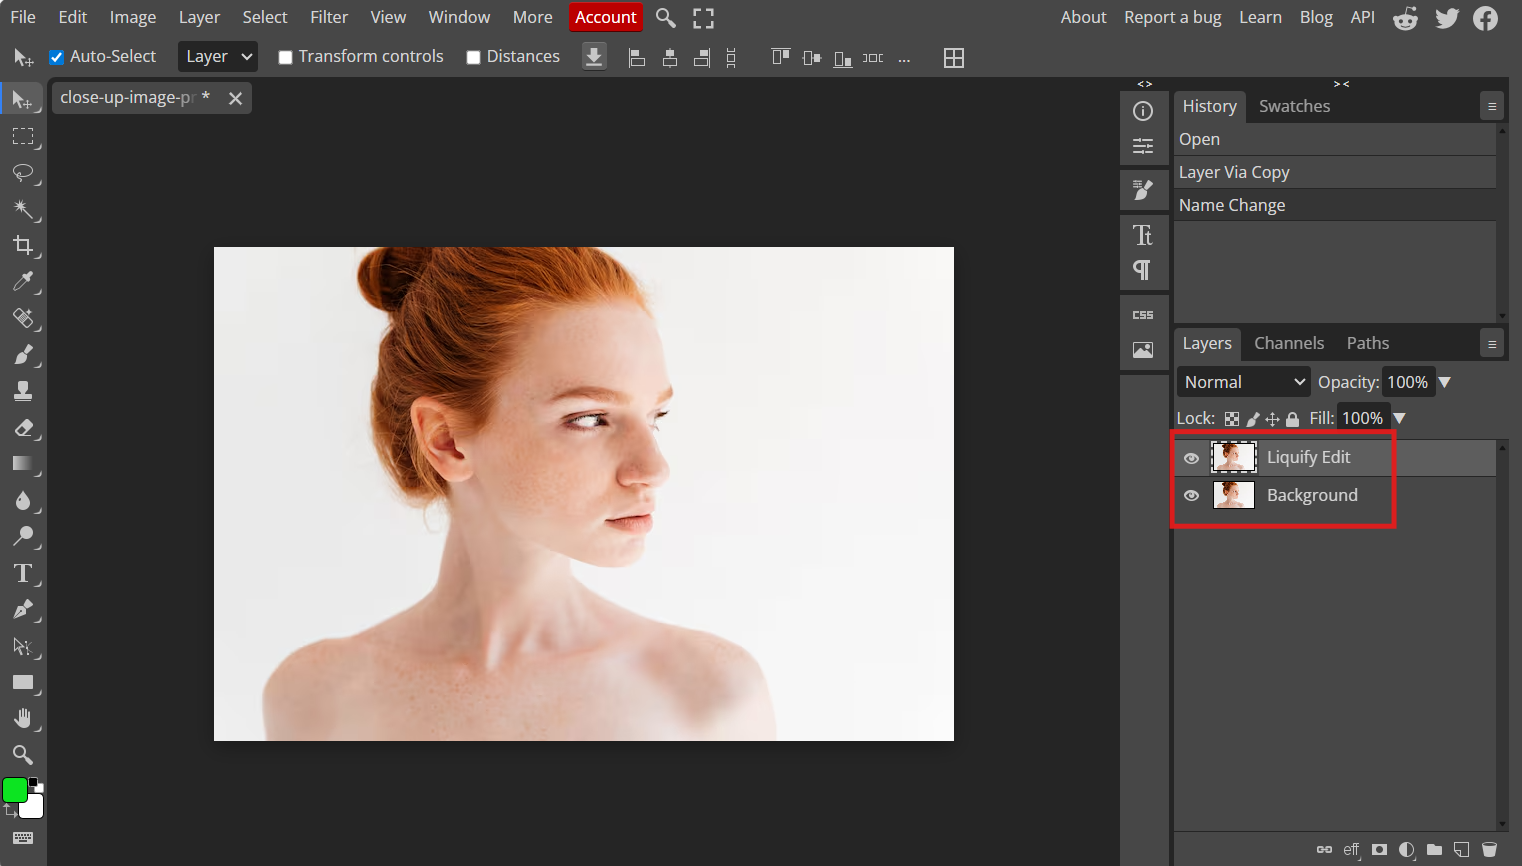
Open your image in Photopea.
Press Ctrl+J to duplicate the layer.
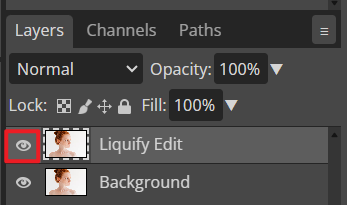
Rename the duplicated layer to Liquify Edit for clarity.
Step 2: Access the Liquify Tool
To open the Liquify workspace:
Steps:
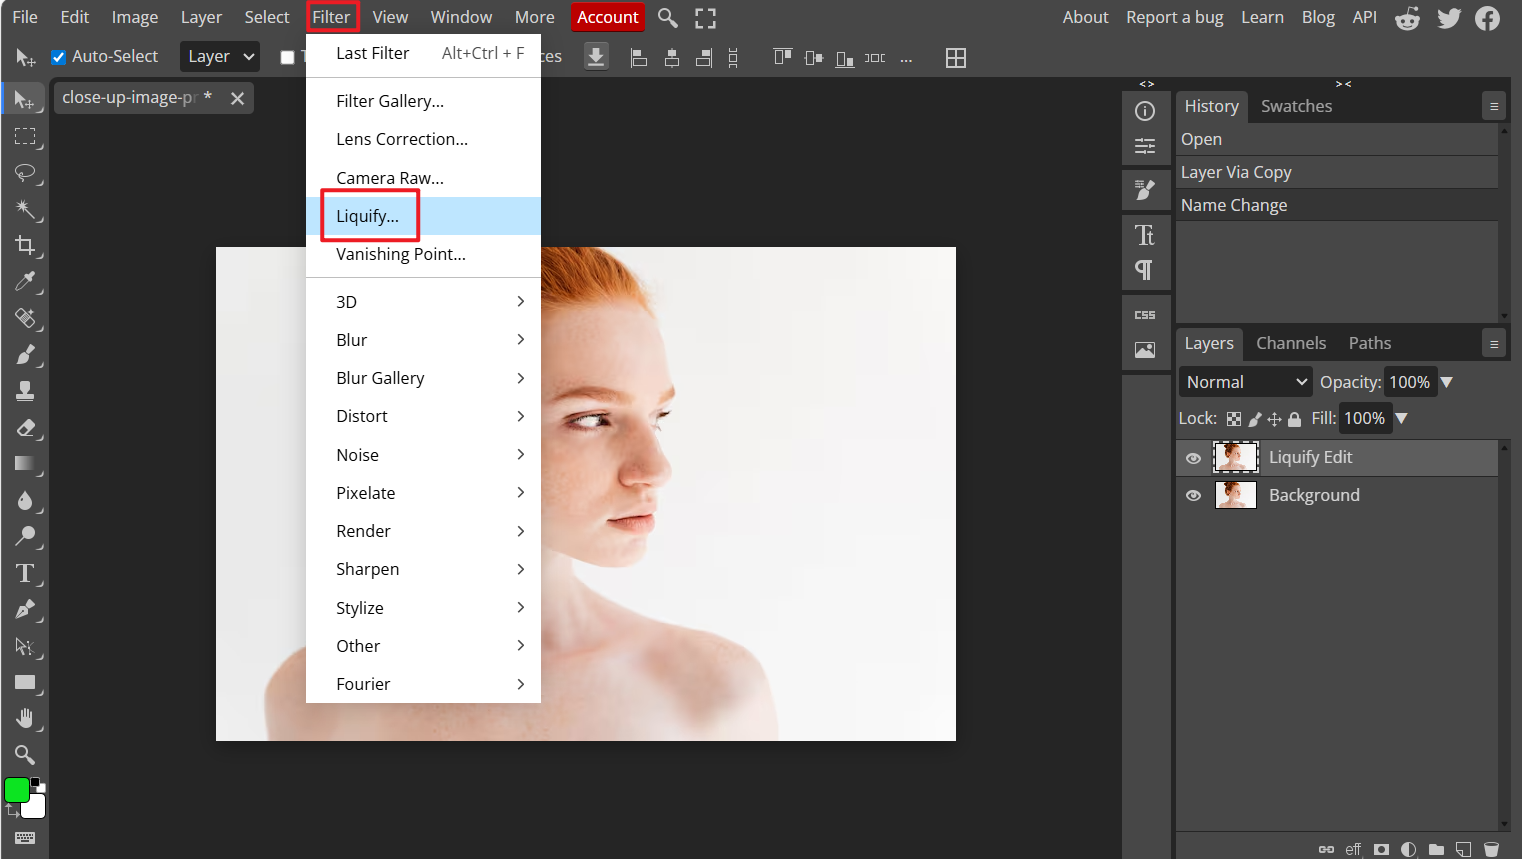
Go to the Filter menu.
Select Liquify from the dropdown.
Wait for the Liquify workspace to load.
Notes:
Keyboard shortcuts: Ctrl+Shift+X (Windows) or Cmd+Shift+X (Mac)
Liquify requires a raster layer, so convert smart objects or vector shapes before proceeding.
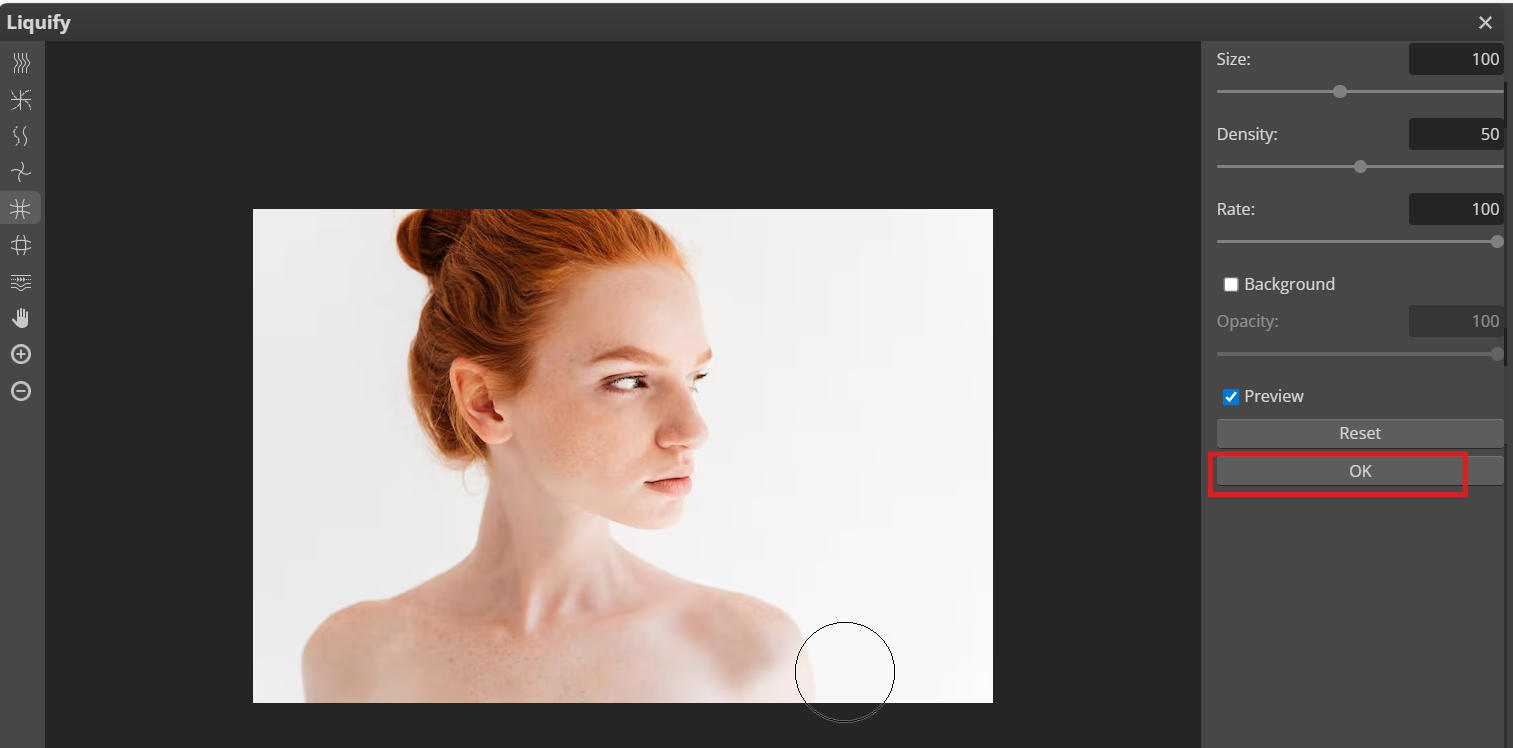
Step 3: Choose the Right Tools and Settings
Photopea offers a set of distortion brushes similar to Photoshop. Each functions differently, so selecting the right tool matters.
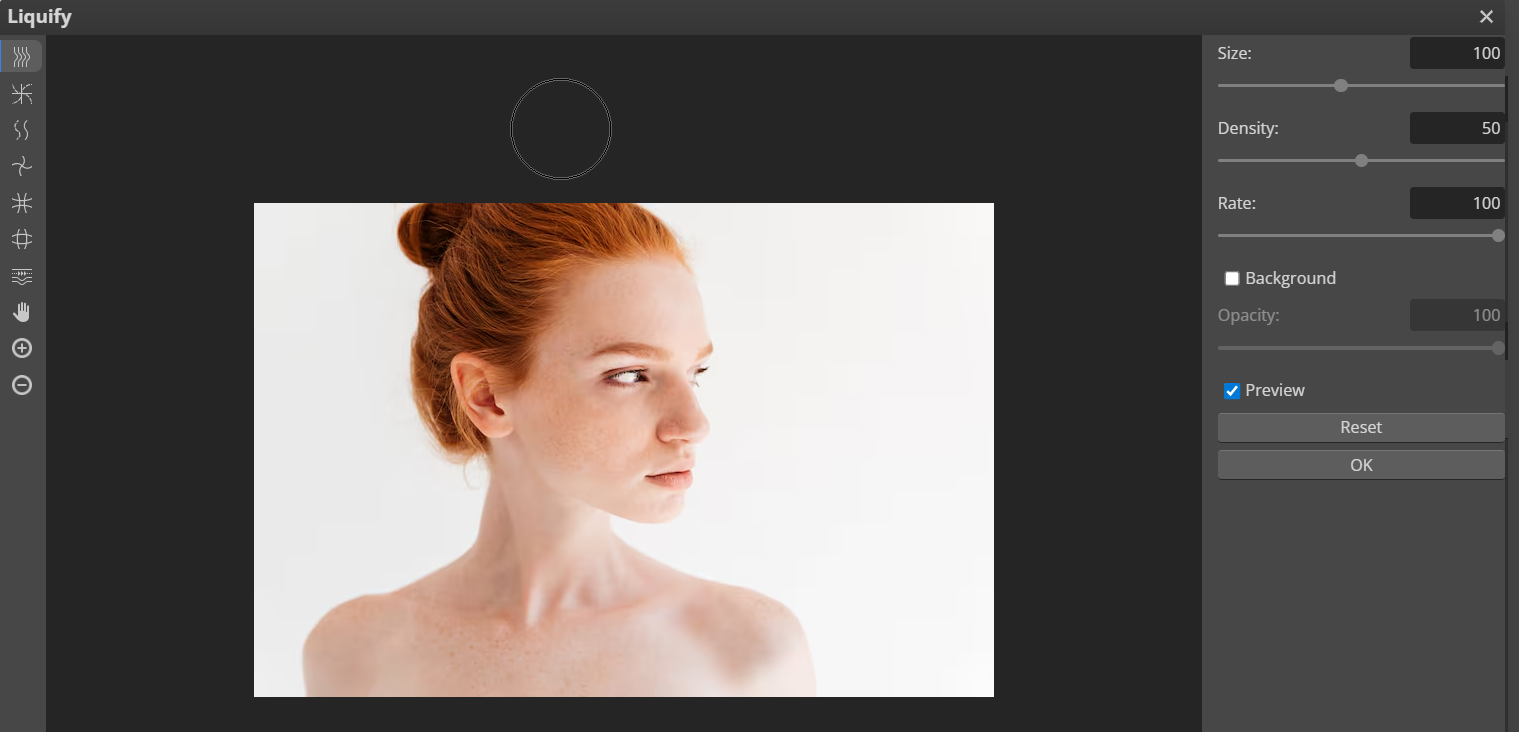
These tools are essential for precise face or body edits, particularly when performing Photopea face editing liquify tasks such as reshaping eyes or refining jawlines.
Step 4: Perform Your Edits
Once you select your tools, begin shaping gently to avoid unnatural distortions.
Steps:
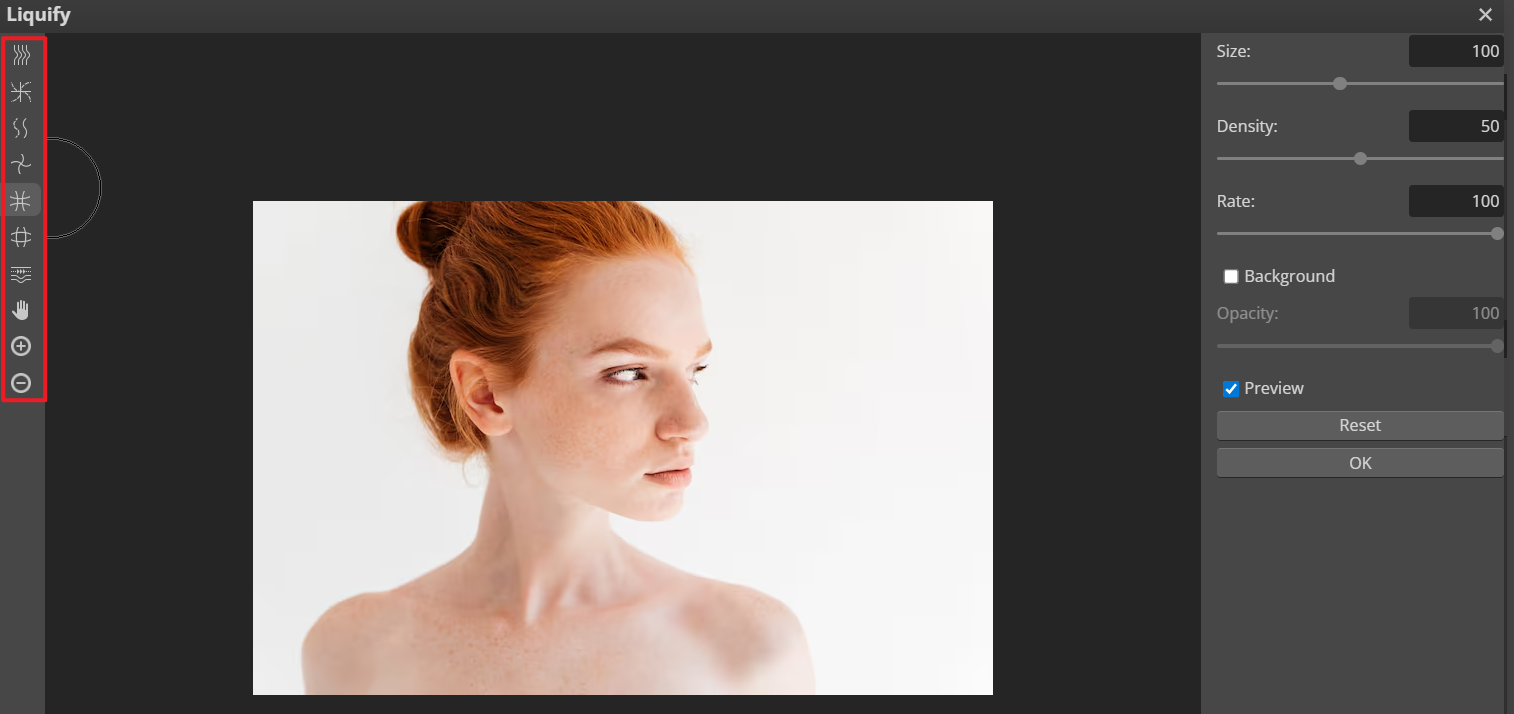
Zoom into the area you want to adjust using Ctrl + +.
Apply small strokes instead of large drag movements.
Maintain symmetry when editing faces, and adjust both sides evenly.
Use Reconstruct to reverse areas that look over-edited.
Use Smooth to blend edges, especially around curved features.
Step 5: Finalize and Export
After completing your liquify enhancements:
Steps:
Click OK to apply liquify changes.
Toggle the Liquify Edit layer ON/OFF to compare before and after results.
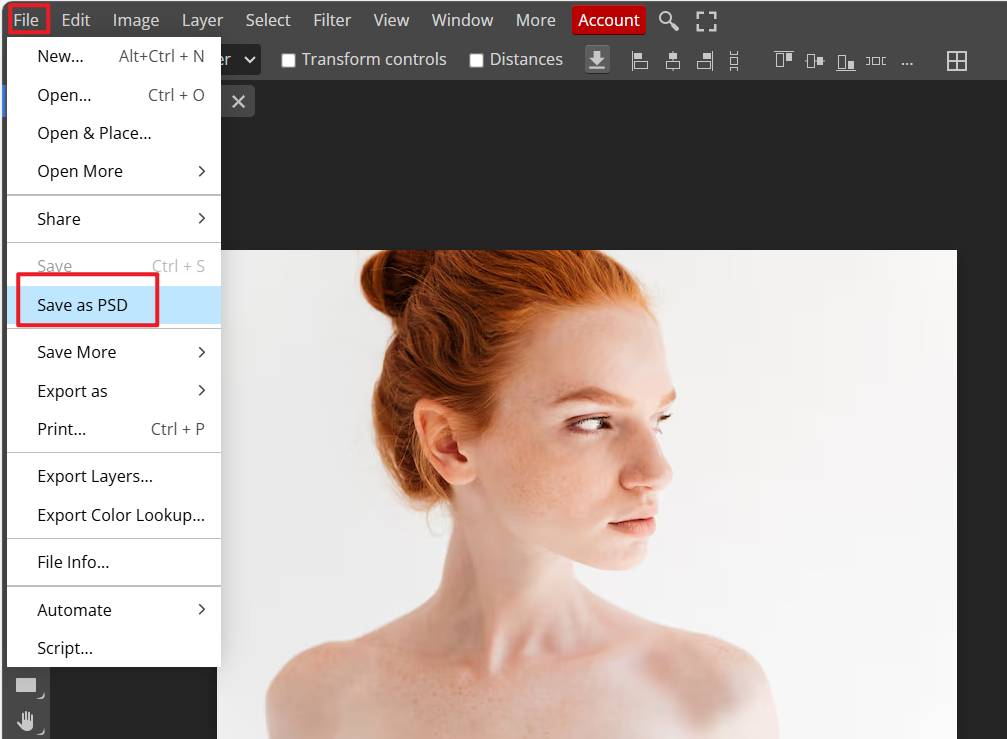
Save your project as a PSD to preserve layers.
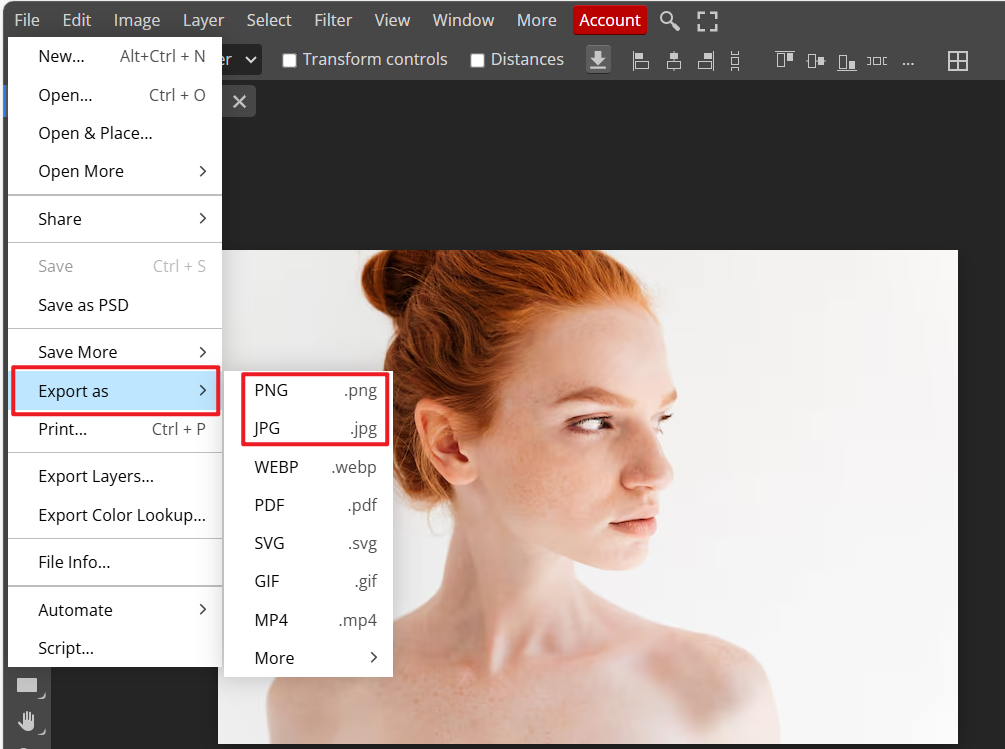
Export as JPG or PNG if you need a final version for publishing or sharing.
Troubleshooting Common Liquify Issues
Beginners often encounter a few predictable problems. Here’s how to handle them:
Personal Experience
From my own experience working with Photopea, Liquify becomes much more intuitive once you understand that less is usually more. Over-editing is the fastest way to make an image look artificial, especially when reshaping facial features. Subtle adjustments consistently deliver cleaner, more believable results. This is also why I often rely on a duplicated layer and the Freeze Mask tool; it keeps the workflow flexible and prevents accidental distortion of important details.
Part 3. Best Alternative: Introduction of WPS AI
While learning how to liquify on Photopea is valuable, the manual editing process can be time-consuming, especially for beginners who want natural enhancements without mastering every brush and setting. This is where WPS AI becomes a powerful alternative. Instead of manually pushing pixels, WPS AI uses trained algorithms to enhance faces and portraits automatically, providing quick and natural results with minimal effort.
Below is an overview of WPS AI’s capabilities, along with a step-by-step guide for enhancing photos using its tools.
Integrated AI Solution
WPS AI Photo tools are built directly into the WPS Office ecosystem, allowing users to perform image enhancements without switching between external applications. This is particularly convenient for anyone inserting edited images into documents, spreadsheets, or presentations.
These advantages make WPS AI a more streamlined option than standalone editors that require exporting and reimporting images.
Key Advantages (The Pros)
When compared to alternatives like Pincel AI or manual liquify editing in online tools, WPS AI provides several meaningful improvements:
Complete Office Integration
You can edit images directly within documents, presentations, and spreadsheets without needing separate software.
Generous Free Access
Unlike many editors that restrict free-tier features, WPS AI offers useful enhancements, including portrait improvement, without strict limits.
Offline Capability
Editing remains available even without an internet connection, increasing reliability and privacy.
No Watermark Policy
Enhanced images remain clean and professional, which is essential for content creators and business users.
Workflow Efficiency
No need to move files between platforms; enhancements occur where you already work.
Cross-Platform Consistency
The same AI tools function identically across all device types, reducing learning time.
How to Enhance Photos with WPS AI
This method is especially helpful for users who want results similar to manual liquify editing without handling every detail manually.
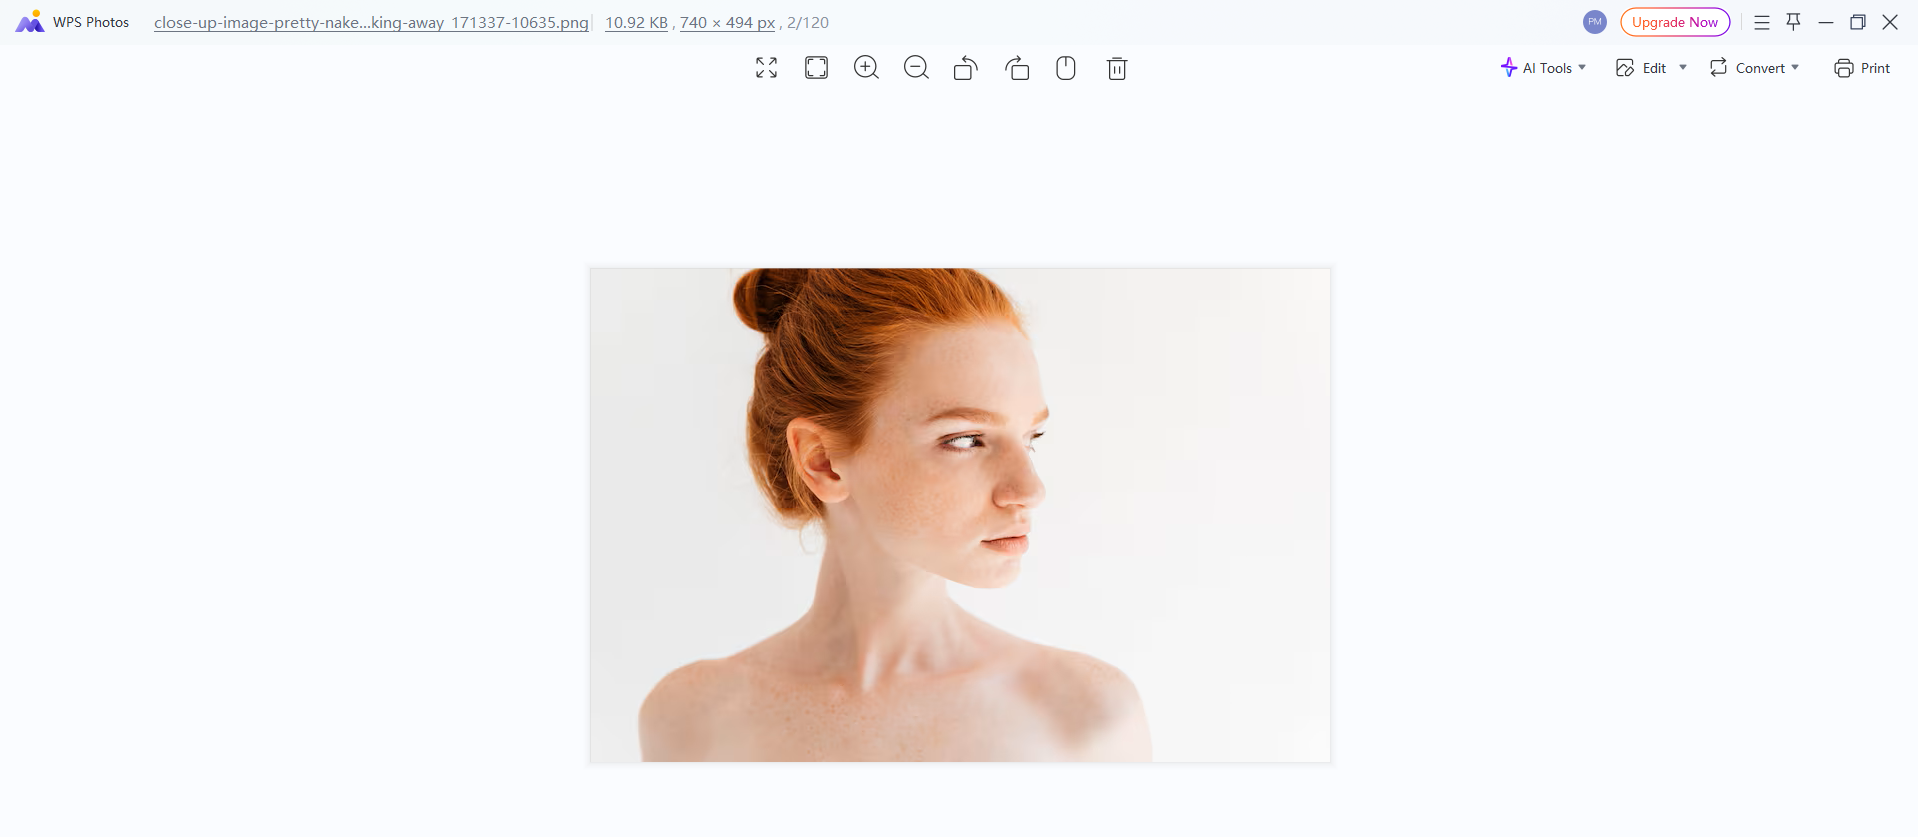
Step 1: Open Your Portrait
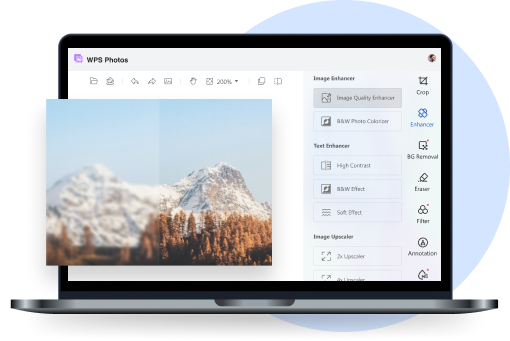
Select the portrait you want to enhance and open it with WPS Photos.
Step 2: Apply AI Enhancements
Go to Edit and use the intuitive sliders to apply adjustments.
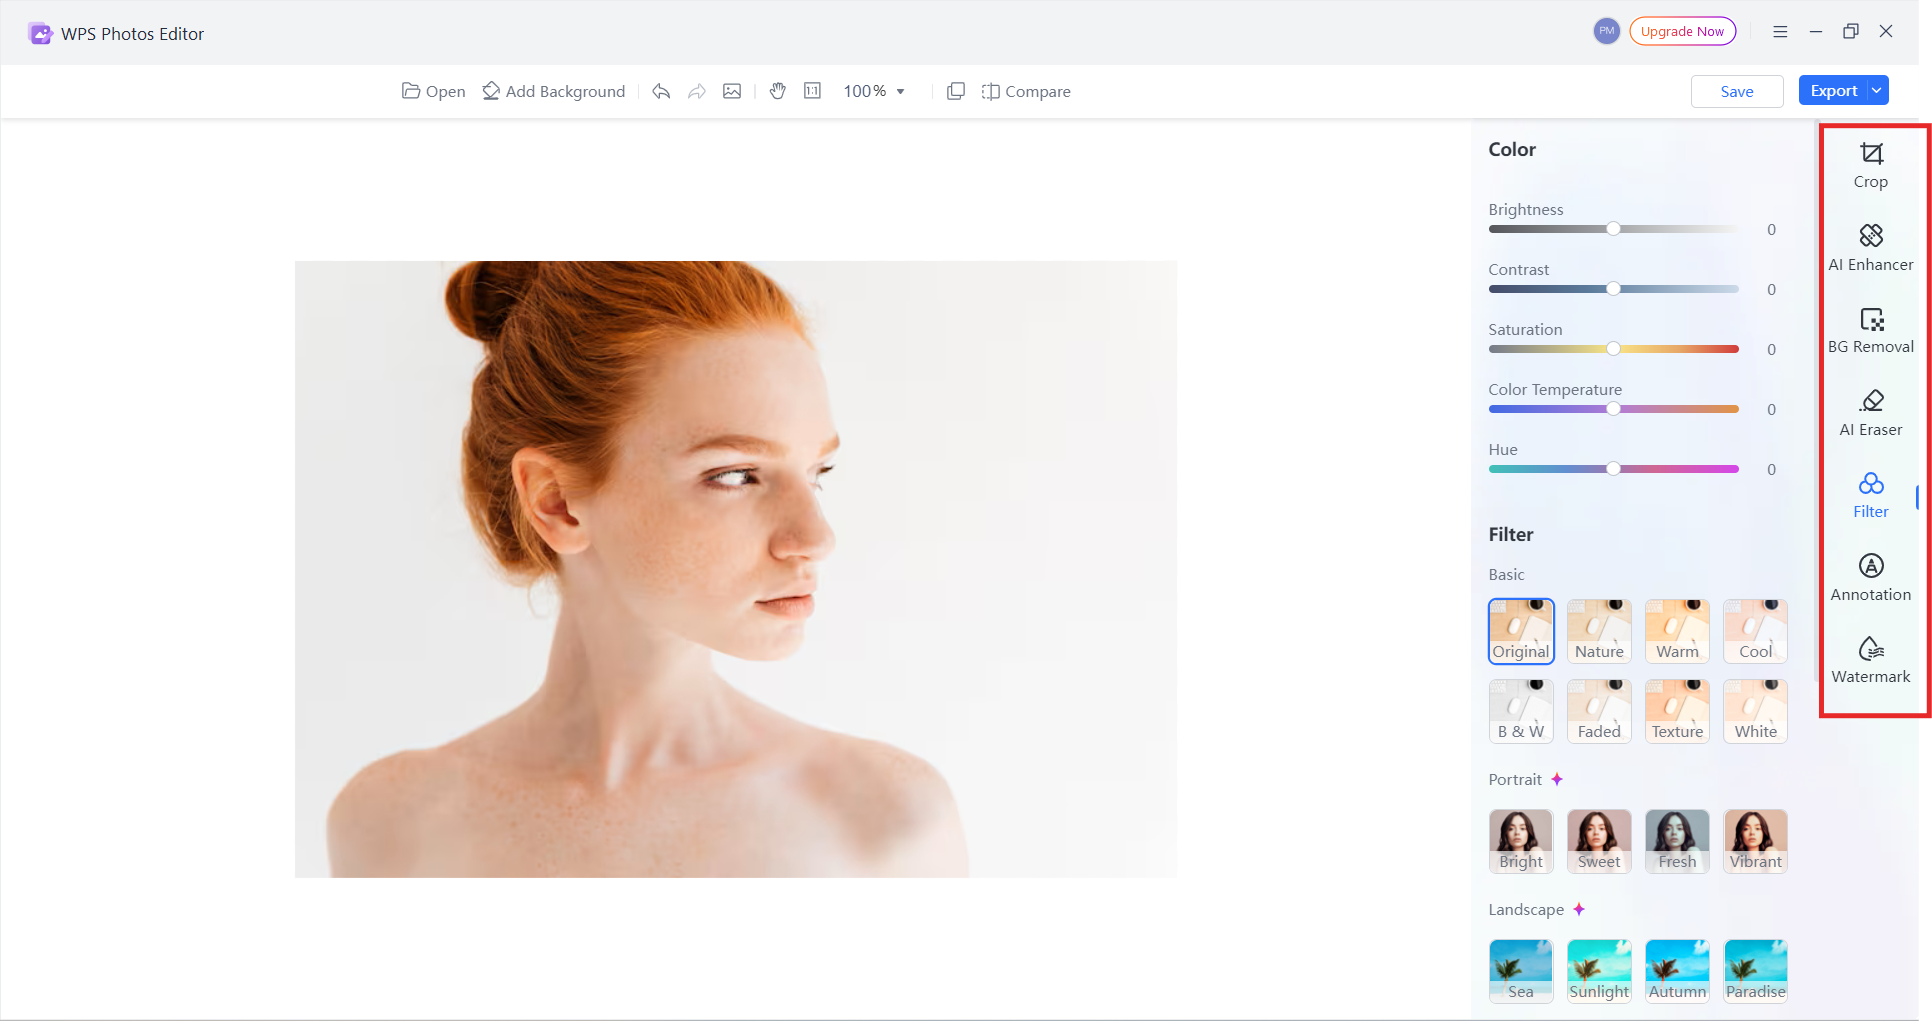
The interface allows you to adjust each enhancement gently without the risk of distorted edges or unnatural warping, issues often encountered with manual liquify edits.
Step 3: Compare and Refine
Use the before/after comparison tool to review your progress.
I recommend starting at 20–30% intensity and gradually increasing the effect only if needed. This approach produces clean, realistic adjustments.
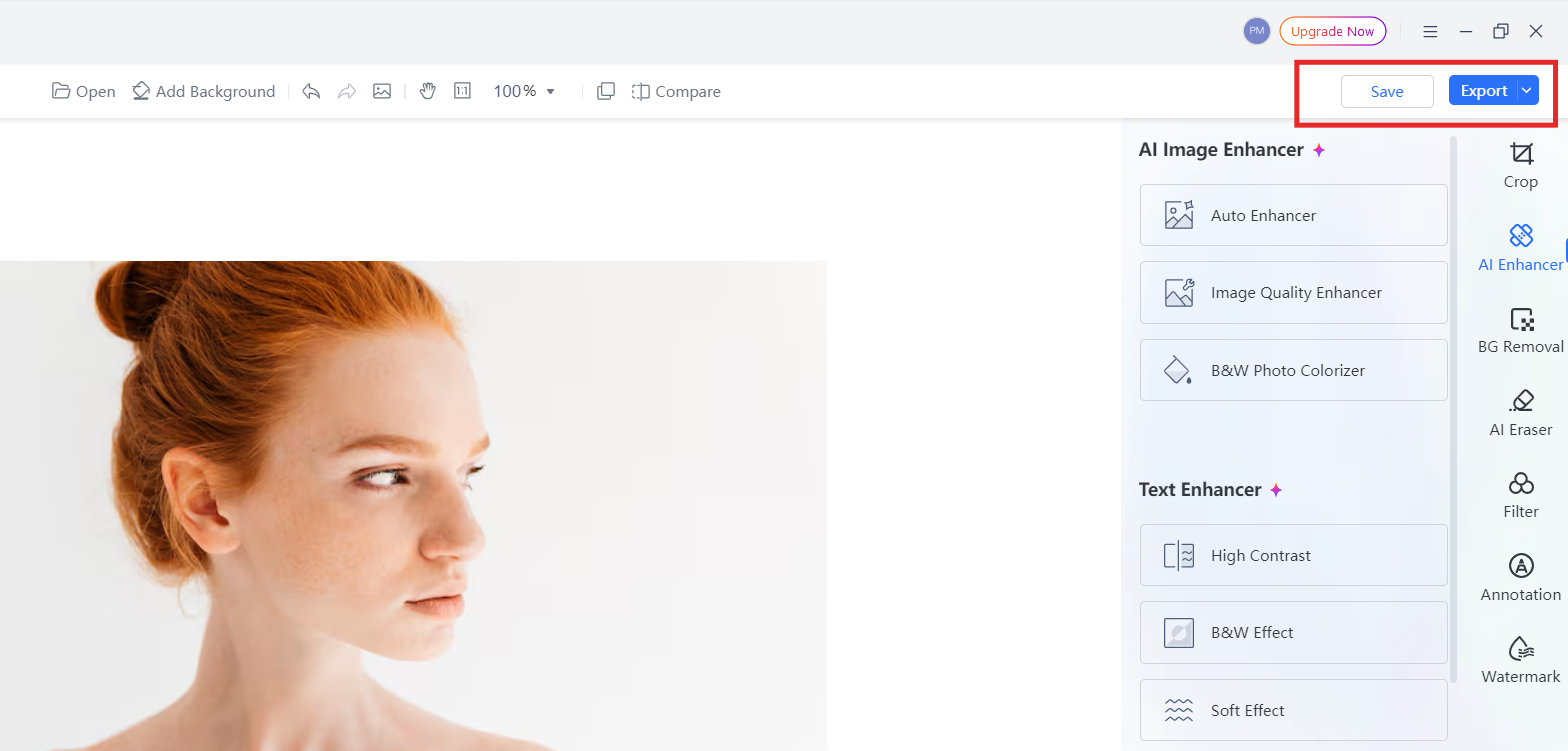
Step 4: Save and Use
You can download the edited image or insert it directly into a document or presentation within WPS Office for immediate use.
Professional Tips
In many scenarios, WPS AI achieves similar outcomes to manual liquify work but with far less effort and a significantly shorter learning curve.
Part 4. Why Choose WPS AI for Photo Enhancement
Many users learn how to liquify on Photopea for precise, manual control, but AI-driven tools have changed the landscape of photo editing entirely. WPS AI provides an alternative approach that focuses on speed, ease of use, and consistency, especially for users who want natural enhancements without dealing with every technical detail of distortion brushes and liquify settings.
Below is a clear comparison to help you understand how WPS AI differs from traditional manual editing tools like Photopea.
Liquify Tools Comparison
| Feature | Photopea | WPS AI |
|---|---|---|
| Liquify Tool | Manual distortion brushes | No manual liquify; AI-powered enhancements instead |
| Learning Curve | Medium; requires practice for natural edits | Easy; slider-based adjustments with automatic balancing |
| Cost | Free | Free |
| AI Enhancement | No AI shaping or smoothing | Yes, portrait enhancement, slimming, smoothing |
| Online Access | Yes | Yes |
| Precision Control | High manual control | Medium AI-guided control |
| Workflow | Requires exporting/importing for documents | Integrated directly into WPS Office |
This comparison highlights a key distinction: Photopea is better for detailed manual edits, while WPS AI is designed for efficiency and accessible results.
Why WPS AI Is the Smart Choice
Democratized Photo Editing
Manual liquify editing requires skill, patience, and a good sense of proportion. Many users struggle with over-editing in the beginning, especially when reshaping facial features. WPS AI removes the steep learning curve by allowing users to produce professional-level enhancements through guided sliders. You don’t need prior editing experience to achieve clean, natural results.
Workflow Integration
Enhancing images often requires multiple steps—editing in one program, exporting, then reusing the image in another workflow. WPS AI eliminates this friction by embedding enhancement tools directly inside WPS Office. This means you can adjust a portrait and place it into a document or presentation immediately, without switching platforms.
Consistent, Natural Results
AI enhancement models in WPS AI are trained on thousands of professionally edited portraits. This helps prevent the common issues people face when learning Liquify manually, such as warped edges, uneven adjustments, or distorted backgrounds. The AI takes care of proportion balancing, making subtle enhancements look natural rather than edited.
Future-Proof Technology
Photopea’s liquify tool is stable and reliable, but it does not evolve significantly over time. In contrast, WPS AI improves continuously as its algorithms learn from more data and user behavior. This means image quality, realism, and enhancement precision will keep getting better.
FAQs
1. Where exactly is the liquify tool located in Photopea?
The liquify tool is found under the Filter menu in Photopea. The exact path is Filter → Liquify, or you can use Ctrl+Shift+X (Windows) or Cmd+Shift+X (Mac) to open it directly. It only works on raster layers, so convert smart objects or vectors before using it.
2. Can I achieve similar results to liquify without learning complex tools?
Yes. If you prefer not to work with manual distortion brushes, WPS AI offers natural-looking adjustments through simple sliders. Enhancements like face slimming, eye enlargement, nose reshaping, and skin smoothing can be done automatically without the steep learning curve required in Photopea.
3. Is Photopea's liquify tool as powerful as Photoshop's?
Photopea includes most of the core liquify features available in Photoshop, such as Forward Warp, Pucker, Bloat, and reconstruction tools. While it lacks some advanced brush customization and performance optimizations, it is still highly effective for everyday portrait and product edits.
4. Why is my liquify edit in Photopea distorting the background?
Background distortion usually happens when large brush sizes or high-pressure settings are used. To prevent this, reduce brush size, work closer to the subject edges, or freeze the areas you want to protect. Subtle movements help maintain structural integrity around backgrounds and shadows.
5. Why does Liquify feel laggy or slow in Photopea?
Because Photopea runs in the browser, Liquify's performance depends heavily on your device’s RAM and CPU. Large images or high-resolution portraits may cause delays. Closing unused tabs, lowering image size, or using a more capable device can significantly improve speed.

'%3e%3cpath%20d='M19.9911%204.11386V6.471H18.5894C18.0775%206.471%2017.7322%206.57814%2017.5536%206.79243C17.3751%207.00671%2017.2858%207.32814%2017.2858%207.75671V9.44421H19.9019L19.5536%2012.0871H17.2858V18.8639H14.5536V12.0871H12.2769V9.44421H14.5536V7.49779C14.5536%206.39064%2014.8632%205.53201%2015.4822%204.92189C16.1013%204.31177%2016.9257%204.00671%2017.9554%204.00671C18.8304%204.00671%2019.509%204.04243%2019.9911%204.11386Z'%20fill='%23333333'/%3e%3c/g%3e%3cdefs%3e%3cclipPath%20id='clip0_2938_8199'%3e%3crect%20width='16'%20height='16'%20fill='white'%20transform='translate(8%204.00671)'/%3e%3c/clipPath%3e%3c/defs%3e%3c/svg%3e)
'%3e%3cpath%20d='M17.5237%2010.7813L23.4811%204H22.0699L16.8949%209.88693L12.7648%204H8L14.2469%2012.9029L8%2020.0133H9.4112L14.8725%2013.7952L19.2352%2020.0133H24M9.92053%205.04213H12.0885L22.0688%2019.0224H19.9003'%20fill='%23333333'/%3e%3c/g%3e%3cdefs%3e%3cclipPath%20id='clip0_2938_8200'%3e%3crect%20width='16'%20height='16.0134'%20fill='white'%20transform='translate(8%204)'/%3e%3c/clipPath%3e%3c/defs%3e%3c/svg%3e)


