

'%3e%3cpath%20d='M8%200C12.4183%200%2016%203.58172%2016%208C16%2012.4183%2012.4183%2016%208%2016C3.58172%2016%200%2012.4183%200%208C0%203.58172%203.58172%200%208%200ZM11.6162%204.38379C11.2257%203.99337%2010.5927%203.99338%2010.2021%204.38379L8%206.58594L5.79785%204.38379C5.40732%203.99334%204.77429%203.99329%204.38379%204.38379C3.99331%204.77429%203.99335%205.40733%204.38379%205.79785L6.58594%208L4.38379%2010.2021C3.99348%2010.5927%203.99341%2011.2257%204.38379%2011.6162C4.77426%2012.0066%205.40734%2012.0065%205.79785%2011.6162L8%209.41406L10.2021%2011.6162C10.5927%2012.0066%2011.2257%2012.0067%2011.6162%2011.6162C12.0067%2011.2257%2012.0066%2010.5927%2011.6162%2010.2021L9.41406%208L11.6162%205.79785C12.0066%205.40735%2012.0066%204.77429%2011.6162%204.38379Z'%20fill='%23080E17'%20fill-opacity='0.46'/%3e%3c/g%3e%3cdefs%3e%3cclipPath%20id='clip0_3761_713'%3e%3crect%20width='16'%20height='16'%20fill='white'/%3e%3c/clipPath%3e%3c/defs%3e%3c/svg%3e)



'%3e%3cpath%20fill-rule='evenodd'%20clip-rule='evenodd'%20d='M21.4999%2010.9993C21.4999%205.20009%2016.7986%200.498901%2010.9993%200.498901C5.19994%200.498901%200.498657%205.20009%200.498657%2010.9993C0.498657%2016.2404%204.33858%2020.5844%209.35855%2021.3722V14.0346H6.69238V10.9993H9.35855V8.68594C9.35855%206.05427%2010.9262%204.60062%2013.3248%204.60062C14.4736%204.60062%2015.6753%204.80571%2015.6753%204.80571V7.38979H14.3512C13.0468%207.38979%2012.64%208.19921%2012.64%209.0296V10.9993H15.5523L15.0867%2014.0346H12.64V21.3722C17.66%2020.5844%2021.4999%2016.2404%2021.4999%2010.9993Z'%20fill='%231568EA'/%3e%3c/g%3e%3c/svg%3e)


'%3e%3cpath%20d='M2.42045%2022.1876H6.31818V12.7217L0.75%208.54553V20.5171C0.75%2021.4414%201.49892%2022.1876%202.42045%2022.1876Z'%20fill='%234285F4'/%3e%3cpath%20d='M19.682%2022.1876H23.5797C24.5041%2022.1876%2025.2502%2021.4387%2025.2502%2020.5171V8.54553L19.682%2012.7217'%20fill='%2334A853'/%3e%3cpath%20d='M19.682%205.48293V12.7216L25.2502%208.54543V6.31816C25.2502%204.25236%2022.8921%203.07469%2021.2411%204.31361'%20fill='%23FBBC04'/%3e%3cpath%20d='M6.31824%2012.7217V5.48303L13.0001%2010.4944L19.6819%205.48303V12.7217L13.0001%2017.733'%20fill='%23EA4335'/%3e%3cpath%20d='M0.75%206.31816V8.54543L6.31818%2012.7216V5.48293L4.75909%204.31361C3.10534%203.07469%200.75%204.25236%200.75%206.31816Z'%20fill='%23C5221F'/%3e%3c/g%3e%3cdefs%3e%3cclipPath%20id='clip0_2954_7305'%3e%3crect%20width='24.5'%20height='18.375'%20fill='white'%20transform='translate(0.75%203.8125)'/%3e%3c/clipPath%3e%3c/defs%3e%3c/svg%3e)


To add a page border in Word, open your document, go to Design > Page Borders, choose a border setting such as Box or Custom, adjust the style, color, and width, then click OK.
This complete guide explains the main page-border method first, then covers the common border scenarios users usually mean: borders around text, top borders, bottom borders, picture borders, one-page borders, and border troubleshooting.
What Does “Add a Border in Word” Actually Mean?
When people search for how to add a border in Word, they may be asking about several different tasks. Some users want a frame around the whole page. Others want a line above a heading, a border below a paragraph, a box around selected text, or a frame around an image.
The tool you use depends on what you want to frame. A page border is created from the Design tab. A text or paragraph border usually comes from the Home tab. A picture border appears under Picture Format after you select an image. Understanding this difference helps you avoid using the wrong menu.
| Border type | Best for | Main Word path |
|---|---|---|
| Page border | A frame around a full page or document | Design > Page Borders |
| Text border | Boxing a sentence, paragraph, note, or quote | Home > Borders |
| Top border | Adding a horizontal line above a paragraph or heading | Home > Borders > Top Border |
| Bottom border | Adding a horizontal line below a paragraph or heading | Home > Borders > Bottom Border |
| Picture border | Adding an outline around an image | Picture Format > Picture Border |
This guide starts with the most common interpretation, a page border, and then explains the other border types in separate sections so you can choose the correct method for your document.
How to Add a Page Border in Word
A page border is the standard option when you want a full frame around the edge of a Word page. This is often used for certificates, invitations, flyers, school assignments, and documents that need a more formal layout.

Open your Word document
Start by opening the document where you want to place the border. If you are working with a long file, decide whether the border should apply to every page, only the first page, or a specific section.

Go to Design > Page Borders
Select the Design tab on the ribbon. In the Page Background group, click Page Borders. This opens the Borders and Shading dialog box, where Word stores most page-border controls.

Choose Box, Shadow, 3-D, or Custom
Under Setting, choose the basic border type. Box is the simplest full-page frame. Shadow and 3-D create stronger visual effects. Custom is useful when you only want some sides of the page to show a border.

Customize the line style, color, and width
Use Style, Color, and Width to control how the border looks. A thin black line is best for formal papers. A thicker or colored line can work for posters, event pages, or decorative documents.

Choose where the border applies and click OK
Use the Apply to setting carefully. You can apply the border to the whole document, the current section, or part of the document depending on your layout. When everything looks right in the preview, click OK.

How to Customize a Border in Word
After you know where the border is created, customization becomes easier. For page borders, the main options are line style, color, width, art, preview sides, and Apply to. For text and paragraph borders, you can also adjust shading and spacing between the border and the text.
If your document is formal, keep the border simple. A thin solid line usually looks cleaner than a decorative frame. If you are designing a flyer or certificate, a thicker line or decorative art border may be acceptable, but you should still check print preview before exporting or printing.
Tip: If your border appears on more pages than expected, the problem is usually the Apply to setting or the section structure of the document.
How to Put a Border Around Text in Word
If you want to frame a sentence, paragraph, quote, warning note, or text block, you usually do not need Page Borders. A text border is different from a page border because it follows the selected text or paragraph instead of the page edge.
To put a border around text in Word, select the text or paragraph first. Then go to the Home tab, open the Borders menu, and choose a border option. For more control, open Borders and Shading, choose the border style, and apply it to text or paragraph.
This is useful for callout notes, important reminders, quotes, form-like sections, or boxed instructions inside a document. If the border is too close to the words, adjust the spacing in the Borders and Shading options.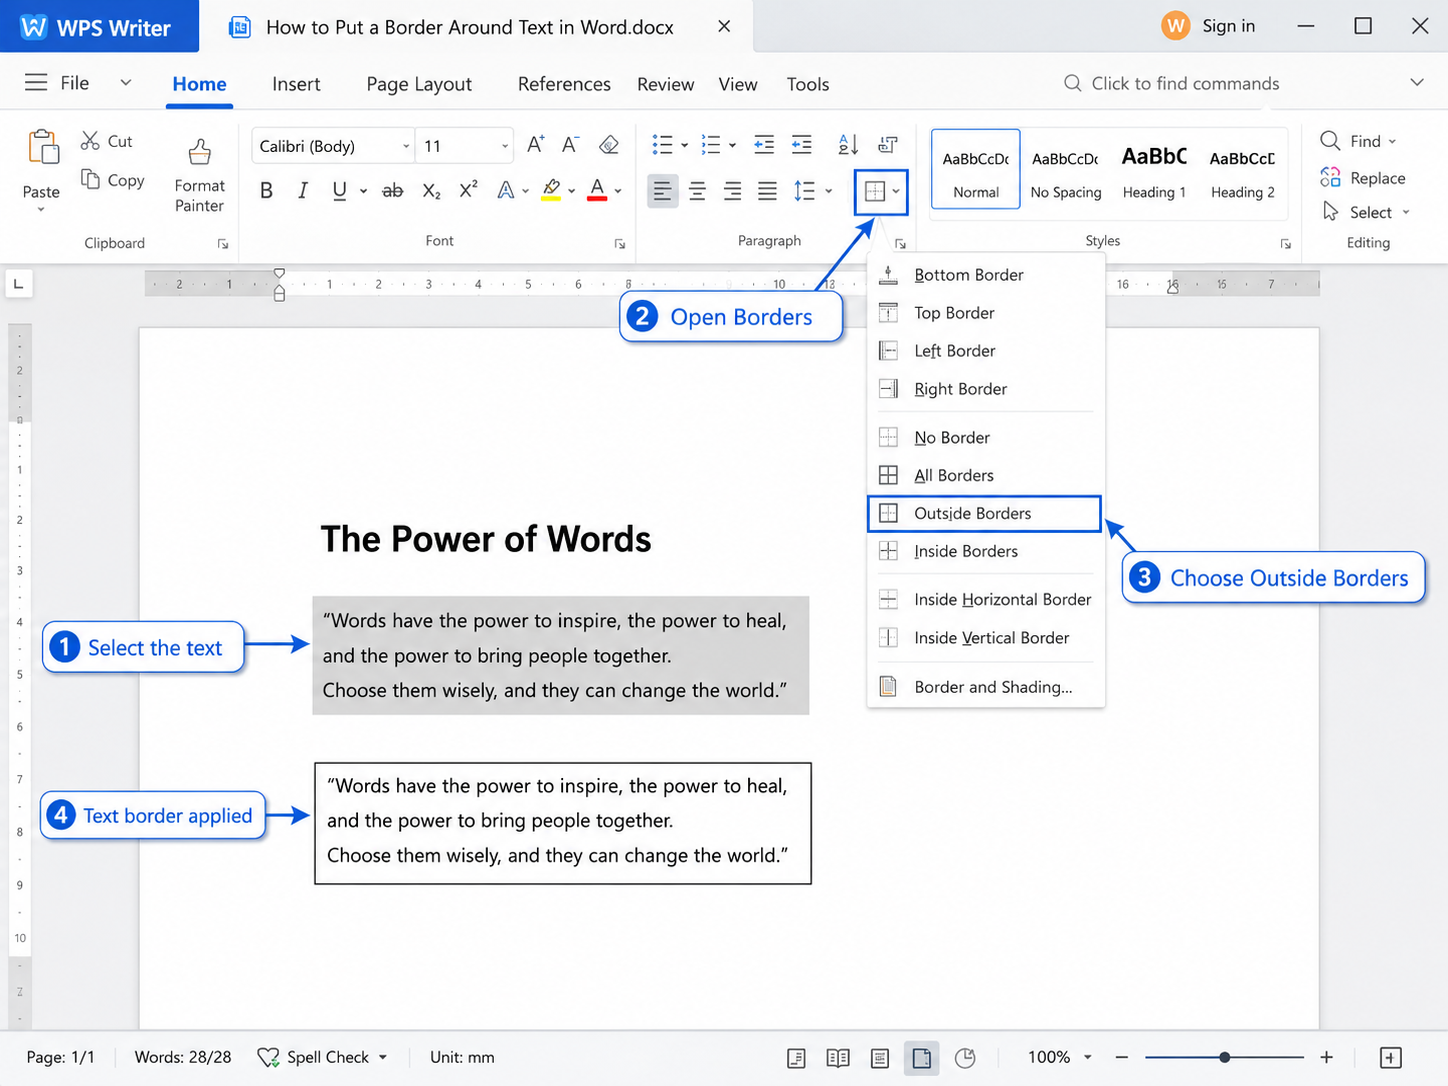
For the screenshot-by-screenshot version, read the detailed guide on how to put a border around text in Word.
How to Add a Top Border in Word
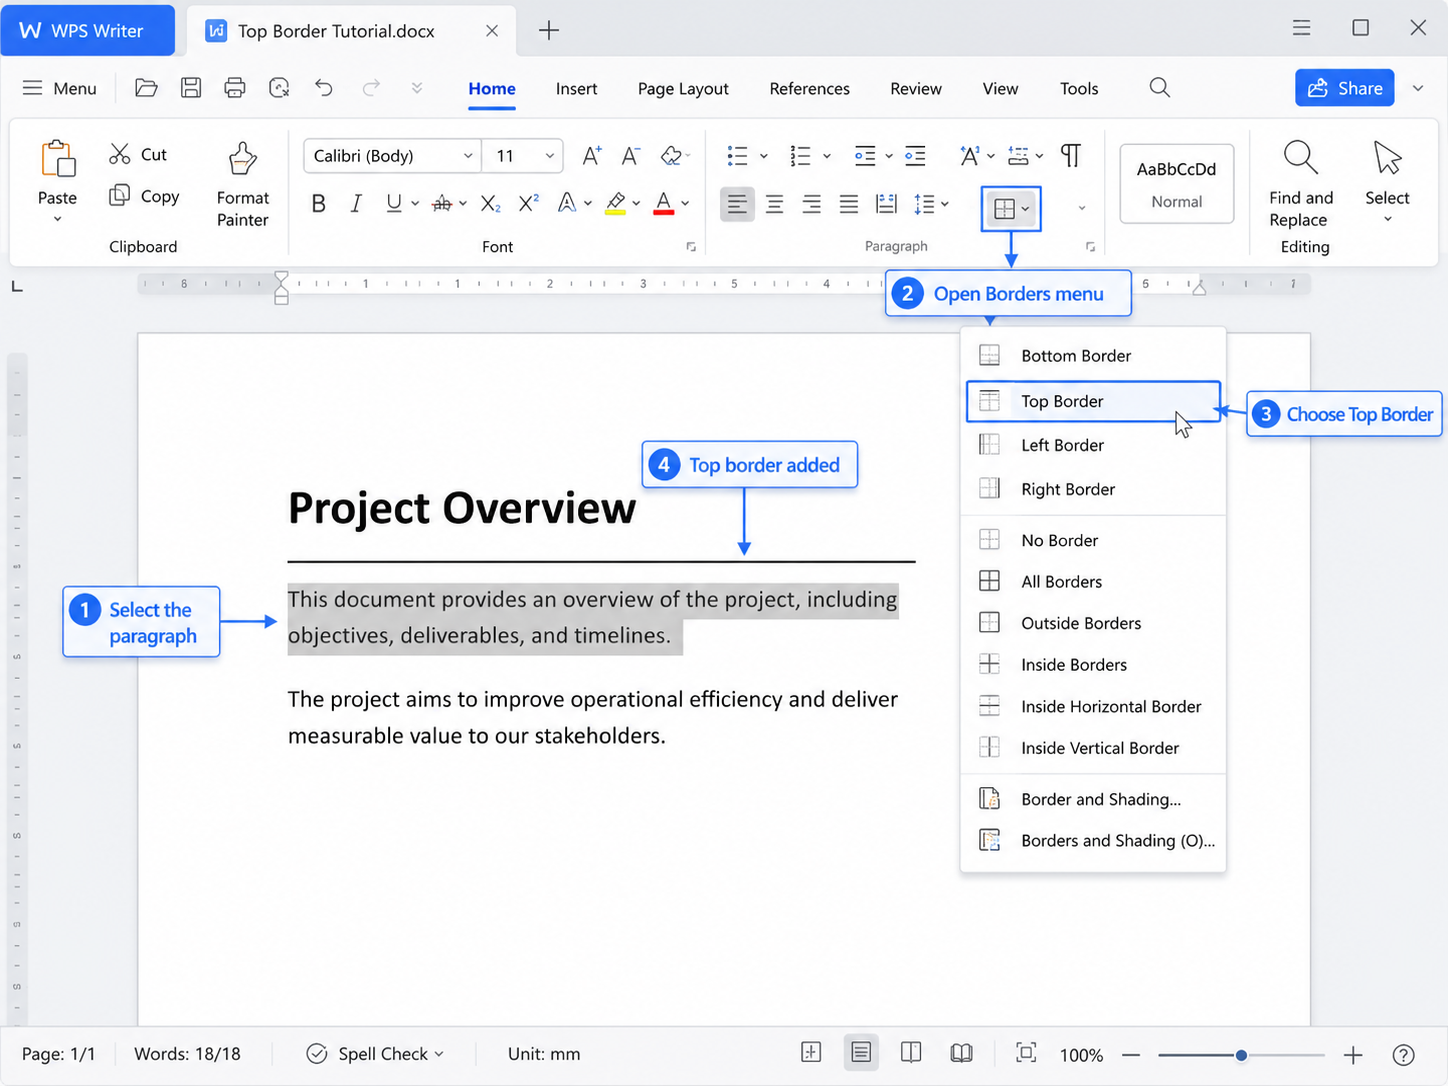
A top border is a single horizontal line placed above a paragraph. It is often used to separate sections, create a heading divider, or add a clean line above a block of content. It is not the same as a full page border.
Place your cursor inside the paragraph that needs the line. Go to Home > Borders and choose Top Border. Word adds the line above the current paragraph. If the line appears in the wrong place, check which paragraph your cursor is in before applying the border.
Top borders are useful when you want a simple separator without drawing a shape or inserting a table. You can also open Borders and Shading to change the line weight, color, or style.
For a more focused walkthrough, see how to add a top border in Word.
How to Add a Bottom Border in Word
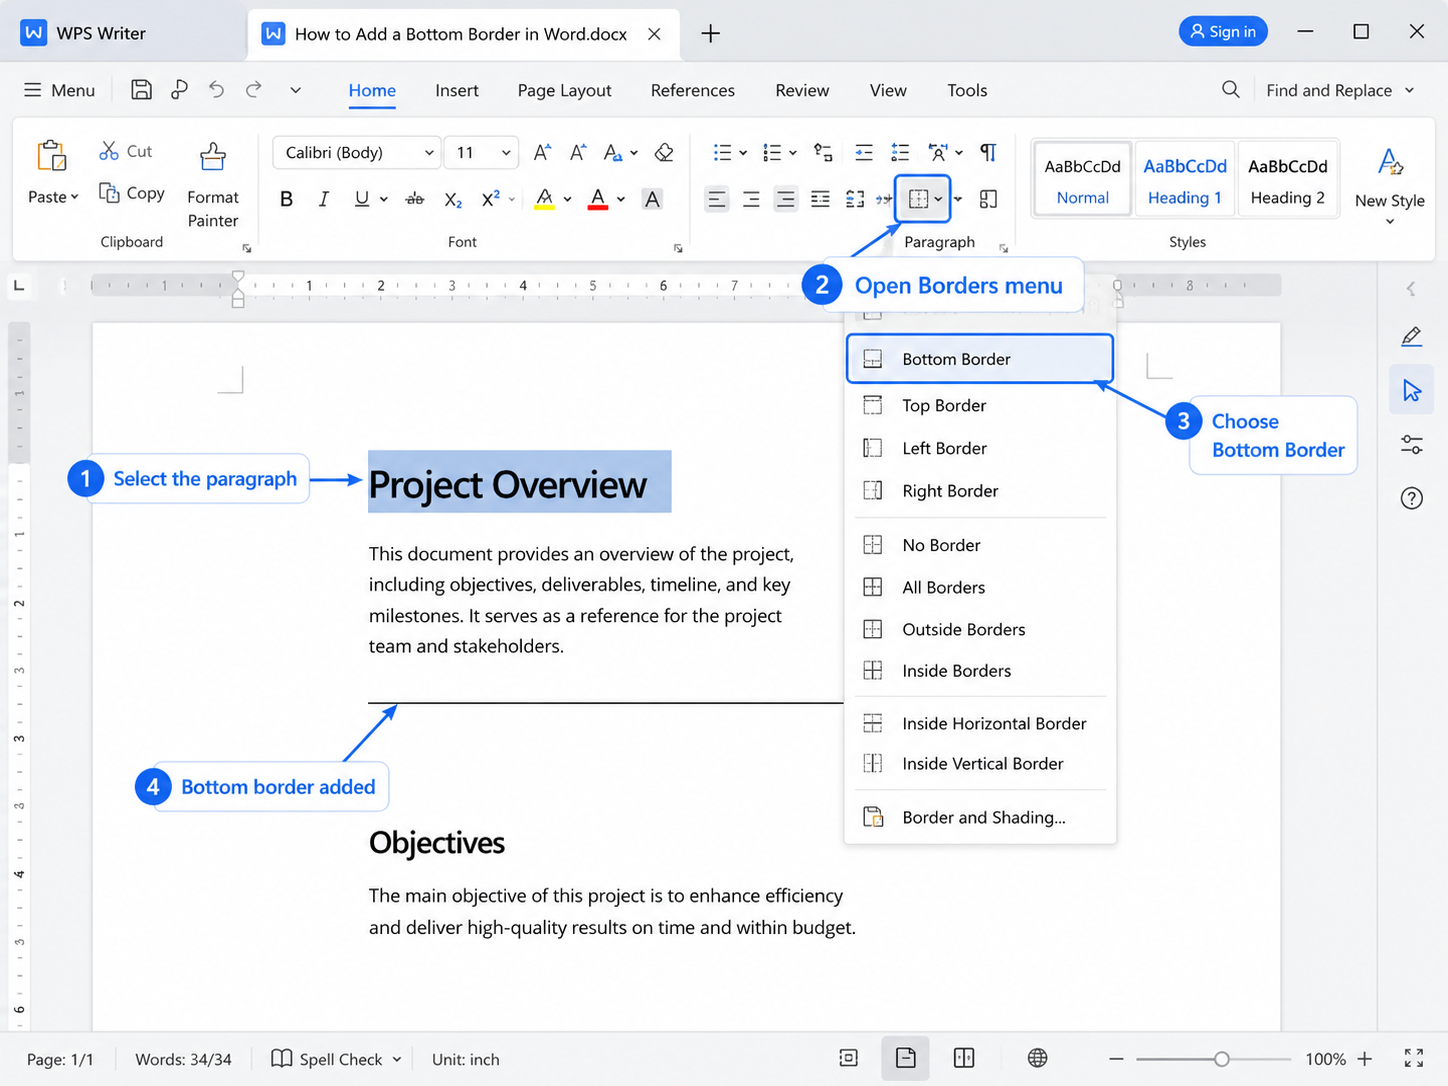
A bottom border places a line below the selected paragraph. It is commonly used under headings, signature lines, form fields, or section titles. If you only need one horizontal line, a bottom border is usually better than a page border.
Click inside the paragraph where the line should appear. Open Home > Borders, then choose Bottom Border. Word places the line below that paragraph. To remove it later, return to the Borders menu and choose No Border.
If the line stretches too far, the border is probably applied to the whole paragraph width. You can adjust paragraph indents or use a table/shape if you need a shorter custom line.
For the dedicated tutorial, read how to add a bottom border in Word.
How to Add a Border to a Picture in Word
Picture borders use a different tool path because the border belongs to the image, not to the page or paragraph. Select the image first. Once the image is selected, Word shows image-specific formatting options.
Go to Picture Format > Picture Border. Choose a color for the outline, then adjust the weight or dash style if needed. A thin gray or black border works well for screenshots and academic documents. A thicker border may work better for posters or visual layouts.
If you do not see Picture Format, make sure the image itself is selected. Clicking near the image may place the cursor in the paragraph instead, which will show text tools rather than image tools.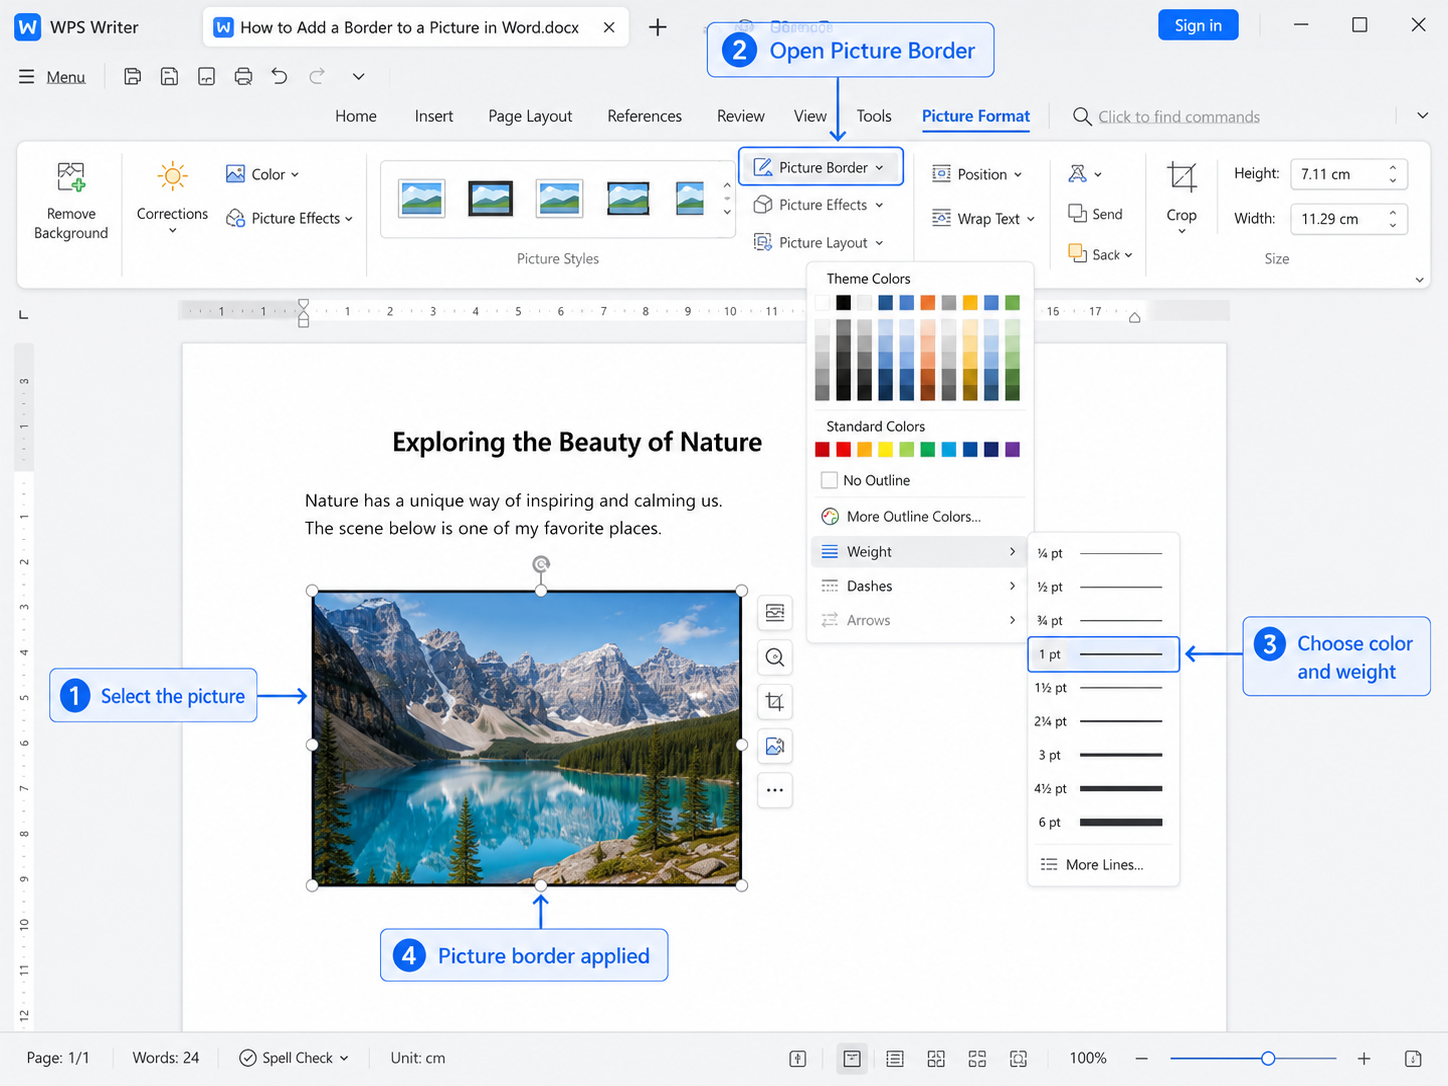
For image-specific screenshots, follow the guide on how to add a border to a picture in Word.
How to Add a Border to Only One Page in Word
If you only want a border on one page, the key is controlling where the border applies. In the Page Borders dialog box, check the Apply to dropdown. For simple files, choosing the current section may be enough. For middle pages, you may need section breaks before and after the page.
Single-page borders are common for cover pages, title pages, certificates, and forms. The mistake to avoid is applying a page border to the whole document when you only want it on one page.
For the full setup, see how to add a border in Word on a single page.


Common Problems When Adding Borders in Word
Why does my border appear on every page?
This usually happens because the page border was applied to the whole document. Open Page Borders again and check Apply to. If you only want one page, use sections or choose a more limited apply option.
Why can’t I find Page Borders?
On desktop Word, Page Borders is normally under the Design tab. If you are using a mobile app or a simplified editor, the path may be different. For Android-specific steps, use the guide on how to add border in Word Android.
How do I remove a border in Word?
For a page border, go to Design > Page Borders, choose None, and click OK. For other border types, you need to select the text, paragraph, picture, or table first. See the guide on how to remove a border in Word.
Why is my page border not printing?
A border may not print if it is too close to the edge of the page or outside the printer’s printable area. Try adjusting margins, changing the border distance from the page edge, and checking print preview.
FAQs About Adding Borders in Word
What is the fastest way to add a border in Word?
For a page border, use Design > Page Borders. Choose a setting, adjust style, color, and width, then click OK.
Is a page border the same as a text border?
No. A page border frames the page. A text border frames selected text or a paragraph.
Can I add only a top or bottom line?
Yes. Use the Borders menu under the Home tab and choose Top Border or Bottom Border.
Can I add a border to an image?
Yes. Select the image, open Picture Format, and use Picture Border to choose an outline color, weight, or dash style.

'%3e%3cpath%20d='M19.9911%204.11386V6.471H18.5894C18.0775%206.471%2017.7322%206.57814%2017.5536%206.79243C17.3751%207.00671%2017.2858%207.32814%2017.2858%207.75671V9.44421H19.9019L19.5536%2012.0871H17.2858V18.8639H14.5536V12.0871H12.2769V9.44421H14.5536V7.49779C14.5536%206.39064%2014.8632%205.53201%2015.4822%204.92189C16.1013%204.31177%2016.9257%204.00671%2017.9554%204.00671C18.8304%204.00671%2019.509%204.04243%2019.9911%204.11386Z'%20fill='%23333333'/%3e%3c/g%3e%3cdefs%3e%3cclipPath%20id='clip0_2938_8199'%3e%3crect%20width='16'%20height='16'%20fill='white'%20transform='translate(8%204.00671)'/%3e%3c/clipPath%3e%3c/defs%3e%3c/svg%3e)
'%3e%3cpath%20d='M17.5237%2010.7813L23.4811%204H22.0699L16.8949%209.88693L12.7648%204H8L14.2469%2012.9029L8%2020.0133H9.4112L14.8725%2013.7952L19.2352%2020.0133H24M9.92053%205.04213H12.0885L22.0688%2019.0224H19.9003'%20fill='%23333333'/%3e%3c/g%3e%3cdefs%3e%3cclipPath%20id='clip0_2938_8200'%3e%3crect%20width='16'%20height='16.0134'%20fill='white'%20transform='translate(8%204)'/%3e%3c/clipPath%3e%3c/defs%3e%3c/svg%3e)


